前回からのつづき
RaspberryPi 3 Model B+ でlircを使ってリモコン化する(その1)
さて、前回のつづきで、ラズパイをスマホやPCから制御したいと思います。
今回やること
今回は「Slack」とラズパイを連携させて、Slackを介して制御させます
下準備
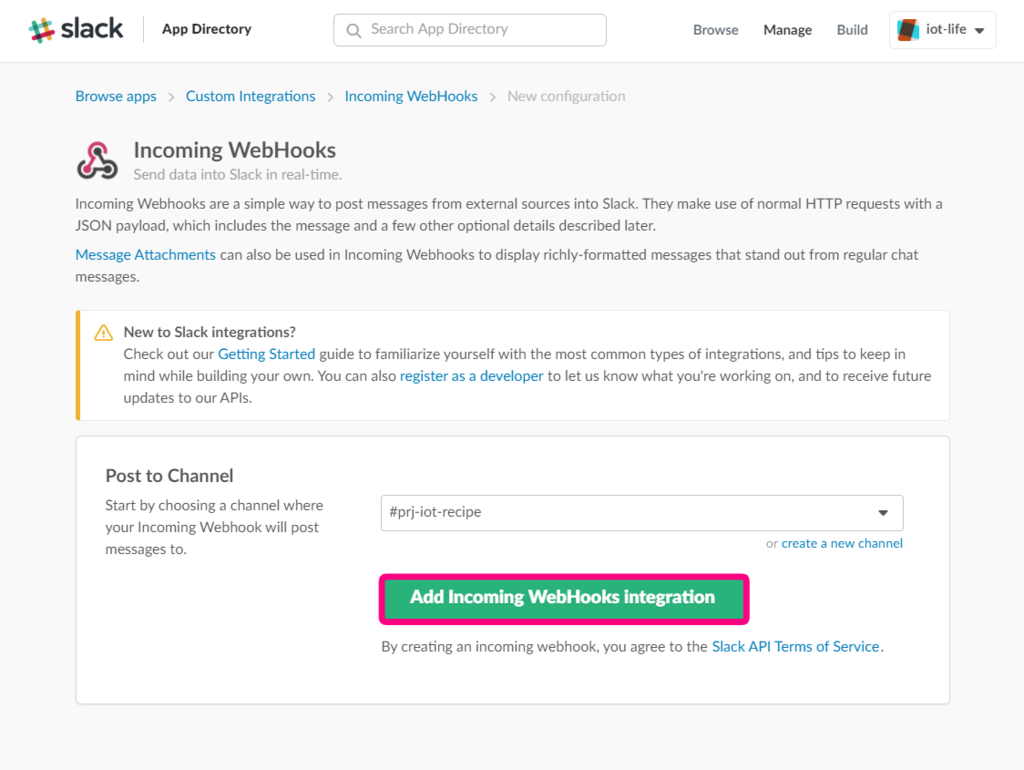
SlackでIncomingWebHookの有効化
以下のアドレスから、IncomingWebHooksを有効化します
[https://my.slack.com/services/new/incoming-webhook/]
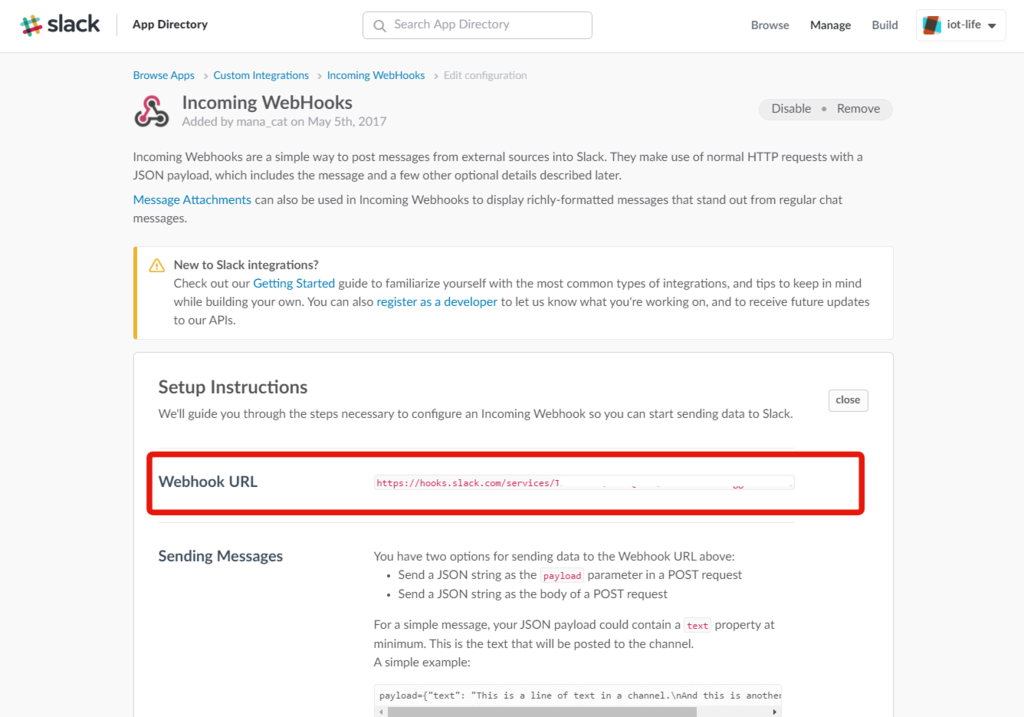
ここで、投稿するチャンネル(制御するためのチャンネル)を選択し、Webhook URLを取得します。

ここで取得したWebhook URLをコピペします。また、ここで取得したアドレスを用いて制御を行っていきます。

ここでは、Slackへ投稿するIncomingWebHookの表示名、アイコンなどはカスタマイズ可能です。これは各個人で変更することができます。
apache2, php5のインストール
$ sudo apt-get install apache2 php5
Reading package lists... Done
Building dependency tree
Reading state information... Done
The following extra packages will be installed:
  apache2-bin apache2-data apache2-utils libapache2-mod-php5 libapr1 libaprutil1 libaprutil1-dbd-sqlite3
  libaprutil1-ldap liblua5.1-0 libonig2 libperl4-corelibs-perl libqdbm14 lsof php5-cli php5-common php5-json
  php5-readline
Suggested packages:
  apache2-doc apache2-suexec-pristine apache2-suexec-custom php-pear php5-user-cache
The following NEW packages will be installed:
  apache2 apache2-bin apache2-data apache2-utils libapache2-mod-php5 libapr1 libaprutil1 libaprutil1-dbd-sqlite3
  libaprutil1-ldap liblua5.1-0 libonig2 libperl4-corelibs-perl libqdbm14 lsof php5 php5-cli php5-common php5-json
  php5-readline
0 upgraded, 19 newly installed, 0 to remove and 81 not upgraded.
Need to get 6,829 kB of archives.
After this operation, 24.3 MB of additional disk space will be used.
Do you want to continue? [Y/n] Y
Slackからラズパイにアクセスされる際に、apacheがないとhttp経由でアクセスすることができません。
また、ラズパイと異なるネットワークからアクセスるる場合は、Internet側のIPアドレスに80ポートでアクセスしたとき、ラズパイのIPアドレスにポートフォワードしてあげるように設定してください。
さらには、www-dataではrootの権限がないので、www-dataにroot権限を与えます。
今回はすべてローカルネットワークでの完結です。
$ nano /etc/sudoers

# 以下をファイルの一番下に追記してください
www-data ALL=(root) NOPASSWD: ALL
Slackwebのセットアップ
Slackwebのインストール
$ sudo pip install slackweb
Downloading/unpacking slackweb
  Downloading slackweb-1.0.5.tar.gz
  Running setup.py (path:/tmp/pip-build-ZtOu3c/slackweb/setup.py) egg_info for package slackweb

Installing collected packages: slackweb
  Running setup.py install for slackweb

Successfully installed slackweb
Cleaning up...
投稿テスト
とりあえずパッケージが入ったので投稿テストしてみます。ここではiPythonを使います。
$ ipython
Python 2.7.9 (default, Sep 17 2016, 20:26:04)
Type "copyright", "credits" or "license" for more information.

IPython 2.3.0 -- An enhanced Interactive Python.
?         -> Introduction and overview of IPython's features.
%quickref -> Quick reference.
help      -> Python's own help system.
object?   -> Details about 'object', use 'object??' for extra details.

In [1]: import slackweb

In [2]: slack_url = "https://hooks.slack.com/services/xxx/xxx/xxxxx"

In [3]: slack = slackweb.Slack(url=slack_url)

In [4]: slack.notify(text="Hello World!! From iPython")
Out[4]: u'ok'
このようにSlackに投稿されていればOKです。
実際に動かす
webページを作る
ここでは簡単なボタンが設置されてるだけのwebページを作ります。ボタンが押されたらphpからirsendコマンドを実行し、その後pythonを呼び出しSlackにメッセージを投げます。
<?php
if (isset($_POST['action'])) {
        exe($_POST['action']);
}
function exe($selector) {
        exec('irsend SEND_ONCE fctv_controller ' . $selector);
        exec('python /var/www/slack.py '. $selector . "を実行したよ");
        exit;
}
?>
<html>
<head>
<script src="https://code.jquery.com/jquery-3.3.1.min.js"></script>
  <script>
    $(document).ready(function(){
      $('.button').click(function(){
          var clickBtnValue = $(this).val();
          var ajaxurl = 'ajax.php',
          data =  {'action': clickBtnValue};
          $.post(ajaxurl, data)
                .done( function (response) {
                        // Response div goes here.
                        // alert(response);
                });
      });

    });
  </script>
</head>
<body>
  <input type="submit" class="button" name="tv_power" value="tv_power" />
</body>
</html>
import sys, slackweb
argvs = sys.argv

SLACK_URL = "https://hooks.slack.com/services/xx/xx/xxxx"

slack = slackweb.Slack(url=SLACK_URL)
slack.notify(text=argvs[1])
irsend SEND_ONCE XXXXXXXX xxxxxxxx
それぞれをそれぞれのファイルに書き込み、作成します。そして、ラズパイのIPアドレスにアクセスし、ボタンを押すことにより、制御することができると思います。
