みなさんこんにちわ!
点群データ触ってますか!!!
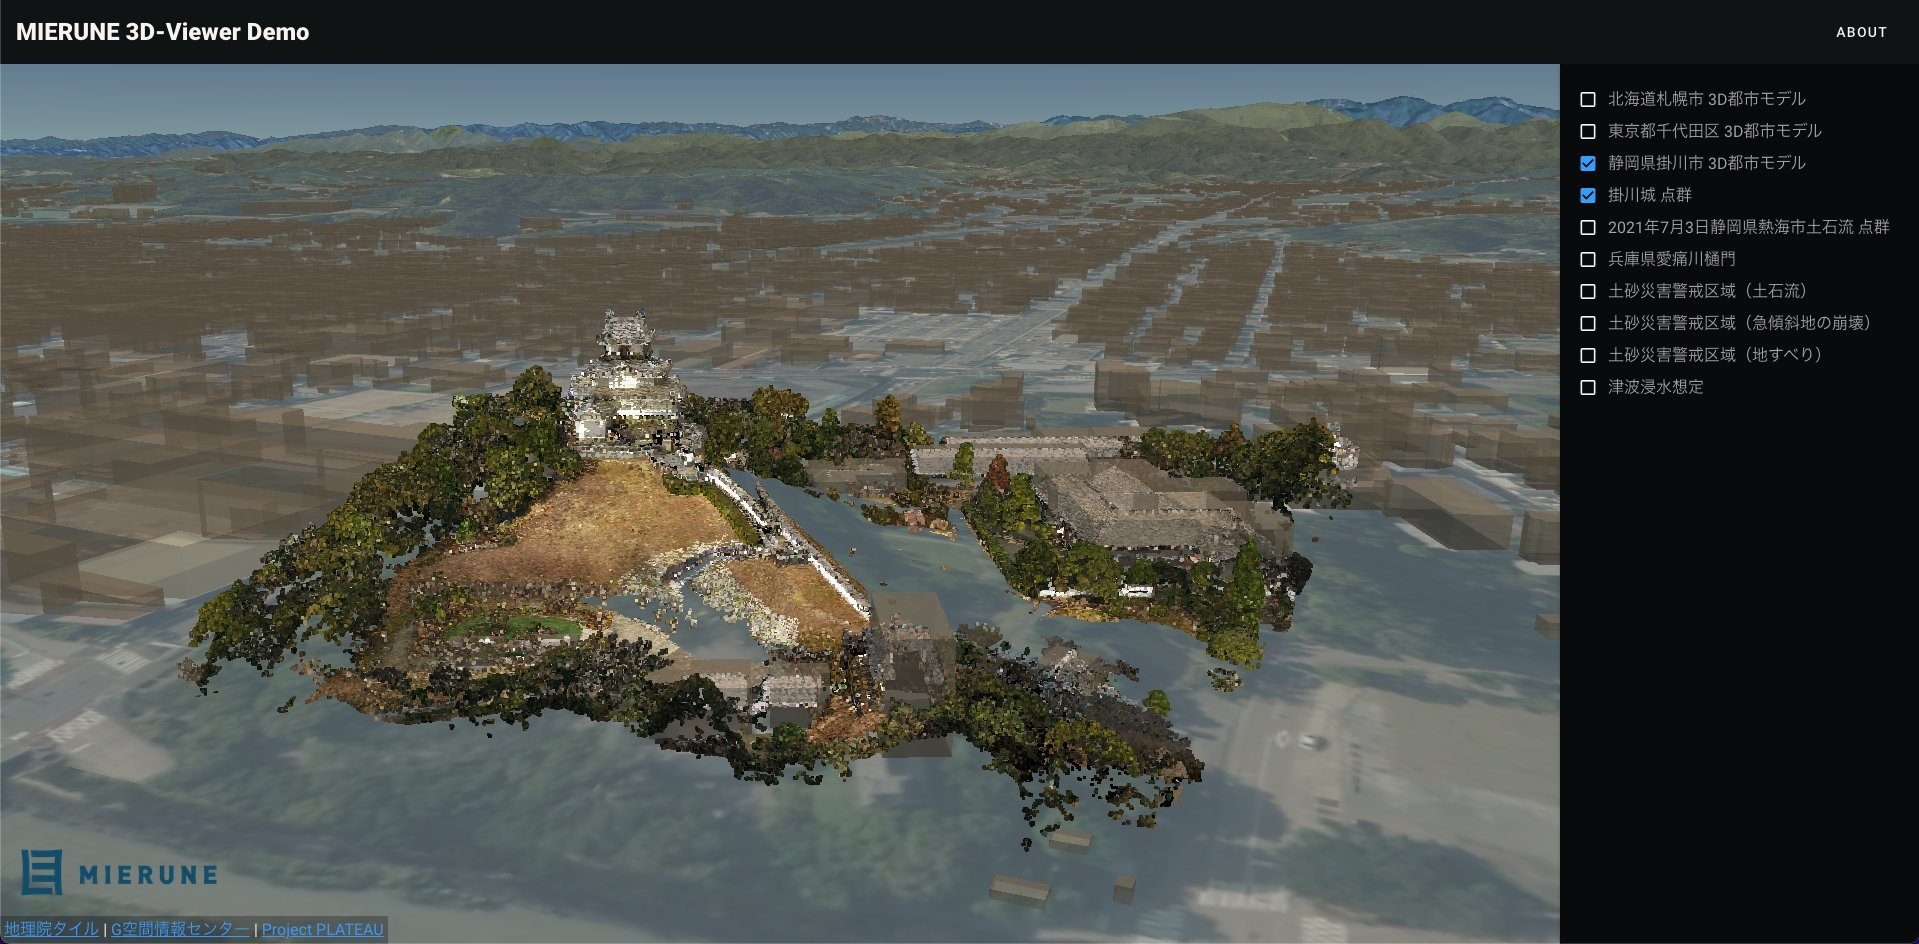
最近はiPhoneでLiDARを利用した点群データを取得出来るようになったので、知っている方も増えているかと思いますが、下のような「点」の集合のデータを点群データと言います。
まさに、iPhoneを利用して取得したLiDARデータをPythonでガチャガチャする記事も書いてたりします!
で、この点群データですが、Pythonでは色々弄ったり、計算したりするライブラリが豊富だったりするんで比較的簡単に触ることが出来るんですが、よりパフォーマンスが良さそうなRustではあまり3D系のライブラリが成熟しておらず…
Read/Writeのためのライブラリなどはありますが、今回の目的であるLAS形式のデータをglTF形式に出力するような便利ライブラリはありません。
今回は勉強の側面もありつつ、将来的にはRust用のLAS・glTFパーサーを作成していきたいなーという意味も込めて、自力でちょっと解析しようと思います!
今回はこちらで公開されている点群データ(LAS)を利用し、glTFにしていきたいと思います。
データをダウンロードする
まずはデータがなければ始まりませんね!
上記の点群データをダウンロードしてみましょう!
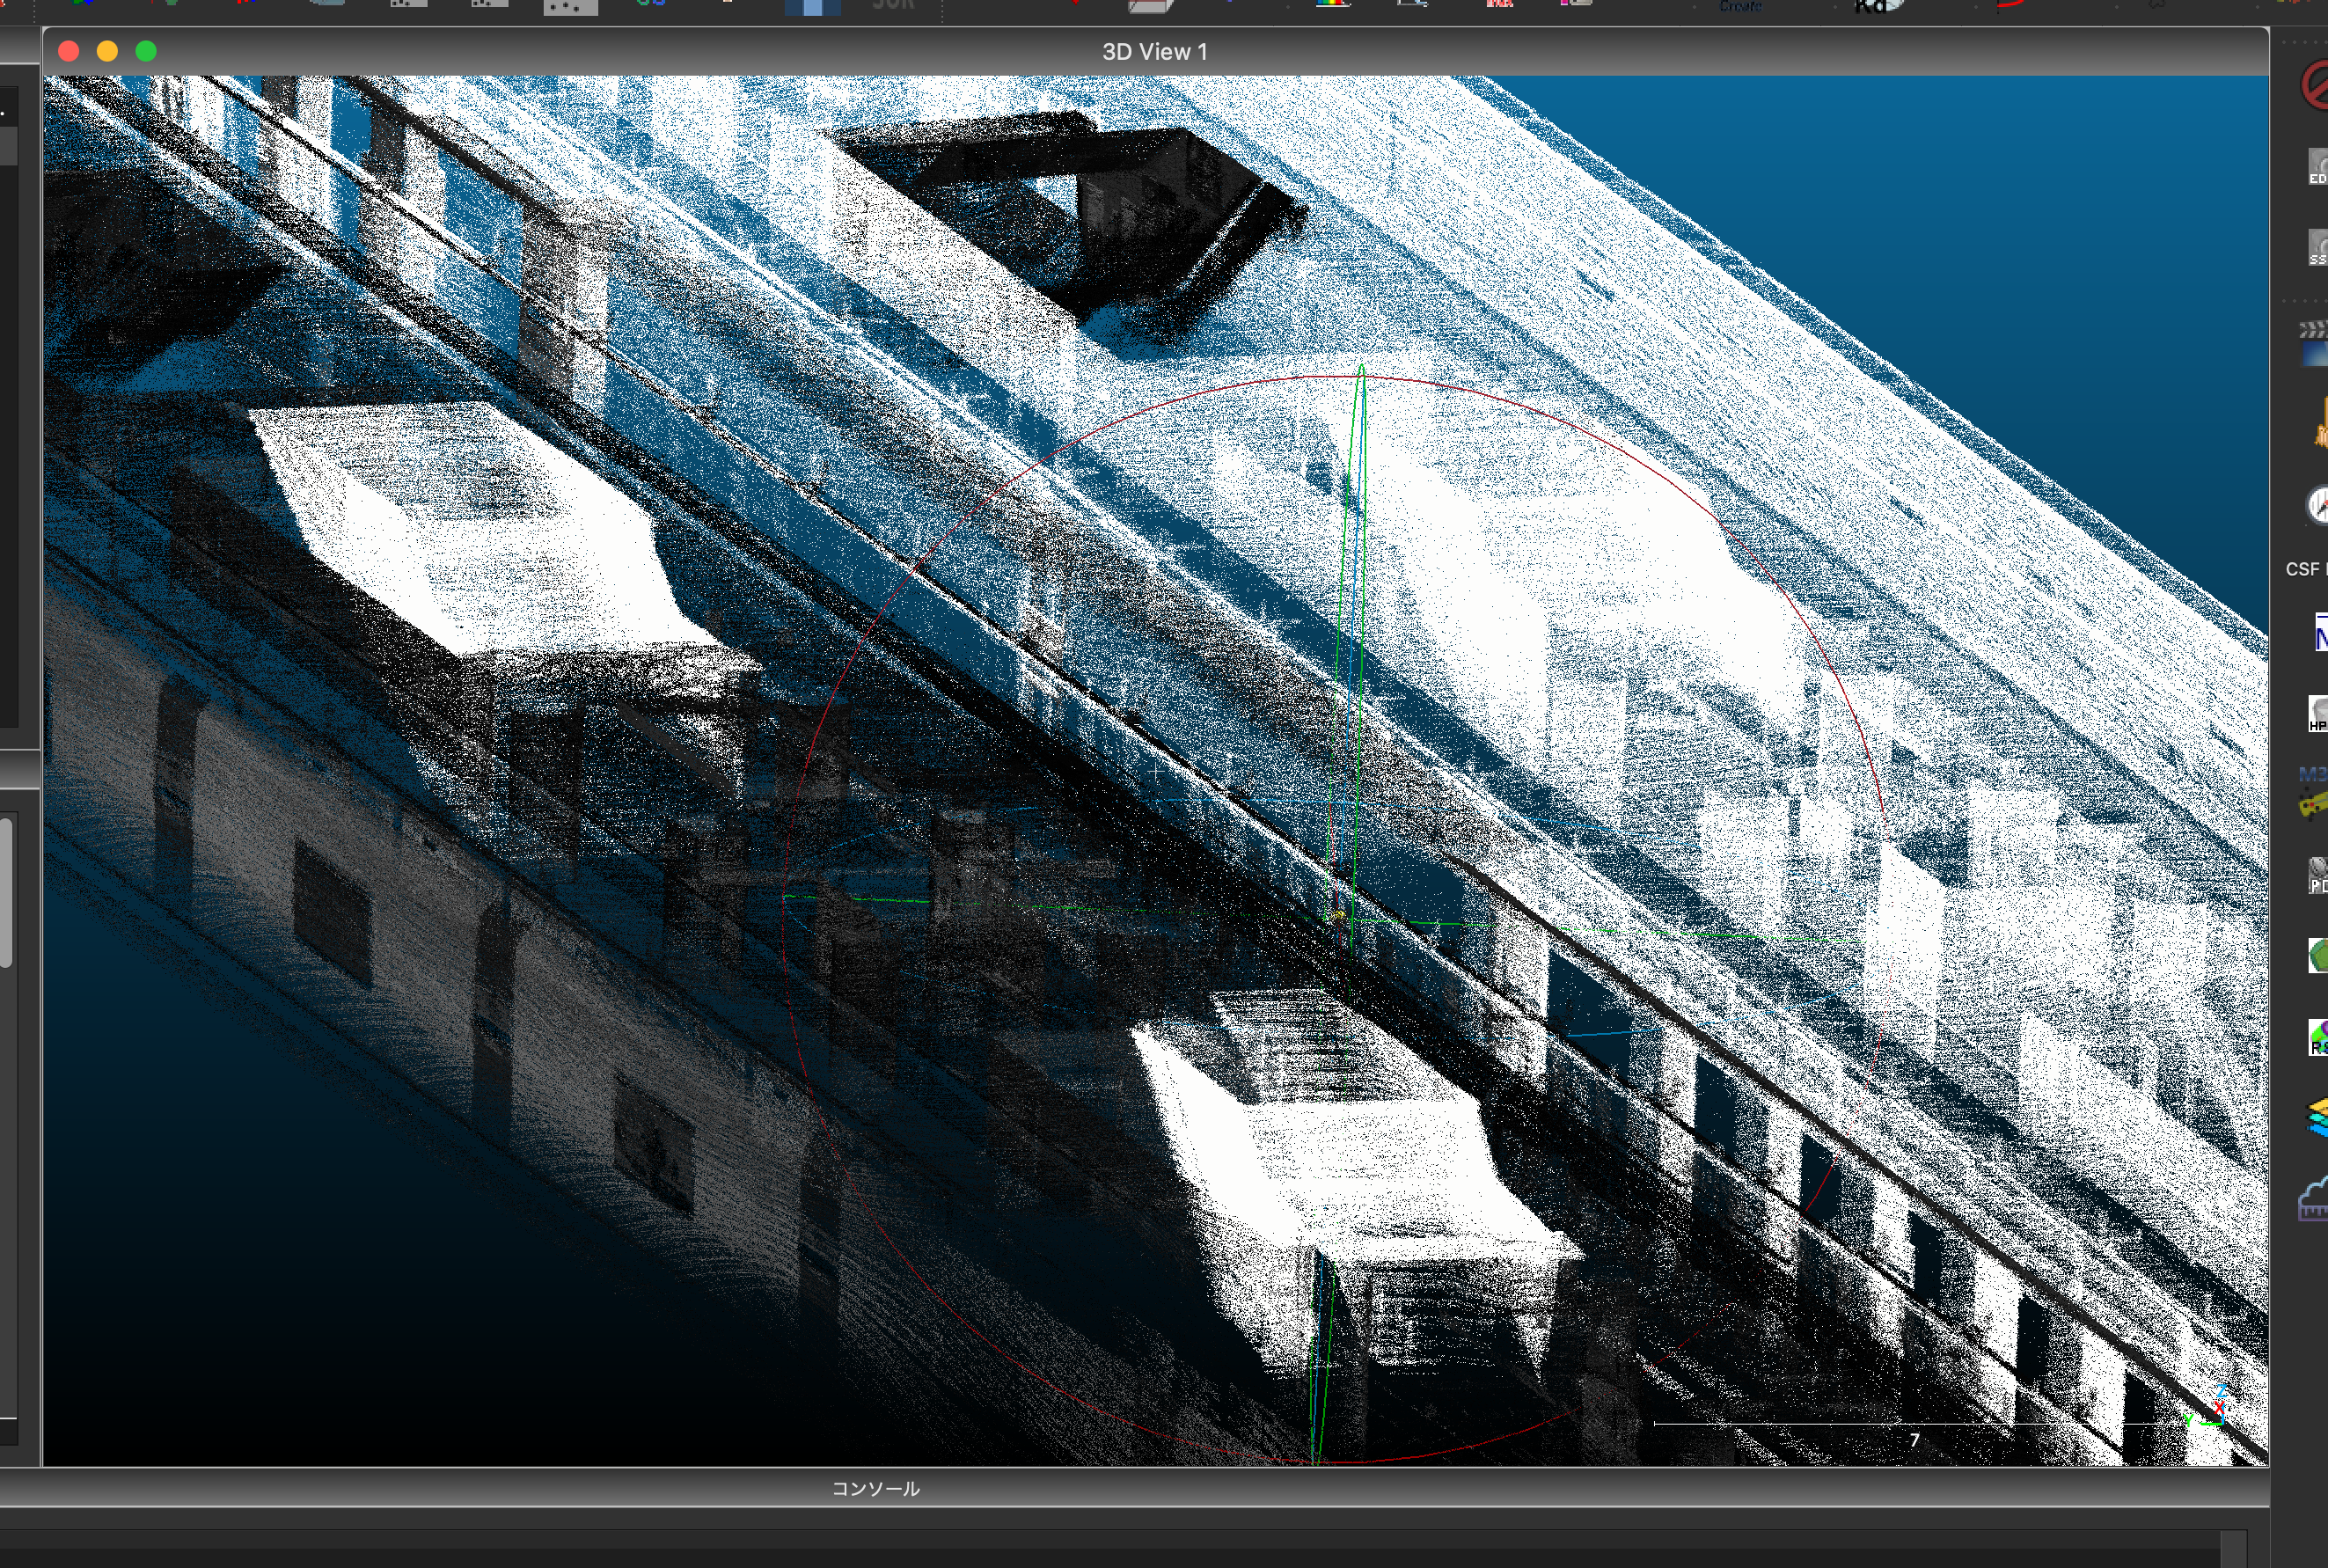
実際にダウンロードしてtochomaeb3f.lasというLAS形式のデータをCloudCompareという点群データ可視化・計算等のためのツールに読み込ませていきましょう!
(興味があったらダウンロードしてみてください)
すると、このようなイメージのデータが表示されるかと思います。地下三階の地下鉄のホームになりますが、上層階に登るための階段なんかも見える超高密の点群データですね!
今回はこのデータを一般的な3Dデータ形式であるglTFにしていきます。
まずはプログラム作成の環境を作る
あまり詳しいことは説明しませんが、Rustの開発環境がないと開発が出来ませんので簡単に説明します。
僕はMacOSを利用しているので、MacOSユーザーを想定します。
それ以外のOSをご利用の方も、調べればすぐに出てくるような内容のなので、あまり困ることはないと思います!
- Xcodeをインストール
xcode-select --install
- rustupをインストール
% curl --proto '=https' --tlsv1.2 -sSf https://sh.rustup.rs | sh
# 対話が始まるが、気にせずEnterでOK!
...
% source "$HOME/.cargo/env"

% rustup -V
rustup 1.26.0 (5af9b9484 2023-04-05)
info: This is the version for the rustup toolchain manager, not the rustc compiler.
info: The currently active `rustc` version is `rustc 1.72.1 (d5c2e9c34 2023-09-13)`

% rustc -V
rustc 1.72.1 (d5c2e9c34 2023-09-13)

% cargo -V
cargo 1.72.1 (103a7ff2e 2023-08-15)
- プロジェクトの作成
-
new_projectは任意のプロジェクト名に変更
-
cargo new new_project
フォルダをすでに作ってしまっている場合なら中に入って初期化しましょう
cargo init
cargoというツールを利用して、Rustのプロジェクトが作成されました!
作成されたらCargo.tomlを修正して、以下のようにしましょう。
[workspace]

members = [
    "las",
]
resolver = "2"
その後、以下のコマンドでlas・gltfの二つのクレートを作成します。
cargo new las --lib
最後に、las/Cargo.tomlを以下のように編集しましょう。
[package]
name = "las"
version = "0.1.0"
edition = "2021"

[dependencies]
byteorder = "1.5.0"
serde = { version = "1.0.192", features = ["derive"] }
serde_json = { version = "1.0.108", features = ["float_roundtrip"] }

[dev-dependencies]
LASデータの仕様を眺める
聞き馴染みのある方も、そうでない方もいると思いますが、この「LAS」という形式のデータはバイナリのため、テキストエディターなどで中身を確認することが出来ないですし、比較的大容量になりがちでとっつきづらいです。
ただ、LASデータは仕様が厳密に定められていて、仕様さえ理解してしまえばあとは単純な点の集まりです。
今回はちょっとだけ仕様を見ていきましょう。
PDALというツールを利用してLASデータの中身を確認することができます。
(PDALについては超強力な「PDAL」おすすめコマンド3選・「メタデータの表示」「CRSの付与」「XY座標の入れ替え」
という記事で解説しています)
% pdal info --metadata data/tochomaeb3f.las                                                                                               [main]:+
{
  "file_size": 278037419,
  "filename": "data/tochomaeb3f.las",
  "metadata":
  {
    "comp_spatialreference": "COMPD_CS[\"unnamed + unknown\",LOCAL_CS[\"unnamed\",UNIT[\"metre\",1,AUTHORITY[\"EPSG\",\"9001\"]],AXIS[\"Easting\",EAST],AXIS[\"Northing\",NORTH]],VERT_CS[\"unknown\",VERT_DATUM[\"unknown\",2005],UNIT[\"metre\",1,AUTHORITY[\"EPSG\",\"9001\"]],AXIS[\"Up\",UP]]]",
    "compressed": false,
    "copc": false,
    "count": 13901851,
    "creation_doy": 35,
    "creation_year": 2021,
    "dataformat_id": 0,
    "dataoffset": 399,
    "filesource_id": 0,
    "global_encoding": 0,
    "global_encoding_base64": "AAA=",
    "gtiff": "Geotiff_Information:\n   Version: 1\n   Key_Revision: 1.0\n   Tagged_Information:\n      End_Of_Tags.\n   Keyed_Information:\n      GTModelTypeGeoKey (Short,1): Undefined\n      GeogLinearUnitsGeoKey (Short,1): Linear_Meter\n      ProjLinearUnitsGeoKey (Short,1): Linear_Meter\n      VerticalUnitsGeoKey (Short,1): Linear_Meter\n      End_Of_Keys.\n   End_Of_Geotiff.\n",
    "header_size": 227,
    "major_version": 1,
    "maxx": 135.8516,
    "maxy": 45.098,
    "maxz": 1.8137,
    "minor_version": 2,
    "minx": -5.6802,
    "miny": -18.9376,
    "minz": -4.1986,
    "offset_x": 0,
    "offset_y": -10,
    "offset_z": 0,
    "point_length": 20,
    "project_id": "00000000-0000-0000-0000-000000000000",
    "scale_x": 0.0001,
    "scale_y": 0.0001,
    "scale_z": 0.0001,
    "software_id": "TRW 11.2.1.132 r0 (130917)",
    "spatialreference": "COMPD_CS[\"unnamed + unknown\",LOCAL_CS[\"unnamed\",UNIT[\"metre\",1,AUTHORITY[\"EPSG\",\"9001\"]],AXIS[\"Easting\",EAST],AXIS[\"Northing\",NORTH]],VERT_CS[\"unknown\",VERT_DATUM[\"unknown\",2005],UNIT[\"metre\",1,AUTHORITY[\"EPSG\",\"9001\"]],AXIS[\"Up\",UP]]]",
    "srs":
    {
      "compoundwkt": "COMPD_CS[\"unnamed + unknown\",LOCAL_CS[\"unnamed\",UNIT[\"metre\",1,AUTHORITY[\"EPSG\",\"9001\"]],AXIS[\"Easting\",EAST],AXIS[\"Northing\",NORTH]],VERT_CS[\"unknown\",VERT_DATUM[\"unknown\",2005],UNIT[\"metre\",1,AUTHORITY[\"EPSG\",\"9001\"]],AXIS[\"Up\",UP]]]",
      "horizontal": "LOCAL_CS[\"unnamed\",UNIT[\"metre\",1,AUTHORITY[\"EPSG\",\"9001\"]],AXIS[\"Easting\",EAST],AXIS[\"Northing\",NORTH]]",
      "isgeocentric": false,
      "isgeographic": false,
      "json": {
  "type": "CompoundCRS",
  "name": "unnamed + unknown",
  "components": [
    {
      "type": "EngineeringCRS",
      "name": "unnamed",
      "datum": {
        "name": "Unknown engineering datum"
      },
      "coordinate_system": {
        "subtype": "Cartesian",
        "axis": [
          {
            "name": "Easting",
            "abbreviation": "",
            "direction": "east",
            "unit": "metre"
          },
          {
            "name": "Northing",
            "abbreviation": "",
            "direction": "north",
            "unit": "metre"
          }
        ]
      }
    },
    {
      "type": "VerticalCRS",
      "name": "unknown",
      "datum": {
        "type": "VerticalReferenceFrame",
        "name": "unknown"
      },
      "coordinate_system": {
        "subtype": "vertical",
        "axis": [
          {
            "name": "Up",
            "abbreviation": "",
            "direction": "up",
            "unit": "metre"
          }
        ]
      }
    }
  ]
},
      "prettycompoundwkt": "COMPD_CS[\"unnamed + unknown\",\n    LOCAL_CS[\"unnamed\",\n        UNIT[\"metre\",1,\n            AUTHORITY[\"EPSG\",\"9001\"]],\n        AXIS[\"Easting\",EAST],\n        AXIS[\"Northing\",NORTH]],\n    VERT_CS[\"unknown\",\n        VERT_DATUM[\"unknown\",2005],\n        UNIT[\"metre\",1,\n            AUTHORITY[\"EPSG\",\"9001\"]],\n        AXIS[\"Up\",UP]]]",
      "prettywkt": "LOCAL_CS[\"unnamed\",\n    UNIT[\"metre\",1,\n        AUTHORITY[\"EPSG\",\"9001\"]],\n    AXIS[\"Easting\",EAST],\n    AXIS[\"Northing\",NORTH]]",
      "proj4": "+vunits=m +no_defs",
      "units":
      {
        "horizontal": "metre",
        "vertical": "metre"
      },
      "vertical": "VERT_CS[\"unknown\",VERT_DATUM[\"unknown\",2005],UNIT[\"metre\",1,AUTHORITY[\"EPSG\",\"9001\"]],AXIS[\"Up\",UP]]",
      "wkt": "LOCAL_CS[\"unnamed\",UNIT[\"metre\",1,AUTHORITY[\"EPSG\",\"9001\"]],AXIS[\"Easting\",EAST],AXIS[\"Northing\",NORTH]]"
    },
    "system_id": "Trimble",
    "vlr_0":
    {
      "data": "AQABAAAABAAABAAAAQAAAAQIAAABACkjBAwAAAEAKSMDEAAAAQApIw==",
      "description": "LASzip DLL 2.2 r0 (130917)",
      "record_id": 34735,
      "user_id": "LASF_Projection"
    },
    "vlr_1":
    {
      "data": "AAAAAAAAAAAAAAAAAAAkwAAAAAAAAAAA",
      "description": "TopoDOT Scanner Origin",
      "record_id": 101,
      "user_id": "Origin"
    }
  },
  "now": "2023-12-07T22:41:52+0900",
  "pdal_version": "2.5.6 (git-version: Release)",
  "reader": "readers.las"
}
どれも重要な情報ですが、今回特に重要なのは以下のあたりです。
...
    "dataformat_id": 0,
...
    "major_version": 1,
...
    "minor_version": 2,
...
この情報から、このLASデータは
- バージョンが1.2
- データフォーマットが0
ということがわかります。
バージョンは最新のものが1.4で、バージョンによって利用できるデータフォーマットが異なるが種類は10種類程度あります。
ということでバージョン1.2の仕様を眺め、ヘッダー部とデータフォーマット0に剃ったデータのフォーマットがどのようになっているか見てみましょう。
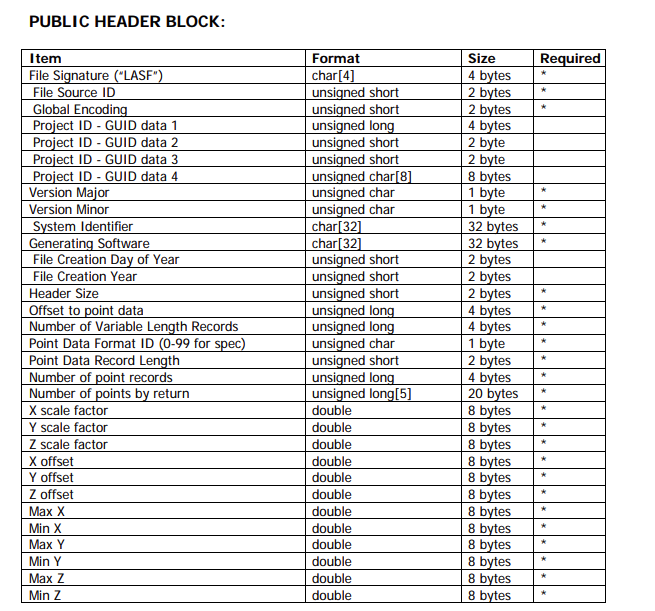
仕様によると、まずPUBLIC HEADER BLOCKというものがあるようですね。
よくみてみると、これらは大抵の情報がPDALのコマンドで取得したメタデータのように見えます。
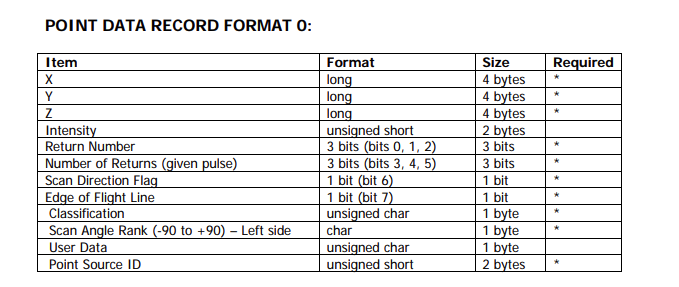
さらに読み進めると、以下のようなPOINT DATA RECORD FORMAT 0という記述が見つかります。
X・Y・Zなどの情報が見つかりますね!
このXYZの情報を抽出し、glTFに点の集合を格納していくことで、データの変換をやってみるわけです。
ヘッダー部をパースしてみる
ということで、メタデータ取得のために早速ヘッダーを読み取るコードを書いていきましょう!
バージョン1.2、データフォーマット0の情報を愚直に書き込んでモデルを定義していきます。
LAS上のデータは仕様上リトルエンディアンで書き込む必要があるため、LASデータを読み込む際も、リトルエンディアンで読み込んでいきます。
las/src/public_header.rs
use byteorder::{LittleEndian, ReadBytesExt};
use std::fs::File;
use std::io::{self, BufReader, Read};

#[derive(Debug, Default)]
pub struct PublicHeader {
    // LAS 1.2
    pub file_signature: [u8; 4],
    pub file_source_id: u16,
    pub global_encoding: u16,
    pub project_id_guid_data_1: u32,
    pub project_id_guid_data_2: u16,
    pub project_id_guid_data_3: u16,
    pub project_id_guid_data_4: [u8; 8],
    pub version_major: u8,
    pub version_minor: u8,
    pub system_identifier: [u8; 32],
    pub generating_software: [u8; 32],
    pub file_creation_day_of_year: u16,
    pub file_creation_year: u16,
    pub header_size: u16,
    pub offset_to_point_data: u32,
    pub number_of_variable_length_records: u32,
    pub point_data_record_format: u8,
    pub point_data_record_length: u16,
    pub legacy_number_of_point_records: u32,
    pub legacy_number_of_points_by_return: [u32; 5],
    pub x_scale_factor: f64,
    pub y_scale_factor: f64,
    pub z_scale_factor: f64,
    pub x_offset: f64,
    pub y_offset: f64,
    pub z_offset: f64,
    pub x_max: f64,
    pub x_min: f64,
    pub y_max: f64,
    pub y_min: f64,
    pub z_max: f64,
    pub z_min: f64,
}

impl PublicHeader {
    pub fn new() -> PublicHeader {
        Default::default()
    }

    pub fn read_public_header(&mut self, reader: &mut BufReader<File>) -> io::Result<()> {
        reader.read_exact(&mut self.file_signature)?;

        self.file_source_id = reader.read_u16::<LittleEndian>()?;

        self.global_encoding = reader.read_u16::<LittleEndian>()?;

        self.project_id_guid_data_1 = reader.read_u32::<LittleEndian>()?;
        self.project_id_guid_data_2 = reader.read_u16::<LittleEndian>()?;
        self.project_id_guid_data_3 = reader.read_u16::<LittleEndian>()?;
        reader.read_exact(&mut self.project_id_guid_data_4)?;

        self.version_major = reader.read_u8()?;
        self.version_minor = reader.read_u8()?;

        reader.read_exact(&mut self.system_identifier)?;
        reader.read_exact(&mut self.generating_software)?;
        self.file_creation_day_of_year = reader.read_u16::<LittleEndian>()?;
        self.file_creation_year = reader.read_u16::<LittleEndian>()?;

        self.header_size = reader.read_u16::<LittleEndian>()?;

        self.offset_to_point_data = reader.read_u32::<LittleEndian>()?;

        self.number_of_variable_length_records = reader.read_u32::<LittleEndian>()?;

        self.point_data_record_format = reader.read_u8()?;

        self.point_data_record_length = reader.read_u16::<LittleEndian>()?;

        self.legacy_number_of_point_records = reader.read_u32::<LittleEndian>()?;
        self.legacy_number_of_points_by_return = [
            reader.read_u32::<LittleEndian>()?,
            reader.read_u32::<LittleEndian>()?,
            reader.read_u32::<LittleEndian>()?,
            reader.read_u32::<LittleEndian>()?,
            reader.read_u32::<LittleEndian>()?,
        ];

        self.x_scale_factor = reader.read_f64::<LittleEndian>()?;
        self.y_scale_factor = reader.read_f64::<LittleEndian>()?;
        self.z_scale_factor = reader.read_f64::<LittleEndian>()?;

        self.x_offset = reader.read_f64::<LittleEndian>()?;
        self.y_offset = reader.read_f64::<LittleEndian>()?;
        self.z_offset = reader.read_f64::<LittleEndian>()?;

        self.x_max = reader.read_f64::<LittleEndian>()?;
        self.x_min = reader.read_f64::<LittleEndian>()?;
        self.y_max = reader.read_f64::<LittleEndian>()?;
        self.y_min = reader.read_f64::<LittleEndian>()?;
        self.z_max = reader.read_f64::<LittleEndian>()?;
        self.z_min = reader.read_f64::<LittleEndian>()?;

        Ok(())
    }
}
las/src/lib.rs
mod public_header;

pub use public_header::PublicHeader;
これでひとまずヘッダーが読み取れるようになりました!
ヘッダー読み取りのための構造体を定義したので、ヘッダーを読むロジックも書いていきましょう!
las/examples/las_to_gltf.rs
use byteorder::{LittleEndian, ReadBytesExt, WriteBytesExt};
use las::*;
use serde_json::json;
use std::fs::File;
use std::io::{self, BufReader, BufWriter, Read, Seek, SeekFrom, Write as _};

fn main() -> io::Result<()> {
    let file = File::open("data/tochomaeb3f.las")?;
    let mut reader = BufReader::new(file);

    // Public Header Blockの読み込み
    let mut public_header = PublicHeader::new();

    public_header.read_public_header(&mut reader)?;

    // offset_to_point_dataを取得
    // LASデータの先頭からポイントデータまでのオフセット(バイト)
    let offset_to_point_data = public_header.offset_to_point_data;
    println!("offset to point data: {}", offset_to_point_data);

    // ポイントデータの合計数を取得
    let points_count = public_header.legacy_number_of_point_records;
    println!("points count: {}", points_count);

    // ポイントフォーマットによって、point data recordsの長さが変わる
    let point_format = public_header.point_data_record_format;
    println!("point format: {}", point_format);

    println!("x_scale_factor: {}", public_header.x_scale_factor);
    println!("y_scale_factor: {}", public_header.y_scale_factor);
    println!("z_scale_factor: {}", public_header.z_scale_factor);
    println!("x_offset: {}", public_header.x_offset);
    println!("y_offset: {}", public_header.y_offset);
    println!("z_offset: {}", public_header.z_offset);

    let x_max = public_header.x_max;
    let x_min = public_header.x_min;
    let y_max = public_header.y_max;
    let y_min = public_header.y_min;
    let z_max = public_header.z_max;
    let z_min = public_header.z_min;

    println!("x_max: {}", x_max);
    println!("x_min: {}", x_min);
    println!("y_max: {}", y_max);
    println!("y_min: {}", y_min);
    println!("z_max: {}", z_max);
    println!("z_min: {}", z_min);
    Ok(())
}
コードが書けたので、先ほどダウンロードしたtochomaeb3f.lasをlas/dataというフォルダを作って格納しておきましょう。
そして、以下のようにlasフォルダに移動して、そのままコマンドを入力してみましょう!
% cd las
% cargo run --example las_to_gltf --release

offset to point data: 399
points count: 13901851
point format: 0
x_scale_factor: 0.0001
y_scale_factor: 0.0001
z_scale_factor: 0.0001
x_offset: 0
y_offset: -10
z_offset: 0
x_max: 135.85160000000002
x_min: -5.6802
y_max: 45.098000000000006
y_min: -18.9376
z_max: 1.8137
z_min: -4.1986
上記のようにメタデータが表示されましたでしょうか!
点群の部分をパースしてみる
サクサク行きます!
メタデータが取得できたので、肝心なポイントデータ本体の情報を取得していきましょう!
さっきのコードに追加する形で、書き進めていきます。
las/examples/las_to_gltf.rs
use byteorder::{LittleEndian, ReadBytesExt, WriteBytesExt};
use gltf::*;
use las::*;
use std::fs::File;
use std::io::{self, BufReader, BufWriter, Read, Write as _};

fn main() -> io::Result<()> {
    let file = File::open("data/tochomaeb3f.las")?;
    let mut reader = BufReader::new(file);

    // Public Header Blockの読み込み
    let mut public_header = PublicHeader::new();

    public_header.read_public_header(&mut reader)?;

    // offset_to_point_dataを取得
    // LASデータの先頭からポイントデータまでのオフセット(バイト)
    let offset_to_point_data = public_header.offset_to_point_data;
    println!("offset to point data: {}", offset_to_point_data);

    // ポイントデータの合計数を取得
    let points_count = public_header.legacy_number_of_point_records;
    println!("points count: {}", points_count);

    // ポイントフォーマットによって、point data recordsの長さが変わる
    let point_format = public_header.point_data_record_format;
    println!("point format: {}", point_format);

    println!("x_scale_factor: {}", public_header.x_scale_factor);
    println!("y_scale_factor: {}", public_header.y_scale_factor);
    println!("z_scale_factor: {}", public_header.z_scale_factor);
    println!("x_offset: {}", public_header.x_offset);
    println!("y_offset: {}", public_header.y_offset);
    println!("z_offset: {}", public_header.z_offset);

    let x_max = public_header.x_max;
    let x_min = public_header.x_min;
    let y_max = public_header.y_max;
    let y_min = public_header.y_min;
    let z_max = public_header.z_max;
    let z_min = public_header.z_min;

    println!("x_max: {}", x_max);
    println!("x_min: {}", x_min);
    println!("y_max: {}", y_max);
    println!("y_min: {}", y_min);
    println!("z_max: {}", z_max);
    println!("z_min: {}", z_min);

    // ポイントデータレコードの長さを取得
    // ポイントフォーマットによって、point data recordsの長さが変わるが、今回はpoint_data_record_lengthには20バイトと書かれていたので20バイト確保
    let point_data_record_length = public_header.point_data_record_length;

    // ポイントデータレコードの長さに合わせて事前にバッファを確保し、0で初期化
    let mut point_record = vec![0; point_data_record_length as usize];

    // let mut points: Vec<Vec<f64>> = Vec::new();
    let mut points: Vec<f64> = Vec::new();

    for _ in 0..points_count {
        // ポイントレコードの長さ分のバッファを読み取る
        reader.read_exact(&mut point_record)?;

        // point_data_record_lengthの長さのバッファを読み取ったデータを格納
        let mut point_data = BufReader::new(point_record.as_slice());

        // ポイントフォーマットに限らず、先頭12バイト(4 * 3バイト → f64 * 3)がXYZ座標
        // X座標を読み取る
        let x = point_data.read_i32::<LittleEndian>()? as f64;
        let x = x * public_header.x_scale_factor + public_header.x_offset;

        // Y座標を読み取る
        let y = point_data.read_i32::<LittleEndian>()? as f64;
        let y = y * public_header.y_scale_factor + public_header.y_offset;

        // Z座標を読み取る
        let z = point_data.read_i32::<LittleEndian>()? as f64;
        let z = z * public_header.z_scale_factor + public_header.z_offset;

        // ポイントデータを格納
        points.push(x);
        points.push(y);
        points.push(z);
    }

    // gltf用のバイナリファイルにデータを流し込む
    let mut gltf_file = BufWriter::new(File::create("data/output.bin")?);

    for point in points {
        gltf_file.write_f64::<LittleEndian>(point)?;
    }
    Ok(())
}
これで、data/output.binが生成されました!
このファイルにはポイントデータがバイナリでがさっと全て詰め込まれているので、それなりのファイルサイズになっているはずです。
glTFの仕様を眺める
LASからポイントデータを抽出することができたので、次はglTFに進みましょう。
glTFは以下のような仕様になっています。
膨大な仕様ですね…
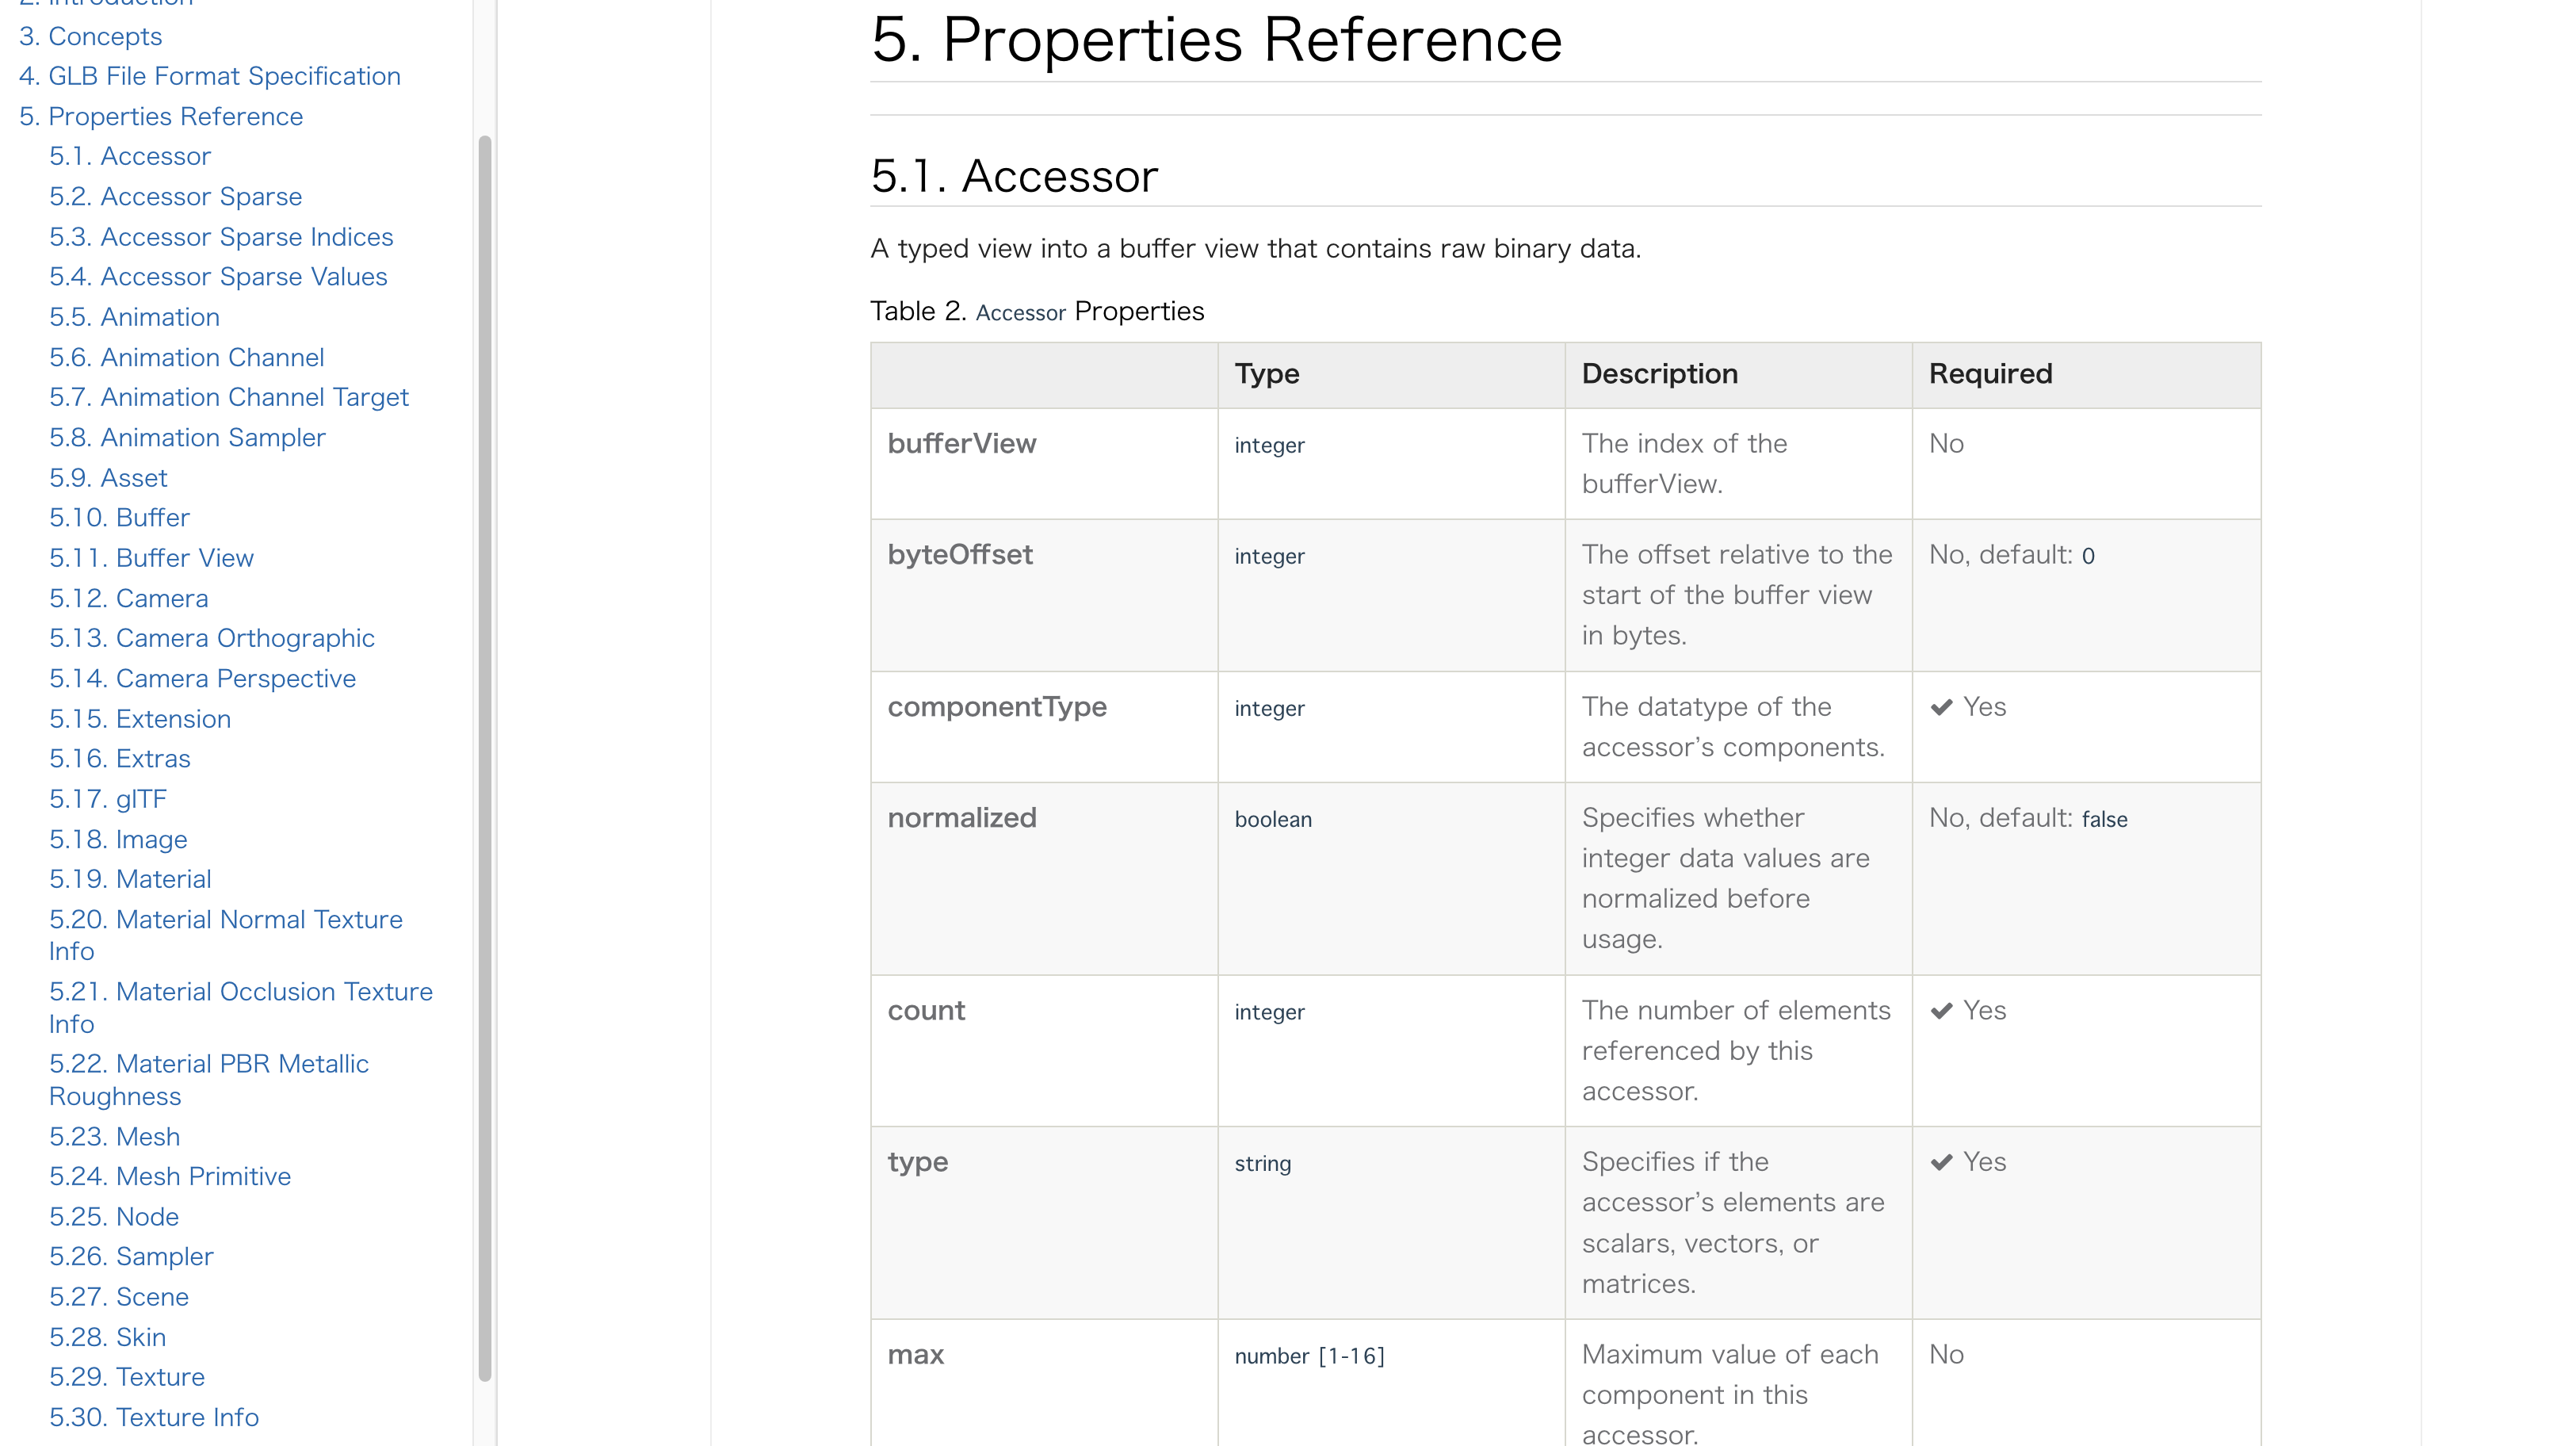
ですが、細かいところは気にせず、仕様の中でも今回特に重要な部分であるProperties Referenceについてみていきましょう。
glTFに格納できるデータ仕様ついて定められた項目で、5.1~5.30までの合計30個の属性が定義されています。
今回これら全ての仕様に対応する必要はなく、必要な部分のみ使っていきましょう!
glTFで出力する
仕様に合わせて構造体を定義していきたかったですが、今回はあまり時間がなかったので、直接JSONに情報を埋め込んでいきます!
(glTFはスキーマが定義されたJSON形式のファイルです。)
最下部にglTF作成のコードを挿入し、最終的な変換プログラムは以下のようになりました!
las/examples/las_to_gltf.rs
use byteorder::{LittleEndian, ReadBytesExt, WriteBytesExt};
use las::*;
use serde_json::json;
use std::fs::File;
use std::io::{self, BufReader, BufWriter, Read, Write as _};

fn main() -> io::Result<()> {
    let file = File::open("data/tochomaeb3f.las")?;
    let mut reader = BufReader::new(file);

    // Public Header Blockの読み込み
    let mut public_header = PublicHeader::new();

    public_header.read_public_header(&mut reader)?;

    // offset_to_point_dataを取得
    // LASデータの先頭からポイントデータまでのオフセット(バイト)
    let offset_to_point_data = public_header.offset_to_point_data;
    println!("offset to point data: {}", offset_to_point_data);

    // ポイントデータの合計数を取得
    let points_count = public_header.legacy_number_of_point_records;
    println!("points count: {}", points_count);

    // ポイントフォーマットによって、point data recordsの長さが変わる
    let point_format = public_header.point_data_record_format;
    println!("point format: {}", point_format);

    println!("x_scale_factor: {}", public_header.x_scale_factor);
    println!("y_scale_factor: {}", public_header.y_scale_factor);
    println!("z_scale_factor: {}", public_header.z_scale_factor);
    println!("x_offset: {}", public_header.x_offset);
    println!("y_offset: {}", public_header.y_offset);
    println!("z_offset: {}", public_header.z_offset);

    let x_max = public_header.x_max;
    let x_min = public_header.x_min;
    let y_max = public_header.y_max;
    let y_min = public_header.y_min;
    let z_max = public_header.z_max;
    let z_min = public_header.z_min;

    println!("x_max: {}", x_max);
    println!("x_min: {}", x_min);
    println!("y_max: {}", y_max);
    println!("y_min: {}", y_min);
    println!("z_max: {}", z_max);
    println!("z_min: {}", z_min);

    // ポイントデータレコードの長さを取得
    // ポイントフォーマットによって、point data recordsの長さが変わるが、今回はpoint_data_record_lengthには20バイトと書かれていたので20バイト確保
    let point_data_record_length = public_header.point_data_record_length;

    // ポイントデータレコードの長さに合わせて事前にバッファを確保し、0で初期化
    let mut point_record = vec![0; point_data_record_length as usize];

    // let mut points: Vec<Vec<f64>> = Vec::new();
    let mut points: Vec<f64> = Vec::new();

    for _ in 0..points_count {
        // ポイントレコードの長さ分のバッファを読み取る
        reader.read_exact(&mut point_record)?;

        // point_data_record_lengthの長さのバッファを読み取ったデータを格納
        let mut point_data = BufReader::new(point_record.as_slice());

        // ポイントフォーマットに限らず、先頭12バイト(4 * 3バイト → f64 * 3)がXYZ座標
        // X座標を読み取る
        let x = point_data.read_i32::<LittleEndian>()? as f64;
        let x = x * public_header.x_scale_factor + public_header.x_offset;

        // Y座標を読み取る
        let y = point_data.read_i32::<LittleEndian>()? as f64;
        let y = y * public_header.y_scale_factor + public_header.y_offset;

        // Z座標を読み取る
        let z = point_data.read_i32::<LittleEndian>()? as f64;
        let z = z * public_header.z_scale_factor + public_header.z_offset;

        // ポイントデータを格納
        points.push(x);
        points.push(y);
        points.push(z);
    }

    // gltf用のバイナリファイルにデータを流し込む
    let mut gltf_file = BufWriter::new(File::create("data/output.bin")?);

    for point in points {
        gltf_file.write_f64::<LittleEndian>(point)?;
    }

    // ポイント数 × 3(XYZ座標) × 8(f64)バイト
    let byte_length = points_count * 3 * 8;

    // GLTFファイルの作成
    let gltf_json = json!( {
        "asset": {
            "version": "2.0",
        },
        "scene": 0,
        "scenes": [
            {
                "nodes": [0],
            },
        ],
        "nodes": [
            {"mesh": 0},
        ],
        "meshes": [
            {
                "primitives": [
                    {
                        "attributes": {"POSITION": 0},
                        "mode": 0,
                    },
                ],
            },
        ],
        "buffers": [
            {
                "uri": "./output.bin",
                "byteLength": byte_length,
            },
        ],
        "bufferViews": [
            {
                "buffer": 0,
                "byteOffset": 0,
                "byteLength": byte_length,
                "target": 34962,
            },
        ],
        "accessors": [
            {
                "bufferView": 0,
                "byteOffset": 0,
                "componentType": 5126,
                "count": points_count,
                "type": "VEC3",
            },
        ],
    });

    // gltfファイルを出力
    let mut gltf_file: BufWriter<File> = BufWriter::new(File::create("data/output.gltf")?);
    gltf_file.write_all(gltf_json.to_string().as_bytes())?;

    Ok(())
}
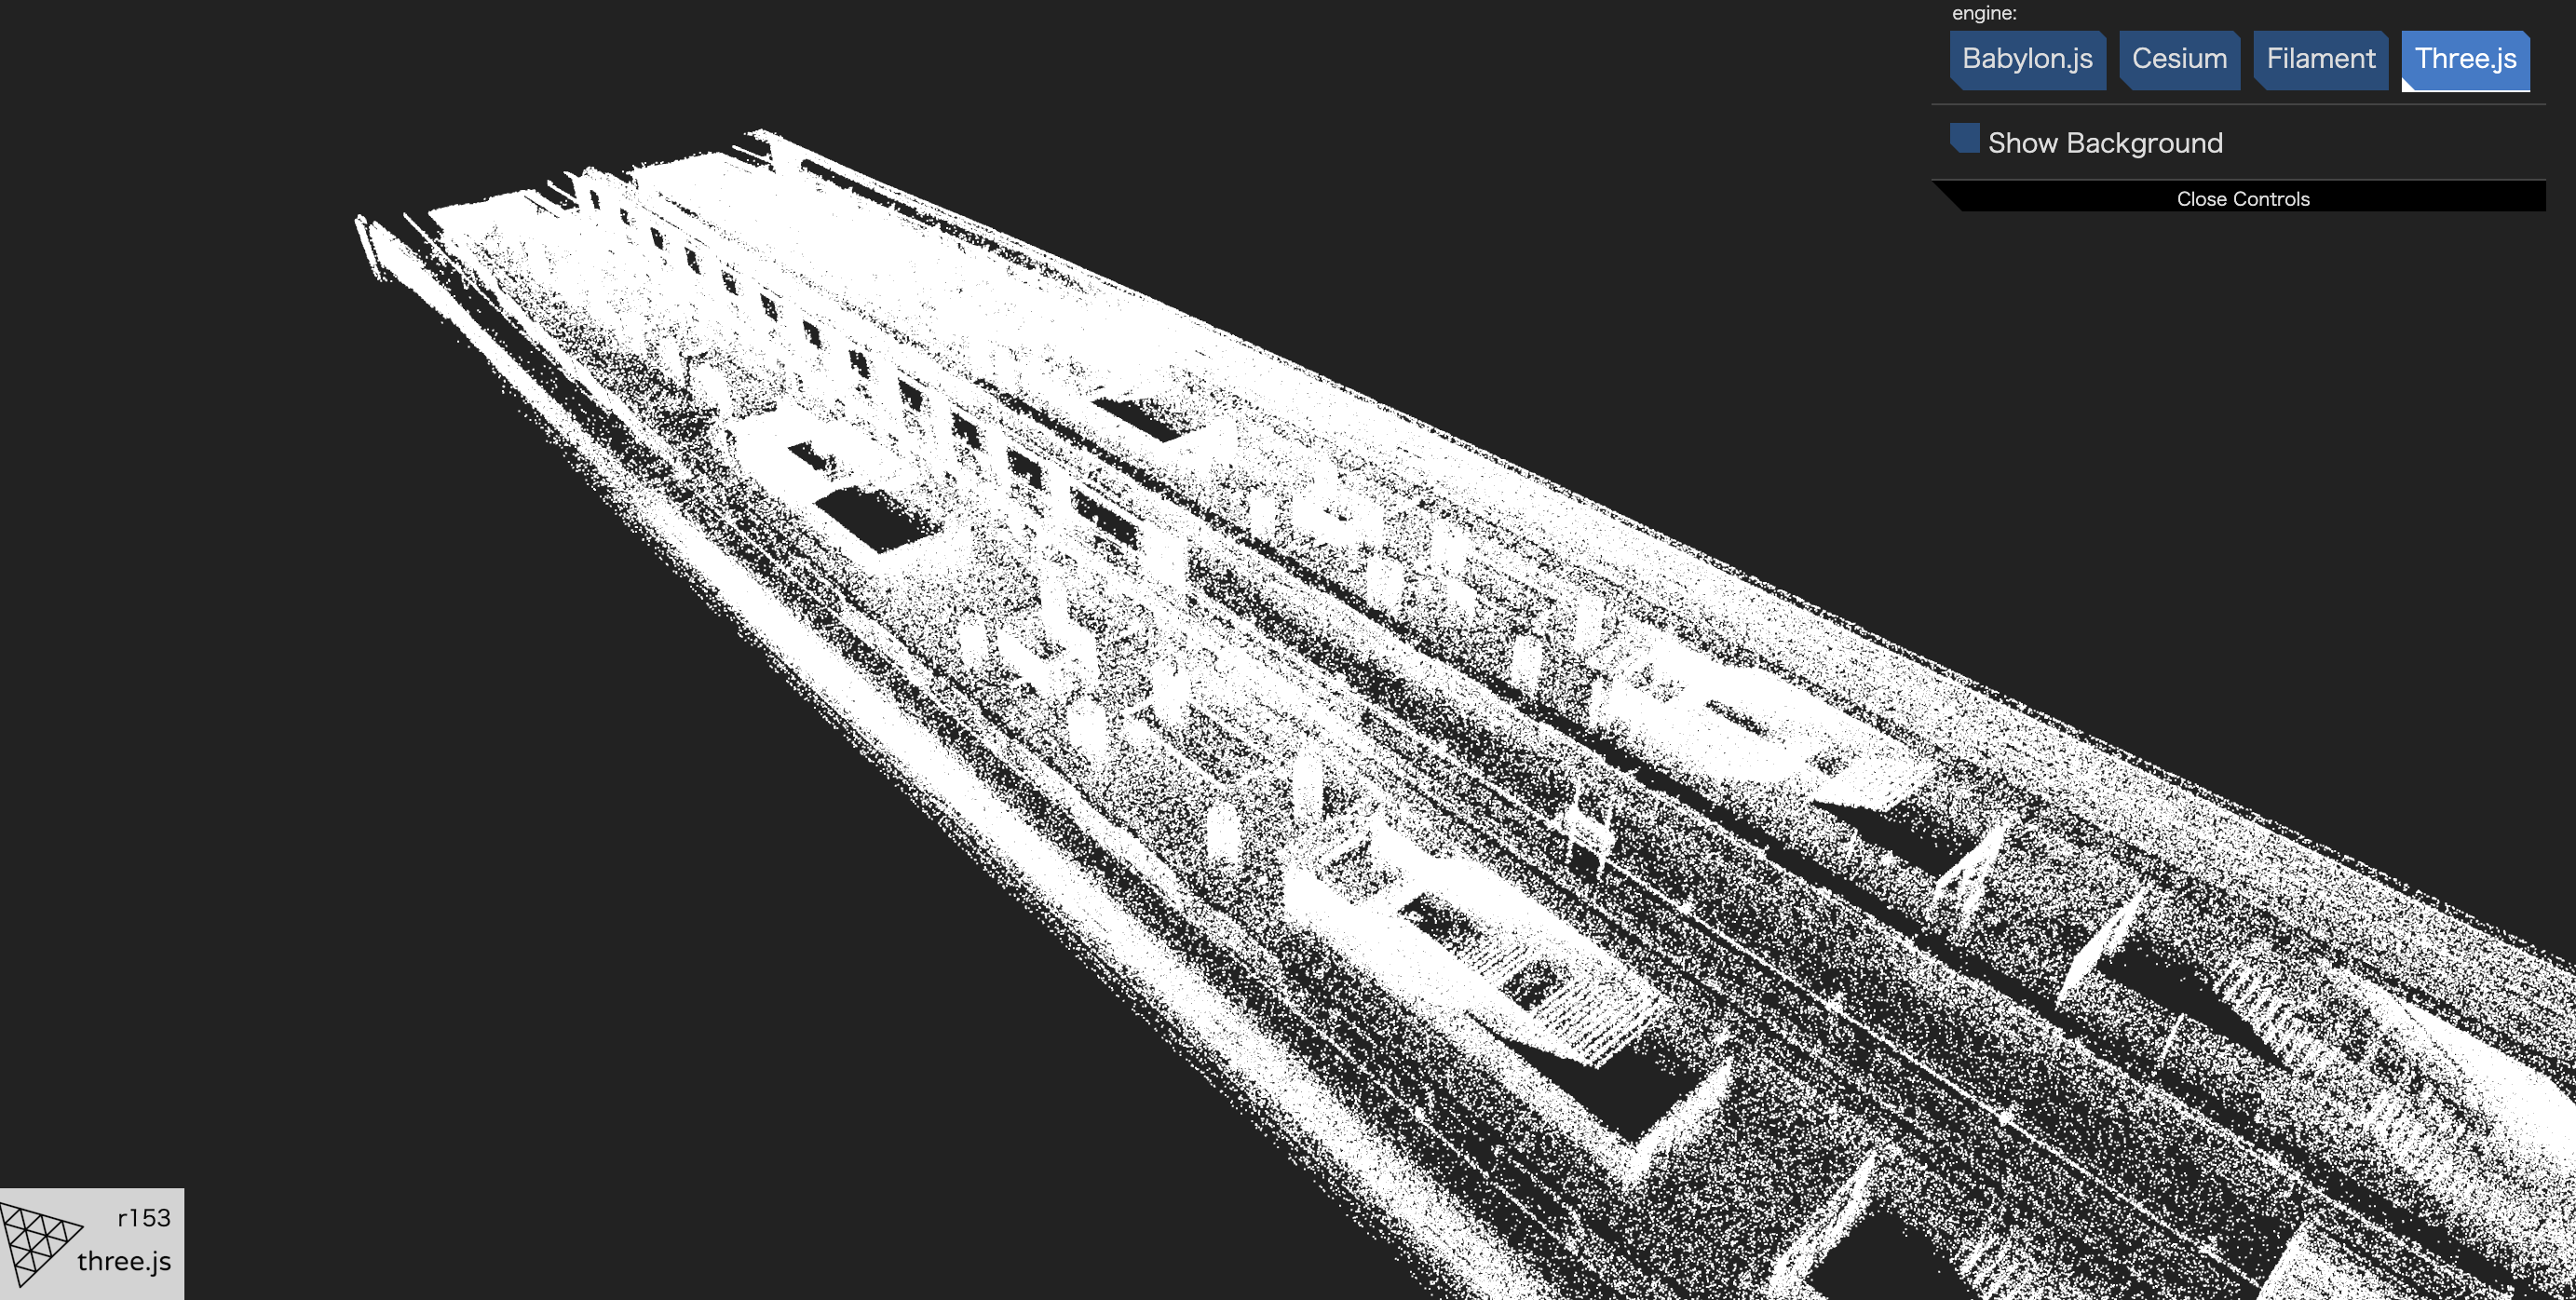
VSCode拡張機能glTF Toolsを利用して表示すると以下のようになっているはずです!
終わりに
ということで、3Dデータ形式である「LAS」と「glTF」についてRustで変換プログラムを書いてみました!
弊社では地理空間情報(GIS)という特殊なデータ形式をメインで取り扱うため、ライブラリが成熟しているPythonをよく利用するのですが、「3DのGISデータ」などを扱う際にはPythonだとパフォーマンス的につらいことも多く…
どうしようか色々迷っていたのですが、Rustは慣れてくると、そこまで難しいというわけでもなく、かつとても高速に動作するため開発体験が良いなーと思いました!
Rustと3Dデータは相性がいいと思いますので、これを機に皆さんも「3DGISデータ」である「LAS」や「glTF」に触れてみてくださいー!
