はじめに
皆さん、STAC(スタック)という言葉を聞いたことはありますか?
以前、以下の記事でAWSのオープンデータについて解説した際に、少しだけSTACについて触れました。
STACは、地理空間データを扱うためのオープンな標準仕様です。
特に、衛星画像、航空写真、ドローン画像、LiDAR点群データなど、時間と空間の情報を伴うデータ(これらは「時空間アセット」とも呼ばれます)のメタデータを管理するために設計されています。
STAC仕様に基づいてデータを管理することで、関連するデータを非常に簡単に見つけ出し、利用できるようになる点が大きなメリットです。
実際に、AWSのオープンデータプラットフォームやGoogle Earth Engineなどでも、STAC仕様に準拠したデータセットが公開されています。
STACでは、データのメタデータをJSON形式で表現します。これはプログラムで処理しやすいテキスト形式であるため、APIを介してデータに容易にアクセスできるという利点があります。
ここで重要な点として、STACには「Static(静的)」な形式と「Dynamic(動的)」な形式が存在します。
STACの主要な仕様(構成要素)として、以下の3つが定義されています。
- STAC Item: 個々のデータアセット(例: 1枚の衛星画像ファイル)のメタデータを記述する基本的な単位です。
- STAC Collection: 関連するItemの集まり(例: 同じ衛星シリーズで撮影された画像群)をグループ化し、データセット全体の概要情報などを記述するものです。
- STAC Catalog: 他のCatalogやCollectionへのリンクをまとめる、ディレクトリ構造のような役割を果たします。
これらはすべてJSONファイルとして表現され、例えばAWS S3のようなオブジェクトストレージに静的なファイルとしてそのまま配置できます。これが「StaticなSTAC」と呼ばれる形式で、シンプルなファイル構成が特徴です。
さまざまなデータが以下のページから公開されているので、興味のある方はぜひご覧ください。
データセット
一方、「DynamicなSTAC」は一般的に「STAC API」と呼ばれます。これはWebサーバー上で動作するAPIであり、ユーザーからのリクエスト(例: 特定の地理的範囲や期間に合致するデータの検索)に応じて、動的にメタデータを生成し、JSON形式で応答します。これにより、より柔軟なデータの検索やフィルタリングが可能になります。
詳細については、以下の公式ドキュメントをご参照ください。
今回は、このSTAC APIを構築するためのライブラリである「stac-fastapi」を使って、STAC APIを構築する方法を紹介します。
このstac-fastapiは日本語のドキュメントが少なく、使い方がわかりにくい部分が多いため、特に初心者にとっては学習コストが高いかもしれません。
ただ、stac-fastapiは、PythonのWebフレームワークであるFastAPIをベースにしており、非常に高速でありながら、使いやすいAPIを提供されるため、メリットは大きいです。
今回作成したサンプルはここにおいておきます。
stac-fastapiのインストール
最近ではPythonのパッケージ管理はuvを利用するのが一般的になってきたため、uvを利用します。
uv自体のインストール方法は調べてみてください。
uv init sample-stac-fastapi
cd sample-stac-fastapi
uv add stac-fastapi.types stac-fastapi.api stac-fastapi.extensions stac-fastapi.pgstac fastapi uvicorn
uv sync
これで一通りのパッケージがインストールされました。
pyproject.toml
[project]
name = "stac-fastapi-sample"
version = "0.1.0"
description = "Add your description here"
readme = "README.md"
requires-python = ">=3.13"
dependencies = [
    "fastapi>=0.115.12",
    "stac-fastapi-api>=5.2.0",
    "stac-fastapi-extensions>=5.2.0",
    "stac-fastapi-pgstac>=5.0.2",
    "stac-fastapi-types>=5.2.0",
    "uvicorn>=0.34.1",
]
公式リポジトリの説明ではあまりに説明不足な気はしまうが、このようにいくつかのパッケージをインストールすることで、stac-fastapiを利用することができるようになります。
stac-fastapiの起動
stac-fastapiを使用するために、いくつかのコードを書きましょう。
起動させるだけでも設定が多く、それなりに大変なので、まずはがさっと起動させてみましょう。
DBの準備
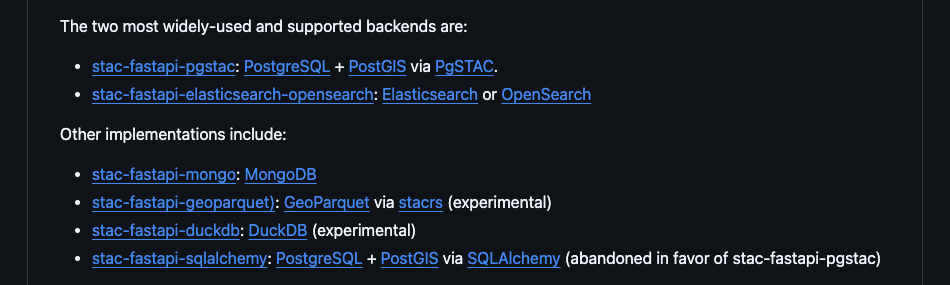
STAC APIはさまざまなバックエンド(データベース)をサポートしています。
今回はポピュラーなPostGISを利用したPgSTACを利用します。
リポジトリのルートにdocker-compose.ymlを作成し、以下の内容を追加します。
services:
  # PostgreSQL + PgSTAC
  db:
    image: ghcr.io/stac-utils/pgstac:v0.9.5
    environment:
      - POSTGRES_USER=postgres
      - POSTGRES_PASSWORD=postgres
      - POSTGRES_DB=postgres
      - PGUSER=postgres
      - PGPASSWORD=postgres
      - PGDATABASE=postgres
    ports:
      - "25432:5432"
    volumes:
      - pgstac_data:/var/lib/postgresql/data
    healthcheck:
      test: ["CMD-SHELL", "pg_isready -U postgres"]
      interval: 10s
      timeout: 5s
      retries: 5
    networks:
      - app-network

  # PgSTACスキーマ・拡張初期化
  pgstac-init:
    image: ghcr.io/stac-utils/pgstac:v0.9.5
    environment:
      - PGUSER=postgres
      - PGPASSWORD=postgres
      - PGDATABASE=postgres
      - PGHOST=db
      - PGPORT=5432
    depends_on:
      db:
        condition: service_healthy
    command: >
      psql -c "CREATE SCHEMA IF NOT EXISTS pgstac;" -c "CREATE EXTENSION IF NOT EXISTS postgis;" -c "CREATE EXTENSION IF NOT EXISTS btree_gist;" -c "SELECT pg_catalog.set_config('search_path', 'pgstac', false);" -f /docker-entrypoint-initdb.d/999_pgstac.sql
    networks:
      - app-network

volumes:
  pgstac_data:

networks:
  app-network:
    driver: bridge
DB本体であるghcr.io/stac-utils/pgstac:v0.9.5を利用しつつ、初期設定用のpgstac-initを用意しています。
このpgstac-initは、DBが立ち上がった後にPgSTACのスキーマや拡張機能を初期化するためのものです。
docker-compose upを実行すると、PgSTACのスキーマや拡張機能が自動的に初期化されます。
一旦、このままにしておきましょう。
stac-fastapiの設定
まずはルートディレクトリにsrcというディレクトリを作成し、その中にmain.pyというファイルを作成します。
mkdir src
touch src/__init__.py src/config.py src/main.py
次に、main.pyに以下のコードを追加します。
src/main.py
from contextlib import asynccontextmanager

from fastapi import FastAPI
from fastapi.responses import ORJSONResponse


# 設定とSTAC関連クラスをインポート
from .config import settings, api_settings, postgres_settings
from stac_fastapi.api.app import StacApi
from stac_fastapi.extensions.core import (
    FieldsExtension,
    FilterExtension,
    QueryExtension,
    SortExtension,
    TransactionExtension,
)
from stac_fastapi.pgstac.core import CoreCrudClient
from stac_fastapi.pgstac.db import close_db_connection, connect_to_db
from stac_fastapi.pgstac.transactions import TransactionsClient


# FastAPIのライフサイクルイベント
@asynccontextmanager
async def lifespan(app: FastAPI):
    # アプリケーション起動時
    await connect_to_db(app, postgres_settings=postgres_settings)
    print("Database connection established.")
    yield
    # アプリケーション終了時
    await close_db_connection(app)
    print("Database connection closed.")


# クライアントの初期化
client = CoreCrudClient()
transactions_client = TransactionsClient()


# STAC APIの拡張
extensions = [
    FieldsExtension(),
    FilterExtension(),
    QueryExtension(),
    SortExtension(),
    TransactionExtension(
        client=transactions_client, settings=settings, response_class=ORJSONResponse
    ),
]


# FastAPIアプリケーションインスタンス
app = FastAPI(
    title=settings.project_name,
    version=settings.api_version,
    description=settings.stac_fastapi_description,
    root_path=settings.root_path,
    lifespan=lifespan,
    openapi_url=api_settings.openapi_url,
    docs_url=api_settings.docs_url,
)


# STAC APIインスタンス
stac_api: StacApi = StacApi(
    app=app,
    settings=api_settings,
    client=client,
    extensions=extensions,
)


app = stac_api.app


# FastAPIアプリケーションにSTAC APIルーターを登録
app.include_router(stac_api.router)
次に、config.pyというファイルを作成し、以下のコードを追加します。
src/config.py
from typing import List, Type, Optional

from pydantic import Field
from pydantic_settings import BaseSettings, SettingsConfigDict
from stac_fastapi.types.config import ApiSettings
from stac_fastapi.pgstac.config import PostgresSettings as PgStacPostgresSettings
from stac_fastapi.pgstac.types.base_item_cache import (
    BaseItemCache,
    DefaultBaseItemCache,
)


class AppSettings(BaseSettings):
    """アプリケーション全体の設定"""

    model_config = SettingsConfigDict(
        env_file=".env",
        env_file_encoding="utf-8",
        extra="ignore",
    )

    # FastAPI & Uvicorn
    project_name: str = Field("stac-fastapi-sample", description="APIプロジェクト名")
    api_version: str = Field("1.0.0", description="APIバージョン")
    debug: bool = Field(False, description="デバッグモード")
    root_path: str = Field(
        "", description="FastAPIのルートパス(リバースプロキシ下など)"
    )

    # Database (PostgreSQL for pgSTAC)
    postgres_user: str = Field(..., description="PostgreSQL ユーザー名")
    postgres_pass: str = Field(..., description="PostgreSQL パスワード")
    postgres_host: str = Field(..., description="PostgreSQL ホスト名")
    postgres_port: int = Field(..., description="PostgreSQL ポート")
    postgres_dbname: str = Field(..., description="PostgreSQL データベース名")
    postgres_host_reader: Optional[str] = Field(
        None, description="読み取り用PostgreSQLホスト"
    )
    postgres_host_writer: Optional[str] = Field(
        None, description="書き込み用PostgreSQLホスト"
    )
    db_pool_size: int = Field(5, description="DB接続プールサイズ")
    db_max_overflow: int = Field(10, description="DB接続プール最大オーバーフロー")

    # STAC FastAPI Settings
    stac_fastapi_title: str = Field(
        "stac-fastapi-sample", description="STAC APIタイトル"
    )
    stac_fastapi_description: str = Field(
        "stac-fastapi-sample", description="STAC API 説明"
    )
    stac_fastapi_version: str = Field("1.0.0", description="STAC API バージョン")
    openapi_url: str = Field("/api/openapi.json", description="OpenAPIスキーマURL")
    docs_url: str = Field("/api/docs", description="Swagger UI URL")
    enable_response_models: bool = Field(
        False, description="STACレスポンスモデル有効化"
    )
    use_api_hydrate: bool = Field(True, description="STAC API Hydrate有効化")
    invalid_id_chars: List[str] = Field(
        ["/", "\\", "?", "#"], description="無効なID文字"
    )
    base_item_cache: Type[BaseItemCache] = Field(
        DefaultBaseItemCache, description="ベースアイテムキャッシュクラス"
    )


class PostgresSettings(PgStacPostgresSettings):
    """stac-fastapi-pgstac用のPostgreSQL設定"""

    # AppSettingsから値を注入
    pass


class CustomApiSettings(ApiSettings):
    """stac-fastapi用のカスタムAPI設定"""

    # AppSettingsから値を注入
    pass


# 設定インスタンスを作成 (アプリケーション全体でインポートして使用)
settings: AppSettings = AppSettings()

# stac-fastapi用の設定インスタンスも作成
postgres_settings: PostgresSettings = PostgresSettings(
    postgres_user=settings.postgres_user,
    postgres_pass=settings.postgres_pass,
    postgres_host=settings.postgres_host,
    postgres_port=settings.postgres_port,
    postgres_dbname=settings.postgres_dbname,
    postgres_host_reader=settings.postgres_host_reader or settings.postgres_host,
    postgres_host_writer=settings.postgres_host_writer or settings.postgres_host,
)


api_settings: CustomApiSettings = CustomApiSettings(
    stac_fastapi_title=settings.stac_fastapi_title,
    stac_fastapi_description=settings.stac_fastapi_description,
    stac_fastapi_version=settings.stac_fastapi_version,
    openapi_url=settings.openapi_url,
    docs_url=settings.docs_url,
    root_path=settings.root_path,
    enable_response_models=settings.enable_response_models,
    use_api_hydrate=settings.use_api_hydrate,
    invalid_id_chars=settings.invalid_id_chars,
    base_item_cache=settings.base_item_cache,
    testing=settings.debug,
)
最後に、ルートに.envというファイルを作成し、以下の内容を追加します。
# FastAPI & Uvicorn
PROJECT_NAME="stac-fastapi-sample"
API_VERSION="1.0.0"
DEBUG=False
ROOT_PATH=""

# Database (PostgreSQL for pgSTAC) - Adjust values as needed
POSTGRES_USER=postgres
POSTGRES_PASS=postgres
POSTGRES_HOST=db
POSTGRES_PORT=5432
POSTGRES_DBNAME=postgres

# STAC FastAPI Settings - Adjust values as needed
STAC_FASTAPI_TITLE="stac-fastapi-sample"
STAC_FASTAPI_DESCRIPTION="stac-fastapi-sample"
docker-compose.ymlにAPIの設定を追加します。
services:
  # PostgreSQL + PgSTAC
  db:
    image: ghcr.io/stac-utils/pgstac:v0.9.5
    environment:
      - POSTGRES_USER=postgres
      - POSTGRES_PASSWORD=postgres
      - POSTGRES_DB=postgres
      - PGUSER=postgres
      - PGPASSWORD=postgres
      - PGDATABASE=postgres
    ports:
      - "25432:5432"
    volumes:
      - pgstac_data:/var/lib/postgresql/data
    healthcheck:
      test: ["CMD-SHELL", "pg_isready -U postgres"]
      interval: 10s
      timeout: 5s
      retries: 5
    networks:
      - app-network

  # PgSTACスキーマ・拡張初期化
  pgstac-init:
    image: ghcr.io/stac-utils/pgstac:v0.9.5
    environment:
      - PGUSER=postgres
      - PGPASSWORD=postgres
      - PGDATABASE=postgres
      - PGHOST=db
      - PGPORT=5432
    depends_on:
      db:
        condition: service_healthy
    command: >
      psql -c "CREATE SCHEMA IF NOT EXISTS pgstac;" -c "CREATE EXTENSION IF NOT EXISTS postgis;" -c "CREATE EXTENSION IF NOT EXISTS btree_gist;" -c "SELECT pg_catalog.set_config('search_path', 'pgstac', false);" -f /docker-entrypoint-initdb.d/999_pgstac.sql
    networks:
      - app-network

  # API
  api:
    build:
      context: .
      dockerfile: Dockerfile
    volumes:
      - ./src:/app/src
    depends_on:
      db:
        condition: service_healthy
    ports:
      - "8000:8000"
    env_file:
      - ./.env
    networks:
      - app-network
    command: ["uvicorn", "src.main:app", "--host", "0.0.0.0", "--port", "8000", "--reload"]

volumes:
  pgstac_data:

networks:
  app-network:
    driver: bridge
Dockerfileを作成し、以下のようにします。
Dockerfile
FROM python:3.13-slim

ENV PIP_DISABLE_PIP_VERSION_CHECK=1 \
    PIP_NO_CACHE_DIR=1 \
    PYTHONUNBUFFERED=1

WORKDIR /app

RUN pip install uv

COPY pyproject.toml ./

COPY src/ ./src/

RUN uv pip install --system --no-cache "."
docker composeを起動します。
docker compose up -d --build
ブラウザでhttp://localhost:8000/docsにアクセスすると、Swagger UIが表示されます。

これでstac-fastapiが起動しました。
デモデータの投入
この段階では何もデータが入っていません。
データ投入用のエンドポイントも用意されるので、そちらを利用してデモデータを投入することができます。
まずは、サンプルとなるコレクションを用意します。
sample-collection.json
{
  "id": "sample-collection",
  "type": "Collection",
  "stac_version": "1.0.0",
  "description": "サンプルSTACコレクション",
  "title": "サンプルコレクション",
  "license": "CC-BY-4.0",
  "providers": [
    {
      "name": "サンプルプロバイダー",
      "description": "サンプルデータのプロバイダー",
      "roles": ["producer", "processor"],
      "url": "https://example.com"
    }
  ],
  "extent": {
    "spatial": {
      "bbox": [[135.0, 35.0, 136.0, 36.0]]
    },
    "temporal": {
      "interval": [["2020-01-01T00:00:00Z", "2023-01-01T00:00:00Z"]]
    }
  },
  "links": [
    {
      "rel": "self",
      "href": "./collection.json",
      "type": "application/json"
    }
  ]
}
次に、サンプルとなるアイテムを用意します。
sample-item.json
{
  "type": "FeatureCollection",
  "features": [
    {
      "type": "Feature",
      "stac_version": "1.0.0",
      "id": "sample-item",
      "properties": {
        "datetime": "2022-01-01T00:00:00Z",
        "title": "サンプルアイテム",
        "description": "これはサンプルSTACアイテムです"
      },
      "geometry": {
        "type": "Polygon",
        "coordinates": [
          [
            [135.5, 35.5],
            [135.5, 35.6],
            [135.6, 35.6],
            [135.6, 35.5],
            [135.5, 35.5]
          ]
        ]
      },
      "bbox": [135.5, 35.5, 135.6, 35.6],
      "links": [
        {
          "rel": "self",
          "href": "./sample-item.json",
          "type": "application/json"
        },
        {
          "rel": "collection",
          "href": "./sample-collection.json",
          "type": "application/json"
        }
      ],
      "assets": {
        "visual": {
          "href": "https://example.com/sample-image.tif",
          "type": "image/tiff",
          "title": "サンプル画像",
          "roles": ["visual"]
        }
      },
      "collection": "sample-collection"
    }
  ]
}
次に、これらのデータをAPIを利用して投入します。
curl -X POST http://localhost:8000/collections -H "Content-Type: application/json" -d @sample-collection.json
curl -X POST http://localhost:8000/collections/sample-collection/items -H "Content-Type: application/json" -d @sample-item.json
dockerが起動していれば、これでデータ登録が完了します。
次に、登録したデータを確認してみましょう。
- コレクションの確認
❯ curl -s http://localhost:8000/collections | jq
{
  "collections": [
    {
      "id": "sample-collection",
      "type": "Collection",
      "links": [
        {
          "rel": "items",
          "type": "application/geo+json",
          "href": "http://localhost:8000/collections/sample-collection/items"
        },
        {
          "rel": "parent",
          "type": "application/json",
          "href": "http://localhost:8000/"
        },
        {
          "rel": "root",
          "type": "application/json",
          "href": "http://localhost:8000/"
        },
        {
          "rel": "self",
          "type": "application/json",
          "href": "http://localhost:8000/collections/sample-collection"
        },
        {
          "rel": "http://www.opengis.net/def/rel/ogc/1.0/queryables",
          "type": "application/schema+json",
          "title": "Queryables",
          "href": "http://localhost:8000/collections/sample-collection/queryables"
        }
      ],
      "title": "サンプルコレクション",
      "extent": {
        "spatial": {
          "bbox": [
            [
              135.0,
              35.0,
              136.0,
              36.0
            ]
          ]
        },
        "temporal": {
          "interval": [
            [
              "2020-01-01T00:00:00Z",
              "2023-01-01T00:00:00Z"
            ]
          ]
        }
      },
      "license": "CC-BY-4.0",
      "providers": [
        {
          "url": "https://example.com",
          "name": "サンプルプロバイダー",
          "roles": [
            "producer",
            "processor"
          ],
          "description": "サンプルデータのプロバイダー"
        }
      ],
      "description": "サンプルSTACコレクション",
      "stac_version": "1.0.0"
    }
  ],
  "links": [
    {
      "rel": "root",
      "type": "application/json",
      "href": "http://localhost:8000/"
    },
    {
      "rel": "self",
      "type": "application/json",
      "href": "http://localhost:8000/collections"
    }
  ],
  "numberMatched": 1,
  "numberReturned": 1
}
- アイテムの確認
❯ curl -s http://localhost:8000/collections/sample-collection/items | jq
{
  "type": "FeatureCollection",
  "links": [
    {
      "rel": "collection",
      "type": "application/json",
      "href": "http://localhost:8000/collections/sample-collection"
    },
    {
      "rel": "parent",
      "type": "application/json",
      "href": "http://localhost:8000/collections/sample-collection"
    },
    {
      "rel": "root",
      "type": "application/json",
      "href": "http://localhost:8000/"
    },
    {
      "rel": "self",
      "type": "application/geo+json",
      "href": "http://localhost:8000/collections/sample-collection/items"
    }
  ],
  "features": [
    {
      "id": "sample-item",
      "bbox": [
        135.5,
        35.5,
        135.6,
        35.6
      ],
      "type": "Feature",
      "links": [
        {
          "rel": "collection",
          "type": "application/json",
          "href": "http://localhost:8000/collections/sample-collection"
        },
        {
          "rel": "parent",
          "type": "application/json",
          "href": "http://localhost:8000/collections/sample-collection"
        },
        {
          "rel": "root",
          "type": "application/json",
          "href": "http://localhost:8000/"
        },
        {
          "rel": "self",
          "type": "application/geo+json",
          "href": "http://localhost:8000/collections/sample-collection/items/sample-item-2"
        }
      ],
      "assets": {
        "visual": {
          "href": "https://example.com/sample-image.tif",
          "type": "image/tiff",
          "roles": [
            "visual"
          ],
          "title": "サンプル画像"
        }
      },
      "geometry": {
        "type": "Polygon",
        "coordinates": [
          [
            [
              135.5,
              35.5
            ],
            [
              135.5,
              35.6
            ],
            [
              135.6,
              35.6
            ],
            [
              135.6,
              35.5
            ],
            [
              135.5,
              35.5
            ]
          ]
        ]
      },
      "collection": "sample-collection",
      "properties": {
        "title": "サンプルアイテム",
        "datetime": "2022-01-01T00:00:00Z",
        "description": "これはサンプルSTACアイテムです"
      },
      "stac_version": "1.0.0"
    }
  ],
  "numberReturned": 1
}
いい感じですね!
自作のルートを追加する
stac-fastapiは非常に多機能で、さまざまな拡張機能を持っていますが、時には自分のニーズに合わせてカスタマイズしたいこともあります。
通常のFastAPIと同じように、stac-fastapiでも独自のルートを追加することができます。
以下のように、src/routes/add.pyに独自のルートを追加してみましょう。
(src/routes/__init__.pyも合わせて作成しておきましょう)
- `src/routers/add.py
import logging
from fastapi import APIRouter, Body
from pydantic import BaseModel

logger = logging.getLogger(__name__)

# APIルーターを作成
router = APIRouter(
    prefix="/add",
    tags=["Add"],
)


# リクエストボディのモデル定義
class AddPayload(BaseModel):
    x: int
    y: int


# レスポンスモデルの定義
class AddResponse(BaseModel):
    result: int


# POST /add エンドポイント
@router.post("/", response_model=AddResponse, status_code=200)
def add(payload: AddPayload = Body(...)):
    result = payload.x + payload.y
    return AddResponse(result=result)
次に、src/main.pyにこのルートを追加します。
src/main.py
from contextlib import asynccontextmanager

from fastapi import FastAPI
from fastapi.responses import ORJSONResponse


# 設定とSTAC関連クラスをインポート
from .config import settings, api_settings, postgres_settings
from .routers.add import router as add_router
from stac_fastapi.api.app import StacApi
from stac_fastapi.extensions.core import (
    FieldsExtension,
    FilterExtension,
    QueryExtension,
    SortExtension,
    TransactionExtension,
)
from stac_fastapi.pgstac.core import CoreCrudClient
from stac_fastapi.pgstac.db import close_db_connection, connect_to_db
from stac_fastapi.pgstac.transactions import TransactionsClient


# FastAPIのライフサイクルイベント
@asynccontextmanager
async def lifespan(app: FastAPI):
    # アプリケーション起動時
    await connect_to_db(app, postgres_settings=postgres_settings)
    print("Database connection established.")
    yield
    # アプリケーション終了時
    await close_db_connection(app)
    print("Database connection closed.")


# クライアントの初期化
client = CoreCrudClient()
transactions_client = TransactionsClient()


# STAC APIの拡張
extensions = [
    FieldsExtension(),
    FilterExtension(),
    QueryExtension(),
    SortExtension(),
    TransactionExtension(
        client=transactions_client, settings=settings, response_class=ORJSONResponse
    ),
]


# FastAPIアプリケーションインスタンス
app = FastAPI(
    title=settings.project_name,
    version=settings.api_version,
    description=settings.stac_fastapi_description,
    root_path=settings.root_path,
    lifespan=lifespan,
    openapi_url=api_settings.openapi_url,
    docs_url=api_settings.docs_url,
)


# STAC APIインスタンス
stac_api: StacApi = StacApi(
    app=app,
    settings=api_settings,
    client=client,
    extensions=extensions,
)


app = stac_api.app


# FastAPIアプリケーションにSTAC APIルーターを登録
app.include_router(stac_api.router)

app.include_router(add_router) # 追加!!!
APIが起動していれば、以下のようにリクエストを送信することで、独自のルートを利用できます。
❯ curl -X 'POST' \
  'http://localhost:8000/add/' \
  -H 'accept: application/json' \
  -H 'Content-Type: application/json' \
  -d '{
  "x": 0,
  "y": 1
}'
{"result":1}
これで、stac-fastapiに独自のルートを追加することができました。
まとめ
今回は、stac-fastapiを利用してSTAC APIを構築する方法を紹介しました。
stac-fastapiは非常に多機能かつ拡張性が高いですが、ドキュメントが少ないため初期構築が大変です。
この辺りまでの構築ができれば、あとはAPIを利用してデータを投入したり、独自のルートを追加したりすることができるようになります。
みなさんもstac-fastapiを利用して、STAC APIを構築してみてください!