cloudpack あら便利カレンダー 2017 の13日目です。
in-houseで社内に配布するときにチームを変更しないといけなかったり
別案件では受託開発で証明書とProvisioning Profileしかもらえないといったことはよくあります。
Target追加するのはバグの元…
Schemeを複製して配布時に変更してArchive…
そんなことしないで手作業ではなくfastlaneで簡単に配布したり、ipaを作られるようにしちゃいましょうーという記事です。
ざっくりとした方法
- 配布用のConfigurationsを作成する
- xcconfigを作成し、各種設定を追加する
- Projectの設定を変更する
- fastlaneでチーム切り替え、Automatically manage siginingなどを設定する
あとはfastlaneで配布/ipa作成するだけ!
fastlane
fastlaneインストール
qiitaに素晴らしい記事が上がっているので省きます!
参考: これから始めるfastlane
別チームでのアプリ配布設定
in-house用のものを例にして、まずはXcode上で設定を行います。
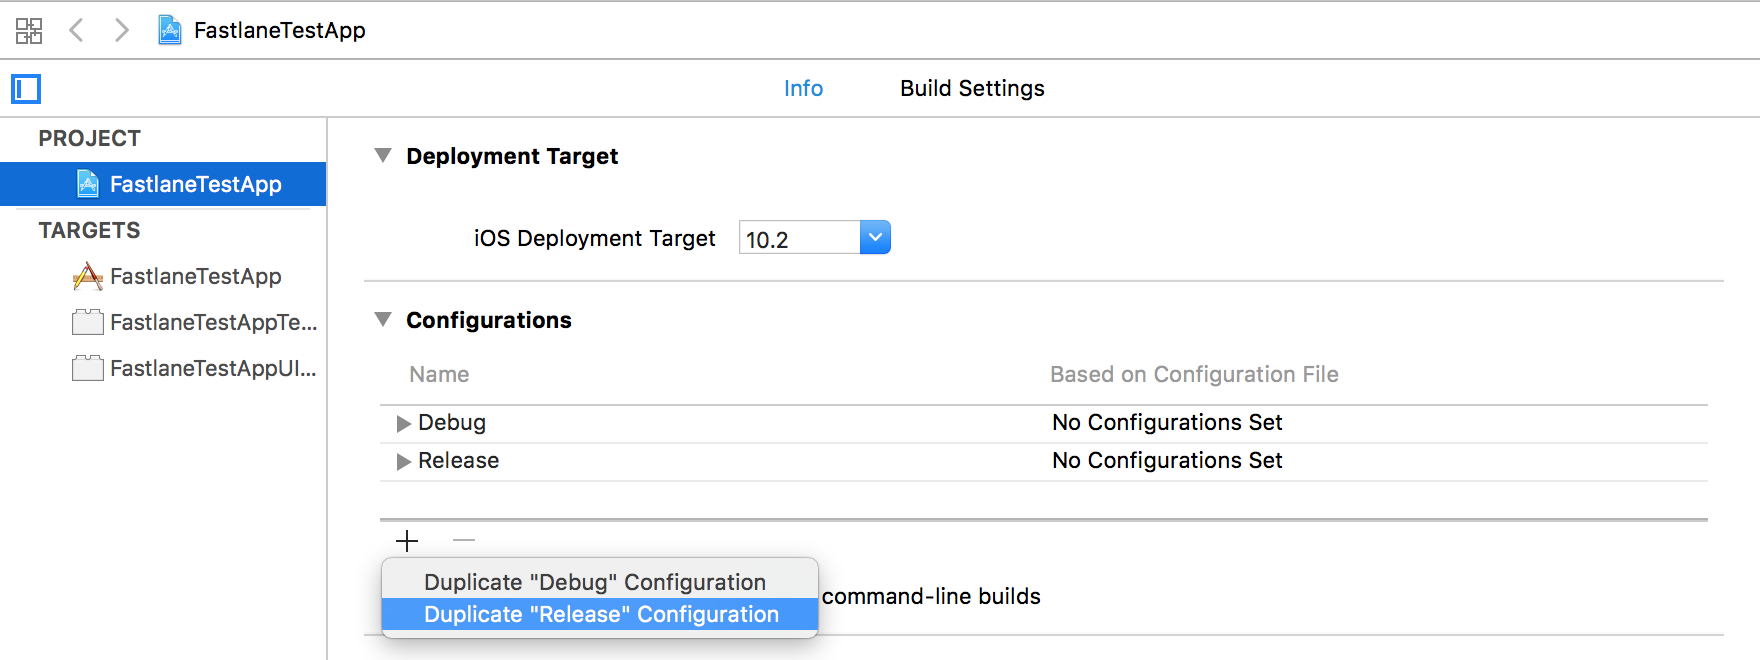
Configurationsの追加
InHouse配布用のConfigurationを追加します。
Configuration名はのちほどfastlaneでの設定に使用します。
CocoaPodsを使っている場合、作成したConfigration用のxcconfigがないため
下記のコマンドで作成しましょう。
$ pod install
xcconfig作成
各Configurations用のxcconfigを作成します。
Project navigatorでxcconfigを作成するgroupを右クリックし、 New File…を選択します。
Configuration Setting Fileを選択し、任意の名前をつけます。
xcconfig記述
作成した各xcconfigに下記の設定を行います。
- podで作成されたxcconfigの読み込み(Cocoapodsを使用している場合)
- Bundle Identifierの設定
- アプリ名の設定
// CocoaPodsを使用している場合。パスは適宜置き換えてください。
# include "Pods/Target Support Files/Pods-FastlaneTestApp/Pods-FastlaneTestApp.debug.xcconfig"

// Bundle Identifier
PRODUCT_BUNDLE_IDENTIFIER = jp.cloudpack.fastlane.debug
// アプリ名
PRODUCT_NAME = fastlane debug
xcconfig適用
反映されるように、Projectに設定します。
Project navigatorでProjectを選択し、Configurationsをそれぞれ設定します。
Cmd+Bでビルドしてパスが間違っていないことを確認します。
Projectの設定
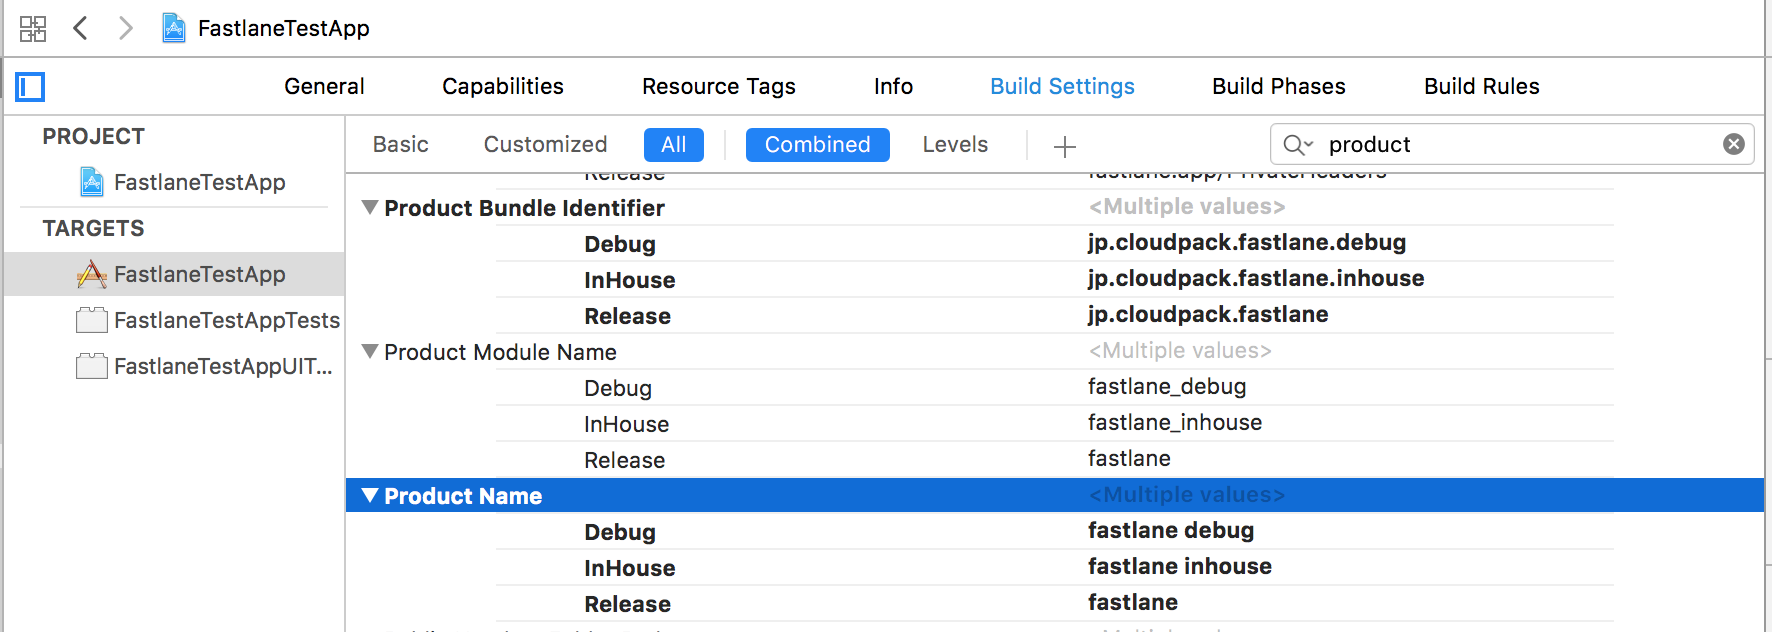
xcconfigで設定した Bundle Identifierや アプリ名はそのままでは反映されていません。
Build Settingで下記の項目に $(inherited)を設定します。
- Product Bundle Identifier
- Product Name
fastlaneの設定
fastlane初期設定
下記コマンドを実行します。
Usernameのみ入力必須で他は入力しなくてよいです。
fastlane init
fastlane/Fastfileの編集
各種パス、Configurations、チームIDを記述
platform :ios do

  APP_SCHEME = "FastlaneTestApp"
  PLIST_PATH = "./" + APP_SCHEME + "/Info.plist"
  PROJECT_NAME = APP_SCHEME + ".xcodeproj"

  # Configurations
  IN_HOUSE = "InHouse"
  RELEASE = "Release"

  # for in-house
  TEAM_ID = "**********"
  IN_HOUSE_TEAM_ID = "**********"
ビルド用lane追加
出力先やファイル名をgymで毎回設定するのは手間なので
下記のようなprivate_laneをよく使用しています。
private_lane :build do |options|
  build = get_info_plist_value(path: PLIST_PATH, key: "CFBundleVersion")
  version = get_info_plist_value(path: PLIST_PATH, key: "CFBundleShortVersionString")
  scheme = options[:scheme] || APP_SCHEME
  config = options[:config] || IN_HOUSE
  method = options[:method] || "ad-hoc"
  include_bitcode = options[:include_bitcode] || false

  gym(
    clean: true,
    configuration: config,
    scheme: scheme,
    output_directory: "./fastlane/Build/#{build}_#{version}",
    output_name: "#{scheme}_#{config}_#{build}_#{version}",
    include_bitcode: include_bitcode,
    export_method: method
  )
end
配布用のlane作成
ビルド前にチームIDを切り替えて、ビルド完了後に元のチームに戻しています。
lane :inhouse do

  # 配布用のチームIDに切り替える
  update_project_team(
    path: PROJECT_NAME,
    teamid: IN_HOUSE_TEAM_ID
  )

  # enterpriseを指定してビルド
  build(
    method: "enterprise"
  )

  # チームIDを戻す
  update_project_team(
    path: PROJECT_NAME,
    teamid: TEAM_ID
  )

  # DeployGateやCrashlyticsなどの設定はよしなに
  # deploygate(
  #   message: RELEASE_NOTE_DEV,
  #   api_token: "your api token"
  # )

  # ENV['CRASHLYTICS_API_TOKEN'] = "your api token"
  # ENV['CRASHLYTICS_BUILD_SECRET'] = "your build secret"

  # crashlytics(
  #   crashlytics_path: "./Pods/Crashlytics/iOS/Crashlytics.framework",
  #   notes: "notes",
  #   groups: ["group"]
  # )
end
アプリ配布
laneを実行してアプリ配布します。
いつもの配布どおり、配布用の証明書が必要です。
$ fastlane inhouse
release版ipaファイルの作成
配布用証明書と Provisioning Profileのみがある状態です。
このままfastlaneで作成しようとしてもチームに入っていないため作成ができません。
Automatically manage signingをオフにしてビルドするだけと思いきや
自動化するには色々設定が必要となります。
チームID、Provisioning Profile名の確認
もらった .mobileprovisionをエディタで開き Nameの値と TeamIdentifierの値をそれぞれ確認します。
<key>Name</key>
<string>fastlane test</string>
<key>TeamIdentifier</key>
<array>
  <string>**********</string>
</array>
Release.xcconfigに設定
Release.xcconfigに下記を追記します。
PROVISIONING_PROFILE_SPECIFIER = fastlane test
DEVELOPMENT_TEAM = ********** // TeamIdentifierの値
BuildSettingsの変更
XcodeでBuild Settingsを開き、各項目を設定します。
Code Signing Identity
automatically manage signingオフで配布したいConfigurationには iOS Distributionを設定します。
下記のとおりに設定しないとエラーとなり、ここでしばらくハマりました。。
| Automatically manage signing | Any iOS SDKの設定 |
|---|---|
| オン | iOS Developer |
| オフ | iOS Distribution |
Development Team
オフで配布したいConfigurationのみ $(inherited)を設定します。
Other...を選択すると値の設定ができます。
Provisioning Profileの設定
すでに設定したものが反映されている場合はそのままでOKです。
もし別のものが入っている場合は $(inherited)を設定しましょう。
リリース用ipa作成用lane作成
チームIDの変更とほぼ同じく、ビルドの前にAutomatically manage signingをオフにし、
ビルド後にオンに戻します。
Google先生に聞くと fastlane-plugin-update_project_codesigning というプラグインが出てきますが、
2.20.0 でfastlaneに取り入れられているのでそちらを使用します。
lane :release do

  # Automatic code signingをオフにする
  automatic_code_signing(
    path: PROJECT_NAME,
    use_automatic_signing: false
  )

  # app-store用にビルド
  build(
    config: RELEASE,
    method: "app-store"
  )

  # オンに戻す
  automatic_code_signing(
    path: PROJECT_NAME,
    use_automatic_signing: true
  )

end
ipa作成
laneを実行してipaを作成します。
$ fastlane release
まとめ
忙しい時期になるとアプリ配布の時間がもったいなく感じます
最初に設定しておくと後々(リリース前など)とても楽になります。
今回は触れていませんがCIとの連携もいいですね。


