はじめに
業務の中でWebサーバーなんぞ詳しくないのに、
PoC用にWebサーバーを立てろ(しかも秒で)と言われた経験がある方にswagger-codegenをご紹介します。
(秒では立てられないかもしれませんが、API仕様さえyamlで書ければ簡単にサーバーまで立てられます。)
swagger-codegenについて
swagger-codegenはYAML(or JSON)でAPI仕様を定義すると、
そのAPI定義通りにモックサーバーを作り、
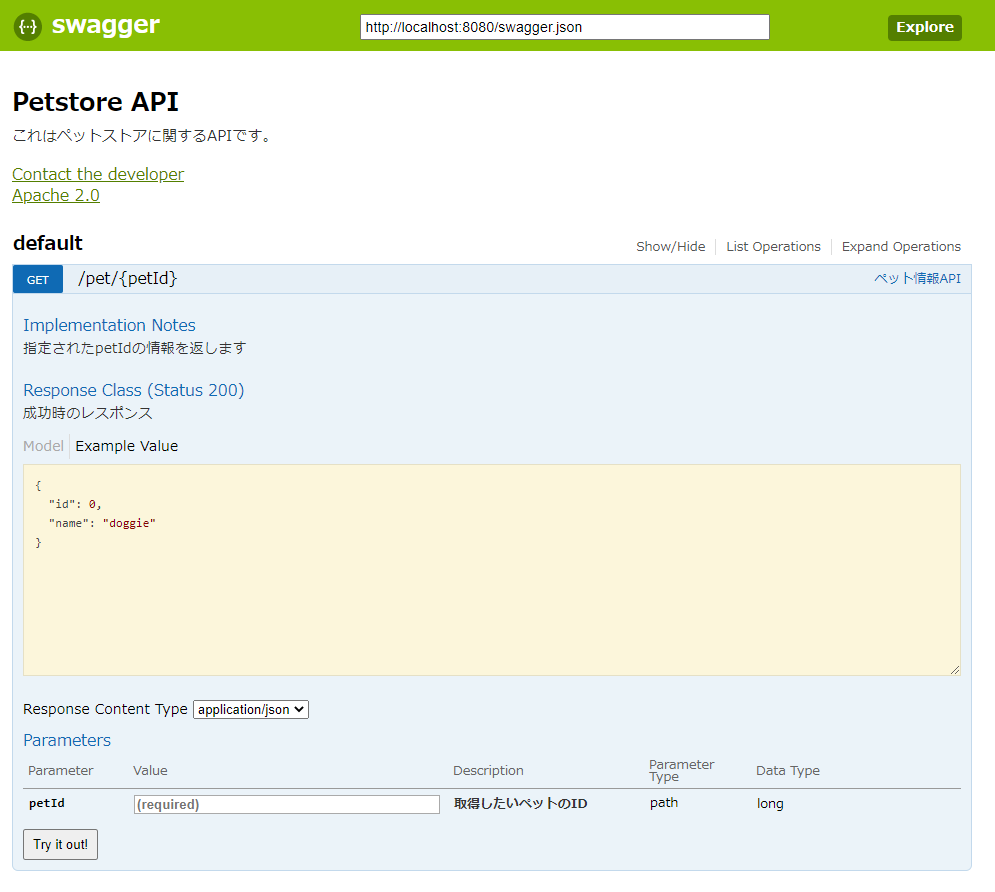
さらに、以下のようにそのAPIを叩けるブラウザUI画面を作成できます。
使用環境
- OS ... Windows 10 Home(64bit)
- Python ... conda環境
- その他、JREが必要
JREのインストール
JREがない場合は以下よりダウンロード&インストールをする。
swagger-codegen-cli.jarの取得
mavenのレポジトリから取得する。
今回は以下の2.4.15を使用した。
API仕様をswagger.yamlに定義
API仕様を定義してあげると、その定義に沿ってモックサーバーができます。
以下のようなファイルをどこか適当に作成します。
swagger: "2.0"
info:
  description: "これはペットストアに関するAPIです。"
  version: "1.0.0"
  title: "Petstore API"
  termsOfService: "http://swagger.io/terms/"
  contact:
    email: "apiteam@swagger.io"
  license:
    name: "Apache 2.0"
    url: "http://www.apache.org/licenses/LICENSE-2.0.html"
paths:
  /pet/{petId}:
    get:
      summary: "ペット情報API"
      description: "指定されたpetIdの情報を返します"
      parameters:
      - name: "petId"
        in: "path"
        description: "取得したいペットのID"
        required: true
        type: "integer"
        format: "int64"
      responses:
        200:
          description: "成功時のレスポンス"
          schema:
            type: "object"
            properties:
              id:
                type: "integer"
                format: "int64"
              name:
                type: "string"
                example: "doggie"
swagger.yml内の記述の意味は以下をご参考にしてください。
モックサーバーを作成
今回は慣れ親しんだpythonを使いたいので、pytoh-flaskでモックサーバーを作成します。
> java -jar {ダウンロードしたjarファイル} generate -i swagger.yaml -l python-flask -o test-server
-lオプションを変えればGoでもNode.jsでもRuby on Railsでもなんでも作れます。
他に-lオプションに何があるかは以下を参考にしてください。
作成されたフォルダ構成
python-flaskの場合、こんな感じでモックサーバーができます。
Dockerfileもできていますので、Dockerコンテナにすることも可能です。
> tree server
server
├── Dockerfile
├── README.md
├── git_push.sh
├── requirements.txt
├── setup.py
├── swagger_server
│   ├── __init__.py
│   ├── __main__.py
│   ├── controllers
│   │   ├── __init__.py
│   │   └── default_controller.py
│   ├── encoder.py
│   ├── models
│   │   ├── __init__.py
│   │   ├── base_model_.py
│   │   └── inline_response200.py
│   ├── swagger
│   │   └── swagger.yaml
│   ├── test
│   │   ├── __init__.py
│   │   └── test_default_controller.py
│   └── util.py
├── test-requirements.txt
└── tox.ini
この中で、実際の処理を記載するのは、default_controller.pyのpet_pet_id_getの部分になります。
import connexion
import six

from swagger_server.models.inline_response200 import InlineResponse200  # noqa: E501
from swagger_server import util


def pet_pet_id_get(petId):  # noqa: E501
    """ペット情報API

    指定されたpetIdの情報を返します # noqa: E501

    :param petId: 取得したいペットのID
    :type petId: int

    :rtype: InlineResponse200
    """
    return 'do some magic!'
Windows上のconda環境で動かしてみる。
必要なパッケージをインストールします。
swagger-codegenによって作られた環境にはpipのrequirements.txtしか書いていませんが、
conda環境では以下をインストールすれば動かすことができます。
> conda install connexion
> conda install swagger-ui-bundle
起動します。
> cd test-server
> python -m swagger_server
以下にブラウザからアクセスして画面が見えたら起動できています。
以上、お疲れさまでした!
