はじめに
Xcode6とswiftに慣れる練習課題として書いています。
UINavigationContollerの制御は、戻るボタン(leftButton)を使わない場合の方が珍しいはずです。
- segue、actionをstoryboardで設定する方法
- NavigationContollerのカスタム化によるsegue利用時のfuncの呼ばれ方の確認
- segue内でのアニメーション指定
以上をつらつらと書いてみました。
長文になってしまいましたが、どなたかの参考になれば幸いです。
8/28 Xcode6β5でコードが変わっていたところを修正しています。
9/8 Xcode6β7でコードが変わっていたところを修正しています。
9/28 Xcode6.0.1でコードが変わっていたところを修正しています。
10/20 Xcode6.1でprintlnで使用しているNSDateのclass構成が変っていたため修正しています。
スタンダードな遷移
swiftでアニメーションのカスタマイズを書くことをゴールに
一般的な遷移を書く練習からはじめます
storyboard
ViewControllerとSecondViewController間のSegueには
"next"とIdentifierをつけて
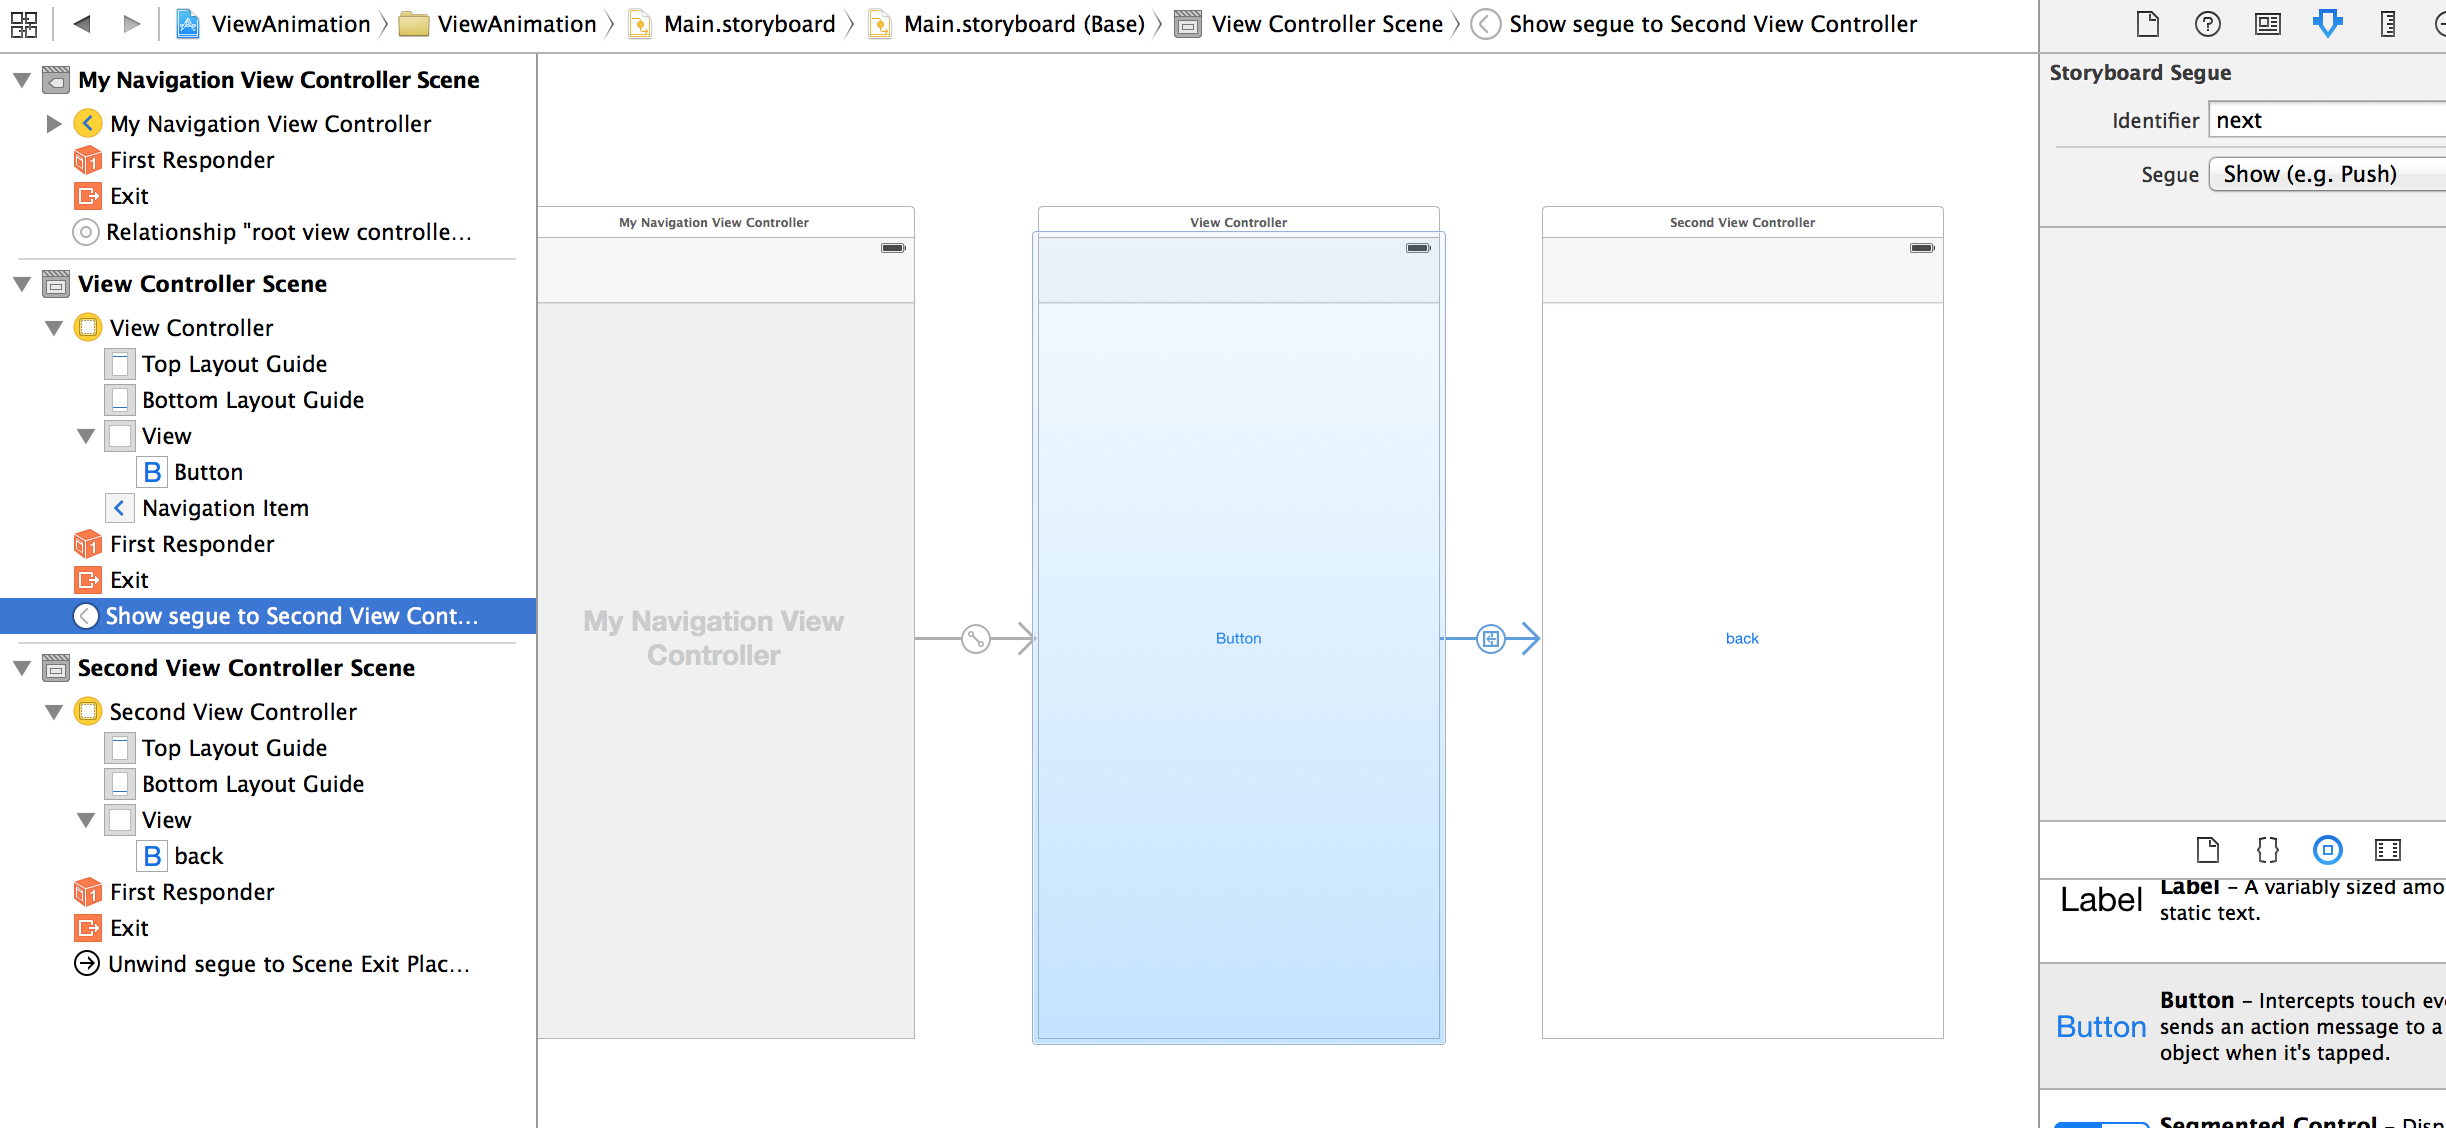
unwindSegueをつけたSecondViewController上で"back"としています。
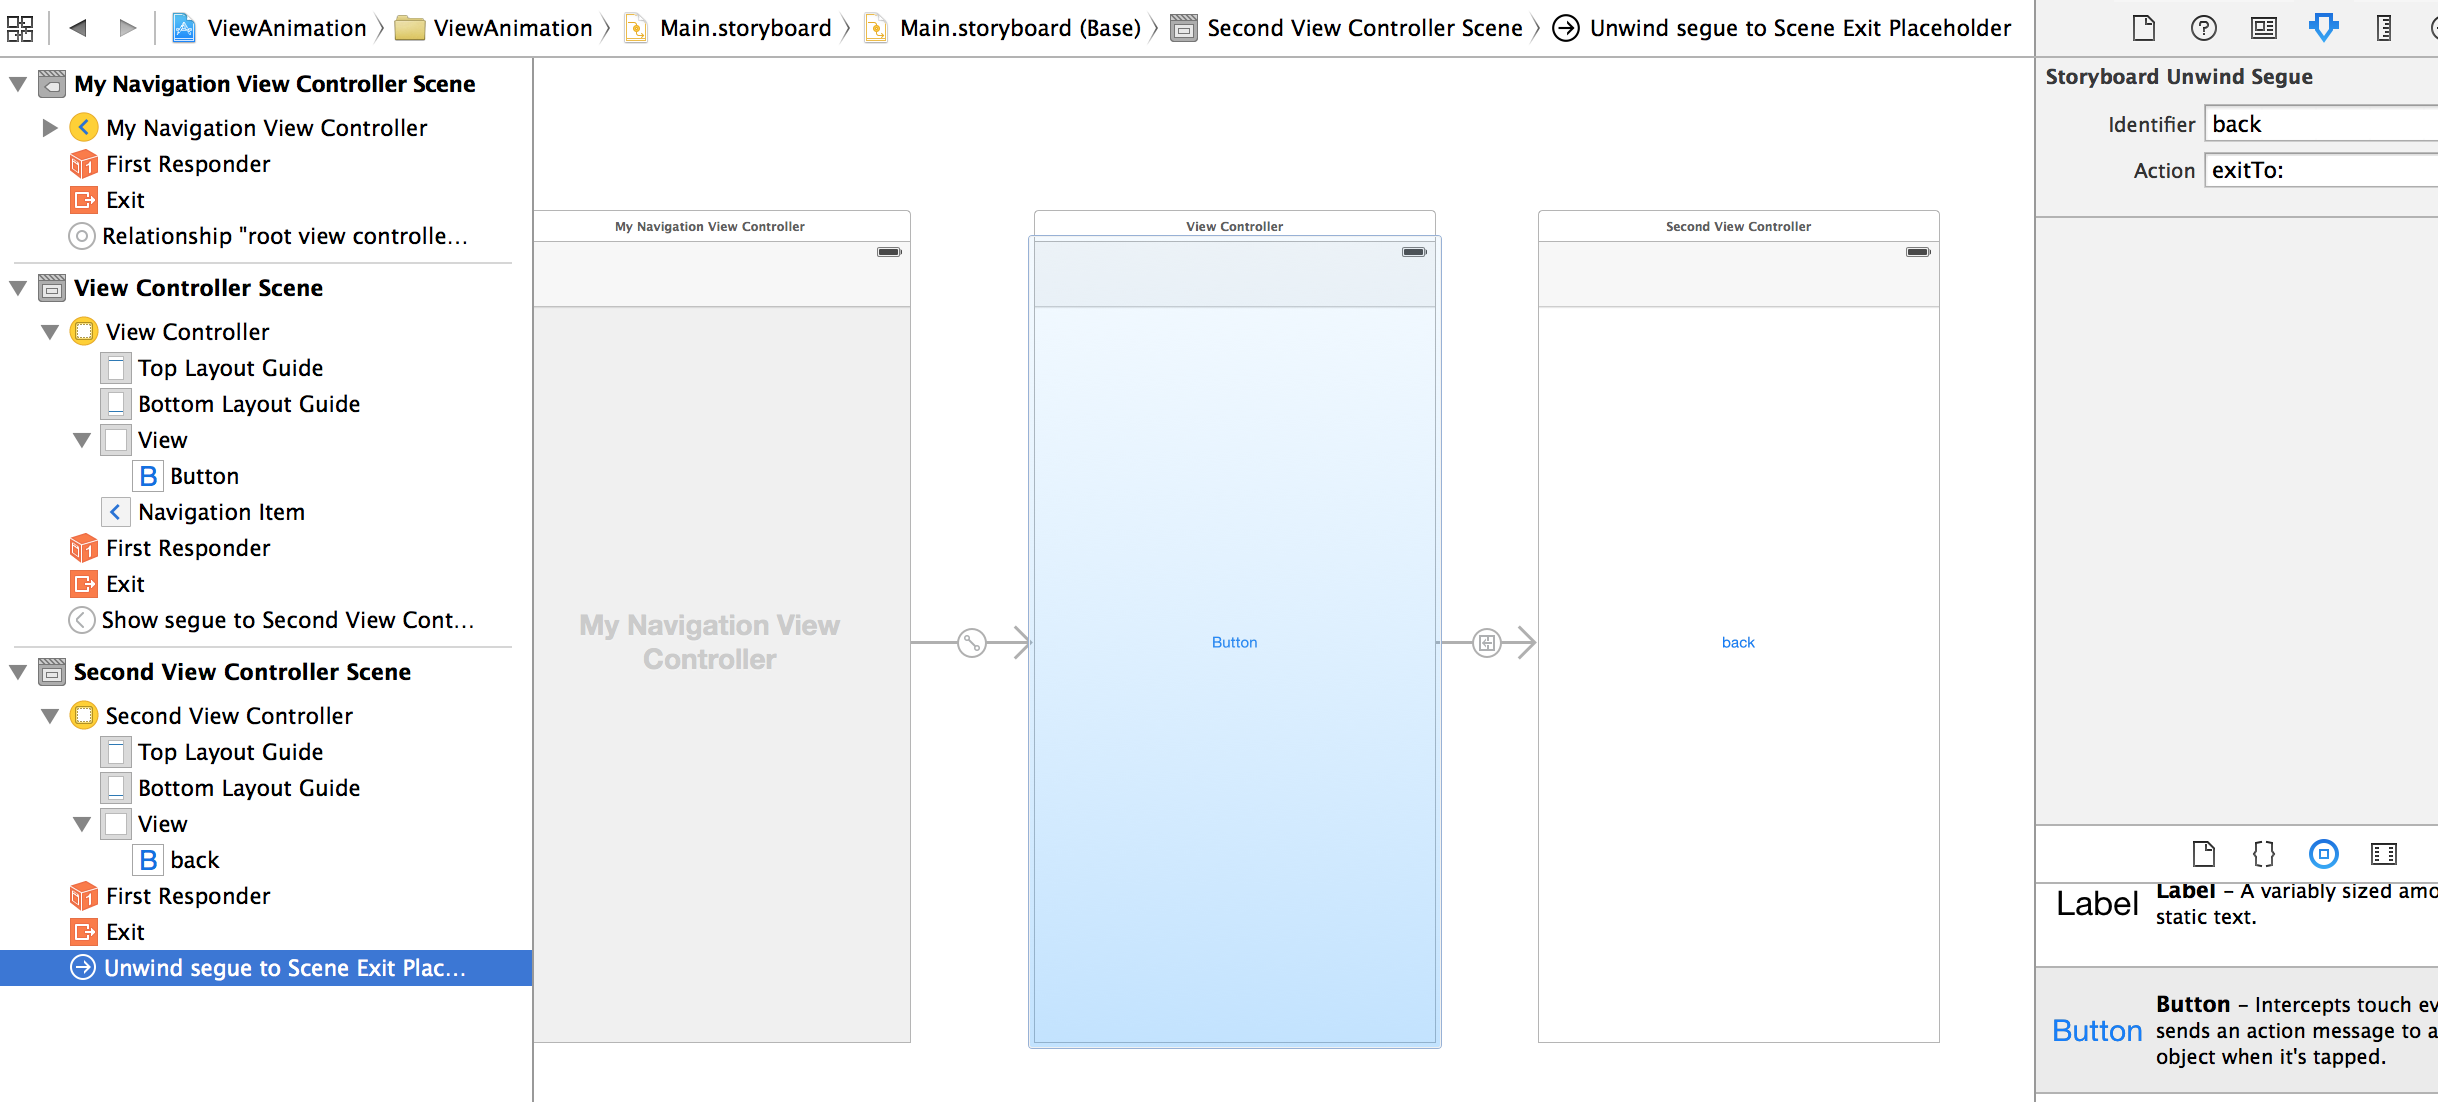
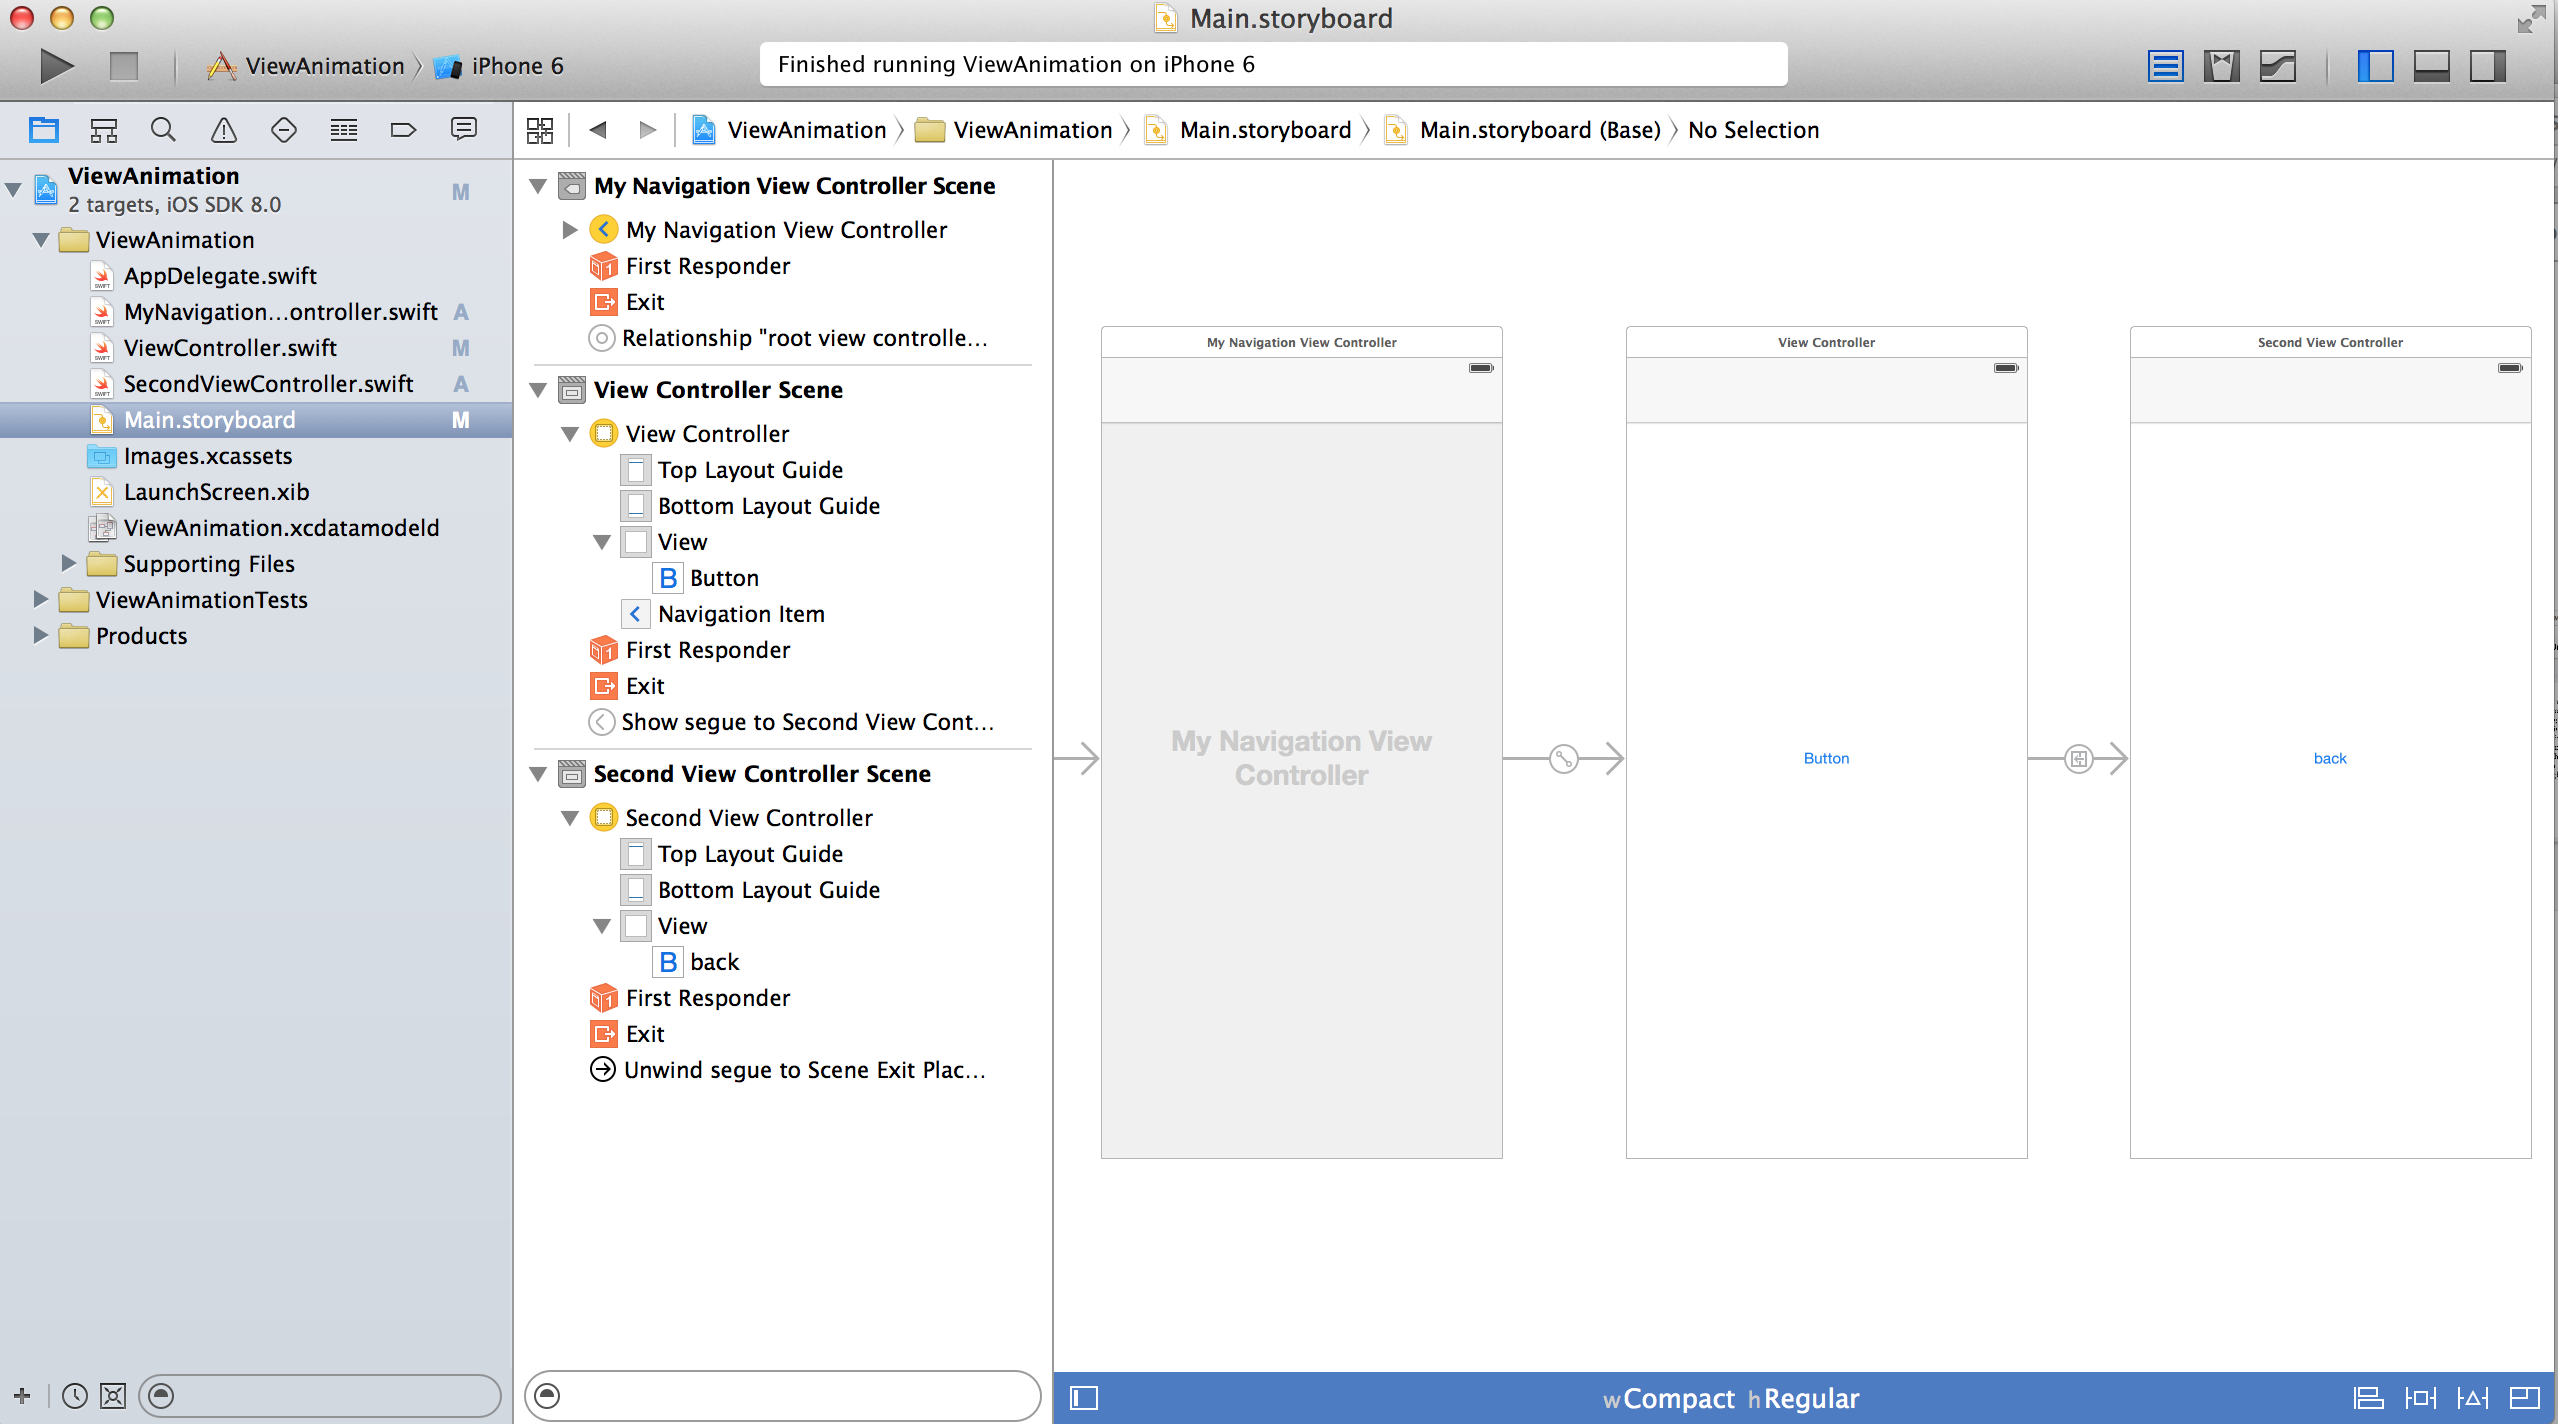
全体的の構成下記の通りです
ViewController
class ViewController: UIViewController {

    override func viewDidLoad() {
        super.viewDidLoad()
        // Do any additional setup after loading the view, typically from a ni
    }

    override func didReceiveMemoryWarning() {
        super.didReceiveMemoryWarning()
        // Dispose of any resources that can be recreated.
    }

    override func prepareForSegue(segue: UIStoryboardSegue, sender: AnyObject!) {
        if (segue.identifier == "next") {
        }
    }

    @IBAction func push(sender : UIButton) {
        performSegueWithIdentifier("next",sender: nil)
    }

    //unwind
    @IBAction func exitTo(segue: UIStoryboardSegue) {
        if (segue.identifier == "back") {
        }

    }
}
カスタマイズした遷移
push、popしたNavigationContollerの動作を左右から上下に変更します。
CATransitionを使う
QuartzCoreが必要でした。
β7以前に不要になっていることを確認したので、importは不要です。
NavigationController
横移動のアニメーションがついてしまったので、サブクラスでoverrideして止めています。
他に、NavigationBar上の戻るボタンを使う場合の実装を追加していますが、完全ではありません。Second以外の前の画面に戻る画面遷移のときに同じアニメーションを実行します。この場合は戻るボタンのところにカスタムボタンを付け・・・という実装が良いかと思います。どうでしょうか。
元のViewControllerへ追加
import UIKit

class ViewController: UIViewController {

    override func viewDidLoad() {
        super.viewDidLoad()
        // Do any additional setup after loading the view, typically from a nib.
    }

    override func didReceiveMemoryWarning() {
        super.didReceiveMemoryWarning()
        // Dispose of any resources that can be recreated.
    }

    @IBAction func push(sender : UIButton) {
        performSegueWithIdentifier("next",sender: nil)
    }

    override func prepareForSegue(segue: UIStoryboardSegue, sender: AnyObject!) {
        if (segue.identifier == "next") {
            // pass data to next view
            let transition: CATransition = CATransition()
            transition.duration = 1.0
            transition.type = kCATransitionMoveIn
            transition.subtype = kCATransitionFromBottom

            self.navigationController!.view.layer.addAnimation(transition,forKey: kCATransition)
        }
    }

    //SecondViewController上のボタンから戻るときに通ります
    @IBAction func exitTo(segue: UIStoryboardSegue)
    {
        if (segue.identifier == "back") {
            // pass data to first view
            let transition: CATransition = CATransition()
            transition.duration = 1.0
            transition.type = kCATransitionMoveIn
            transition.subtype = kCATransitionFromTop

            self.navigationController!.view.layer.addAnimation(transition,forKey: kCATransition)
        }
    }
}
import UIKit

class SecondViewController: UIViewController {

    override func viewDidLoad() {
        super.viewDidLoad()

        // Do any additional setup after loading the view.
    }

    override func viewDidAppear(animated: Bool) {
        super.viewDidAppear(false)

    }
    override func didReceiveMemoryWarning() {
        super.didReceiveMemoryWarning()
        // Dispose of any resources that can be recreated.
    }

    @IBAction func back(sender : UIButton) {
        performSegueWithIdentifier("back",sender: nil)
    }
}
import UIKit

class MyNavigationViewController: UINavigationController {

    override func viewDidLoad() {
        super.viewDidLoad()

        // Do any additional setup after loading the view.
    }

    override func didReceiveMemoryWarning() {
        super.didReceiveMemoryWarning()
        // Dispose of any resources that can be recreated.
    }

    override func pushViewController(viewController: UIViewController, animated: Bool) {
        super.pushViewController(viewController, animated: false)
    }

    //NavigationBar上の戻るボタンで戻るときに通ります
    override func popViewControllerAnimated(animated: Bool) -> UIViewController{

        let transition: CATransition = CATransition()
        transition.duration = 1.0
        transition.type = kCATransitionMoveIn
        transition.subtype = kCATransitionFromTop

        self.view.layer.addAnimation(transition,forKey: kCATransition)
        return super.popViewControllerAnimated(false)!
    }
}
戻るボタンでの遷移
NavigationBar上の戻るボタンを使う場合の実装で不完全だった部分を補足します。
前の画面に戻る画面遷移のときに一律同じアニメーションを実行、ではなく個別の画面で実装できるよう、戻るボタンのところにカスタムボタンを付ける方針で進めます。
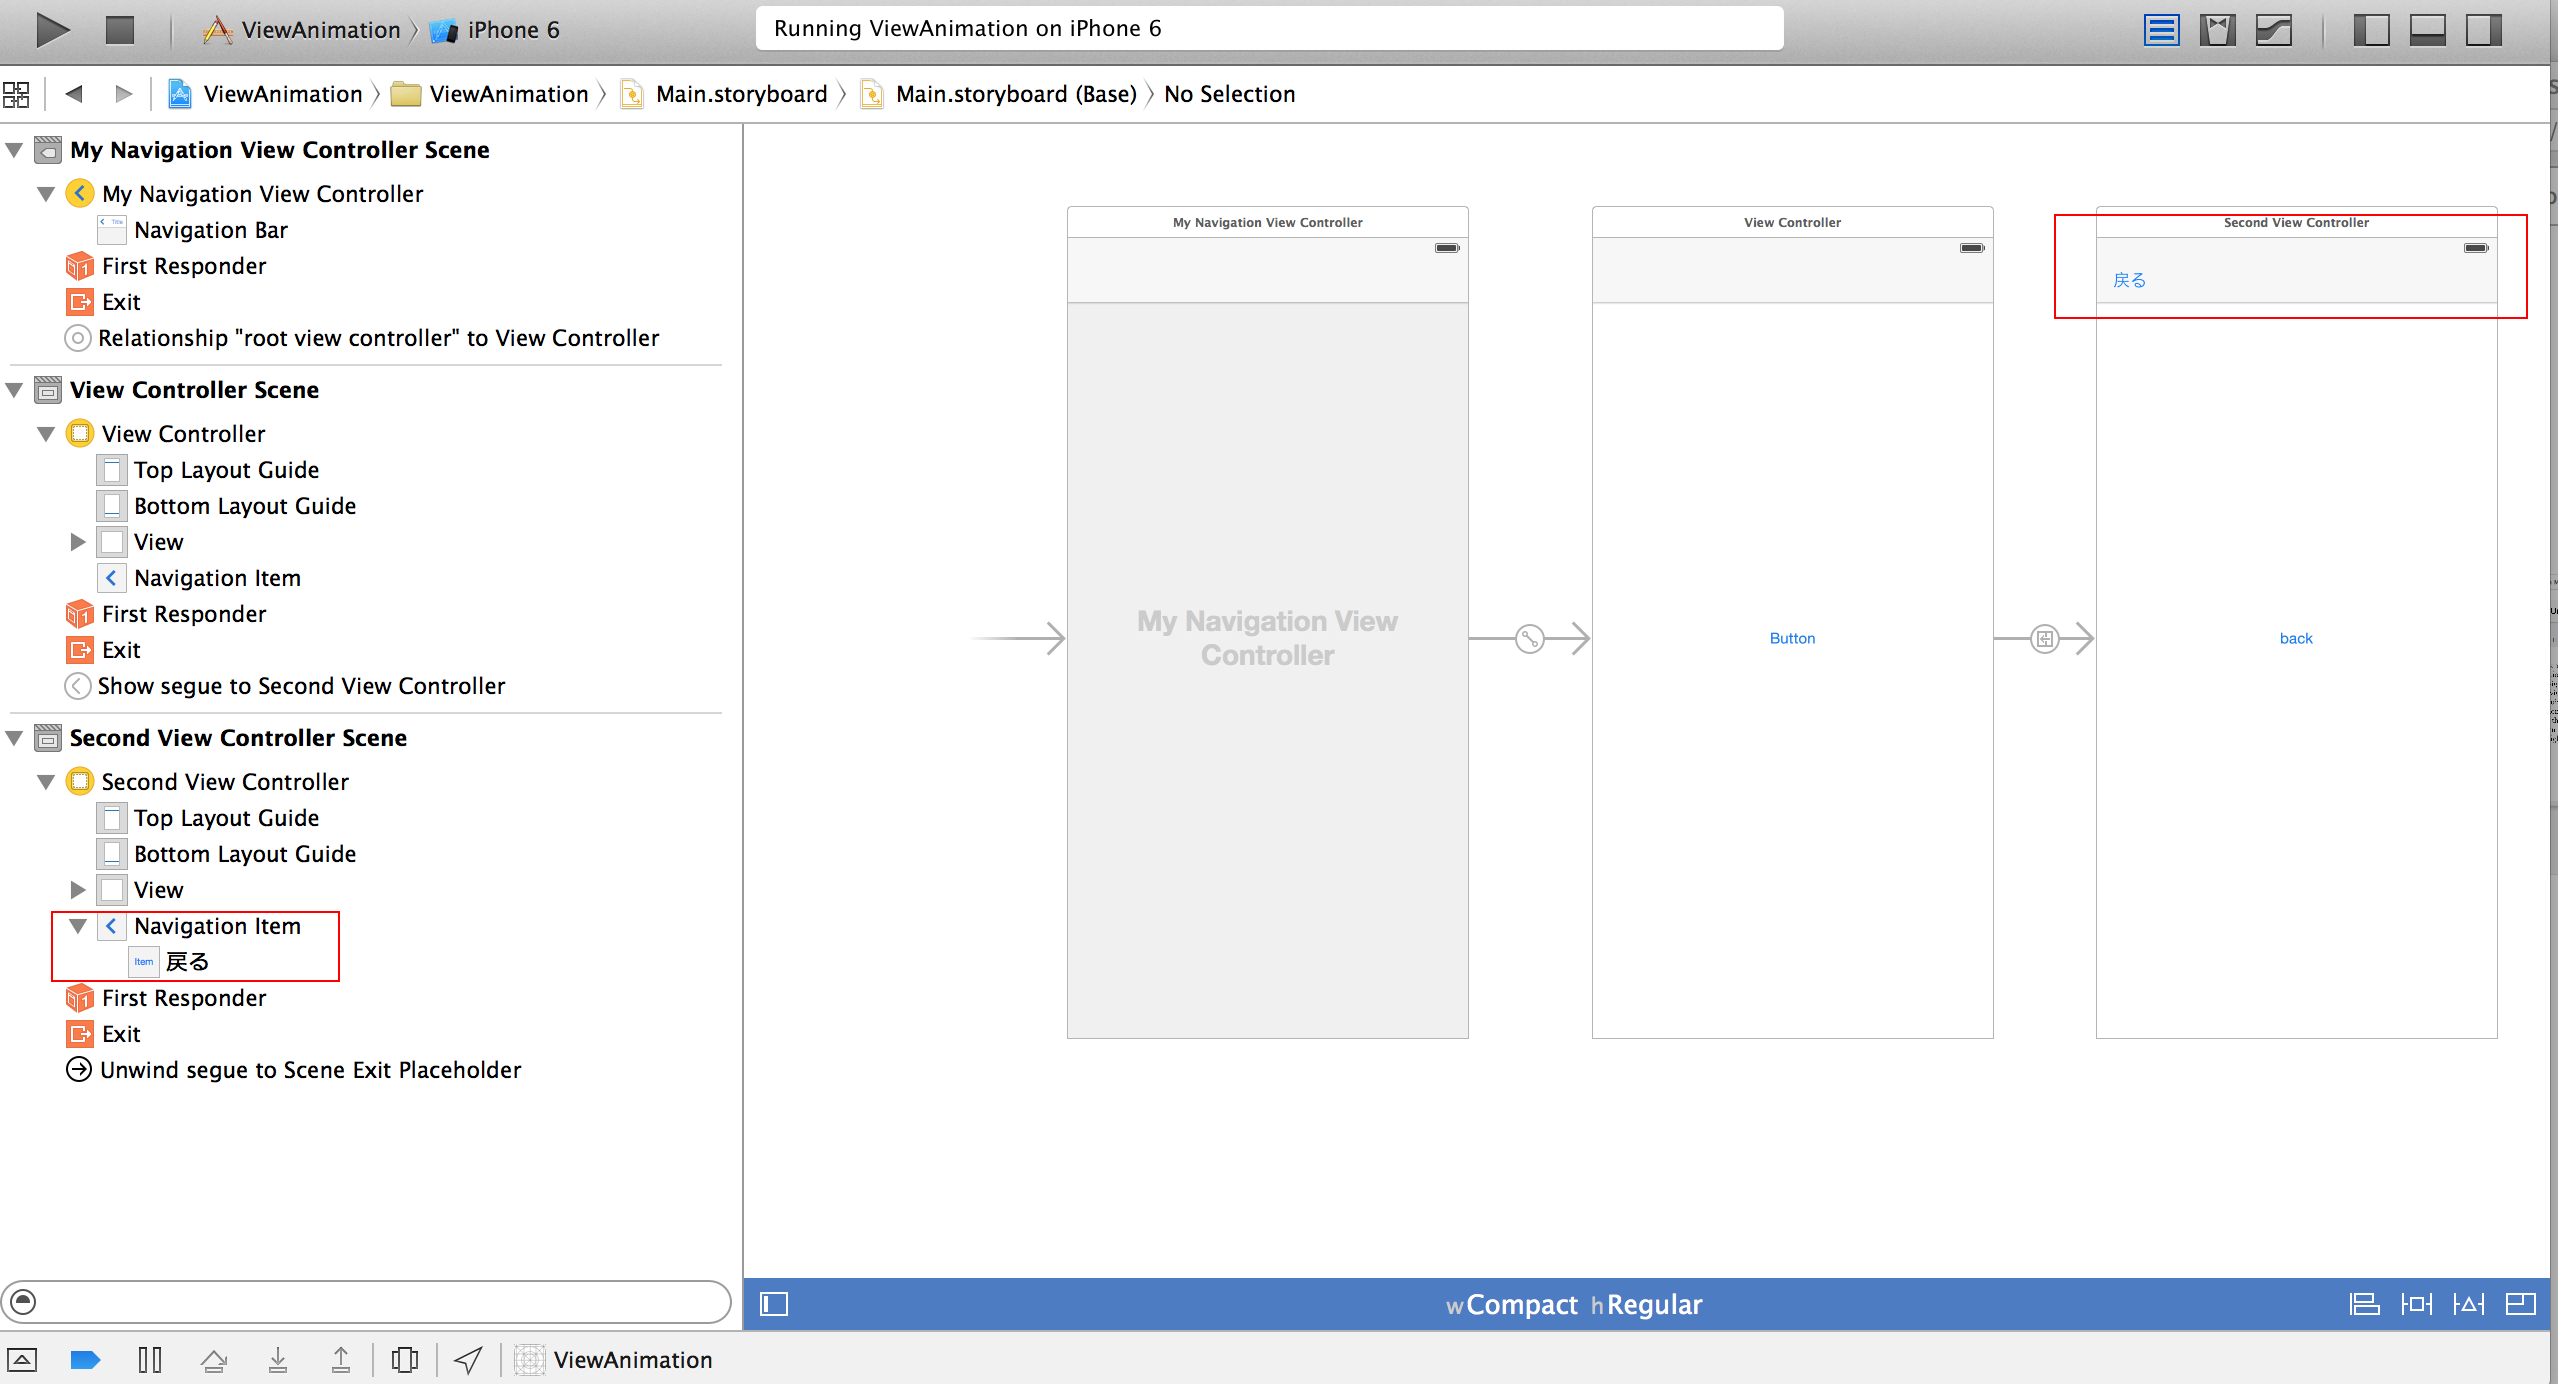
赤枠の部分に
- NavigationItem
- BarButtonItem
を追加しています。
ViewController
(1) Unwindの処理からAnimationをSecondViewControllerのprepareForSegueに移動させます。
(2) segueでunwindされた場合に呼ばれないnavigationControllerのpopViewControllerAnimatedを呼びます。
import UIKit

class ViewController: UIViewController {

    override func viewDidLoad() {
        super.viewDidLoad()
        // Do any additional setup after loading the view, typically from a nib.
    }

    override func didReceiveMemoryWarning() {
        super.didReceiveMemoryWarning()
        // Dispose of any resources that can be recreated.
    }

    @IBAction func push(sender : UIButton) {
        performSegueWithIdentifier("next",sender: nil)
    }

    override func prepareForSegue(segue: UIStoryboardSegue, sender: AnyObject!) {
        let transition: CATransition = CATransition()
        if (segue.identifier == "next") {
            transition.duration = 1.0
            transition.type = kCATransitionMoveIn
            transition.subtype = kCATransitionFromTop
            self.navigationController!.view.layer.addAnimation(transition,forKey: kCATransition)
        }
        println(__FUNCTION__, __LINE__)
    }

    @IBAction func exitTo(segue: UIStoryboardSegue)
    {
        if (segue.identifier == "back") {
            // segue使用時はpopViewControllerAnimatedが呼ばれないので呼ぶ
            self.navigationController?.popViewControllerAnimated(false);
            println(__FUNCTION__, __LINE__)
        }
    }
}
SecondViewController
(1) ViewControllerから移動させたprepareForSegueを追加して
segueでの遷移時にアニメーションをつけるよう統一します。
(2) NavigationBar、View上のボタンにIBActionを用意してstoryboardで接続します。
※ログの出力のため分けていますが指定する@IBActionは下記の"func backButton(sender : UIButton) "ひとつで間に合います。
import UIKit

class SecondViewController: UIViewController {
    @IBOutlet weak var leftButtonItem: UIBarButtonItem!

    override func viewDidLoad() {
        super.viewDidLoad()

        // Do any additional setup after loading the view.
    }

    override func didReceiveMemoryWarning() {
        super.didReceiveMemoryWarning()
        // Dispose of any resources that can be recreated.
    }

    @IBAction func backButton(sender : UIButton) {
                println(__FUNCTION__, __LINE__)
                performSegueWithIdentifier("back",sender: nil)
    }

    @IBAction func returnByNavigation(sender: AnyObject) {
        println(__FUNCTION__, __LINE__)
        performSegueWithIdentifier("back",sender: nil)
    }

    override func prepareForSegue(segue: UIStoryboardSegue, sender: AnyObject!) {
        let transition: CATransition = CATransition()
        if (segue.identifier == "back") {
            transition.duration = 1.0
            transition.type = kCATransitionMoveIn
            transition.subtype = kCATransitionFromBottom
            self.navigationController!.view.layer.addAnimation(transition,forKey: kCATransition)
        }
        println(__FUNCTION__, __LINE__)
    }
}
MyNavigationController
本当はこのクラスは使わないようにしたいのですが、pushするときのアニメーションが今の実装からは切れないので、必要です。segueをカスタマイズすれば不要にできるかも。
アニメーションの実行の順番を確認するためにも最初は作った方が良いかと思います。
import UIKit

class MyNavigationViewController: UINavigationController {

    override func viewDidLoad() {
        super.viewDidLoad()

        // Do any additional setup after loading the view.
    }

    override func didReceiveMemoryWarning() {
        super.didReceiveMemoryWarning()
        // Dispose of any resources that can be recreated.
    }

    override func pushViewController(viewController: UIViewController, animated: Bool) {
        println(__FUNCTION__, __LINE__)
        super.pushViewController(viewController, animated: false)
    }

    override func popViewControllerAnimated(animated: Bool) -> UIViewController{
        println(String(NSDate.date().description),__FUNCTION__, __LINE__)
        return super.popViewControllerAnimated(animated)!
    }
}
UIStoryboardSegueを使う
UIViewController内でUIStoryboardSegueをカスタム化することで
アニメーションの制御のみために使用していたNavigationControllerの拡張クラスを捨てることが出来ます。
import UIKit

class ViewController: UIViewController {

    override func viewDidLoad() {
        super.viewDidLoad()
        // Do any additional setup after loading the view, typically from a nib.
    }

    override func didReceiveMemoryWarning() {
        super.didReceiveMemoryWarning()
        // Dispose of any resources that can be recreated.
    }

    @IBAction func push(sender : UIButton) {
        performSegueWithIdentifier("next",sender: nil)
    }

    override func prepareForSegue(segue: UIStoryboardSegue, sender: AnyObject!) {
        let transition: CATransition = CATransition()
        if (segue.identifier == "next") {
            transition.duration = 1.0
            transition.type = kCATransitionMoveIn
            transition.subtype = kCATransitionFromTop
            self.navigationController!.view.layer.addAnimation(transition,forKey: kCATransition)
        }
        let nextViewController: SecondViewController = segue.destinationViewController as SecondViewController
        println(__FUNCTION__, __LINE__)
    }

    @IBAction func exitTo(segue: UIStoryboardSegue)
    {
        if (segue.identifier == "back") {
            // 戻ったあとの処理をなにか書く
            self.navigationController?.popViewControllerAnimated(false);
            println(__FUNCTION__, __LINE__)
        }
    }
}

class PushNoAnimationSegue: UIStoryboardSegue {
    override func perform(){
        self.sourceViewController.navigationController??.pushViewController(self.destinationViewController as UIViewController, animated: false)
    }
}
ViewControllerに追加したCustomSegueをstoryboardで指定します。
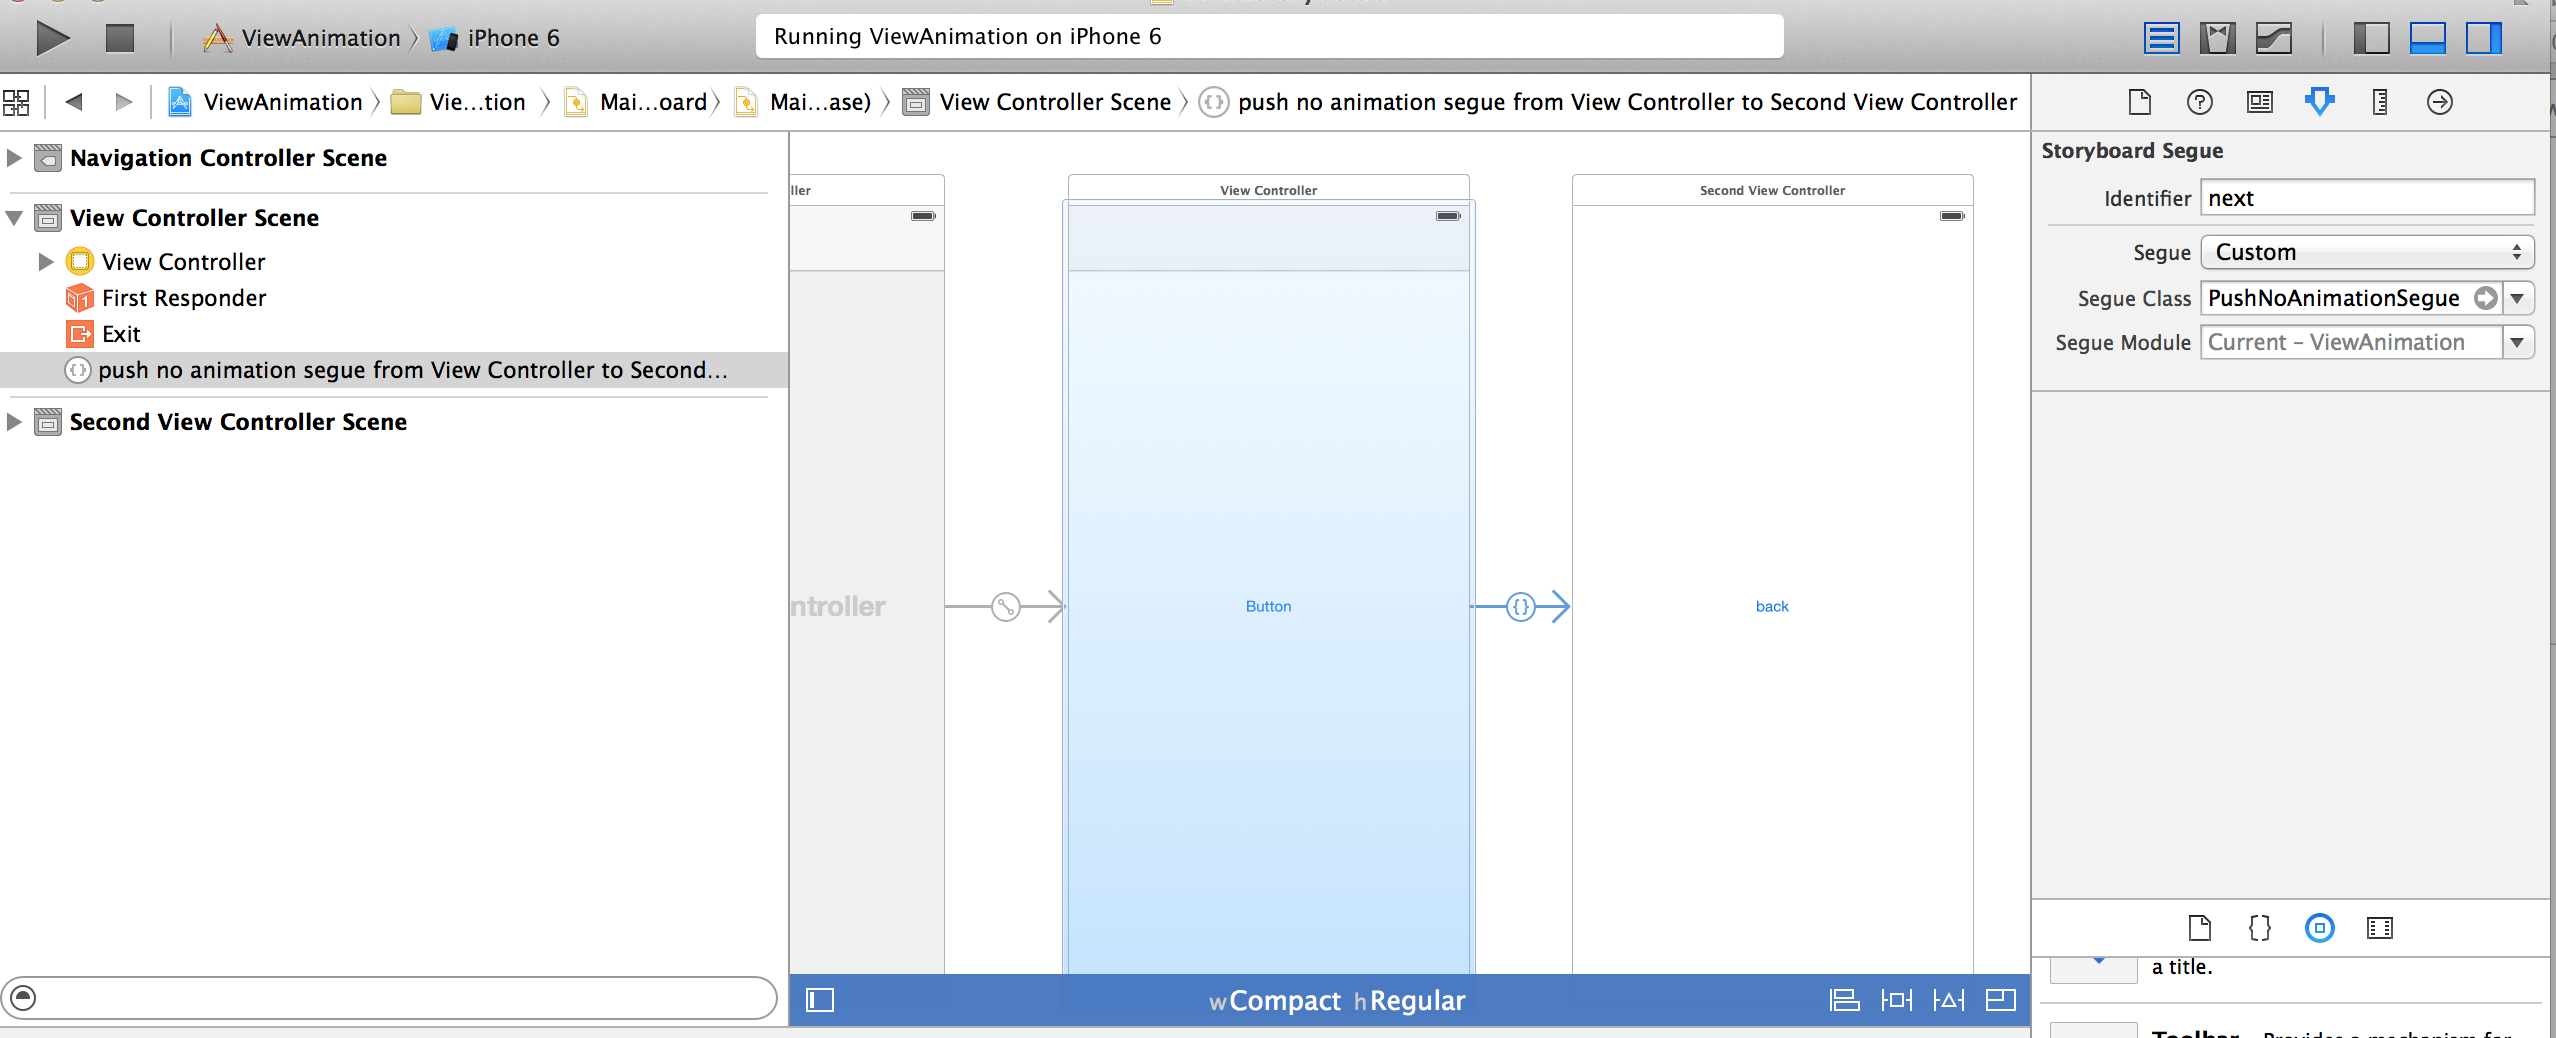
これで使用していたMyNavigtionControllerをstoryboardから外すことができます。
実装ポイント
ヘッダーをみる
例えば
let transition: CATransition = CATransition()
transition.duration = 1.0
transition.type = "moveIn"
transition.subtype = "fromTop"
transition.typeやsubtypeに設定するパラメータに迷ったときは
commandを押しながらで目的のプロパティをクリックすると
目的のプロパティを持つクラスのhファイルに遷移します。コメントに必要なパラメータが書かれていることがあります。
objective-cのフローを踏襲
今回そのコメント通りに書いてみましたが、よく見ると同じヘッダーファイルにkではじまる常数があるじゃないですか・・・。
書き換えましょう!
let transition: CATransition = CATransition()
transition.duration = 1.0
transition.type = kCATransitionMoveIn
transition.subtype = kCATransitionFromTop
これでだいぶObjective-cで書いた時のコードと似た感じになりました。
unwindやNavigationControllerでの呼び出されるfunc
遷移先から遷移元に戻ったときの動作については
(1)ViewContoller上のボタンで戻る
(2)NavigationControllerの”戻るボタン”で遷移
この二つは挙動がだいぶ違うのでカスタム化の必要があります。
unwindのコードが実行されているのはsegueで移動した時だけ。
popViewControllerAnimatedが呼ばれるのはデフォルトの戻るボタン利用時なので、意識して実行させる
| 遷移 | unwind segue | pushViewController | popViewControllerAnimated |
|---|---|---|---|
| segueあり | 呼ばれる | segue内で固定:true(カスタム化で設定可) | 実装なしでは呼ばれない |
| segueなし | 呼ばれない | 設定可能 | animatedのBool設定可能 |
Custom Segue Class
UIStoryboardSegueが持っているのはperform()だけで、用途は遷移に関する記述です。
各ViewControllerで書いているCATransitionはこちらにまとめてしまってもすっきりしそうです。
ViewContorllerと同じソース内でClass記述できるのでまとめるのも分割して他のViewContollerと共通クラスにするのも自由度が高そうです。
さいごに
swiftの仕様に振り回されたコードの変更が申し訳ないです。
!とか?とかの調整は、そろそろまとまったかと思って更新しましたが、変らない可能性もゼロではないので、モチベーションが下がりがちです。
これで一旦更新は終了しますので、また進展がありましたら、別記事にまとめます。