はじめに
この前リリースしたAR Mini SketchというアプリでUIImageView上の画像をユーザーが指定した範囲で切り抜くという処理があるが、画像によっては指定通りに切り抜かれないという不具合があった。
原因を調べてみたところ、CGImage.cropping()の際の範囲指定には元画像の向きを考慮しなければいけないことが分かったため、注意点を備忘として残しておく。
CGImageクラスとは
CGImageクラスとはCore Graphics Imageの略。
bitmapイメージとして画像のマスク処理や切抜き処理を行うことができる。
尚、このクラスにはwidthとheightというプロパティはあるがorientationというプロパティはない。
UIImageクラスとは
iOSアプリ上で画像を操作する際の最も一般的なクラス。
リソース上の画像ファイルを読み込む際も大抵このクラスのインスタンスとして操作することが多い。
UIImage.cgImageでこの画像のGCImageを参照することができる。
尚、このクラスにはorientationというプロパティがあり画像の向き情報を保持している。
CGImage.cropping()とは
定義
func cropping(to rect: CGRect) -> CGImage?
rectで指定した範囲を切り抜いて、新しいCGImageのインスタンスを返してくれる
注意点
rect は切り抜きたいCGImageのスケールで指定する必要がある。
具体的な例を示すと、400x200のサイズのCGImageの丁度真ん中で50x50で画像を切り抜きたい場合、CGRectのパラメータは次の様になる。
let rect = CGRect(x: 200 - 25, y: 100 - 25, width: 50, height: 50)
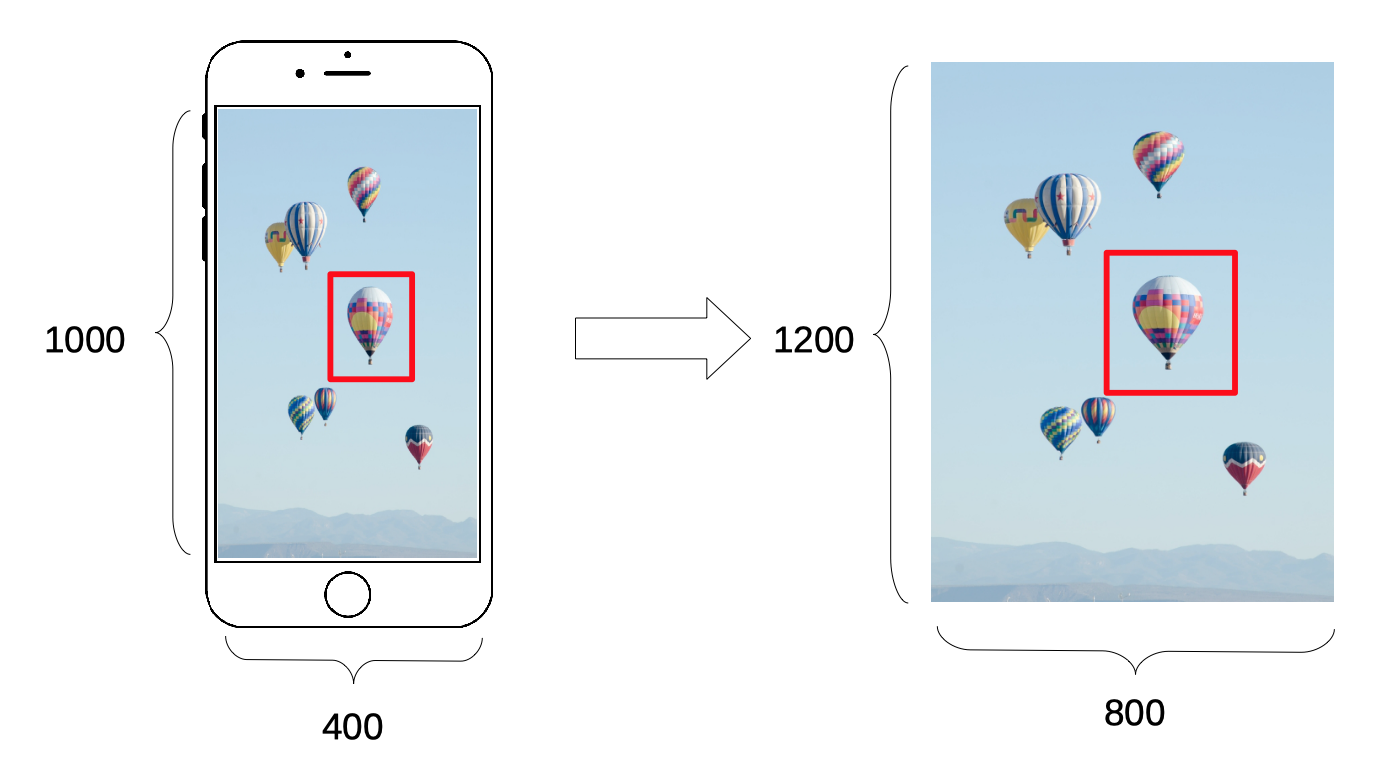
また、大抵UIImageViewと表示するUIImageのサイズは一致しないため、UIImageView上で指定された範囲は実際のCGImageのスケールに直す必要がある。
例えば上記の図のようにUIImageViewの表示上のサイズが400x1000で実際のUIImageのサイズが800x1200だったとした場合、選択範囲のRectは次のようにスケールを変更しなければならない。
let transform = CGAffineTransform(scaleX: 2.0, y: 1.2)
rect.applying(transform)
本題
じゃあ毎回、UIImageViewのサイズとUIImage(CGImage)のサイズを測って指定範囲のスケールを変更すれば良いのね、という訳ではなく一つ落とし穴がある。
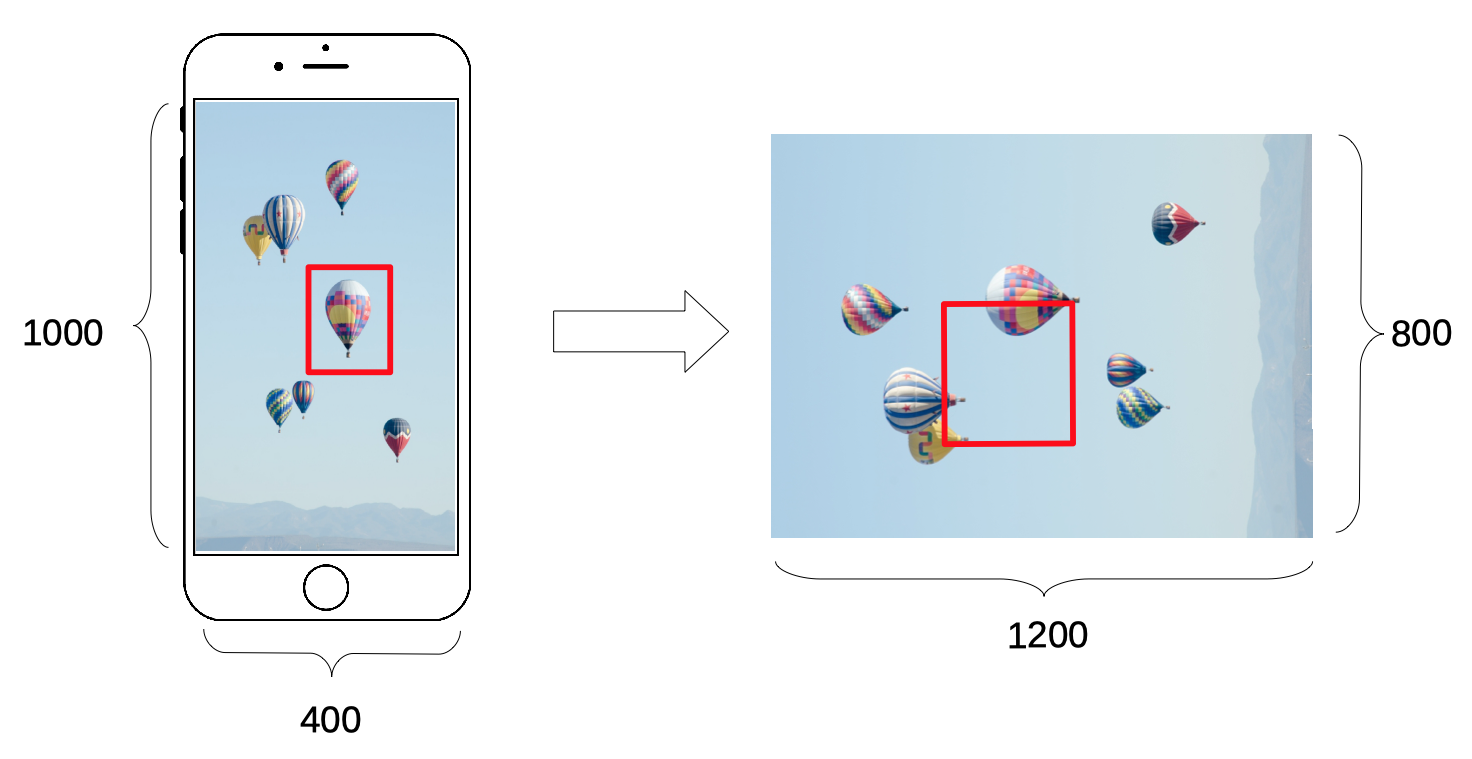
ここのサイトの説明が分かり易いが画像にはorientationというプロパティが保持されており、UIImageView上で縦向きに画像が表示されていたとしてもCGImageの段階で横になっているということがある。
そうなると、下の図のように単純にスケールを変更しただけでは意図した場所から外れてしまうことになる。
したがって、UIImageView上で指定された範囲でCGImage.cropping()を行う際には次のロジックで処理を行う必要がある。
1. UIImageViewと表示しているUIImageの縦横のスケール比率を取得する
2. UIImageのorientationを取得し、画像の向きを判定する
3. 画像の向きに応じて範囲の回転並びに、平行移動を行う
4. 先ほど計算したスケール比率で範囲の拡大/縮小を行う
実際に書くとこんな感じ
extension UIImageView {
    func transformByImage(rect : CGRect) -> CGRect? {
        guard let image = self.image else { return nil }
        let imageSize = image.size
        let imageOrientation = image.imageOrientation
        let selfSize = self.frame.size

        let scaleWidth = imageSize.width / selfSize.width
        let scaleHeight = imageSize.height / selfSize.height

        var transform: CGAffineTransform

        switch imageOrientation {
        case .left:
            transform = CGAffineTransform(rotationAngle: .pi / 2).translatedBy(x: 0, y: -image.size.height)
        case .right:
            transform = CGAffineTransform(rotationAngle: -.pi / 2).translatedBy(x: -image.size.width, y: 0)
        case .down:
            transform = CGAffineTransform(rotationAngle: -.pi).translatedBy(x: -image.size.width, y: -image.size.height)
        default:
            transform = .identity
        }

        transform = transform.scaledBy(x: scaleWidth, y: scaleHeight)

        return rect.applying(transform)
    }
}
こんな感じで使います。
let cropRect = self.cropRect
let imageView = self.imageView

guard let image = imageView?.image else { return }
guard let rectByImage = imageView?.transformByImage(rect : cropRect) else { return }

let croppedImage = image.cgImage.cropping(to: rectByImage)
let newImage = UIImage(cgImage: croppedImage!, scale: imageView.scale, orientation: image.imageOrientation)
もし誰かのお役に立てば嬉しいです。

