babylon.jsのチュートリアルを学習していきます。
Discover Basic Elements
https://doc.babylonjs.com/babylon101/discover_basic_elements
いろいろな図形を描いていきます。
MeshBuilder Method
BABYLON.MeshBuilderクラスから、ボックス、球体、平面、地面の描画メソッドとオプションを見ていきます。メッシュビルダーなので、メッシュを作っている。メッシュとは、図形を構成する要素で、三角形または四角形の集まり。CGの基礎知識も理解していく必要がありますね。
wikipedia ポリゴンメッシュ
box
BABYLON.MeshBuilder.CreateBoxでボックスを生成します。
サンプルでは高さ、幅、深さを指定。
    // box生成
    var box = BABYLON.MeshBuilder.CreateBox("box", {height: 1, width: 0.75, depth: 0.25}, scene);
See the Pen babylon101 Discover Basic Elements box by nobuyuki ishii (@nobuyuki-ishii) on CodePen.
sphere
BABYLON.MeshBuilder.CreateSphereで球を生成します。
サンプルでは直径を指定して、直径Xを上書き。たまご型。
var mySphere = BABYLON.MeshBuilder.CreateSphere("mySphere", {diameter: 2, diameterX: 3}, scene);
See the Pen babylon101 Discover Basic Elements box by nobuyuki ishii (@nobuyuki-ishii) on CodePen.
plane
BABYLON.MeshBuilder.CreatePlaneで平面を生成。
サンプルでは幅、高さを指定。
var myPlane = BABYLON.MeshBuilder.CreatePlane("myPlane", {width: 3, height: 2}, scene);
See the Pen babylon101 Discover Basic Elements plane by nobuyuki ishii (@nobuyuki-ishii) on CodePen.
ground
地面を生成。ぱっと見、planeと同じだけれど、CreateGroundFromHeightMapで起伏のある地面を作れるとあり、平面も作れるけれど、区別している。
var myGround = BABYLON.MeshBuilder.CreateGround("myGround", {width: 2, height: 1, subdivisions: 4}, scene);
See the Pen babylon101 Discover Basic Elements ground by nobuyuki ishii (@nobuyuki-ishii) on CodePen.
faceColors
ボックスの面に色をつけるオプション。
引数はr, g, b, aをそれぞれ0から1で指定。
  // 色設定
  var faceColors = new Array(6);
  faceColors[0] = new BABYLON.Color4(1,0,0,0);
  faceColors[1] = new BABYLON.Color4(1,1,0,0);
  faceColors[2] = new BABYLON.Color4(1,1,1,0);
  faceColors[3] = new BABYLON.Color4(0,0,0,1);
  faceColors[4] = new BABYLON.Color4(1,0,1,1);
  faceColors[5] = new BABYLON.Color4(0,1,0,1);

  // box生成
  var box = BABYLON.MeshBuilder.CreateBox("box", {size: 1, faceColors: faceColors}, scene);
See the Pen babylon101 Discover Basic Elements faceColors by nobuyuki ishii (@nobuyuki-ishii) on CodePen.
faceUV
ボックスの面に画像を設定するオプション。
  // 画像設定
  var mat = new BABYLON.StandardMaterial("mat", scene);
  var texture = new BABYLON.Texture("https://drive.google.com/uc?export=view&id=16gDNMIwZDSqaa3M80DiL15rvCNs039x9", scene);
  mat.diffuseTexture = texture;

  var columns = 6;  // 6 columns
  var rows = 1;  // 1 rows

  var faceUV = new Array(6);

  for (var i = 0; i < 6; i++) {
    faceUV[i] = new BABYLON.Vector4(i / columns, 0, (i + 1) / columns, 1 / rows);
  }

  // box生成
  var box = BABYLON.MeshBuilder.CreateBox("box", {size: 1, faceUV: faceUV}, scene);
  box.material = mat;
画像を指定して、その中の表示箇所の左底辺、右頂点をBABYLON.Vector4(x,y,z,w)で4点指定する。
1コ目は、こんな感じ。6までズラしている。
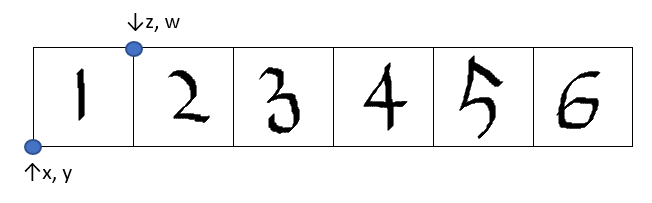
縦、横はそれぞれ全体で1になるので、横を6等分する。以下のプログラムでfaceUVは、以下を指定している。
  faceUV[0] = new BABYLON.Vector4(0, 0, 1/6, 1);
  faceUV[1] = new BABYLON.Vector4(1/6, 0, 2/6, 1);
  faceUV[2] = new BABYLON.Vector4(2/6, 0, 3/6, 1);
  faceUV[3] = new BABYLON.Vector4(3/6, 0, 4/6, 1);
  faceUV[4] = new BABYLON.Vector4(4/6, 0, 5/6, 1);
  faceUV[5] = new BABYLON.Vector4(5/6, 0, 1, 1);
See the Pen babylon101 Discover Basic Elements faceUV by nobuyuki ishii (@nobuyuki-ishii) on CodePen.
codepenで画像を読み込むとcorsにより、代替画像?になってしまった。。
corsを解決すると、こんな感じになる。
http://141-lab.com/babylon/qiita/faceuv/
updatable
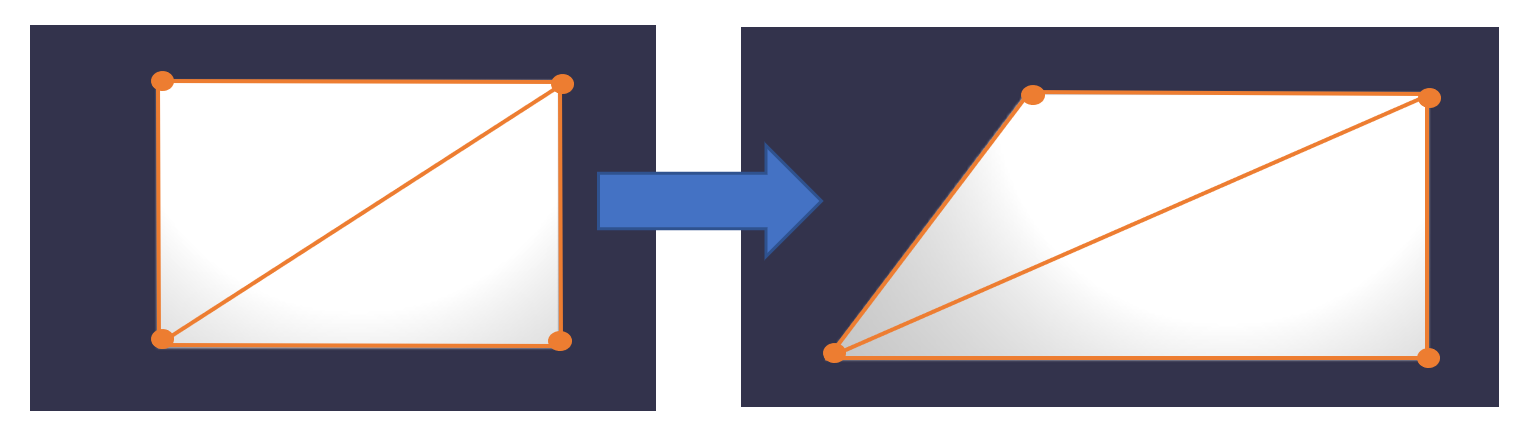
メッシュの変更を許可するというオプション。デフォルトはfalseで、変更不可となっている。サンプルは下記イメージのように左下の点の位置を変更して、図形を変更。updatable設定がfalseだと何も変化しない。
  // 平面生成
  var myPlane = BABYLON.MeshBuilder.CreatePlane("myPlane", {width: 3, height: 2, updatable: true}, scene);

  var positions = myPlane.getVerticesData(BABYLON.VertexBuffer.PositionKind);
  console.log(positions);

  positions[0] = -3;
  myPlane.updateVerticesData(BABYLON.VertexBuffer.PositionKind, positions);
getVerticesDataで取得したデータは、[-1.5, -1, 0, 1.5, -1, 0, 1.5, 1, 0, -1.5, 1, 0]となっていて、updateVerticesDataで[-3, -1, 0, 1.5, -1, 0, 1.5, 1, 0, -1.5, 1, 0]に変更している。
See the Pen babylon101 Discover Basic Elements updatable by nobuyuki ishii (@nobuyuki-ishii) on CodePen.
side orientation
平面のメッシュ設定。デフォルトだと表面しか表示されないのは、この面設定オプションによるもの。
BABYLON.Mesh.FRONTSIDE(デフォルト)
BABYLON.Mesh.BACKSIDE
BABYLON.Mesh.DOUBLESIDE
  // 平面生成
  var myPlane = BABYLON.MeshBuilder.CreatePlane("myPlane", {width: 3, height: 2, sideOrientation: BABYLON.Mesh.DOUBLESIDE}, scene);
BABYLON.Mesh.DOUBLESIDEにすると、両面が表示される。マウスを左クリックしたまま動かして回転させてみてください。
See the Pen babylon101 Discover Basic Elements plane by nobuyuki ishii (@nobuyuki-ishii) on CodePen.
front and back uv
平面に画像を設定するオプション。sideOrientationにBABYLON.Mesh.DOUBLESIDEを設定していること。画像の指定の仕方は面のときと同じ。画像の貼り付けたい場所をBABYLON.Vector4で指定する。
  // 画像設定
  var mat = new BABYLON.StandardMaterial("mat", scene);
  var texture = new BABYLON.Texture("https://drive.google.com/uc?export=view&id=16gDNMIwZDSqaa3M80DiL15rvCNs039x9", scene);
  mat.diffuseTexture = texture;

  var fuv = new BABYLON.Vector4(0, 0, 1/6, 1);
  var buv = new BABYLON.Vector4(1/6, 0, 2/6, 1);

  // 平面生成
  var myPlane = BABYLON.MeshBuilder.CreatePlane("myPlane", {width: 3, height: 2, sideOrientation: BABYLON.Mesh.DOUBLESIDE, frontUVs: fuv, backUVs: buv}, scene);
  myPlane.material = mat;
codepenはまたcorsにより代替画像。。
See the Pen babylon101 Discover Basic Elements front and back uv by nobuyuki ishii (@nobuyuki-ishii) on CodePen.
やりたかったのはこれ。
http://141-lab.com/babylon/qiita/frontuv_backuv/
position and rotation
オブジェクトの場所、回転、スケールを設定します。
サンプルはボックスを3コ生成し、場所変更して、ボックスを3コ並べ、1コを回転、1コをスケール変更しています。
場所の設定値にはx, y, zがあり、個別に設定するか、BABYLON.Vector3でまとめて設定する。
  // 場所移動
  box1.position.x = 2;
  box3.position.x = -2;
回転の設定値にはx, y, zがあり、個別に設定するか、BABYLON.Vector3でまとめて設定する。
  // 回転設定
  box1.rotation = new BABYLON.Vector3(1,1,1);
スケールの設定値にはx, y, zがあり、個別に設定するか、BABYLON.Vector3でまとめて設定する。
  // スケール設定
  box3.scaling = new BABYLON.Vector3(0.5, 2, 1);
See the Pen babylon101 Discover Basic Elements Position and Rotation by nobuyuki ishii (@nobuyuki-ishii) on CodePen.