doorkeeper gemの用途
doorkeeperはOAuthのプロバイダ機能を提供するためのgemです。
例えば公開用のAPIを作成した場合にアクセストークンを発行するためOAuth2.0で認可しトークン発行させるなどで使用します。
この記事の注意点
今回は実際にdoorkeeperを導入してOAuthプロバイダとして機能する確認までを行いますが細かな設定は省略しています。
実際に業務で開発するアプリケーションではroutingの設定や画面のカスタマイズ、doorkeeper.rbのカスタマイズなどもっと丁寧に設定する必要があるのでご注意ください。
ドキュメントについて
以下を参考にdoorkeeperの導入を行いました。
doorkeeper gem はドキュメントが整っているので導入しやすいと思います。
https://github.com/doorkeeper-gem/doorkeeper
https://github.com/doorkeeper-gem/doorkeeper/wiki
https://doorkeeper.gitbook.io/guides/
doorkeeper導入環境
今回は以下の環境のrailsアプリケーションが既にある想定で進めていきます。
rails: 6.0.3.4
ruby: 2.7.1

その他gem:
devise(4.7.3)
userテーブルの作成
今回userテーブルを事前に用意してログイン周りはdevise gemで管理します。
userテーブルのschemaは以下になります。
(今回Doorkeeperの導入のために作成した簡易的なテーブルです)
create_table :users do |t|
  ## Database authenticatable
  t.string :email,              null: false, default: ""
  t.string :encrypted_password, null: false, default: ""

  ## Recoverable
  t.string   :reset_password_token
  t.datetime :reset_password_sent_at

  ## Rememberable
  t.datetime :remember_created_at

  # Trackable
  t.integer  :sign_in_count, default: 0, null: false
  t.datetime :current_sign_in_at
  t.datetime :last_sign_in_at
  t.string   :current_sign_in_ip
  t.string   :last_sign_in_ip

  t.string   :fullname
  t.string   :fullname_ja
  t.boolean  :admin, null: false, default: false

  t.timestamps null: false
end

add_index :users, :email,                unique: true
add_index :users, :reset_password_token, unique: true
gemを追加
Gemfileへ以下を追加しbundle installします。
gem 'doorkeeper'
bundle install
現時点(2020/12/01)では以下のバージョンがinstallされました。
doorkeeper (5.4.0)
doorkeeperの環境をセットアップ
doorkeeperをinstallします。
rails generate doorkeeper:install
実行結果
      create  config/initializers/doorkeeper.rb
      create  config/locales/doorkeeper.en.yml
       route  use_doorkeeper
===============================================================================

There is a setup that you need to do before you can use doorkeeper.

Step 1.
Go to config/initializers/doorkeeper.rb and configure
resource_owner_authenticator block.

Step 2.
Choose the ORM:

If you want to use ActiveRecord run:

  rails generate doorkeeper:migration

And run

  rake db:migrate

Step 3.
That's it, that's all. Enjoy!

===============================================================================
以下の2つのファイルの作成とdoorkeeperを使うためのroutingが生成されます。
config/initializers/doorkeeper.rb
config/locales/doorkeeper.en.yml
migrationファイル作成
次にOAuth Applications、 Access Grants、 Access Tokensのテーブル用のmigrationファイルを作成するために以下を実行します。
bundle exec rails generate doorkeeper:migration
実行結果
create db/migrate/20201201064749_create_doorkeeper_tables.rb
db/migrate/yyyymmddhhmmss_create_doorkeeper_tables.rbファイルが作成されるのでこれを編集していきます。
今回はuser model が resource ownerとなるように設定していきます。
# frozen_string_literal: true

class CreateDoorkeeperTables < ActiveRecord::Migration[6.0]
  def change
    create_table :oauth_applications do |t|
      t.string  :name,    null: false
      t.string  :uid,     null: false
      t.string  :secret,  null: false

      # Remove `null: false` if you are planning to use grant flows
      # that doesn't require redirect URI to be used during authorization
      # like Client Credentials flow or Resource Owner Password.
      t.text    :redirect_uri, null: false
      t.string  :scopes,       null: false, default: ''
      t.boolean :confidential, null: false, default: true
      t.timestamps             null: false
    end

    add_index :oauth_applications, :uid, unique: true

    create_table :oauth_access_grants do |t|
      t.references :resource_owner,  null: false
      t.references :application,     null: false
      t.string   :token,             null: false
      t.integer  :expires_in,        null: false
      t.text     :redirect_uri,      null: false
      t.datetime :created_at,        null: false
      t.datetime :revoked_at
      t.string   :scopes,            null: false, default: ''
    end

    add_index :oauth_access_grants, :token, unique: true
    add_foreign_key(
      :oauth_access_grants,
      :oauth_applications,
      column: :application_id
    )

    create_table :oauth_access_tokens do |t|
      t.references :resource_owner, index: true

      # Remove `null: false` if you are planning to use Password
      # Credentials Grant flow that doesn't require an application.
      t.references :application,    null: false

      # If you use a custom token generator you may need to change this column
      # from string to text, so that it accepts tokens larger than 255
      # characters. More info on custom token generators in:
      # https://github.com/doorkeeper-gem/doorkeeper/tree/v3.0.0.rc1#custom-access-token-generator
      #
      # t.text :token, null: false
      t.string :token, null: false

      t.string   :refresh_token
      t.integer  :expires_in
      t.datetime :revoked_at
      t.datetime :created_at, null: false
      t.string   :scopes

      # The authorization server MAY issue a new refresh token, in which case
      # *the client MUST discard the old refresh token* and replace it with the
      # new refresh token. The authorization server MAY revoke the old
      # refresh token after issuing a new refresh token to the client.
      # @see https://tools.ietf.org/html/rfc6749#section-6
      #
      # Doorkeeper implementation: if there is a `previous_refresh_token` column,
      # refresh tokens will be revoked after a related access token is used.
      # If there is no `previous_refresh_token` column, previous tokens are
      # revoked as soon as a new access token is created.
      #
      # Comment out this line if you want refresh tokens to be instantly
      # revoked after use.
      t.string   :previous_refresh_token, null: false, default: ""
    end

    add_index :oauth_access_tokens, :token, unique: true
    add_index :oauth_access_tokens, :refresh_token, unique: true
    add_foreign_key(
      :oauth_access_tokens,
      :oauth_applications,
      column: :application_id
    )

    # userがresource_ownerとなるようにしてコメントアウトを外します。
    # Uncomment below to ensure a valid reference to the resource owner's table
    # add_foreign_key :oauth_access_grants, <model>, column: :resource_owner_id
    # add_foreign_key :oauth_access_tokens, <model>, column: :resource_owner_id
    ↓↓↓↓↓
    add_foreign_key :oauth_access_grants, :users, column: :resource_owner_id
    add_foreign_key :oauth_access_tokens, :users, column: :resource_owner_id
  end
end
migrationを実行します。
rails db:migrate RAILS_ENV=development
次の3つのテーブルが作成されます。
oauth_applications
oauth_access_grants
oauth_access_tokens
doorkeeper.rb の設定
次にdoorkeeperの設定ファイルである config/initializers/doorkeeper.rb を編集していきます。
設定方法は
https://doorkeeper.gitbook.io/guides/ruby-on-rails/configuration
を参考に進めていきます。
編集した箇所のみ記載しています。
# frozen_string_literal: true

Doorkeeper.configure do

 〜〜略〜〜

  # このブロックは、resource owner が認証されているかどうかを確認するために呼び出されます。
  # 今回はdeviseを使用しているので
  # https://doorkeeper.gitbook.io/guides/ruby-on-rails/configuration
  # を参考に修正します。
  # This block will be called to check whether the resource owner is authenticated or not.
  resource_owner_authenticator do
    raise "Please configure doorkeeper resource_owner_authenticator block located in #{__FILE__}"
    # Put your resource owner authentication logic here.
    # Example implementation:
    #   User.find_by(id: session[:user_id]) || redirect_to(new_user_session_url)
  end
 ↓↓↓↓
  # 以下のように修正します。
  resource_owner_authenticator do
    current_user || warden.authenticate!(scope: :user)
  end

  # ここではoauth application のへのアクセスを制御することができます。
  # 今回はusersテーブルへadminフラグを追加してadminフラグが立っている場合にのみアクセスできるようにするため
  # コメントアウト部分を外します。
  # admin以外のuserがアクセスした場合は 403 Forbidden レスポンスを返します。
  # If you didn't skip applications controller from Doorkeeper routes in your application routes.rb
  # file then you need to declare this block in order to restrict access to the web interface for
  # adding oauth authorized applications. In other case it will return 403 Forbidden response
  # every time somebody will try to access the admin web interface.
  #
  # admin_authenticator do
  #   # Put your admin authentication logic here.
  #   # Example implementation:
  #
  #   if current_user
  #     head :forbidden unless current_user.admin?
  #   else
  #     redirect_to sign_in_url
  #   end
  # end
 ↓↓↓↓
  admin_authenticator do
    # Put your admin authentication logic here.
    # Example implementation:

    if current_user
      head :forbidden unless current_user.admin?
    else
      redirect_to new_user_session_url
    end
  end

 〜〜略〜〜

  # access_token_expires_in オプション
  # アクセストークンの有効期限の設定です。
  # defaultでは2時間。変更する場合はコメントアウトを外して編集します。
  # 有効期限を無効にする場合は、これを「nil」に設定します。
  #
  # 今回は24時間へ変更します。
  # Access token expiration time (default: 2 hours).
  # If you want to disable expiration, set this to `nil`.
  #
  # access_token_expires_in 2.hours
  access_token_expires_in 24.hours

 〜〜略〜〜

  # scope
  # プロバイダのアクセストークンスコープの定義
  # 詳細については、次のサイトを参照してください。
  # https://doorkeeper.gitbook.io/guides/ruby-on-rails/scopes
  #
  # 今回は
  # default_scopes  :public と
  # optional_scopes :write
  #  を設定しておきます。
  # Define access token scopes for your provider
  # For more information go to
  # https://doorkeeper.gitbook.io/guides/ruby-on-rails/scopes
  #
  # default_scopes  :public
  # optional_scopes :write, :update
  ↓↓↓↓
  default_scopes  :public
  optional_scopes :write

  # enforce_configured_scopes オプション
  # 「default_scopes」や「optional_scopes」にない任意のスコープでのアプリケーションの作成や更新を禁止します。
  # (デフォルトでは禁止しない)
  #
  # 使用するためコメントアウトを外します。
  # Forbids creating/updating applications with arbitrary scopes that are
  # not in configuration, i.e. +default_scopes+ or +optional_scopes+.
  # (disabled by default)
  #
  # enforce_configured_scopes
  ↓↓↓↓
  enforce_configured_scopes

  # force_ssl_in_redirect_uri オプション
  # ネイティブではないリダイレクト用の uris で HTTPS プロトコルを強制的に使用します。
  # (development環境以外ではデフォルトで有効になっています)
  # OAuth2 は通信のセキュリティを HTTPS プロトコルに委譲するので、これを有効にしておくのが賢明です。
  # proc, lambda, block などの呼び出し可能なオブジェクトは、
  # 条件付きチェックを可能にするために使用することができます
  # (例えば、localhostへの非SSLリダイレクトを許可するなど)
  #
  # 今回は使用するため以下の設定を行います。
  # Forces the usage of the HTTPS protocol in non-native redirect uris (enabled
  # by default in non-development environments). OAuth2 delegates security in
  # communication to the HTTPS protocol so it is wise to keep this enabled.
  #
  # Callable objects such as proc, lambda, block or any object that responds to
  # #call can be used in order to allow conditional checks (to allow non-SSL
  # redirects to localhost for example).
  #
  # force_ssl_in_redirect_uri !Rails.env.development?
  #
  # force_ssl_in_redirect_uri { |uri| uri.host != 'localhost' }
  ↓↓↓↓
  #development, test環境ではSSL以外でも許容し、それ以外はSSLのみ許可します。
  force_ssl_in_redirect_uri !(Rails.env.development? || Rails.env.test?)

  #  Client Credentials や Resource Owner Password Credentialsのような
  # URI の無い OAuth グラントフローを使用するように Doorkeeper が設定されている場合に、
  # アプリケーションに空のリダイレクト URI を設定できるようにします。
  # このオプションはデフォルトではオンに設定されており、設定されたグラントの種類をチェックしますが、
  # データベーステーブル「oauth_applications」の「redirect_uri」カラムから「NOT NULL」制約を
  # 手動で削除する必要があります。
  # この機能を完全に無効にするには allow_blank_redirect_uri false のコメントアウトを外すか
  # カスタムチェックを定義することができます。
  #
  # 今回はredirect_uri にNULLを許可しないのでコメントアウトを外します。
  # Allows to set blank redirect URIs for Applications in case Doorkeeper configured
  # to use URI-less OAuth grant flows like Client Credentials or Resource Owner
  # Password Credentials. The option is on by default and checks configured grant
  # types, but you **need** to manually drop `NOT NULL` constraint from `redirect_uri`
  # column for `oauth_applications` database table.
  #
  # You can completely disable this feature with:
  #
  # allow_blank_redirect_uri false
  #
  # Or you can define your custom check:
  #
  # allow_blank_redirect_uri do |grant_flows, client|
  #   client.superapp?
  # end
  ↓↓↓↓
  allow_blank_redirect_uri false

  # どのようなgrant flowsを有効にするかを文字列の配列で指定します。
  # 有効な文字列と有効なフローは以下の通りです。
  #
  # 今回は authorization_code のみ許可するため以下のように記述します。
  # Specify what grant flows are enabled in array of Strings. The valid
  # strings and the flows they enable are:
  #
  # "authorization_code" => Authorization Code Grant Flow
  # "implicit"           => Implicit Grant Flow
  # "password"           => Resource Owner Password Credentials Grant Flow
  # "client_credentials" => Client Credentials Grant Flow
  #
  # If not specified, Doorkeeper enables authorization_code and
  # client_credentials.
  #
  # implicit and password grant flows have risks that you should understand
  # before enabling:
  #   http://tools.ietf.org/html/rfc6819#section-4.4.2
  #   http://tools.ietf.org/html/rfc6819#section-4.4.3
  #
  # grant_flows %w[authorization_code client_credentials]
  ↓↓↓↓
  grant_flows %w[authorization_code]

end
OAuthアプリケーションの作成
(※)事前にadminフラグの付いたアカウントと付いていないアカウントを2つ作っておきます。
> rails s
で local Serverを起動します。
http://localhost:3000/users/sign_in
へアクセスしadminフラグが付いていないアカウントでログインし
http://localhost:3000/oauth/applications
へアクセスするとstatus 403でアクセスできないことを確認します。
今後はadminフラグが付いているアカウントでログインし
http://localhost:3000/oauth/applications
へアクセスすると以下の画面が表示されると思います。
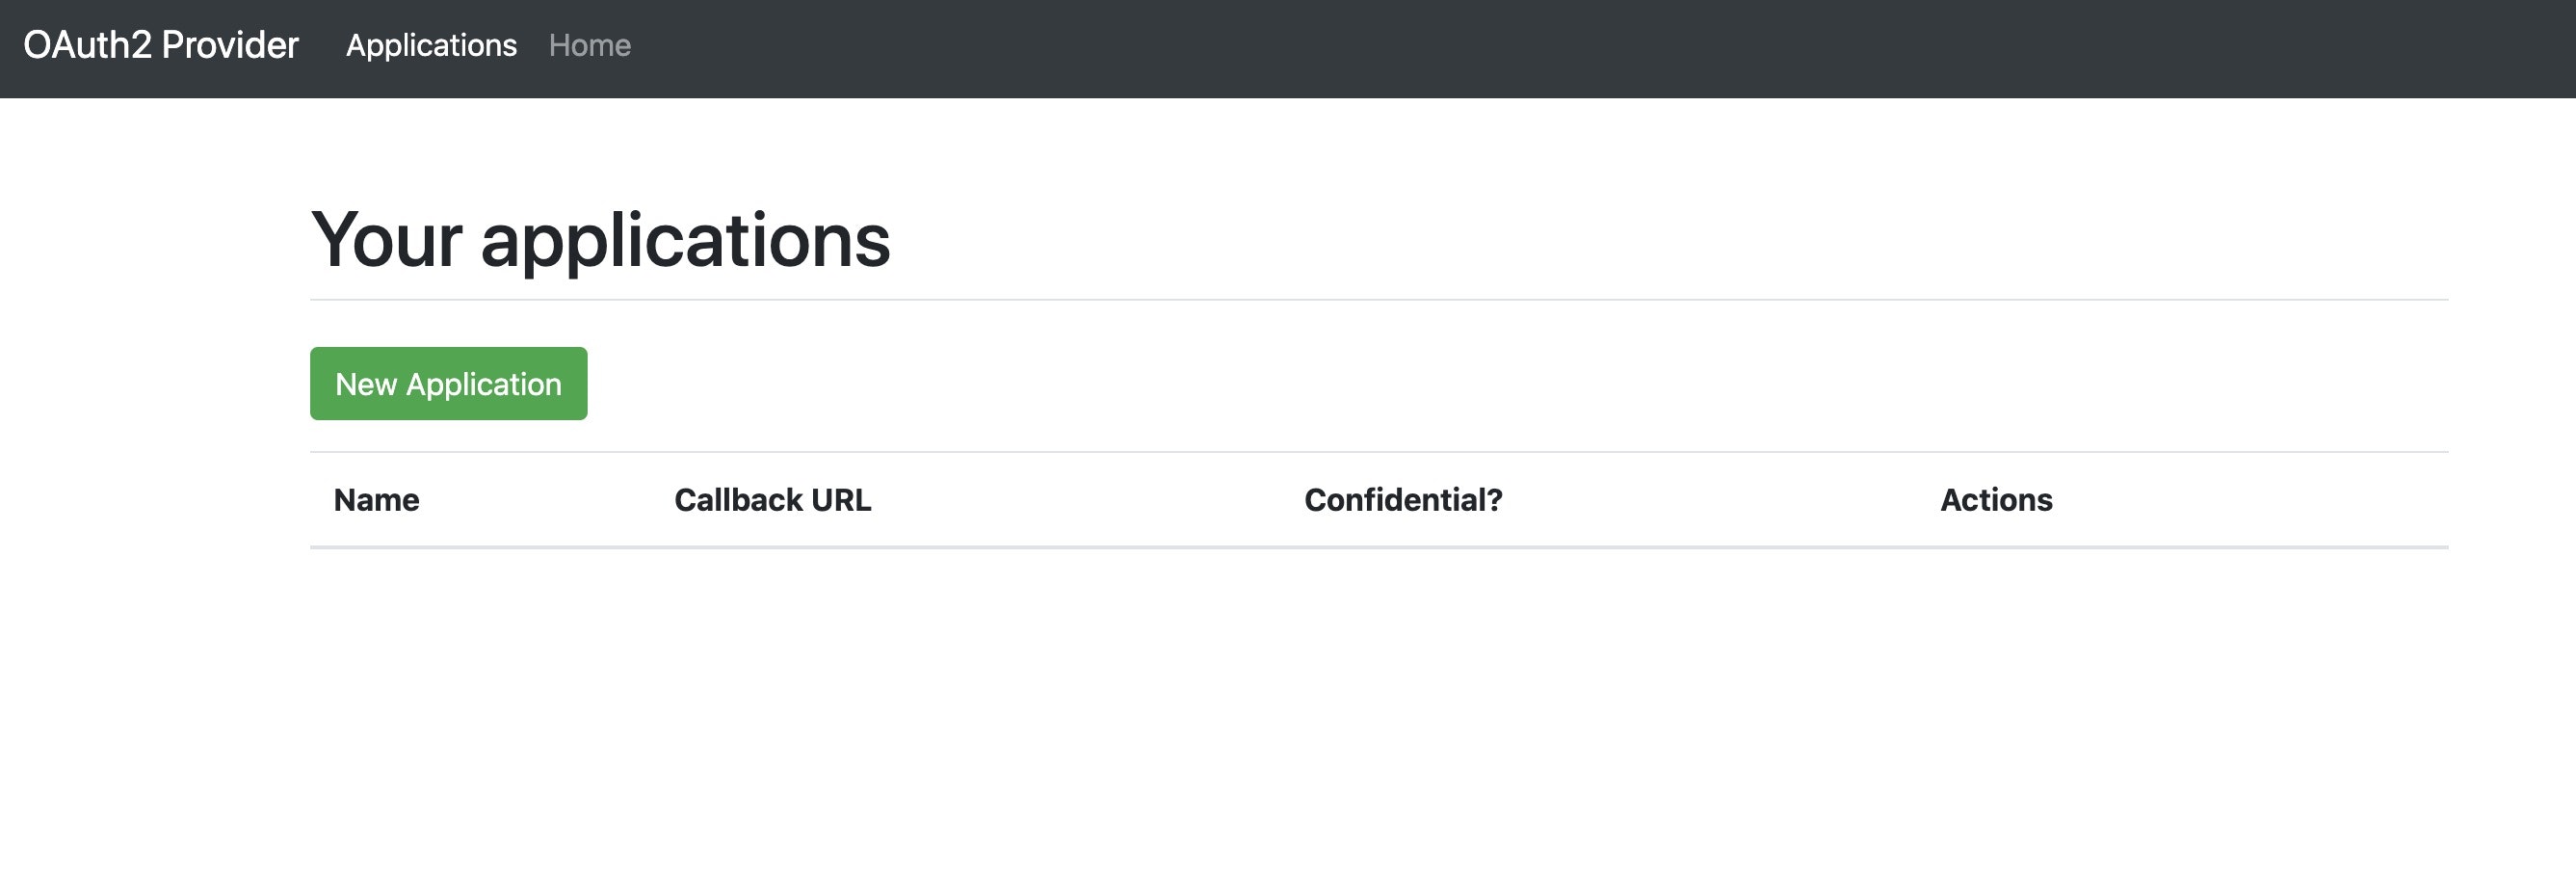
[New Application]ボタンをクリックして
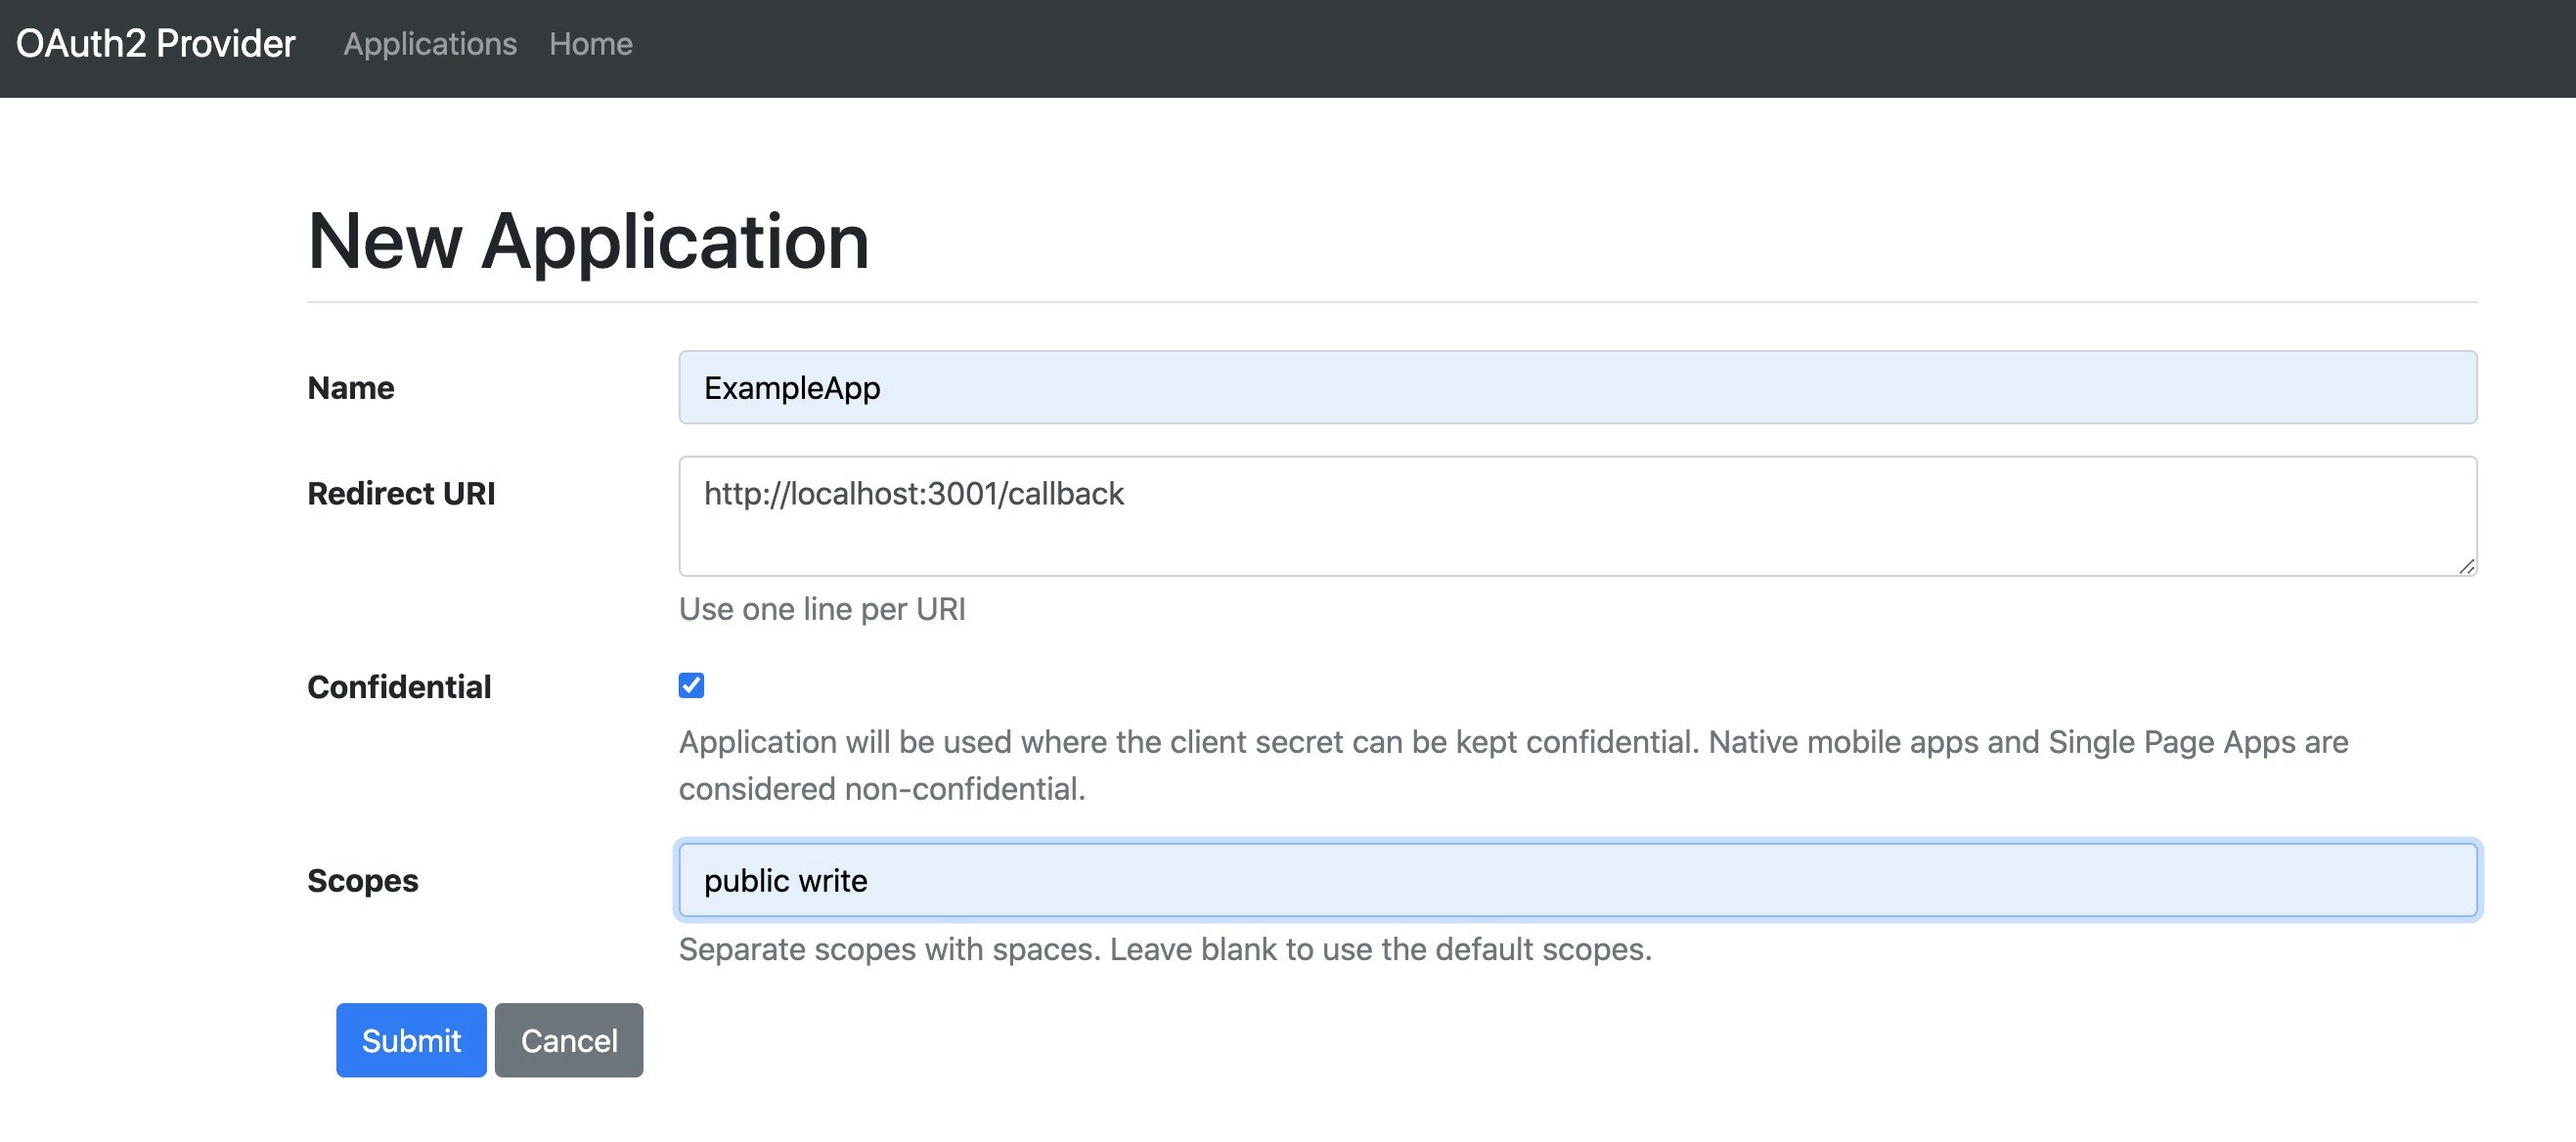
OAuthのアプリケーションを作成していきます。
Name: ExampleApp
Redirect URI: http://localhost:3001/callback
Confidential: ON
Scopes: public write
を設定して[Submit]をクリックします。
OAuthアプリケーションが作成され以下のような画面が表示されると思います。
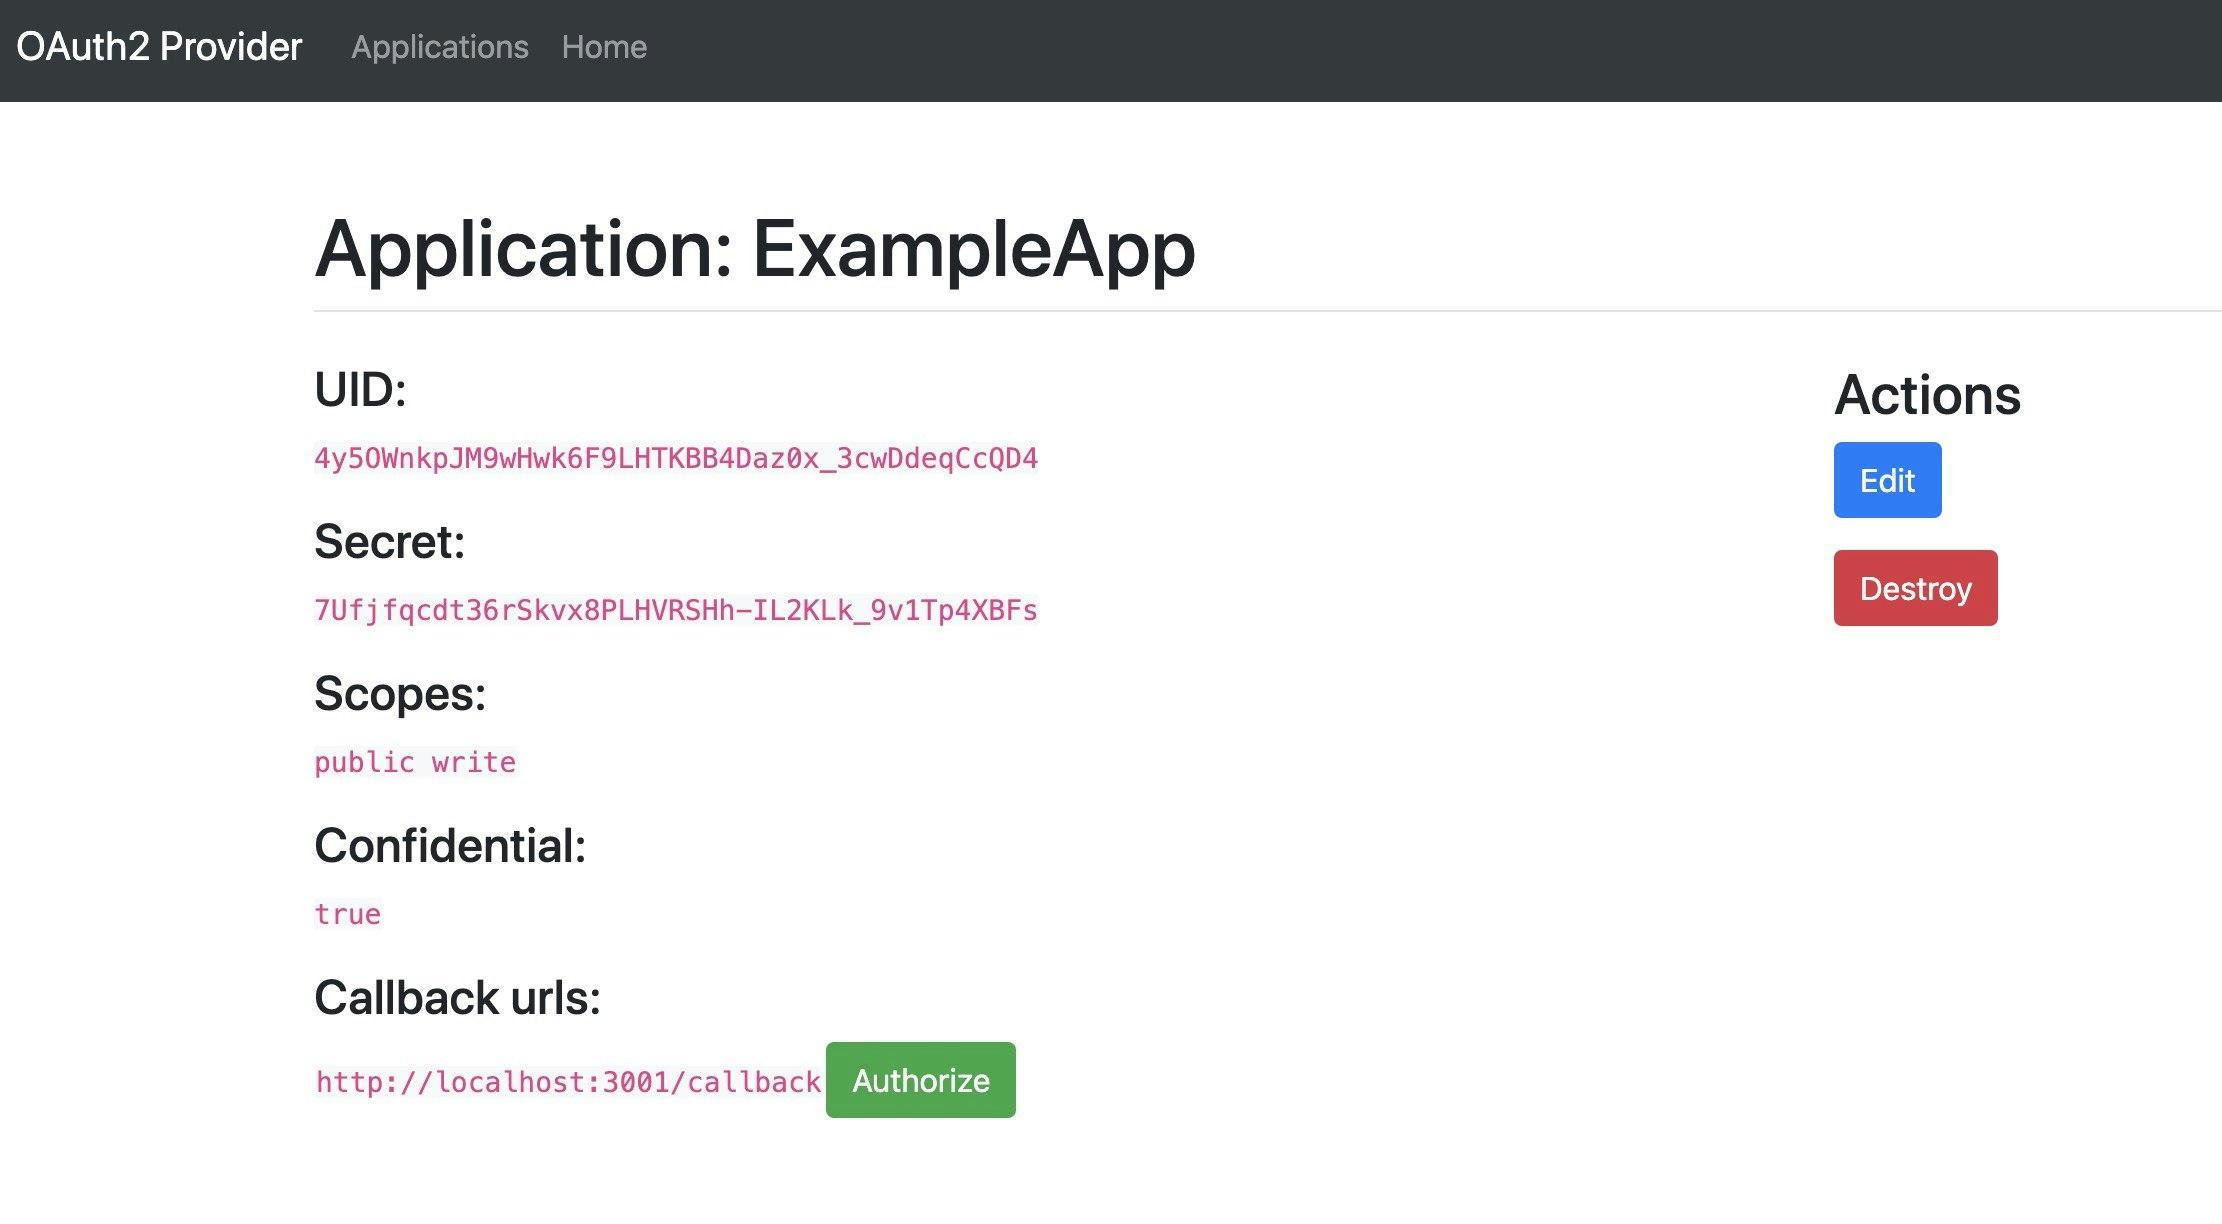
実際に作成されたデータを rails consoleで見てみると以下のようなデータが存在することが分かります。
irb(main):003:0> Doorkeeper::Application.all
=> #<ActiveRecord::Relation [#<Doorkeeper::Application id: 1, name: "ExampleApp", uid: "4y5OWnkpJM9wHwk6F9LHTKBB4Daz0x_3cwDdeqCcQD4", secret: "7Ufjfqcdt36rSkvx8PLHVRSHh-IL2KLk_9v1Tp4XBFs", redirect_uri: "http://localhost:3001/callback", scopes: "public write", confidential: true, created_at: "2020-12-14 17:44:08", updated_at: "2020-12-14 17:44:08">]>
irb(main):009:0>
続いてアクセストークンの発行テストをするためにはDoorkeeperのClientが必要なので↓のclientを使用します。
https://github.com/Nobuo-Hirai/sample_oauth_client
以下の手順でセットアップしていきます。
git clone git@github.com:Nobuo-Hirai/sample_oauth_client.git

cd sample_oauth_client

bundle config set --local path 'vendor/bundle'
bundle install

# .env.developmentファイルを作成します。
touch .env.development

# .env.developmentファイルへ以下の内容を記述します。
# 先ほどOAuthプロバイダの方で作成したOAuthアプリケーションのUIDとSECRET、REDIRECT URIなどを記述します。
## ID for your app registered at the provider
CLIENT_ID=4y5OWnkpJM9wHwk6F9LHTKBB4Daz0x_3cwDdeqCcQD4
## Secret
CLIENT_SECRET=7Ufjfqcdt36rSkvx8PLHVRSHh-IL2KLk_9v1Tp4XBFs

## URL to the provider
SITE=http://localhost:3000/
AUTHORIZE_URL=oauth/authorize
CALLBACK_URI=http://localhost:3001/callback
OAUTH_PROVIDER_URL=http://localhost:3000/oauth/authorize
TOKEN_URL=oauth/token
SCOPE=public write

# port 3001で起動します。
rails s -p 3001
http://localhost:3001
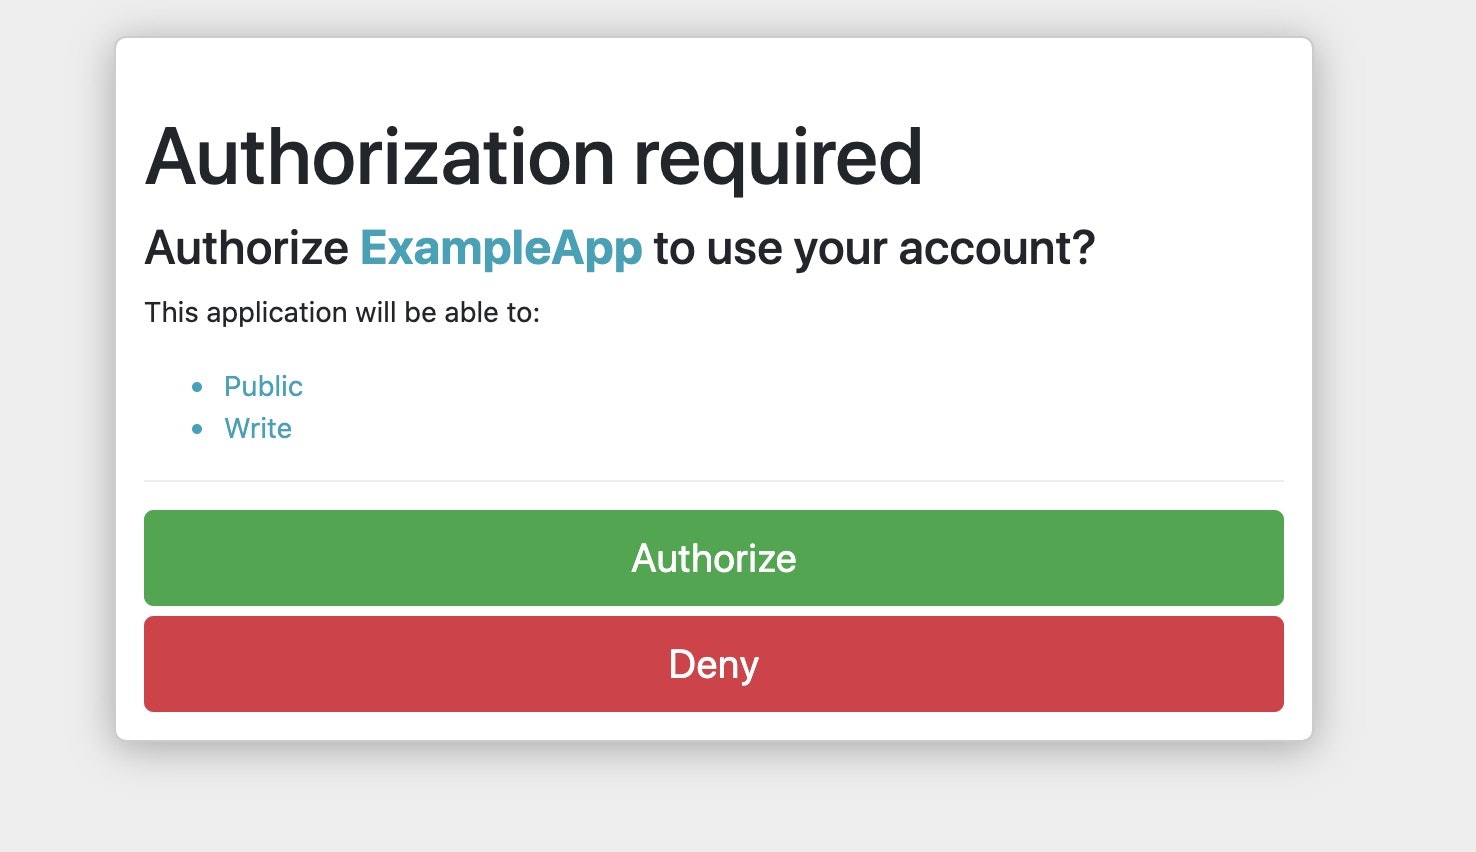
へアクセスすると下の画面が表示されるので[Authorize]をクリックします。
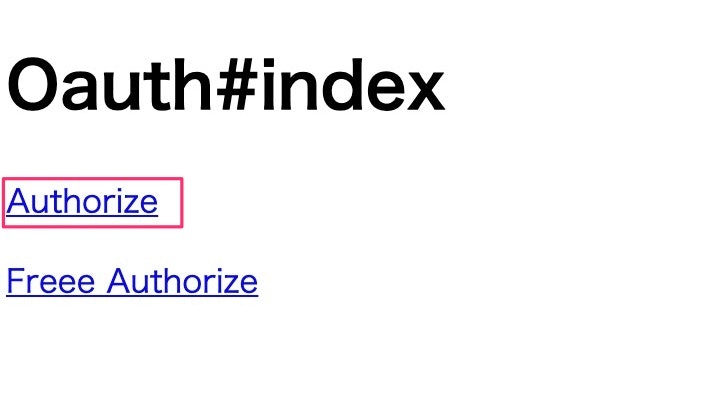
http://localhost:3000/
の認可画面が表示されると思います。
これは[public write]という権限を持ったアクセストークンの発行に同意するかどうかという意味になります。
[Authorize]をクリックします。
http://localhost:3001/callback
の画面が表示されアクセストークンが表示されたと思います。
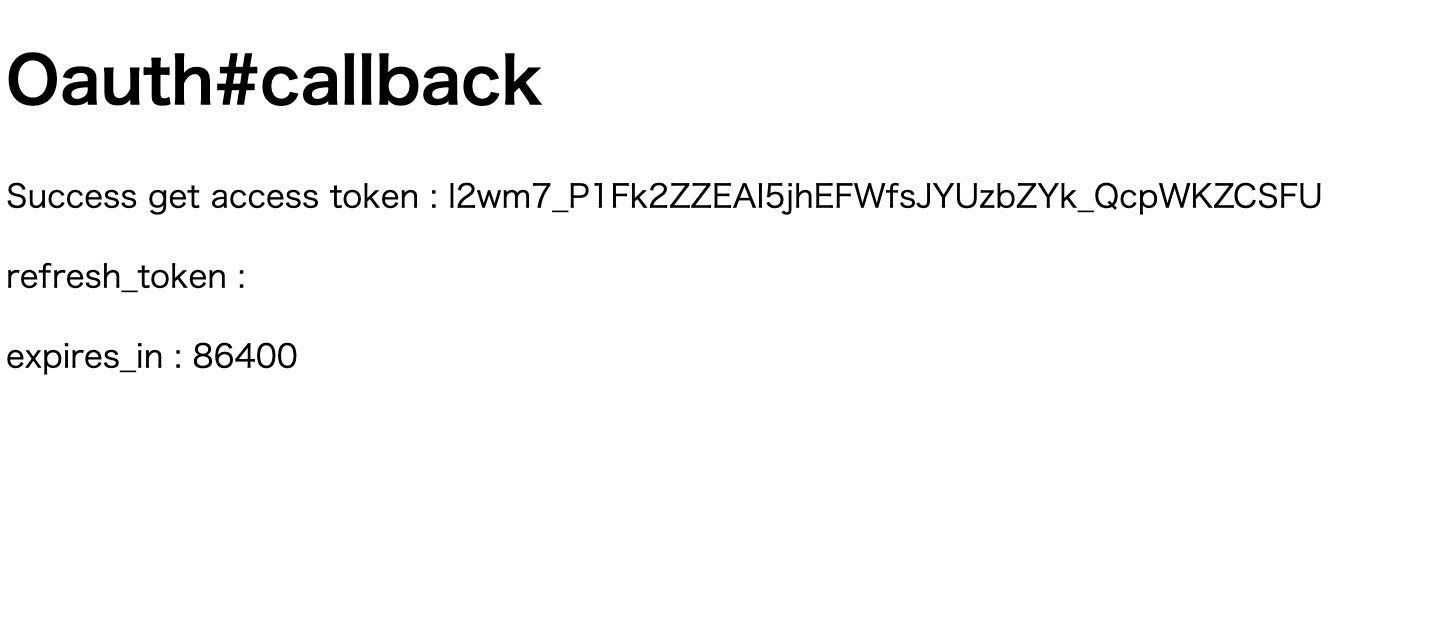
認可画面で[Authorize]をクリック後にcallbackURLへ認可コードパラメータが返ってくるのでそれをもとにアクセストークンを取得しています。
# 認可コードよりaccess_tokenを取得
  def callback
    client = OAuth2::Client.new(
      ENV["CLIENT_ID"],
      ENV["CLIENT_SECRET"],
      site: ENV["SITE"],
      authorize_url: ENV["AUTHORIZE_URL"],
      token_url: ENV["TOKEN_URL"],
    )

    @access_token = client.auth_code.get_token(
      params[:code],
      redirect_uri: ENV["CALLBACK_URI"],
    )
  end
実際に作成されたAccessGrantとAccessTokenを rails consoleで確認する場合は以下のような感じで確認できます。
irb(main):010:0> Doorkeeper::AccessGrant.all
=> #<ActiveRecord::Relation [#<Doorkeeper::AccessGrant id: 1, resource_owner_id: 1, application_id: 1, token: "j0UY2MVee0mW9RmjVhPTZ6hY7yzw44nM5YOS51ZhxUk", expires_in: 600, redirect_uri: "http://localhost:3001/callback", created_at: "2020-12-14 17:54:24", revoked_at: "2020-12-14 17:54:24", scopes: "public write">]>

irb(main):011:0> Doorkeeper::AccessToken.all
=> #<ActiveRecord::Relation [#<Doorkeeper::AccessToken id: 1, resource_owner_id: 1, application_id: 1, token: "l2wm7_P1Fk2ZZEAI5jhEFWfsJYUzbZYk_QcpWKZCSFU", refresh_token: nil, expires_in: 86400, revoked_at: nil, created_at: "2020-12-14 17:54:24", scopes: "public write", previous_refresh_token: "">]>
最後に
doorkeeper gemはドキュメントが豊富なため導入のハードルは低いと思います。
ただdoorkeeper.rbで設定できるオプションが多いため全て確認するには非常に時間がかかります。
doorkeeper.rbでの設定がこのgemのポイントなので色々試してみようと思います。