概要
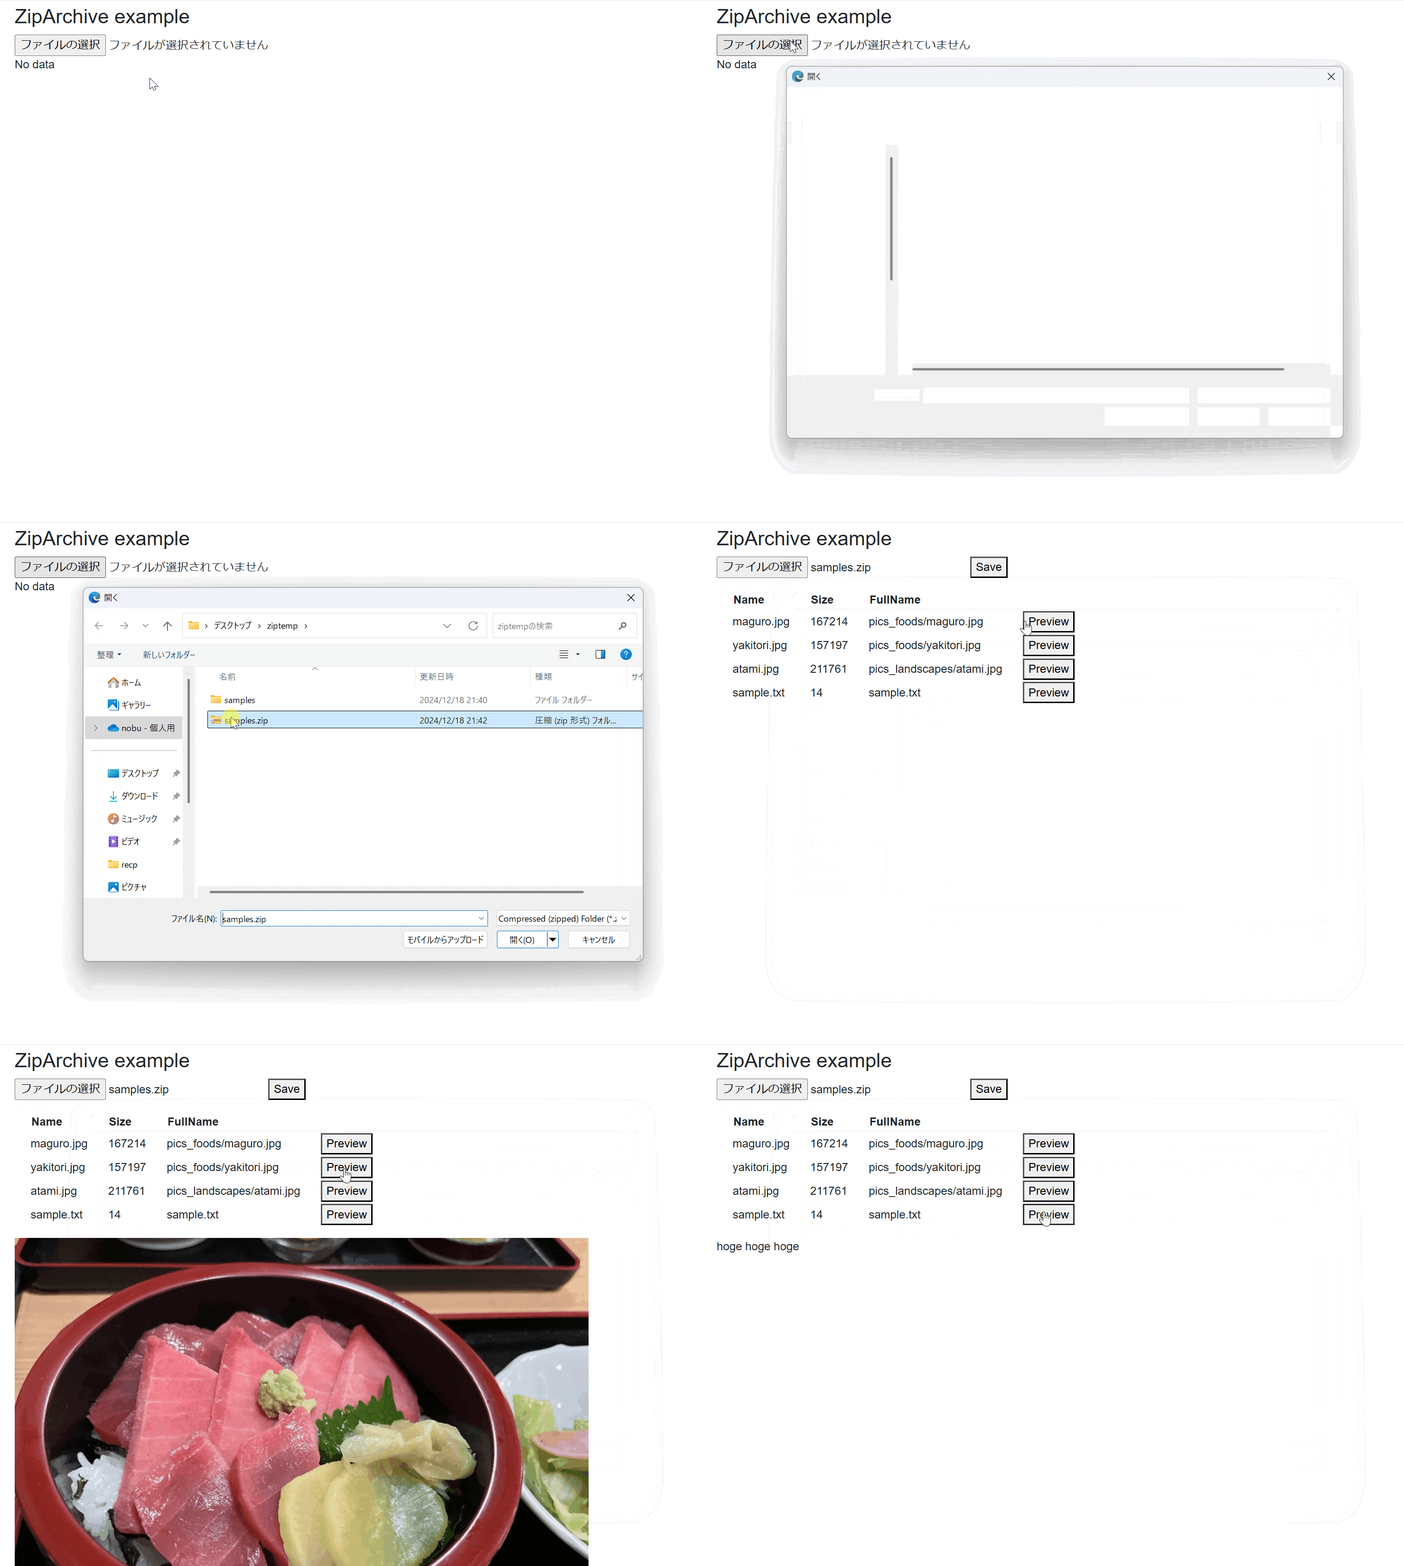
今回はBlazor WebAssemblyを使用してブラウザ上だけでZipファイルの読み込み&作成、保存を行う方法をサンプルアプリを通して紹介します。
Webアプリケーションであれば、一般的にサーバーサイドでファイルの操作などを行うと思いますが、
ブラウザ上だけで全て操作することで、静的ファイルの配信だけで済み、ちょっとしたツールなどの用途としてお手軽にデプロイしたりすることができるようになります。
今回紹介するサンプルアプリ
下記の2つの機能を持ちます。
1.Zipファイルの読み込み&表示
読み込んだZip内に存在するファイルを一覧として表示します。
画像やテキストなど一部のファイルはプレビューボタンを押すことで表示ができます。
2.Zipファイルの再パッケージ
読み込んだZipファイルを再パッケージします。
そのままだと芸がないので、一覧情報を含んだテキストをZip内に追加します。
デモとコード
下記にて公開しています。参考までに。
Demo (GitHub Pages)
Code (GitHub)
GitHub Pagesへのデプロイは@jsakamotoさん公開のNugetパッケージを使用しており、便利でいつも助かっています。
説明
環境
- Windows11
- Visual Studio 2022 (Version 17.12.3)
- .NET 9.0
Zipファイルの読み込み
データ定義
まずは、読み込んだZipファイルを画面で使用するためのデータ定義を用意します。
    // Zipファイル内の個々のファイル情報
    public class ZipContent
    {
        public string FullName { get; set; }
        public string Name { get; set; }
        public byte[] Bytes { get; set; }
        public long Size { get; set; }
    }
    // Zip ファイル自体の情報
    public class ZipInfo
    {
        public string Name { get; set; }
        public List<ZipContent> Contents { get; set; } = new List<ZipContent>(); // ファイル情報
        public List<string> Directories { get; set; } = new List<string>(); // ディレクトリ情報
    }
ファイル入力と読み込み
ファイルの入力にはBlazorの標準コンポーネントのInputFileを使用します。
細かい使い方やエラーチェック等は省略しますが、今回は単一のzipファイルの読み込みを前提とします。
読み込んだファイルのStreamを取得して、.NET標準ライブラリのZipArchiveクラスに渡します。
(今回はMemoryStreamを使って一括読み込みしていますが、大きいサイズが想定される場合にはバッファを使った読み込み方もできます。)
<InputFile OnChange="LoadFilesAsync" accept=".zip" />

@code{
    private const int MaxAllowZipSize = 10000000; // ファイルの最大許容サイズ
    private async Task LoadFilesAsync(InputFileChangeEventArgs e)
    {
        IBrowserFile file = e.File; // 単一ファイルとして受け取り
        using var ms = new MemoryStream();
        await file.OpenReadStream(MaxAllowZipSize).CopyToAsync(ms);

        // Zip内のファイルを順番に読む
        var zipInfo = new ZipInfo() { Name = file.Name };
        using var archive = new ZipArchive(ms, ZipArchiveMode.Read);
        foreach (var entry in archive.Entries)
        {
            // ディレクトリ
            if (string.IsNullOrEmpty(entry.Name) && entry.FullName.EndsWith("/"))
            {
                zipInfo.Directories.Add(entry.FullName);
                continue;
            }
            // ファイル
            using var fs = entry.Open();
            using var fms = new MemoryStream();
            await fs.CopyToAsync(fms);

            var content = new ZipContent() { Name = entry.Name, FullName = entry.FullName, Bytes = fms.ToArray(), Size = entry.Length };
            zipInfo.Contents.Add(content);
        }
    }
一覧情報の表示
次はファイル情報を一覧として表示するためのコンポーネントを作成します。
今回は、.NET8で追加されたMS製のコンポーネントのQuickGridを使用することとします。
Nugetから"Microsoft.AspNetCore.Components.QuickGrid"を追加してください。
dotnet add package Microsoft.AspNetCore.Components.QuickGrid
@if(ZipInfo == null || !ZipInfo.Contents.Any())
{
    <p>No data</p>
}
else
{
    <QuickGrid Items="@ZipInfo.Contents.AsQueryable()">
        <PropertyColumn Property="@(p => p.Name)"/>
        <PropertyColumn Property="@(p => p.Size)"/>
        <PropertyColumn Property="@(p => p.FullName)" />
    </QuickGrid>
}

@code {
    [Parameter]
    public ZipInfo? ZipInfo { get; set; }
}
プレビュー情報の表示
次は、選択したアイテムをプレビュー表示できるようにします。
ファイルに応じて、テキスト表示したり、画像を表示したりしたいので、ファイル種別ごとに異なるコンポーネントを作成します。
下記はテキストと画像ファイルの表示コンポーネントの例です。
@if (Text != null)
{
    <p>@Text</p>
}
else
{
    <p>Null Text</p>
}
@code {
    [Parameter] public string? Text { get; set; }
}
@if(!string.IsNullOrEmpty(Base64Str))
{
    <img src="data:image;base64, @Base64Str" />
}
else
{
    <p>No image</p>
}
@code {
    // base64文字列として受け取って、imgタグに埋め込むことで表示する
    [Parameter] public string? Base64Str { get; set; }
}
これらのコンポーネントを動的に切り替えたいので、.NET6追加されたDynamicComponentを使用します。
このコンポーネントは表示したいコンポーネントの型名を渡すことで、動的に表示できるので今回のようなケースに便利です。
<DynamicComponent Type="_componentType" Parameters="_parameters" />

@code {
    private Type _componentType; // Componentの型名
    private Dictionary<string, object> _parameters; // Componentに渡したいパラメータ
}
詳細は下記を参照ください。
DynamicComponentにデータを渡すためのメタデータと、ファイルからどのコンポーネントを作るのか判断してメタデータを生成するクラスを下記のように作ります。
    // DynamicComponentに渡すためのメタデータ
    public class ComponentMetadata
    {
        public required Type Type { get; set; }
        public Dictionary<string, object> Parameters { get; set; } = new Dictionary<string, object>();
    }
    // ファイルに応じてメタデータを作成するクラス
    public static class ContentFactory
    {
        private static HashSet<string> _imageExtensions = new HashSet<string>() { ".jpg", ".jpeg", ".png" };
        private static HashSet<string> _textExtensions = new HashSet<string>() { ".txt", ".log", ".text" };

        public static ComponentMetadata CreateMetaData(ZipContent content)
        {
            try
            {
                var fileNameLower = content.Name.ToLower();
                // 拡張子によるチェック(画像、テキスト、プレビュー不可)
                if (_imageExtensions.Any(x => fileNameLower.EndsWith(x)))
                {
                    return new ComponentMetadata() { Type = typeof(ImagePreview), Parameters = new() { { "Base64Str", Convert.ToBase64String(content.Bytes) } } };
                }
                if (_textExtensions.Any(x => fileNameLower.EndsWith(x)))
                {
                    return new ComponentMetadata() { Type = typeof(TextPreview), Parameters = new() { { "Text", Encoding.UTF8.GetString(content.Bytes) } } };
                }
                return new ComponentMetadata() { Type = typeof(NotSupportedPreview) };
            }
            catch (Exception e)
            {
                return new ComponentMetadata() { Type = typeof(ErrorPreview), Parameters = new() { { "Exception", e } } };
            }
        }
    }
先ほどの一覧コンポーネントにPreviewボタンと合わせて追加します。
@if(ZipInfo == null || !ZipInfo.Contents.Any())
{
    <p>No data</p>
}
else
{
    <QuickGrid Items="@ZipInfo.Contents.AsQueryable()">
        <PropertyColumn Property="@(p => p.Name)"/>
        <PropertyColumn Property="@(p => p.Size)"/>
        <PropertyColumn Property="@(p => p.FullName)" />
+       <TemplateColumn Title="">
+           <button type="button" @onclick="() => OnPreViewClick(context)">Preview</button>
+       </TemplateColumn>
    </QuickGrid>

+    @if(_previewComponentMetaData != null)
+    {
+        <DynamicComponent Type="_previewComponentMetaData.Type" Parameters="_previewComponentMetaData.Parameters" />
+    }
}

@code {
    [Parameter]
    public ZipInfo? ZipInfo { get; set; }
+    private ComponentMetadata? _previewComponentMetaData;

+    private void OnPreViewClick(ZipContent e)
+    {
+        _previewComponentMetaData = ContentFactory.CreateMetaData(e);
+    }
}
これでZipファイルを読み込んで、表示することができました。
次はZipファイルの保存です。
Zipファイルの書き込&保存
Zipファイルの作成に関しても、読み込みと同じくZipArchiveクラスが使用できます。
@inject IJSRuntime JSRuntime

<button type="button" @onclick="SaveZipAsync">Save</button>

@code {
    private async Task SaveZipAsync()
    {
        using (var zipStream = new MemoryStream())
        {
            using (var archive = new ZipArchive(zipStream, ZipArchiveMode.Create, true))
            {
                // ディレクトリを先に作成
                foreach (var dir in _zipInfo.Directories)
                {
                    archive.CreateEntry(dir);
                }
                // ファイルを書き込み
                foreach (var content in _zipInfo.Contents)
                {
                    var entry = archive.CreateEntry(content.FullName);
                    using (var entryStream = entry.Open())
                    {
                        await entryStream.WriteAsync(content.Bytes, 0, (int)content.Bytes.Length);
                    }
                }
                // 一覧情報の作成&書き込み
                var csvBytes = Encoding.UTF8.GetBytes(_zipInfo.ToCsv());
                var csvEntry = archive.CreateEntry("Summary.csv");
                using (var entryStream = csvEntry.Open())
                {
                    await entryStream.WriteAsync(csvBytes, 0, (int)csvBytes.Length);
                }
            }
            // Base64文字列に変換してJS側に渡す(詳細は後述)
            zipStream.Position = 0;
            var bse64Str = Convert.ToBase64String(zipStream.ToArray());
            await using var module = await JSRuntime.InvokeAsync<IJSObjectReference>("import", "./js/savefile.js");
            await module.InvokeVoidAsync("saveAsZipAsync", _zipInfo.Name, bse64Str);
        }
    }

}
なお、Using Declarationを使う場合、Disposeのタイミングの問題なのか、画像ファイルを含むZipファイル作成時に壊れたZipができてしまったので昔ながらの書き方にしています。
ファイルの保存処理はjsファイル側で作成して、Blazorから呼び出しています。
js側は下記のようBase64文字列をBlobに変換し、それを動的に作成したaタグをクリックしてダウンロードを行うような実装をしています。
export const saveAsZipAsync = async (fileName, base64Str) => {
    const byteChars = atob(base64Str);
    const byteNumers = new Array(byteChars.length);
    for (let i = 0; i < byteChars.length; i++) {
        byteNumers[i] = byteChars.charCodeAt(i);
    }
    const byteArray = new Uint8Array(byteNumers);
    const blob = new Blob([byteArray], { type: "application/zip" });

    const link = document.createElement("a");
    link.href = window.URL.createObjectURL(blob);
    link.download = fileName
    link.click();

    link.remove();
    window.URL.revokeObjectURL(url);
}
なお、@jsakamotoさん公開の下記のパッケージを使用することで、JS側を意識せず、Streamを渡すだけでらくちんに実装ができます。
その他の方法
ZipArchiveクラスを使用した例を紹介しましたが、.NET標準のライブラリには他にも同様な機能を提供するクラスがあり、ZipFileクラスを使用した例を紹介します。
ZipFileクラスは特定のパスを指定して、Zipを展開したり圧縮するクラスなのでブラウザ上で動くわけはないと思っていたのですが、実は使えます。
@code {
    private const string TempExtractPath = "/tmp"; // Zipファイルを展開する一時パス
    private const int MaxZipSize = 10000000;
    private ZipInfo? _zipInfo;
    private async Task LoadFilesAsync(InputFileChangeEventArgs e)
    {
        IBrowserFile file = e.File;
        using var ms = new MemoryStream();
        await file.OpenReadStream(MaxZipSize).CopyToAsync(ms);
        ms.Position = 0;

        if (Directory.Exists(TempExtractPath))
        {
            Directory.Delete(TempExtractPath, true);
        }
        // 一時ディレクトリにZipファイルを展開&ファイル情報を読み取り
        ZipFile.ExtractToDirectory(ms, TempExtractPath);
        var di = new DirectoryInfo(TempExtractPath);
        var contents = di.GetFiles("*.*", SearchOption.AllDirectories);
        var zipInfo = new ZipInfo() { Name = file.Name };
        foreach (var content in contents)
        {
            using var fs = content.OpenRead();
            using var fms = new MemoryStream();
            await fs.CopyToAsync(fms);
            // FullNameには一時ディレクトから始まるので削る
            var zcontent = new ZipContent() { Name = content.Name, FullName = content.FullName.Substring(TempExtractPath.Length + 1), Bytes = fms.ToArray(), Size = content.Length };
            zipInfo.Append(zcontent);
        }

        _zipInfo = zipInfo;
    }
}
ローカル上の絶対パスにはもちろんアクセスはできませんが、ブラウザ上でのみ使用する相対パスを指定して、.NETではなじみ深いファイル用のAPIでのアクセスができます。(永続化はされないのでブラウザを閉じたら消えます。)
Zipファイルの作成も、解凍したディレクトリを指定するだけで実行できるのでかなり楽ちんです。
Fileクラスを使って、解凍ディレクトリ内にファイルを追加といったことも、もちろんできます。
下記の例では、解凍したディレクトリ内にCSVファイルを直接書き込みを行い、そのまま圧縮をしています。
@code {
    private const string TempOutPath = "/tmpout";

    private async Task SaveZipAsync()
    {
        // 出力用の一時ディレクトリの作成
        if (Directory.Exists(TempOutPath))
        {
            Directory.Delete(TempOutPath, true);
        }
        Directory.CreateDirectory(TempOutPath);
        // CSVをZip展開済みのディレクトリ内に作成
        var csvBytes = Encoding.UTF8.GetBytes(_zipInfo.ToCsv());
        await File.WriteAllBytesAsync(Path.Combine(TempExtractPath, "Summary.csv"), csvBytes);
        // 一時ディレクトリにZip生成&読み込み
        var zipDestination = Path.Combine(TempOutPath, _zipInfo.Name);
        ZipFile.CreateFromDirectory(TempExtractPath, zipDestination);
        var zipBytes = await File.ReadAllBytesAsync(zipDestination);
        var bse64Str = Convert.ToBase64String(zipBytes);

        await using var module = await JSRuntime.InvokeAsync<IJSObjectReference>("import", "./js/savefile.js");
        await module.InvokeVoidAsync("saveAsZipAsync", _zipInfo.Name, bse64Str);
    }
}
まとめ
今回はBlazor WebAssemblyを使用してブラウザ上だけでZipファイルの読み込み&作成、保存を行う方法を説明しました。
ブラウザ上で動くものの、.NET標準のライブラリを使用することができるという、Blazorの便利さを実感する内容となっています。
さくっとお手軽なツールとして作ってデプロイしたい時などに使用できるかもしれませんね。
個人的には、DirectoryやFileといった各種ファイルを操作するためのお馴染みのクラス群がブラウザ上で動かせるということに驚きました。

