経緯
様々アセットを用いたりしてDB(Mysql)との連携を試みましたが、WWWを使いphp経由でDBとの連携を行うことが一番手っ取り早いと言うことがわかりました。
Unity ⇔ php ⇔ DB(Mysql)の連携方法を書きます。
今回の実験環境
windows 10
Unity 5.6.0f3
DB と apache は XAMPP Version: 5.6.30 に入ってたもの
方法
1.DBの作成
とりあえず手慣らし程度に今回はSELECT文の結果をUnityに送りたいと思います。
MysqlのDB上に以下のようなテーブルを作成します
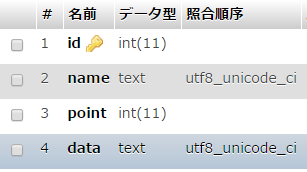
今回は4つカラムを追加しました
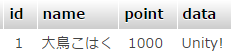
1つ実験用のレコードを以下の様にも追加しました
2.phpの作成
以下の2つのphpのプログラムを作成して今回のテスト環境であるXamppのapacheのホームディレクトリに置きます。PDOを利用しています。
<?php

require_once('mysql_connect.php');
$pdo = connectDB();

//POSTうけとり
$id = $_POST["id"]; //要求されてくるid

try {
    //今回ここではSELECT文を送信している。UPDATE、DELETEなどは、また少し記法が異なる。
    $stmt = $pdo->query("SELECT * FROM `unity` WHERE `id` = '". $id. "'");
    foreach ($stmt as $row) {
     //今回はただカラムを指定し、出力された文字列を結合して出力
        $res = $row['id'];
        $res = $res. $row['name'];
        $res = $res. $row['point'];
        $res = $res. $row['data'];
    }

} catch (PDOException $e) {
    var_dump($e->getMessage());
}
$pdo = null;    //DB切断

echo $res;  //unity に結果を返す
<?php

//PDO MySQL接続
function connectDB(){

//ユーザ名やDBアドレスの定義
    $dsn = 'mysql:dbname=qiita;host=127.0.0.1;charset=utf8';
    $username = 'username';
    $password = 'passwd';

    try {
        $pdo = new PDO($dsn, $username, $password);
    } catch (PDOException $e) {
        exit('' . $e->getMessage());
    }

    return $pdo;
}
mysql_connect.phpではDBに接続するときの情報を記述します。このように接続情報をこのファイルにまとめることで、今回データをUnity側とやりとりするファイルはselecttest.phpだけですが、複数のデータをやり取りするphpファイルを作成したとき、require_once('mysql_connect.php'); $pdo = connectDB();を追加してやるだけでDBに接続でき、尚且つmysql_connect.phpの内容を変えてやるだけで全てのphpのDB接続先を一括で変更可能なので、とても楽になります。
selecttest.phpではUnity側からアクセスされてどのようにDBにSQL文を送信し、結果をどのように返すかを記述してあります。今回はただレコードの結果を文字列結合してやって、echoで返してやっているだけになります。
ここまで作ればあとはUnityからこのPHPにアクセスしてやるだけで結果がUnityに行き、それをUnityに表示すれ完成になります。
3.Unity側の作成
最後にUnity側のスクリプトとsceneの作成に入っていきます。
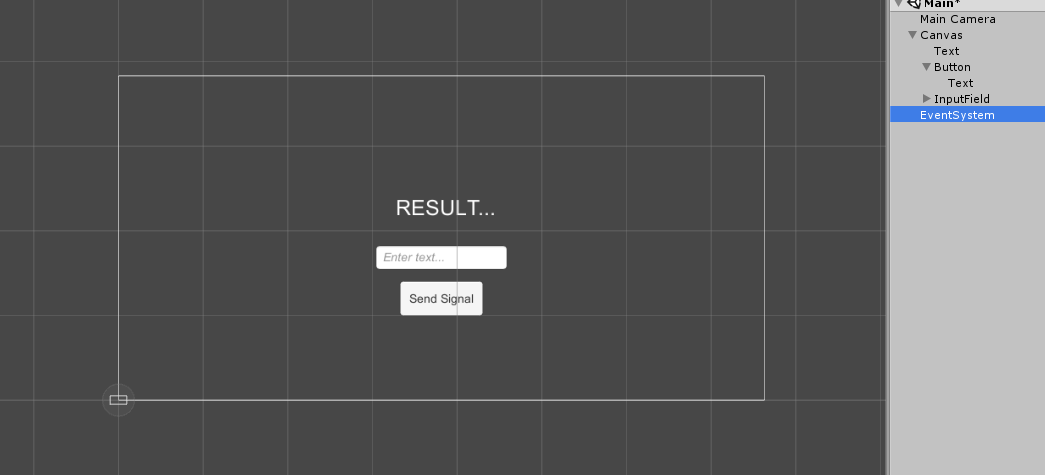
シンプルです。2Dでプロジェクトを作成してUGUIでText、InputField、Buttonを配置しただけです。
InputFieldにレコードのidを入れてSendSignalボタンを押すとRESULT...というテキストに結果が入るようにしたいと思います。
using System.Collections;
using System.Collections.Generic;
using UnityEngine;
using UnityEngine.UI;

public class Catch : MonoBehaviour {

    public Text ResultText_;    //結果を格納するテキスト
    public Text InputText_;     //idを入力するインプットフィールド

    public string ServerAddress = "localhost/selecttest.php";  //selecttest.phpを指定 今回のアドレスはlocalhost

    //SendSignalボタンを押した時に実行されるメソッド
    public void SendSignal_Button_Push() {
        StartCoroutine("Access");   //Accessコルーチンの開始
    }

    private IEnumerator Access() {
        Dictionary<string, string> dic = new Dictionary<string, string>();

        dic.Add("id", InputText_.GetComponent<Text>().text);  //インプットフィールドからidの取得);
        //複数phpに送信したいデータがある場合は今回の場合dic.Add("hoge", value)のように足していけばよい

        StartCoroutine(Post(ServerAddress, dic));  // POST

        yield return 0;
    }

    private IEnumerator Post(string url, Dictionary<string, string> post) {
        WWWForm form = new WWWForm();
        foreach (KeyValuePair<string, string> post_arg in post) {
            form.AddField(post_arg.Key, post_arg.Value);
        }
        WWW www = new WWW(url, form);

        yield return StartCoroutine(CheckTimeOut(www, 3f)); //TimeOutSecond = 3s;

        if (www.error != null) {
            Debug.Log("HttpPost NG: " + www.error);
            //そもそも接続ができていないとき

        } else if (www.isDone) {
            //送られてきたデータをテキストに反映
            ResultText_.GetComponent<Text>().text = www.text;
        }
    }

    private IEnumerator CheckTimeOut(WWW www, float timeout) {
        float requestTime = Time.time;

        while (!www.isDone) {
            if (Time.time - requestTime < timeout)
                yield return null;
            else {
                Debug.Log("TimeOut");  //タイムアウト
                //タイムアウト処理
                //
                //
                break;
            }
        }
        yield return null;
    }
}
上記のスクリプトをボタンに埋め込んでUnity側で実行ボタンを押し、インプットフィールドにidの「1」を入れてSend Signalを押した結果が以下です。
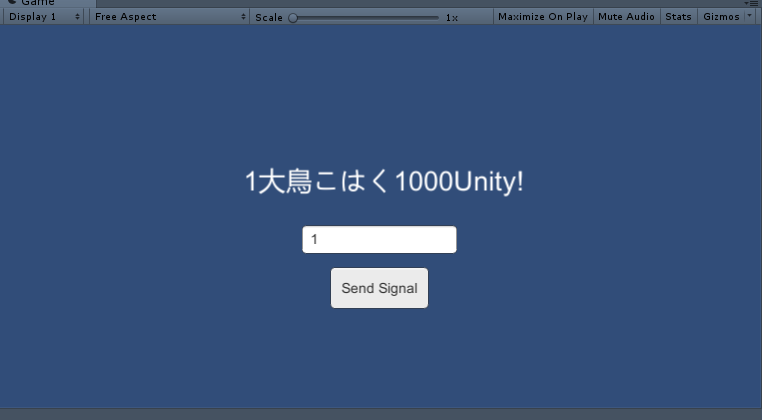
DBから1つのレコードのデータをUnity側にアセットなしで持って来ることができました!
ありがとうございました。