Pref.
個人的OculusGo開発用の備忘録です.
だんだん書き足していく予定です.
毎回の如く間違っていたらコメントをよろしくお願い致します.
Env.
Unity20181.1f1
基本設定
1. PlayerSettingの変更
- 通常のAndroidビルド時の設定のとき同様にCompanyNameなどを変更する.
- Other Settings / Minimam API Levelを API Level 19に変更する.
- XR Settings / Virtual Reality Supported にチェックを入れ,Virtual Reality SDKsにOculusを追加する.
2. OculusGo Utility をインポート
以下のURLからOculus Utility をDLして,中にあるunitypackeageをプロジェクトに展開する
これをしないとはじまらない( •̀ .̫ •́ )✧
https://developer.oculus.com/downloads/package/oculus-utilities-for-unity-5/
3. パフォーマンス設定
適当な名前のスクリプトを作成し適当なオブジェクトにアタッチを行う.
以下の記述を行うことで描画のクオリティーが激変する.
using System.Collections;
using System.Collections.Generic;
using UnityEngine;

public class SystemUtility : MonoBehaviour {

    void Start () {
        OVRManager.display.displayFrequency = 72f; //72Hzモードに変更

        //パフォーマンスレベルの変更 Default=2 0~3,低~高 とパフォーマンスが変わる
        //3にすると高クロックになり著しくバッテリー消費と発熱を起こす.
        OVRManager.cpuLevel = 2;
        OVRManager.gpuLevel = 2;
    }
}
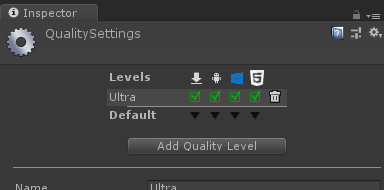
また Edit/ProjectSettings/Qualityを開き以下のようにLevelを設定する.
4. カメラを配置
はじめから存在しているCameraを削除し,
Oculus/VR/Prefabs/OVRCameraRig.prefabをヒエラルキーに配置を行う.
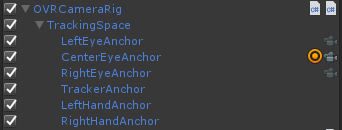
5. コントローラを配置
Oculus/VR/Prefabs/TrackedRemote.prefabをLeftHandAnchorとRightHandAnchorの両方にアタッチすることで
システム設定の右利きか左利きかで自動的に左右が選ばれるコントローラが表示される.

その他
OVRManager
| 関数 | 説明 |
|---|---|
| OVRManager.display.RecenterPose(); | 位置の初期化 |
参考
https://framesynthesis.jp/tech/unity/oculusgo/
https://framesynthesis.jp/tech/2015/07/oculuslegacy/
https://www.pixiv.net/fanbox/creator/177993/post/43818
http://rikoubou.hatenablog.com/entry/2018/06/04/193607