USB over IP技術を用い、手元のRaspberry Piに挿したUSBをクラウドの先にあるマシンに認識させる。
VPNツールとしてSoftEther VPNを、 USB over IPツールとしてVirtualHereを用いる。
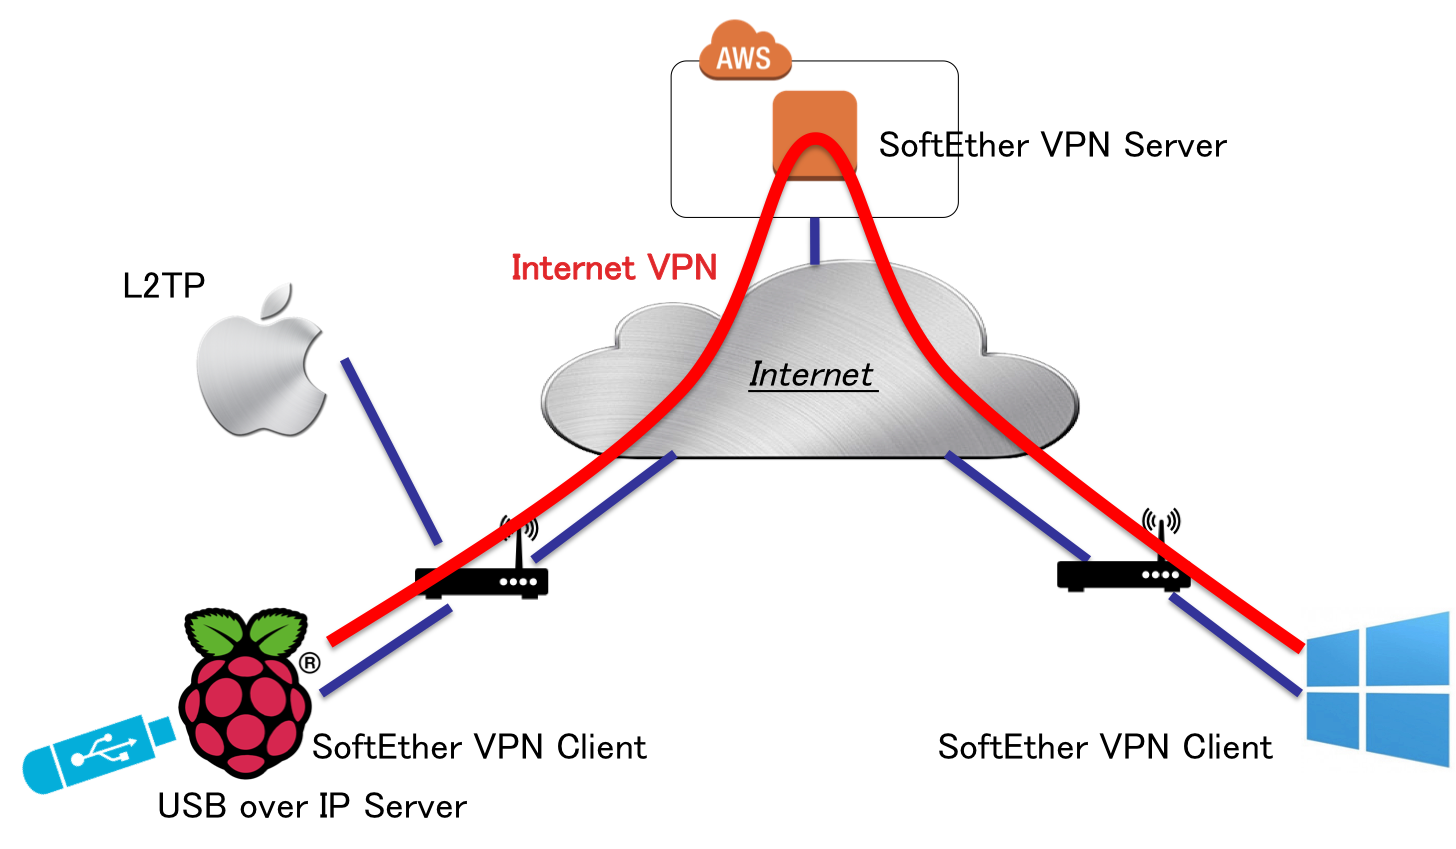
VPNの構築
VPNサーバ(AWS EC2)
| SPEC | |
|---|---|
| Region | Tokyo (ap-northest-1c) |
| AMI | Amazon Linux AMI 2014.09.1 (HVM) - ami-4985b048 64bit |
| Instance Type | m3.medium |
| VPC Subnet | 172.30.2.0/24 (Auto-assign Public IP Enable) |
| Storage | 8GB (General Purpose SSD) |
| Security Group | 22/tcp, 443/tcp, 500/udp, 4500/udp |
インストール
$ sudo yum -y update
$ sudo yum -y groupinstall "Development Tools"
$ wget http://jp.softether-download.com/files/softether/v4.12-9514-beta-2014.11.17-tree/Linux/SoftEther_VPN_Server/64bit_-_Intel_x64_or_AMD64/softether-vpnserver-v4.12-9514-beta-2014.11.17-linux-x64-64bit.tar.gz
$ tar xvfz softether-vpnserver-v4.12-9514-beta-2014.11.17-linux-x64-64bit.tar.gz
$ cd vpnserver/
$ make
 Do you want to read the License Agreement for this software ? -> 1. Yes
 Did you read and understand the License Agreement ? -> 1. Yes
 Did you agree the License Agreement ? -> 1. Agree
$ cd ~
$ vpnserver/vpncmd
 1. VPN Server または VPN Bridge の管理
 2. VPN Client の管理
 3. VPN Tools コマンドの使用 (証明書作成や通信速度測定)

 1 - 3 を選択: 3
 VPN Tools>check
 ...
 すべてのチェックに合格しました。このシステム上で SoftEther VPN Server / Bridge が正しく動作する可能性が高いと思われます。

 コマンドは正常に終了しました。
 VPN Tools>exit
$ sudo vpnserver/vpnserver start
VPN Toolsのcheckコマンドを実行し、全て「合格」であることを確認した後にVPN Serverを起動する
設定
$ vpnserver/vpncmd
 1. VPN Server または VPN Bridge の管理
 2. VPN Client の管理
 3. VPN Tools コマンドの使用 (証明書作成や通信速度測定)

 1 - 3 を選択: 1

 接続先のホスト名または IP アドレス: localhost:443
 接続先の仮想 HUB 名を入力: (何も入力せずにENTER)
 VPN Server>ServerPasswordSet

# Listenerの設定
 VPN Server>ListenerDisable 992
 VPN Server>ListenerDisable 1194
 VPN Server>ListenerDisable 5555
 VPN Server>ListenerList
 ポート番号|状態
 ----------+------
 TCP 443   |動作中
 TCP 992   |停止中
 TCP 1194  |停止中
 TCP 5555  |停止中

# DynamicDNSの設定
 VPN Server>DynamicDnsSetHostname aws-softether-server
 VPN Server>DynamicDnsGetStatus
 項目                                    |値
 ----------------------------------------+-----------------------------
 割当ダイナミック DNS ホスト名 (完全)    |aws-softether-server.softether.net
 割当ダイナミック DNS ホスト名 (ホスト名)|aws-softether-server
 DNS サフィックス                        |.softether.net
 グローバル IPv4 アドレス                |XX.XX.XX.XX

# 仮想HUBの作成
 VPN Server>HubCreate SE_VHUB
 VPN Server>Hub SE_VHUB

# 接続ユーザの作成
 VPN Server/SE_VHUB>UserCreate mac
 VPN Server/SE_VHUB>UserPasswordSet mac
 VPN Server/SE_VHUB>UserCreate raspi
 VPN Server/SE_VHUB>UserPasswordSet raspi
 VPN Server/SE_VHUB>UserCreate win
 VPN Server/SE_VHUB>UserPasswordSet win

# DHCPの設定設定
 VPN Server/SE_VHUB>SecureNatEnable
 VPN Server/SE_VHUB>DhcpEnable
 VPN Server/SE_VHUB>DhcpGet
 項目                                |値
 ------------------------------------+--------------
 仮想 DHCP 機能を使用する            |はい
 配布アドレス帯の開始                |192.168.30.10
 配布アドレス帯の終了                |192.168.30.200
 サブネットマスク                    |255.255.255.0
 リース期限 (秒)                     |7200
 デフォルトゲートウェイアドレス      |192.168.30.1
 DNS サーバー アドレス 1             |192.168.30.1
 DNS サーバー アドレス 2             |なし
 ドメイン名                          |
 NAT および DHCP の動作のログ保存    |はい
 プッシュする静的ルーティングテーブル|

# L2TP/IPSecの有効化
 VPN Server>IPsecEnable
  L2TP over IPsec サーバー機能を有効 (yes / no): yes
  Raw L2TP サーバー機能を有効 (yes / no): no
  EtherIP / L2TPv3 over IPsec サーバー機能を有効 (yes / no): no
  IPsec 事前共有鍵の文字列 (9 文字以下を推奨): awssevpn
  VPN 接続時に仮想 HUB 名が省略された場合のデフォルト仮想 HUB 名: SE_VHUB

 VPN Server>IPsecGet
 項目                                          |値
 ----------------------------------------------+--------
 L2TP over IPsec サーバー機能は有効            |はい
 Raw L2TP サーバー機能は有効                   |いいえ
 EtherIP / L2TPv3 over IPsec サーバー機能は有効|いいえ
 IPsec 事前共有鍵の文字列                      |awssevpn
 デフォルト仮想 HUB 名                         |SE_VHUB
VPNクライアント(Raspberry Pi)
| SPEC | |
|---|---|
| Device | Raspberry Pi model B+ |
| OS | 7.6 (3.12.28+ #709) |
| hostname | raspi |
インストール
$ wget http://jp.softether-download.com/files/softether/v4.12-9514-beta-2014.11.17-tree/Linux/SoftEther_VPN_Client/32bit_-_ARM_EABI/softether-vpnclient-v4.12-9514-beta-2014.11.17-linux-arm_eabi-32bit.tar.gz
$ tar xvfz softether-vpnclient-v4.12-9514-beta-2014.11.17-linux-arm_eabi-32bit.tar.gz
$ cd vpnclient/
$ make
 Do you want to read the License Agreement for this software ? -> 1. Yes
 Did you read and understand the License Agreement ? -> 1. Yes
 Did you agree the License Agreement ? -> 1. Agree
$ cd ~
$ sudo ./vpnclient/vpnclient start
設定
$ vpnclient/vpncmd
 1. Management of VPN Server or VPN Bridge
 2. Management of VPN Client
 3. Use of VPN Tools (certificate creation and Network Traffic Speed Test Tool)

 Select 1, 2 or 3: 2

 Hostname of IP Address of Destination: localhost
 VPN Client>PasswordSet

# 仮想NICの作成
 VPN Client>NicCreate SE_VNIC
 VPN Client>exit
 $ sudo sh -c "echo 'allow-hotplug vpn_se_vnic' >> /etc/network/interfaces"
 $ sudo sh -c "echo 'iface vpn_se_vnic inet dhcp' >> /etc/network/interfaces"
# VPN接続アカウントの作成
$ vpnclient/vpncmd
1. Management of VPN Server or VPN Bridge
2. Management of VPN Client
3. Use of VPN Tools (certificate creation and Network Traffic Speed Test Tool)
Select 1, 2 or 3: 2
Password:
VPN Client>AccountCreate raspi
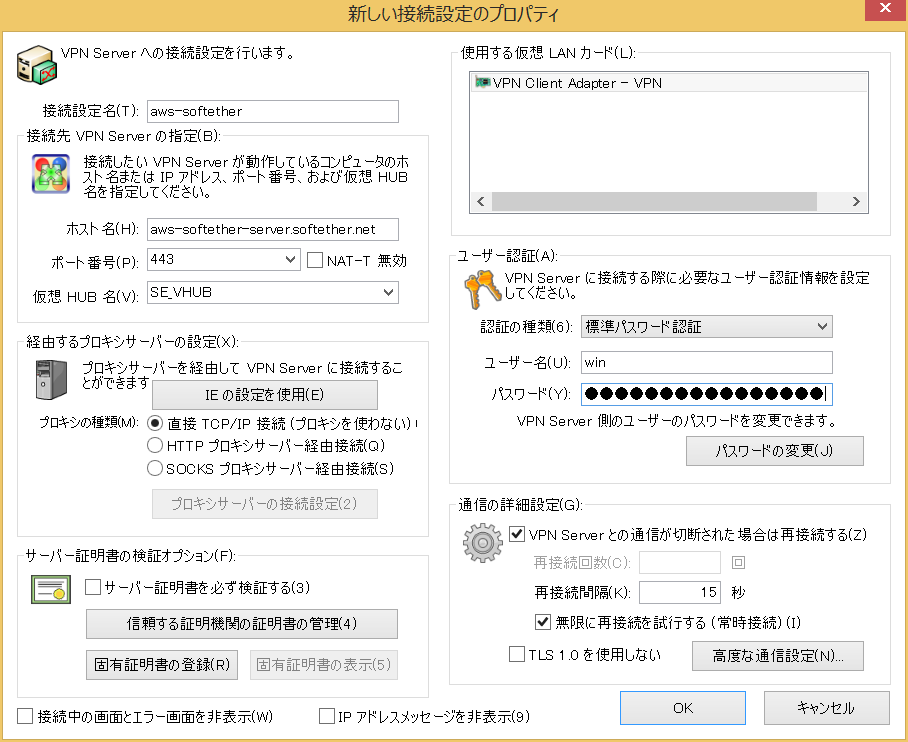
Destination VPN Server Host Name and Port Number: aws-softether-server.softether.net:443
Destination Virtual Hub Name: SE_VHUB
Connecting User Name: raspi
Used Virtual Network Adapter Name: SE_VNIC
VPN Client>AccountPasswordSet raspi
Password: ****************
Confirm input: ****************
Specify standard or radius: standard
VPN Client>AccountStartupSet raspi
VPN Client>KeepEnable raspi
VPN Client>AccountStatusShow raspi
VPN Client>exit
$sudo shutdown -r now
接続
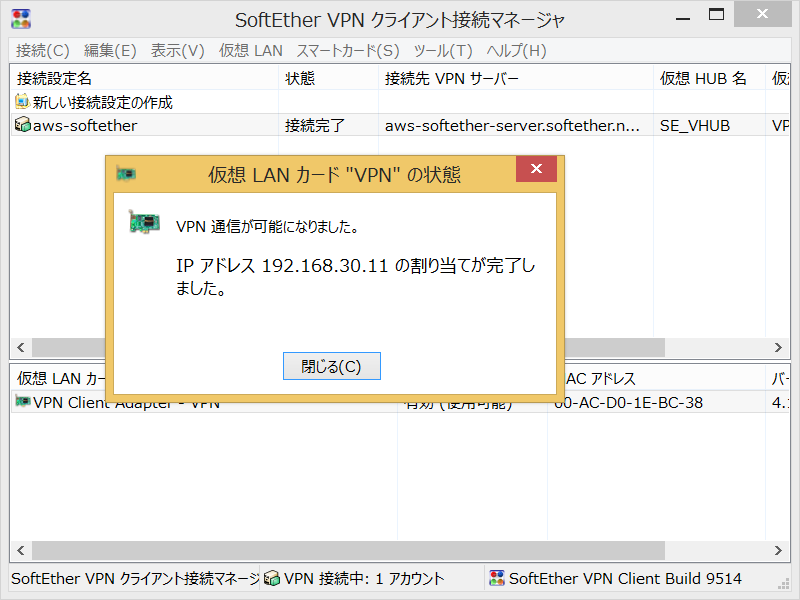
$ sudo ./vpnclient/vpnclient start
$ ifconfig
vpn_se_vnic Link encap:Ethernet  HWaddr 00:ac:ce:27:7b:ae
          inet addr:192.168.30.10  Bcast:192.168.30.255  Mask:255.255.255.0
$ vpnclient/vpncmd
 1. Management of VPN Server or VPN Bridge
 2. Management of VPN Client
 3. Use of VPN Tools (certificate creation and Network Traffic Speed Test Tool)

 Select 1, 2 or 3: 2

 Hostname of IP Address of Destination: localhost

 Password:

 VPN Client>AccountList
 Item                        |Value
 ----------------------------+------------------------------------------------
 VPN Connection Setting Name |raspi
 Status                      |Connected
 VPN Server Hostname         |aws-softether-server.softether.net:443 (Direct TCP/IP Connection)
 Virtual Hub                 |SE_VHUB
 Virtual Network Adapter Name|SE_VNIC
VPNクライアント(Mac)
| SPEC | |
|---|---|
| Device | MacBook Air 11-inch Mid 2011 |
| OS | Mac OS X Lion 10.7.5(11G63) |
| hostname | Air.local |
設定
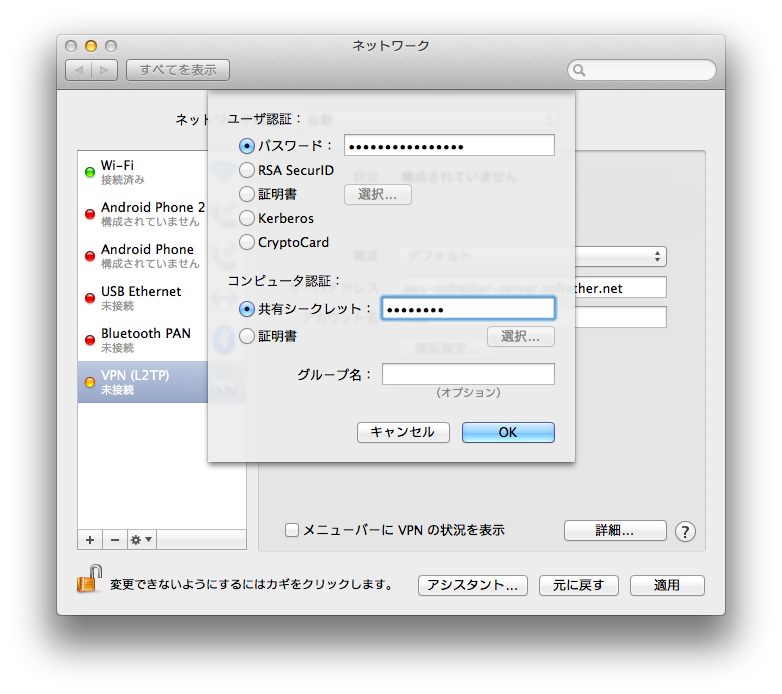
L2TP over IPSecを用いて接続設定を行う

サーバアドレスにはDynamicDNSとして指定したドメイン名を指定し、アカウント名には作成した接続ユーザのうちの一つを指定する。
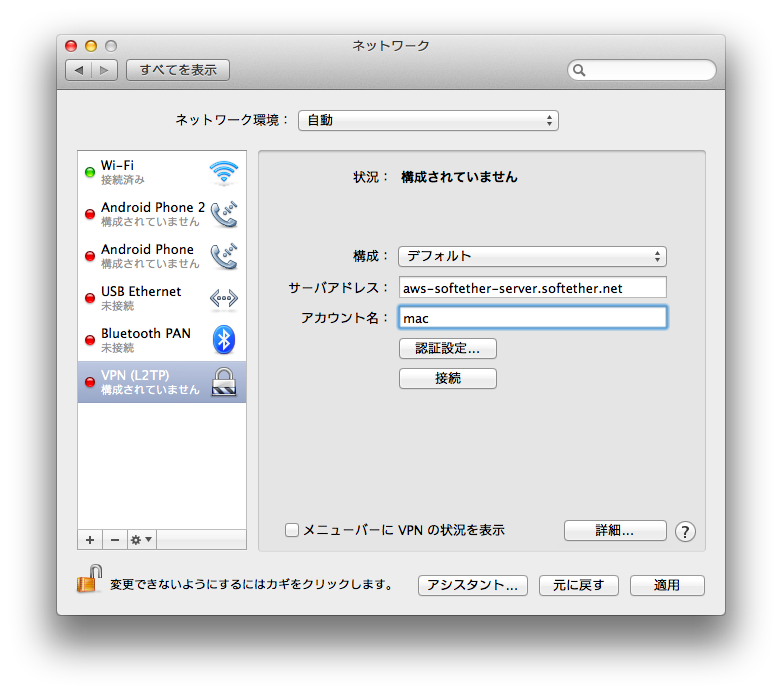
"詳細"ボタンを押し、指定したユーザのパスワードとIPSec事前共有鍵を入力する。
接続
L2TP over IPSecで接続する。
$ ifconfig
ppp0: flags=8051<UP,POINTOPOINT,RUNNING,MULTICAST> mtu 1280
	inet 192.168.30.10 --> 1.0.0.1 netmask 0xffffff00
VPNクライアント(Win)
| SPEC | |
|---|---|
| Device | Surface Pro 3 |
| OS | Windows 8.1 Pro |
| hostname | surface-pro3 |
インストール
次のファイルをダウンロードし実行する。
http://jp.softether-download.com/files/softether/v4.12-9514-beta-2014.11.17-tree/Windows/SoftEther_VPN_Client/softether-vpnclient-v4.12-9514-beta-2014.11.17-windows-x86_x64-intel.exe
「このネットワーク上のPC、デバイス、コンテンツを探し、プリンターやTVなどのデバイスに自動的に接続します」というダイアログが表示された場合、「はい」を選ぶ。そうすることで、Windows FireWallでブロックされない「プライベートネットワーク」としてVPNが作成される。
もし「パブリックネットワーク」として作成してしまった場合、「PC設定>ネットワーク>イーサネット」から作成したVPNを選択し、「デバイスとコンテンツの検索」をオンにすると良い
接続
SoftEther VPN Clientから接続
USB over IPの構築
USB over IPサーバ(Raspberry Pi)
VirtualHereのUSBサーバプログラム Raspberry Pi用(armhf hard-float)を配置
(ダウンロードしたファイルに実行権をつけるだけ)
$ wget --no-check-certificate https://www.virtualhere.com/sites/default/files/usbserver/vhusbdarmhf
$ chmod 755 vhusbdarmhf
USB over IPクライアント(Win)
VirtualHereのUSBクライアントプログラム Windows用を配置
(ダウンロードした実行ファイルを適当なフォルダに置くだけ)
USB over SoftEtherVPNの検証
USB over IPサーバ起動
クラウドの先にあるPCで共有したいUSBデバイスをRaspberry Piに接続した後、下記コマンドでVirtualHereのUSB over IPサーバを起動
$ sudo ./vhusbdarmhf
VirtualHere USB Server is running...press ^C to stop
クラウドの先にあるPCにログイン
SoftEther VPNで接続されているため、クラウドの先にあるマシンのFirewallやインターネットゲートウェイルータに何の設定もせずとも、安全にRDPすることができる
(RDPがつながらない場合、クラウドの先にあるPCで構築したSoftEther VPNが「プライベートネットワーク」として作成されているか確認)
クラウドの先にあるPCにUSBデバイスをセット
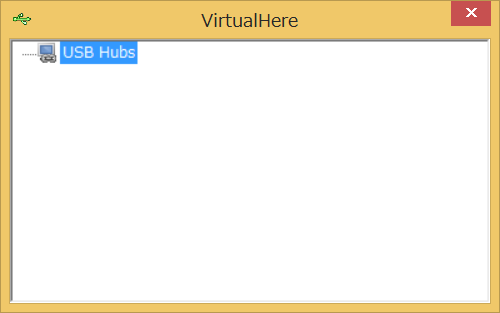
PCでVirtualHereクライアントを実行する。
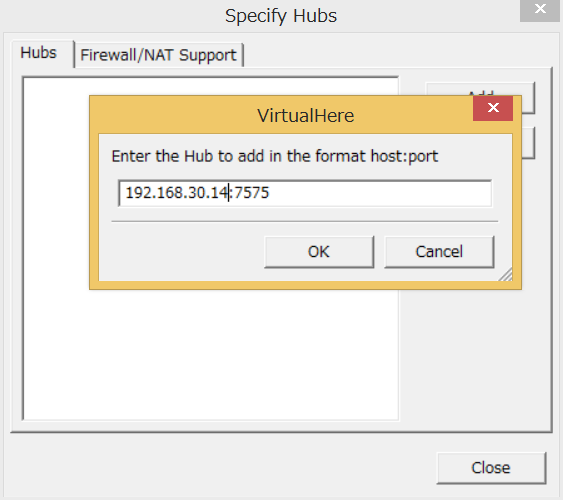
"USB Hubs>Specify Hubs"からSoftEther VPN上でのRaspberry PiのIPアドレスを入力する。
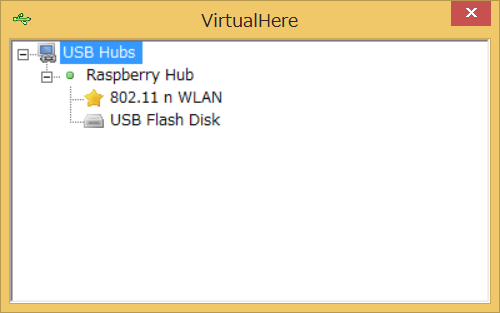
正しくセットアップされていれば、Raspberry Piに接続されているUSBデバイスが表示される。
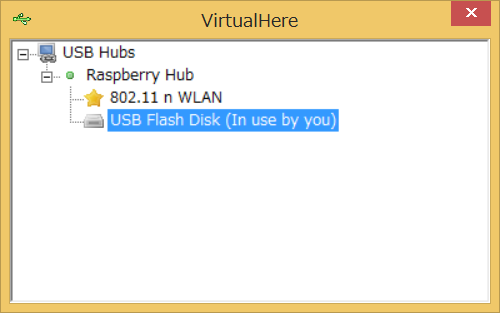
望みのUSBデバイスをダブルクリックすれば、SoftEther VPN越しにRaspberry Piに接続されているUSBデバイスがPCで認識される。
ネットワーク速度
| 実行速度※1 | RTT※2 | |
|---|---|---|
| LAN | 9.53MB/s | <1ms |
| Wifi AP | 1.06MB/s | 50ms |
| SoftEther VPN over LTE | 0.071MB/s | 179ms |
※1 : WindowsPCからRaspberry Piへ60000byteのpingを打ち、60000*2/RTT平均値より概算
※2 : WindowsPCからRaspberry Piへの32byteのpingのRTT平均値
USB2.0デバイスのI/O実行速度
| Sequential Read | Sequential Write | Random Read | Random Write | |
|---|---|---|---|---|
| 直接接続 | 18.85MB/s | 5.076MB/s | 18.77MB/s | 1.175MB/s |
| LAN | 3.140MB/s | 2.058MB/s | 3.155MB/s | 1.170MB/s |
| Wifi AP | 1.301MB/s | 1.114MB/s | 1.328MB/s | 0.711MB/s |
| SoftEther VPN over LTE | 計測不能 | 計測不能 | 計測不能 | 計測不能 |
まとめ
- USB over SoftEther over LTEは確かに動作するが、残念ながら現時点では速度的に使い物にならない
- USB over LANやUSB over Wifiは、USBカメラ(320x240)程度までならば十分使い物になる