はじめに
「リビングに、スタイリッシュな電子ポスターを飾りたい!」
ふとそう思ったのが、このプロジェクトの始まりでした。駅やお店で見るデジタルサイネージ、憧れますよね?
でも、業務用は高価だし、設定も複雑そう…。もっと手軽に、そして**「低コスト」で「シンプルに」、「自宅のFire TV」**で実現できないか?
この記事では、そんな野望を叶えるために、Firebase と Web技術(HTML/CSS/JS) を駆使して、B2サイズ(707mm × 1000mm)の縦長ポスターを16:9の横長ディスプレイで美しく表示・自動切り替えする電子ポスターシステムを自作した過程を、具体的なコードと課題解決の舞台裏とともにご紹介します。
Fire TVユーザー、Web開発者、Androidアプリ開発者、そして「何か面白いものを作りたい!」と考えているすべての方に読んでいただけると嬉しいです。
解決したい課題と選定した技術
今回、電子ポスターに求めた主な要件は以下の通りです。
- 複数の画像を自動で切り替えたい
- B2縦長ポスターを16:9横長画面で美しく表示したい(90度回転、画面フィット)
- アプリを更新せずに、遠隔でポスター画像を更新したい
- 個人利用なので、画像をグローバルに公開せず、セキュアに管理したい
これらの要件を満たすため、以下の技術スタックを選定しました。
Fire TV Stick - 低コストの立役者
- 選定理由: 既に持っているFire TV Stickを活用することで、初期費用をほぼゼロに抑えられました。OSがAndroidベースであるため、Androidアプリとして開発できる点も大きなメリットです。
WebView - Web技術をAndroidで再活用
- 選定理由: UI開発の柔軟性が高く、HTML/CSS/JSといった慣れたWeb技術をそのまま活かせるため、開発速度が格段に上がります。複雑なUIやアニメーションもWebの知見で対応でき、将来的なコンテンツのリモート更新も容易です。
Firebase Storage & Authentication - セキュアな画像管理
-
選定理由: 画像ファイルの保存・配信にFirebase Storage、アクセス制御にFirebase Authenticationを利用しました。
- Storage: クラウド上で手軽に画像を管理でき、配信も高速です。
- Authentication (匿名認証): 外部に画像を公開せず、アプリ内からのみアクセスを許可するために採用。ユーザーにログインを意識させず、アプリが自動で認証状態を確立できるため、個人利用に最適です。
-
ポイント:
firebase.google.comで設定したセキュリティルール(allow read: if request.auth != null;)が重要です。
Anime.js - 軽快でスタイリッシュなアニメーション
- 選定理由: シンプルなHTMLベースのポスターに、動きと魅力的なトランジションを加えるために採用しました。軽量ながら表現力が高く、フェードイン・アウトなどの基本から、より凝ったアニメーションまで幅広く対応できます。
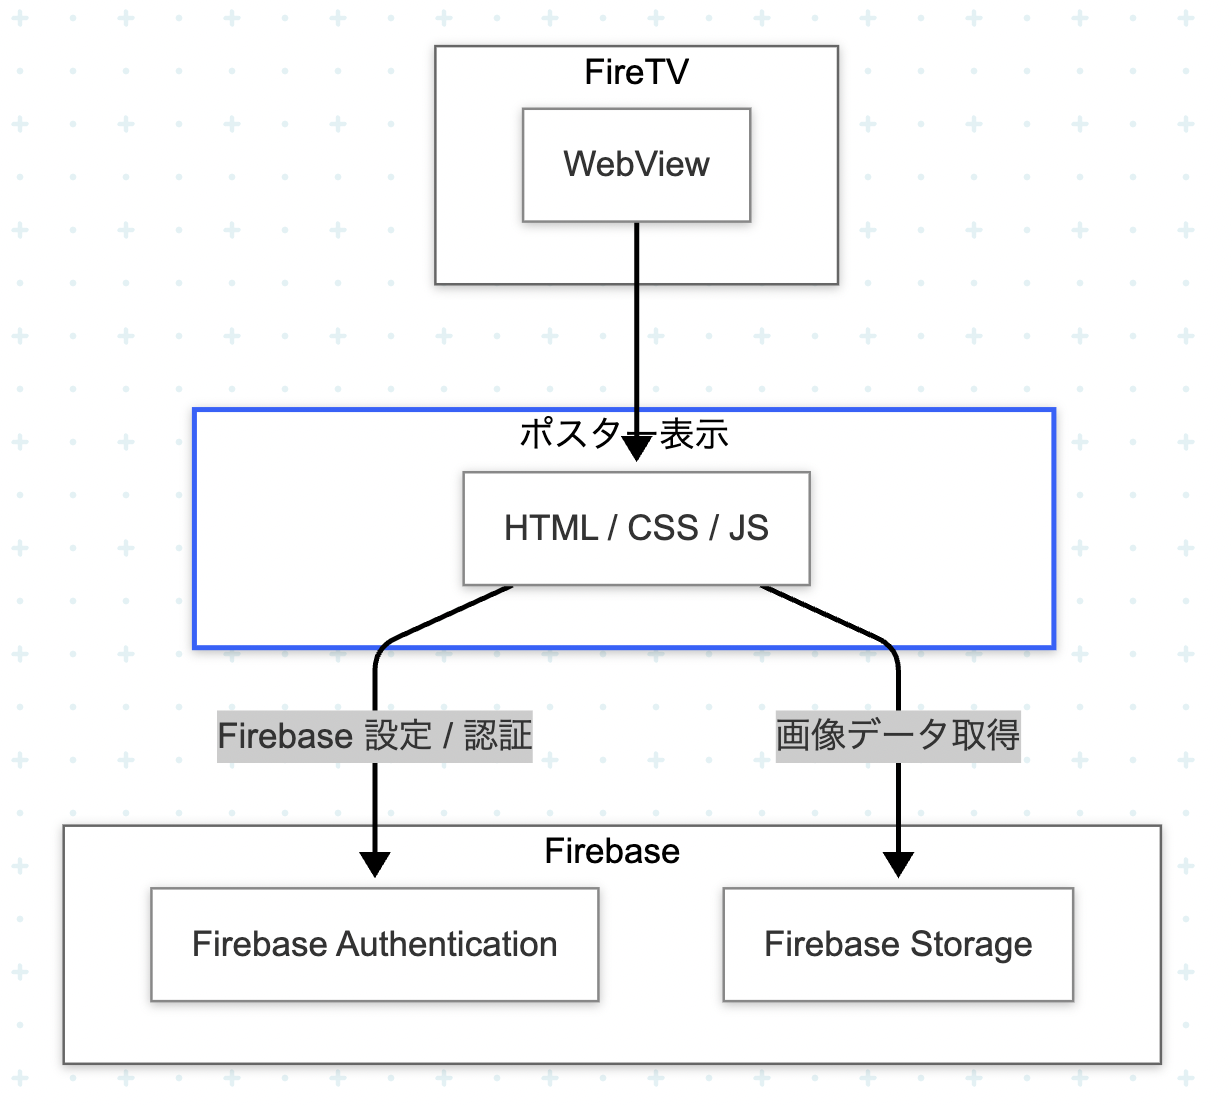
システム構成図
上記選定技術に基づいたシステム構成は以下の通りです。
開発実践:ステップバイステップで構築する
ここからは、実際のコードと共に開発手順を追っていきましょう。
3-1. Firebaseプロジェクトの準備
-
プロジェクト作成・Storage・Authentication(匿名認証)の有効化
- Firebaseコンソールで新規プロジェクトを作成。
- Storage と Authentication を有効にします。
- Authenticationの「ログイン方法」タブで「匿名」をONにします。
-
Storageセキュリティルールの設定
- 「Storage」->「ルール」タブで以下を設定し「公開」。
rules_version = '2'; service firebase.storage { match /b/{bucket}/o { match /{allPaths=**} { allow read: if request.auth != null; allow write: if request.auth != null; } } } -
firebaseConfigの取得とenv.jsへの分離(超重要)- Firebaseコンソール「プロジェクトの設定」->「全般」タブのウェブアプリ構成スニペットから
firebaseConfigを取得。 -
app/src/main/assets/フォルダ内にenv.jsを作成し、そこに貼り付けます。
// app/src/main/assets/env.js const firebaseConfig = { apiKey: "YOUR_API_KEY_HERE", authDomain: "YOUR_AUTH_DOMAIN_HERE", projectId: "YOUR_PROJECT_ID_HERE", storageBucket: "YOUR_STORAGE_BUCKET_HERE", messagingSenderId: "YOUR_MESSAGING_SENDER_ID_HERE", appId: "YOUR_APP_ID_HERE" };-
絶対にGit管理から除外! プロジェクトルートの
.gitignoreに追加。
# ... app/src/main/assets/env.js - Firebaseコンソール「プロジェクトの設定」->「全般」タブのウェブアプリ構成スニペットから
3-2. Androidアプリ(Fire TV)の構築
Fire TVでWebコンテンツを表示するためのAndroidアプリです。
-
新規Kotlinプロジェクトの作成
- Android Studioで「Empty Activity」テンプレートを選択。パッケージ名は
jp.mizukinana.posterとしました。
- Android Studioで「Empty Activity」テンプレートを選択。パッケージ名は
-
build.gradle.ktsでの依存関係設定-
build.gradle.kts (Module: app)に必要なライブラリを追加。
// build.gradle.kts (Module: app) - dependencies ブロック内 implementation(libs.androidx.appcompat) implementation(libs.androidx.core.ktx) implementation(libs.google.android.material) implementation(libs.androidx.constraintlayout) implementation(libs.androidx.lifecycle.runtime.ktx)- これらの
libs.エイリアスは、libs.versions.tomlで定義します。
# libs.versions.toml [versions] appcompat = "1.6.1" # 最新安定版 material = "1.11.0" # 最新安定版 constraintlayout = "2.1.4" # 最新安定版 lifecycleRuntimeKtx = "2.7.0" # 最新安定版 # ... [libraries] androidx-appcompat = { group = "androidx.appcompat", name = "appcompat", version.ref = "appcompat" } google-android-material = { group = "com.google.android.material", name = "material", version.ref = "material" } androidx-constraintlayout = { group = "androidx.constraintlayout", name = "constraintlayout", version.ref = "constraintlayout" } androidx-lifecycle-runtime-ktx = { group = "androidx.lifecycle", name = "lifecycle-runtime-ktx", version.ref = "lifecycleRuntimeKtx" } # ...- 起動、パーミッション、Fire TVランチャー設定が肝です。
<?xml version="1.0" encoding="utf-8"?> <manifest xmlns:android="http://schemas.android.com/apk/res/android" xmlns:tools="http://schemas.android.com/tools" package="jp.mizukinana.poster"> <uses-permission android:name="android.permission.INTERNET" /> <uses-feature android:name="android.software.leanback" android:required="false" /> <uses-feature android:name="android.hardware.touchscreen" android:required="false" /> <application android:allowBackup="true" android:icon="@mipmap/ic_launcher" android:label="@string/app_name" android:roundIcon="@mipmap/ic_launcher_round" android:supportsRtl="true" android:theme="@style/Theme.AppCompat.NoActionBar"> <activity android:name=".MainActivity" android:exported="true" android:banner="@drawable/your_app_banner" android:configChanges="orientation|screenSize|keyboardHidden"> <intent-filter> <action android:name="android.intent.action.MAIN" /> <category android:name="android.intent.category.LAUNCHER" /> <category android:name="android.intent.category.LEANBACK_LAUNCHER" /> </intent-filter> </activity> </application> </manifest> -
-
activity_main.xmlでWebViewの配置-
res/layout/activity_main.xmlにWebViewを全画面で配置します。
<?xml version="1.0" encoding="utf-8"?> <androidx.constraintlayout.widget.ConstraintLayout xmlns:android="http://schemas.android.com/apk/res/android" xmlns:app="http://schemas.android.com/apk/res-auto" xmlns:tools="http://schemas.android.com/tools" android:layout_width="match_parent" android:layout_height="match_parent" tools:context="jp.mizukinana.poster.MainActivity"> <WebView android:id="@+id/webView" android:layout_width="0dp" android:layout_height="0dp" app:layout_constraintBottom_toBottomOf="parent" app:layout_constraintEnd_toEndOf="parent" app:layout_constraintStart_toStartOf="parent" app:layout_constraintTop_toTopOf="parent" /> </androidx.constraintlayout.widget.ConstraintLayout> -
-
MainActivity.ktでWebViewの初期化とローカルHTMLファイルのロード- アプリ起動時の処理です。
package jp.mizukinana.poster

import android.os.Bundle
import android.util.Log
import android.webkit.WebSettings
import android.webkit.WebView
import android.webkit.WebViewClient
import androidx.appcompat.app.AppCompatActivity

class MainActivity : AppCompatActivity() {
    private lateinit var webView: WebView
    private val TAG = "PosterAppKotlin"

    override fun onCreate(savedInstanceState: Bundle?) {
        super.onCreate(savedInstanceState)
        setContentView(R.layout.activity_main)
        webView = findViewById(R.id.webView)
        WebView.setWebContentsDebuggingEnabled(true) // Chrome DevToolsでデバッグ可能に

        val webSettings: WebSettings = webView.settings
        webSettings.javaScriptEnabled = true // JavaScript有効化は必須
        webSettings.domStorageEnabled = true // Firebase SDKで必要
        webSettings.mediaPlaybackRequiresUserGesture = false // 自動再生許可
        webSettings.allowFileAccess = true // assetsフォルダへのアクセス許可

        webView.webViewClient = object : WebViewClient() {
            override fun onPageFinished(view: WebView?, url: String?) {
                super.onPageFinished(view, url)
                Log.d(TAG, "Webページロード完了: $url")
            }
            override fun onReceivedError(view: WebView?, request: android.webkit.WebResourceRequest?, error: android.webkit.WebResourceError?) {
                super.onReceivedError(view, request, error)
                val errorCode = error?.errorCode ?: -1
                val description = error?.description?.toString() ?: "不明なエラー"
                val failingUrl = request?.url?.toString() ?: "不明なURL"
                Log.e(TAG, "WebViewエラー: コード=$errorCode, 説明=$description, URL=$failingUrl")
            }
        }
        webView.loadUrl("file:///android_asset/index.html")
        Log.d(TAG, "WebViewがHTMLのロードを開始しました。")
    }

    override fun onBackPressed() {
        if (webView.canGoBack()) {
            webView.goBack()
        } else {
            super.onBackPressed()
        }
    }
}
3-3. Webコンテンツ(HTML/CSS/JS)の作成
電子ポスターの見た目と動きを定義します。これらは app/src/main/assets/ フォルダに配置します。
-
index.html<!DOCTYPE html> <html lang="ja"> <head> <meta charset="UTF-8"> <meta name="viewport" content="width=device-width, initial-scale=1.0"> <title>電子ポスター</title> <link rel="stylesheet" href="style.css"> </head> <body> <div id="poster-container"> </div> <div id="error-message" style="display:none;"></div> <script src="https://www.gstatic.com/firebasejs/8.10.0/firebase-app.js"></script> <script src="https://www.gstatic.com/firebasejs/8.10.0/firebase-auth.js"></script> <script src="https://www.gstatic.com/firebasejs/8.10.0/firebase-storage.js"></script> <script src="https://cdn.jsdelivr.net/npm/animejs@3.2.1/lib/anime.min.js"></script> <script src="env.js"></script> <script src="script.js"></script> </body> </html> -
style.cssbody, html { margin: 0; padding: 0; overflow: hidden; background-color: black; width: 100vw; height: 100vh; display: flex; justify-content: center; align-items: center; font-family: sans-serif; } #poster-container { width: 100vw; height: 100vh; position: relative; overflow: hidden; } .poster-slide { position: absolute; top: 0; left: 0; width: 100%; height: 100%; opacity: 0; background-color: black; display: flex; justify-content: center; align-items: center; } .poster-image-wrapper { height: 100%; width: 100%; display: flex; justify-content: center; align-items: center; } .poster-image-wrapper img { transform: rotate(90deg); /* 縦長画像を90度回転 */ width: 100vh; /* 画面の高さに合わせて幅を調整(回転しているので逆転) */ height: 100vw; /* 画面の幅に合わせて高さを調整(回転しているので逆転) */ object-fit: contain; /* 画像全体がコンテナ(画面)に収まるようにする */ display: block; transform-origin: center center; /* 回転の中心点を中央に設定 */ } #error-message { color: white; font-size: 2em; text-align: center; padding: 20px; width: 80%; position: absolute; top: 50%; left: 50%; transform: translate(-50%, -50%); background-color: rgba(0, 0, 0, 0.7); border-radius: 10px; z-index: 1000; display: none; } -
script.jsconst ANIMATION_DURATION = 800; const DISPLAY_DURATION = 5000; const firebaseApp = firebase.initializeApp(firebaseConfig); const auth = firebaseApp.auth(); const storage = firebaseApp.storage(); const imagePaths = [ "images/poster1.webp", "images/poster2.webp", "images/poster3.webp", // 必要に応じて、さらに画像パスを追加してください ]; let currentPosterIndex = 0; let posterElements = []; let intervalId; let isAnimating = false; function displayError(message) { let errorMessageElement = document.getElementById('error-message'); if (!errorMessageElement) { errorMessageElement = document.createElement('div'); errorMessageElement.id = 'error-message'; document.body.appendChild(errorMessageElement); } errorMessageElement.innerText = `エラー: ${message}`; errorMessageElement.style.display = 'block'; console.error(`エラー: ${message}`); } async function createPosterElements() { const posterContainer = document.getElementById('poster-container'); if (!posterContainer) { displayError("HTMLに`#poster-container`要素が見つかりません。"); return; } if (imagePaths.length === 0) { displayError("表示する画像が設定されていません。"); return; } const imageUrls = await Promise.all(imagePaths.map(async path => { try { const storageRef = storage.ref(path); return await storageRef.getDownloadURL(); } catch (error) { console.error(`画像のダウンロードURL取得失敗: ${path}`, error); return null; } })); imageUrls.forEach((url, index) => { if (url) { const posterSlide = document.createElement('div'); posterSlide.id = `poster-${index}`; posterSlide.classList.add('poster-slide'); const posterImageWrapper = document.createElement('div'); posterImageWrapper.classList.add('poster-image-wrapper'); const img = document.createElement('img'); img.src = url; img.alt = `電子ポスター ${index + 1}`; posterImageWrapper.appendChild(img); posterSlide.appendChild(posterImageWrapper); posterContainer.appendChild(posterSlide); } }); posterElements = document.querySelectorAll('.poster-slide'); } async function initializePosterDisplay() { try { await auth.signInAnonymously(); console.log("Firebase匿名認証に成功しました。"); } catch (error) { console.error("Firebase匿名認証に失敗しました:", error); displayError(`認証エラー: ${error.message}`); return; } await createPosterElements(); if (posterElements.length === 0) { displayError("画像がロードできませんでした。Firebase Storageのパスとルールを確認してください。"); return; } posterElements.forEach(poster => { anime.set(poster, { opacity: 0 }); }); showPoster(currentPosterIndex); if (posterElements.length <= 1) { console.log("ポスターが1枚のみのため、自動切り替えは行いません。"); return; } intervalId = setInterval(nextPoster, DISPLAY_DURATION + ANIMATION_DURATION); console.log("電子ポスターの表示が開始されました。"); } async function showPoster(index) { if (posterElements.length <= 1) { anime.set(posterElements[0], { opacity: 1 }); return; } if (isAnimating) return; isAnimating = true; const currentActivePoster = document.querySelector('.poster-slide.is-active'); if (currentActivePoster) { await anime({ targets: currentActivePoster, opacity: 0, easing: 'easeOutQuad', duration: ANIMATION_DURATION }).finished; currentActivePoster.classList.remove('is-active'); } const nextPosterElement = posterElements[index]; if (nextPosterElement) { await anime({ targets: nextPosterElement, opacity: [0, 1], easing: 'easeInQuad', duration: ANIMATION_DURATION }).finished; nextPosterElement.classList.add('is-active'); } isAnimating = false; } function nextPoster() { currentPosterIndex = (currentPosterIndex + 1) % posterElements.length; showPoster(currentPosterIndex); } document.addEventListener('DOMContentLoaded', initializePosterDisplay); window.addEventListener('beforeunload', () => { clearInterval(intervalId); anime.remove(posterElements); });
4. 発展と改善点
このプロジェクトは、様々な方向へ発展させることが可能です。
-
Q. 画像が真ん中に来ない・見切れる:
-
object-fit: contain;とtransform: rotate(90deg);を組み合わせることで、縦長画像を回転させて横長画面に余白なくピッタリ表示する解決策を示しました。表示がおかしい場合は、style.cssのobject-fitやwidth/heightのvh/vw指定、transform-originを再確認しましょう。
-
-
Q. もっとかっこいいアニメーションにしたい:
- 今回実装したシンプルなフェード切り替え以外にも、Anime.jsを使えば、
scale(拡大縮小)、translateX/Y(移動)、rotate(回転)などを組み合わせて、よりダイナミックなアニメーションが可能です。CSSのfilterプロパティ(blur、brightness)もアニメーション対象にできます。
- 今回実装したシンプルなフェード切り替え以外にも、Anime.jsを使えば、
-
Q. 別のコンテンツ切り替え方法:
- 現在のシステムは、画像パスが
script.jsにハードコードされていますが、これをFirebase Realtime DatabaseやCloud Firestoreに保存することで、アプリを更新せずに画像リストや表示順、切り替え時間などをリモートで変更できるようになります。
- 現在のシステムは、画像パスが
-
Q. 画面サイズ選びのポイント:
- B2ポスター(707mm × 1000mm)の実寸大に近い表示を目指す場合、43インチディスプレイが幅約953mmとなり、最も現実的で手頃な価格帯(3〜4万円)で実現可能でした。
5. まとめ:個人開発の喜びと次なる挑戦へ
このプロジェクトを通じて、Fire TVという身近なデバイスが、手軽でパワフルなデジタルサイネージのプラットフォームになり得ることを実感しました。Androidアプリ開発とWeb技術、そしてFirebaseというモダンなクラウドサービスを組み合わせることで、「低コスト・シンプル構成」でありながら、非常に実用的な電子ポスターシステムを個人で構築できることが証明されたと思います。
特に、WebViewとHTML/CSS/JSの組み合わせは、UIの柔軟性と開発のしやすさにおいて大きなアドバンテージがあります。また、Firebaseの認証とストレージ機能は、コンテンツの安全な管理と配信を驚くほど簡単に実現してくれました。
今回の挑戦で得られた知識や経験は、きっとあなたの次の個人開発プロジェクトの大きなヒントになるはずです。ぜひ、この記事を参考に、あなた自身の「動くポスター」や、他のアイデアを形にしてみてください。
Gihub Sample