環境準備
前回の記事でRX72N Envision KitでAWSに"Hello World"を送信するプロジェクトを流用して、RX72N Envision Kitに実装されている光センサの値を読み取って、AWSに送信するプログラムを作成します。
準備した環境は前回と同じです。
- RX72N Envision Kit (評価ボード)
- e² studio 2021-07 (統合開発環境)
- GCC for Renesas 8.3.0.202102-GNURX Windows (RXマイコン用コンパイラ)
光センサ値を送信するプログラムの作成
まず現在のMQTTデモプログラムを光センサ値を送信するプログラムに変更します。
RX72N Envision Kitには光センサ(ISL29034)が搭載されており、I2Cを使用してISL29034からセンサ値を読み取って、AWSに送信するプログラムを作成していきます。
簡易I2C FITモジュールのインストール
ISL29034からセンサ値を読み取るためには、I2C通信インタフェースを使用します。
そのため、e² studioのスマートコンフィグレータを使用して、流用するFreeRTOSプロジェクトに簡易I2C FITモジュールをインストールします。
簡易I2C FITモジュールをインストールするためには、FreeRTOSプロジェクトの<プロジェクト名>.scfgファイルをダブルクリックで開きます。

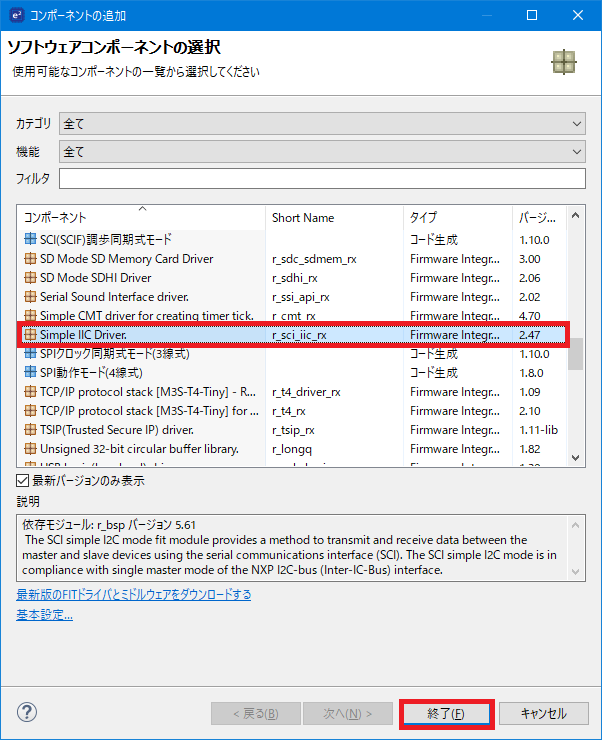
スマートコンフィグレータのプロジェクト設定画面が開くので、以下のように「コンポーネント」タブから「コンポーネントの追加」ボタンをクリックします。

コンポーネントの追加ウィンドウが開くので、選択できるドライバソフトから簡易I2C FITモジュール(「r_sci_iic_rx」)を選択してから、「終了」ボタンをクリックします。
スマートコンフィグレータ上で「r_sci_iic_rx」が追加されていることを確認してから、「r_sci_iic_rx」を選択して「r_sci_iic_rx」の設定画面を開きます。

「r_sci_iic_rx」の設定を以下のように変更します。
- MCU supported channels for CH11 -> Supported
- SSCL11端子 -> 使用する
- SSDA11端子 -> 使用する
次に以下のように「端子」タブをクリックして、SSCL11にPB6、SSDA11にPB7が割り当てられていることを確認してから、画面右上の「コードの生成」ボタンをクリックして、「r_sci_iic_rx」のソースコードを出力します。

光センサ値を読み取るソフトウェアのインポート
光センサ値を読み取るソフトウェアは0から作成するのではなく、下記ページにある「rx65n_cloud_kit_sensor_upload_demo.zip」を流用させてもらいます。
ElasticSearchを使用しRX65Nに接続されたセンサデータをAWSで可視化
「rx65n_cloud_kit_sensor_upload_demo.zip」はRenesas RX65N Cloud Kitに実装されている下記センサの値を読み取るためのソフトウェアライブラリになります。
- Light Sensor (ISL29035)
- Environmental Sensor (BME680)
- Inertial Sensor(BMI160)
Renesas RX65N Cloud Kitに実装されている光センサは「ISL29035」であり、RX72N Envision Kitに実装されている光センサは「ISL29034」であるため型名が違いますが、この違いはICに割り込み端子があるかの違いだけみたいなので基本的に同じソフトウェアライブラリが使えるはずです。
ダウンロードした「rx65n_cloud_kit_sensor_upload_demo.zip」を解凍して、「sensorlib」フォルダと「renesas_sensors.c」、「renesas_sensors.h」をFreeRTOSプロジェクトの「application_code」フォルダ以下にドラッグアンドドロップします。
FreeRTOSのプロジェクト設定で「application_code」をインクルードパスに追加します。

光センサ値を読み取るソフトウェアの修正
インポートしたソフトウェアライブラリはRIIC FITモジュールを使用して、各種センサにアクセスしているので、これを簡易I2C FITモジュールを使用してアクセスするように変更します。
「renesas_sensors.c」をダブルクリックで開き、以下のソースコードを修正します。
RX72N Envision Kitには「ISL29035」しか実装されていないので、そのためのソースコード修正になります。
# include <math.h>
# include "renesas_sensors.h"
# include "r_riic_rx_if.h"
# include <math.h>
# include "renesas_sensors.h"
# include "r_sci_iic_rx_if.h"
uint8_t R_INIT_Sensors(void)
{
    uint8_t err = 0;

    /* Open I2C driver instance */
    riic_info_t iic_info;
    iic_info.dev_sts = RIIC_NO_INIT;
    iic_info.ch_no = 0;
    err = R_RIIC_Open(&iic_info);

    /* Initialize & Configure the BMI160 Sensor */
    if (0 == err)
    {
	err = init_bmi160();
    }

    /* Initialize & Configure the BME680 Sensor */
    if (0 == err)
    {
    	err = init_bme680();
    }

    /* Initialize & Configure the ISL29035 Sensor */
    if (0 == err)
    {
    	err = init_isl29035();
    }

    return err;
}
uint8_t R_INIT_Sensors(void)
{
    uint8_t err = 0;

    /* Open I2C driver instance */
    sci_iic_info_t siic_info;
    siic_info.dev_sts = SCI_IIC_NO_INIT;
    siic_info.ch_no = 11;
    err = R_SCI_IIC_Open(&siic_info);

# if 0
    /* Initialize & Configure the BMI160 Sensor */
    if (0 == err)
    {
	err = init_bmi160();
    }

    /* Initialize & Configure the BME680 Sensor */
    if (0 == err)
    {
    	err = init_bme680();
    }
# endif
    /* Initialize & Configure the ISL29035 Sensor */
    if (0 == err)
    {
    	err = init_isl29035();
    }

    return err;
}
void R_READ_Sensors(st_sensors_t *sens)
{
    struct bme680_field_data  bme680_data;
    bmi160_data accel_data;
    bmi160_data gyro_data;
    double temp_value;
    uint8_t status;

    /* To read both Accel and Gyro data */
    status = bmi160_get_sensor_data(BMI160_BOTH_ACCEL_AND_GYRO, &accel_data, &gyro_data, &g_bmi160);
    if(BMI160_OK == status)
    {
        sens->accel.xacc = accel_data.x_axis;
        sens->accel.yacc = accel_data.y_axis;
        sens->accel.zacc = accel_data.z_axis;

        sens->gyro.xacc = gyro_data.x_axis;
        sens->gyro.yacc = gyro_data.y_axis;
        sens->gyro.zacc = gyro_data.z_axis;
    }

    /* Read temperature, pressure and humidity data */
    status = bme680_read_sensor(&bme680_data, &g_gas_sensor);
    if(BME680_OK == status)
    {
        temp_value = bme680_data.temperature/100.0f;
        sens->temperature = convert_celsius_2_fahrenheit(&temp_value);
        sens->humidity = ((double)bme680_data.humidity/1000.0f);
        sens->pressure = ((double)bme680_data.pressure/100.0f);
    }

    status = isl29035_read_als_data(&g_isl_dev, &sens->als);

    return status;
}
void R_READ_Sensors(st_sensors_t *sens)
{
# if 0
    struct bme680_field_data  bme680_data;
    bmi160_data accel_data;
    bmi160_data gyro_data;
    double temp_value;
# endif
    uint8_t status;

# if 0
    /* To read both Accel and Gyro data */
    status = bmi160_get_sensor_data(BMI160_BOTH_ACCEL_AND_GYRO, &accel_data, &gyro_data, &g_bmi160);
    if(BMI160_OK == status)
    {
        sens->accel.xacc = accel_data.x_axis;
        sens->accel.yacc = accel_data.y_axis;
        sens->accel.zacc = accel_data.z_axis;

        sens->gyro.xacc = gyro_data.x_axis;
        sens->gyro.yacc = gyro_data.y_axis;
        sens->gyro.zacc = gyro_data.z_axis;
    }

    /* Read temperature, pressure and humidity data */
    status = bme680_read_sensor(&bme680_data, &g_gas_sensor);
    if(BME680_OK == status)
    {
        temp_value = bme680_data.temperature/100.0f;
        sens->temperature = convert_celsius_2_fahrenheit(&temp_value);
        sens->humidity = ((double)bme680_data.humidity/1000.0f);
        sens->pressure = ((double)bme680_data.pressure/100.0f);
    }
# endif
    status = isl29035_read_als_data(&g_isl_dev, &sens->als);

    return status;
}
次に「sensorlib/rxdemo_i2c_api.h」をダブルクリックで開き、以下のようにソースコードを修正します。
RX72N Envision Kit用のFreeRTOSプロジェクトでは、簡易I2C FITモジュールを使用するので、そのためのソースコード修正になります。
# include "platform.h"
# include "r_smc_entry.h"
# include "r_riic_rx_if.h"
# include "platform.h"
# include "r_smc_entry.h"
# include "r_sci_iic_rx_if.h"
次に「sensorlib/rxdemo_i2c_api.c」をダブルクリックで開き、以下のようにソースコードを修正します。
RX72N Envision Kit用のFreeRTOSプロジェクトでは、簡易I2C FITモジュールを使用するので、そのためのソースコード修正になります。
int8_t rxdemo_i2c_read(uint8_t dev_addr, uint8_t reg_addr, uint8_t *data, uint16_t len)
{
uint8_t wBuf[2];
uint8_t err;
wBuf[0] = reg_addr;
riic_info_t riic_info;
riic_info.dev_sts = RIIC_NO_INIT;
riic_info.ch_no = 0;
riic_info.p_data1st = ®_addr;
riic_info.cnt1st = 1;
riic_info.p_data2nd = data;
riic_info.cnt2nd = len;
riic_info.callbackfunc = _sensor_callback;
riic_info.p_slv_adr = &dev_addr;
err = R_RIIC_MasterReceive(&riic_info);
if (RIIC_SUCCESS == err)
{
while(RIIC_FINISH != riic_info.dev_sts) {
vTaskDelay(0);
}
}
return err;
/* ... */
}
int8_t rxdemo_i2c_read(uint8_t dev_addr, uint8_t reg_addr, uint8_t *data, uint16_t len)
{
uint8_t wBuf[2];
uint8_t err;
wBuf[0] = reg_addr;
sci_iic_info_t sci_iic_info;
sci_iic_info.dev_sts = SCI_IIC_NO_INIT;
sci_iic_info.ch_no = 11;
sci_iic_info.p_data1st = ®_addr;
sci_iic_info.cnt1st = 1;
sci_iic_info.p_data2nd = data;
sci_iic_info.cnt2nd = len;
sci_iic_info.callbackfunc = _sensor_callback;
sci_iic_info.p_slv_adr = &dev_addr;
err = R_SCI_IIC_MasterReceive(&sci_iic_info);
if (SCI_IIC_SUCCESS == err)
{
while(SCI_IIC_FINISH != sci_iic_info.dev_sts) {
vTaskDelay(0);
}
}
return err;
/* ... */
}
int8_t rxdemo_i2c_write(uint8_t dev_addr, uint8_t reg_addr, uint8_t *data, uint16_t len)
{
int8_t err;
riic_info_t riic_info;
riic_info.ch_no = 0;
riic_info.dev_sts = RIIC_NO_INIT;
riic_info.p_data1st = ®_addr;
riic_info.cnt1st = 1;
riic_info.p_data2nd = data;
riic_info.cnt2nd = len;
riic_info.p_slv_adr = &dev_addr;
riic_info.callbackfunc = _sensor_callback;
err = R_RIIC_MasterSend(&riic_info);
if (RIIC_SUCCESS == err)
{
while(RIIC_FINISH != riic_info.dev_sts);
}
return err;
/* ... */
}
int8_t rxdemo_i2c_write(uint8_t dev_addr, uint8_t reg_addr, uint8_t *data, uint16_t len)
{
int8_t err;
sci_iic_info_t sci_iic_info;
sci_iic_info.ch_no = 11;
sci_iic_info.dev_sts = SCI_IIC_NO_INIT;
sci_iic_info.p_data1st = ®_addr;
sci_iic_info.cnt1st = 1;
sci_iic_info.p_data2nd = data;
sci_iic_info.cnt2nd = len;
sci_iic_info.p_slv_adr = &dev_addr;
sci_iic_info.callbackfunc = _sensor_callback;
err = R_SCI_IIC_MasterSend(&sci_iic_info);
if (SCI_IIC_SUCCESS == err)
{
while(SCI_IIC_FINISH != sci_iic_info.dev_sts);
}
return err;
/* ... */
}
この修正だけではGCCコンパイラではエラーが発生するので、「renesas_sensors.h」を以下のようにソースコードを修正します。
void R_READ_Sensors(struct sensors *sens);
uint8_t R_INIT_Sensors(void);
void R_READ_Sensors(st_sensors_t *sens);
uint8_t R_INIT_Sensors(void);
MQTTデモプログラムの修正
前回使用したMQTTデモプログラムを光センサの値を送信するプログラムに変更します。
「iot_demo_mqtt.c」をダブルクリックで開き、以下のようにソースコードを修正します。
# include "renesas_sensors.h"
# define renesasDemoSENSOR_JSON      \
    "{"                             \
	"\"light\": %.2f,"              \
    "}"

/* Maximum size of update JSON documents. */
# define renesasDemoBUFFER_LENGTH              512
    /* Counts the number of incoming PUBLISHES received (and allows the demo
     * application to wait on incoming PUBLISH messages). */
    IotSemaphore_t publishesReceived;

    /* Topics used as both topic filters and topic names in this demo. */
    const char * pTopics[ TOPIC_FILTER_COUNT ] =
    {
        IOT_DEMO_MQTT_TOPIC_PREFIX "/topic/1",
        IOT_DEMO_MQTT_TOPIC_PREFIX "/topic/2",
        IOT_DEMO_MQTT_TOPIC_PREFIX "/topic/3",
        IOT_DEMO_MQTT_TOPIC_PREFIX "/topic/4",
    };

    /* Flags for tracking which cleanup functions must be called. */
    bool librariesInitialized = false, connectionEstablished = false;
    /* Counts the number of incoming PUBLISHES received (and allows the demo
     * application to wait on incoming PUBLISH messages). */
    IotSemaphore_t publishesReceived;

    /* Initialize Sensor API function */
    R_INIT_Sensors();

    /* Topics used as both topic filters and topic names in this demo. */
    const char * pTopics[ TOPIC_FILTER_COUNT ] =
    {
        IOT_DEMO_MQTT_TOPIC_PREFIX "/sensor",
        IOT_DEMO_MQTT_TOPIC_PREFIX "/sensor",
        IOT_DEMO_MQTT_TOPIC_PREFIX "/sensor",
        IOT_DEMO_MQTT_TOPIC_PREFIX "/sensor",
    };

    /* Flags for tracking which cleanup functions must be called. */
    bool librariesInitialized = false, connectionEstablished = false;
            /* Set the members of the publish info for the acknowledgement message. */
            acknowledgementInfo.qos = IOT_MQTT_QOS_1;
            acknowledgementInfo.pTopicName = ACKNOWLEDGEMENT_TOPIC_NAME;
            acknowledgementInfo.topicNameLength = ACKNOWLEDGEMENT_TOPIC_NAME_LENGTH;
            acknowledgementInfo.pPayload = pAcknowledgementMessage;
            acknowledgementInfo.payloadLength = ( size_t ) acknowledgementLength;
            acknowledgementInfo.retryMs = PUBLISH_RETRY_MS;
            acknowledgementInfo.retryLimit = PUBLISH_RETRY_LIMIT;

            /* Send the acknowledgement for the received message. This demo program
             * will not be notified on the status of the acknowledgement because
             * neither a callback nor IOT_MQTT_FLAG_WAITABLE is set. However,
             * the MQTT library will still guarantee at-least-once delivery (subject
             * to the retransmission strategy) because the acknowledgement message is
             * sent at QoS 1. */
            if( IotMqtt_Publish( pPublish->mqttConnection,
                                 &acknowledgementInfo,
                                 0,
                                 NULL,
                                 NULL ) == IOT_MQTT_STATUS_PENDING )
            {
                IotLogInfo( "Acknowledgment message for PUBLISH %.*s will be sent.",
                            ( int ) messageNumberLength,
                            pPayload + messageNumberIndex );
            }
            else
            {
                IotLogWarn( "Acknowledgment message for PUBLISH %.*s will NOT be sent.",
                            ( int ) messageNumberLength,
                            pPayload + messageNumberIndex );
            }
# if 0
            /* Set the members of the publish info for the acknowledgement message. */
            acknowledgementInfo.qos = IOT_MQTT_QOS_1;
            acknowledgementInfo.pTopicName = ACKNOWLEDGEMENT_TOPIC_NAME;
            acknowledgementInfo.topicNameLength = ACKNOWLEDGEMENT_TOPIC_NAME_LENGTH;
            acknowledgementInfo.pPayload = pAcknowledgementMessage;
            acknowledgementInfo.payloadLength = ( size_t ) acknowledgementLength;
            acknowledgementInfo.retryMs = PUBLISH_RETRY_MS;
            acknowledgementInfo.retryLimit = PUBLISH_RETRY_LIMIT;

            /* Send the acknowledgement for the received message. This demo program
             * will not be notified on the status of the acknowledgement because
             * neither a callback nor IOT_MQTT_FLAG_WAITABLE is set. However,
             * the MQTT library will still guarantee at-least-once delivery (subject
             * to the retransmission strategy) because the acknowledgement message is
             * sent at QoS 1. */
            if( IotMqtt_Publish( pPublish->mqttConnection,
                                 &acknowledgementInfo,
                                 0,
                                 NULL,
                                 NULL ) == IOT_MQTT_STATUS_PENDING )
            {
                IotLogInfo( "Acknowledgment message for PUBLISH %.*s will be sent.",
                            ( int ) messageNumberLength,
                            pPayload + messageNumberIndex );
            }
            else
            {
                IotLogWarn( "Acknowledgment message for PUBLISH %.*s will NOT be sent.",
                            ( int ) messageNumberLength,
                            pPayload + messageNumberIndex );
            }
# endif
    for( publishCount = 0;
         publishCount < IOT_DEMO_MQTT_PUBLISH_BURST_SIZE * IOT_DEMO_MQTT_PUBLISH_BURST_COUNT;
         publishCount++ )
    {
        /* Announce which burst of messages is being published. */
        if( publishCount % IOT_DEMO_MQTT_PUBLISH_BURST_SIZE == 0 )
        {
            IotLogInfo( "Publishing messages %d to %d.",
                        publishCount,
                        publishCount + IOT_DEMO_MQTT_PUBLISH_BURST_SIZE - 1 );
        }

        /* Pass the PUBLISH number to the operation complete callback. */
        publishComplete.pCallbackContext = ( void * ) publishCount;

        /* Choose a topic name (round-robin through the array of topic names). */
        publishInfo.pTopicName = pTopicNames[ publishCount % TOPIC_FILTER_COUNT ];

        /* Generate the payload for the PUBLISH. */
        status = snprintf( pPublishPayload,
                           PUBLISH_PAYLOAD_BUFFER_LENGTH,
                           PUBLISH_PAYLOAD_FORMAT,
                           ( int ) publishCount );

        /* Check for errors from snprintf. */
        if( status < 0 )
        {
            IotLogError( "Failed to generate MQTT PUBLISH payload for PUBLISH %d.",
                         ( int ) publishCount );
            status = EXIT_FAILURE;

            break;
        }
        else
        {
            publishInfo.payloadLength = ( size_t ) status;
            status = EXIT_SUCCESS;
        }

        /* PUBLISH a message. This is an asynchronous function that notifies of
         * completion through a callback. */
        publishStatus = IotMqtt_Publish( mqttConnection,
                                         &publishInfo,
                                         0,
                                         &publishComplete,
                                         NULL );

        if( publishStatus != IOT_MQTT_STATUS_PENDING )
        {
            IotLogError( "MQTT PUBLISH %d returned error %s.",
                         ( int ) publishCount,
                         IotMqtt_strerror( publishStatus ) );
            status = EXIT_FAILURE;

            break;
        }

        /* If a complete burst of messages has been published, wait for an equal
         * number of messages to be received. Note that messages may be received
         * out-of-order, especially if a message was lost and had to be retried. */
        if( ( publishCount % IOT_DEMO_MQTT_PUBLISH_BURST_SIZE ) ==
            ( IOT_DEMO_MQTT_PUBLISH_BURST_SIZE - 1 ) )
        {
            IotLogInfo( "Waiting for %d publishes to be received.",
                        IOT_DEMO_MQTT_PUBLISH_BURST_SIZE );

            for( i = 0; i < IOT_DEMO_MQTT_PUBLISH_BURST_SIZE; i++ )
            {
                if( IotSemaphore_TimedWait( pPublishReceivedCounter,
                                            MQTT_TIMEOUT_MS ) == false )
                {
                    IotLogError( "Timed out waiting for incoming PUBLISH messages." );
                    status = EXIT_FAILURE;
                    break;
                }
            }

            IotLogInfo( "%d publishes received.",
                        i );
        }

        /* Stop publishing if there was an error. */
        if( status == EXIT_FAILURE )
        {
            break;
        }
    }
    char cDataBuffer[ renesasDemoBUFFER_LENGTH ];

    /* Loop to PUBLISH all messages of this demo. */
    for( publishCount = 0; ;publishCount++ )
    {
        /* Announce which burst of messages is being published. */
        if( publishCount % IOT_DEMO_MQTT_PUBLISH_BURST_SIZE == 0 )
        {
            IotLogInfo( "Publishing messages %d to %d.",
                        publishCount,
                        publishCount + IOT_DEMO_MQTT_PUBLISH_BURST_SIZE - 1 );
        }

        /* Pass the PUBLISH number to the operation complete callback. */
        publishComplete.pCallbackContext = ( void * ) publishCount;

        /* Choose a topic name (round-robin through the array of topic names). */
        publishInfo.pTopicName = pTopicNames[ publishCount % TOPIC_FILTER_COUNT ];

        prvGenerateSensorJSON( cDataBuffer );
        publishInfo.pPayload = cDataBuffer;
        publishInfo.payloadLength = ( size_t ) strlen( cDataBuffer );

        /* PUBLISH a message. This is an asynchronous function that notifies of
         * completion through a callback. */
        publishStatus = IotMqtt_Publish( mqttConnection,
                                         &publishInfo,
                                         0,
                                         &publishComplete,
                                         NULL );

        if( publishStatus != IOT_MQTT_STATUS_PENDING )
        {
            IotLogError( "MQTT PUBLISH %d returned error %s.",
                         ( int ) publishCount,
                         IotMqtt_strerror( publishStatus ) );
            status = EXIT_FAILURE;

            break;
        }

        /* If a complete burst of messages has been published, wait for an equal
         * number of messages to be received. Note that messages may be received
         * out-of-order, especially if a message was lost and had to be retried. */
        if( ( publishCount % IOT_DEMO_MQTT_PUBLISH_BURST_SIZE ) ==
            ( IOT_DEMO_MQTT_PUBLISH_BURST_SIZE - 1 ) )
        {
            IotLogInfo( "Waiting for %d publishes to be received.",
                        IOT_DEMO_MQTT_PUBLISH_BURST_SIZE );

            for( i = 0; i < IOT_DEMO_MQTT_PUBLISH_BURST_SIZE; i++ )
            {
                if( IotSemaphore_TimedWait( pPublishReceivedCounter,
                                            MQTT_TIMEOUT_MS ) == false )
                {
                    IotLogError( "Timed out waiting for incoming PUBLISH messages." );
                    status = EXIT_FAILURE;
                    break;
                }
            }

            IotLogInfo( "%d publishes received.",
                        i );
        }

        vTaskDelay(pdMS_TO_TICKS( 500UL ));

        /* Stop publishing if there was an error. */
        if( status == EXIT_FAILURE )
        {
            break;
        }
    }
光センサ値を送信するプログラムの実行およびメッセージの確認
前回の記事を同じ通りに、e² studioの虫マークを押して、プログラムのダウンロード/実行を開始します。
IoT Core左側のメニューから「テスト」をクリックします。

トピックのフィルターに「#」を入力して「サブスクライブ」をクリックします。
(「#」はワイルドカードでこの設定ではすべてのトピックを表示することを意味します)

e² studio上部のRestart/再開ボタンを押してプログラムを実行します。
光センサの値の送信が開始されるので、以下のようにAWS側でメッセージを受信していることを確認します。
RX72N Envision Kitの上部を手で覆うと送信される光センサの値が小さくなり、明るいところに試すと光センサの値が大きくなることを確認します。

さいごに
RX72N Envision Kitに実装されている光センサの値をAWSに送信するまでの手順を紹介しました。
次回は、AWSのサービスを使用して、送信した光センサの値を可視化するまでの手順を紹介したいと思います。