概要
- 画面付き Alexa 搭載デバイス用カスタムインテント開発に必要な機能についてのサンプルコードを示す
- Alexa Skills Kit SDK v2 for Node.js (ASK SDK v2 for Node.js) を使用する
- デプロイ先は Alexa-Hosted などの AWS Lambda 環境を想定している
画面付き Alexa 搭載デバイス (Alexa-Enabled Devices With a Screen) とは
音声インターフェースだけでなく、画面が付いた Alexa 搭載デバイスのこと。
画面付きのAlexa搭載デバイス用のスキルの作成 | Alexa Skills Kit
Echo Show、Echo Spot、Fire TV Cube、Fire HD 8、Fire HD 10など、画面付きのAlexa搭載デバイスの場合、スキル開発者は画面と音声対話の両方を使用できるスキルを開発できます。
Alexa Skills Kit SDK v2 for Node.js とは
- Alexa Skill を開発するための Node.js 用ライブラリ
- TypeScript で書かれている
Alexa Skills Kit (ASK) SDK for Node.js バージョン2のリリース : Alexa Blogs
ASK SDK v1では alexa-sdk だったSDKのパッケージ名が ask-sdk に変更されました。 ask-sdk パッケージはモジュール化されており、DynamoDBを使ったデータ永続化のような拡張機能を利用しない場合、 ask-sdk-core および ask-sdk-model というパッケージのみを利用することでプログラムが利用するSDKのサイズを小さく最適化することができます。
参考資料:
- alexa/alexa-skills-kit-sdk-for-nodejs: The Alexa Skills Kit SDK for Node.js helps you get a skill up and running quickly, letting you focus on skill logic instead of boilerplate code.
- ASK SDK for Node.js — ASK SDK for Node.js ドキュメント
Alexa Skills Kit SDK v2 を使用する
package.json の dependencies に aws-sdk, ask-sdk-core, ask-sdk-model を追加する。
Alexa Developer Console で Alexa-Hosted (Node.js) を選択したときは以下のようになっていた。
{
  "name": "hello-world",
  "version": "1.1.0",
  "description": "alexa utility for quickly building skills",
  "main": "index.js",
  "scripts": {
    "test": "echo \"Error: no test specified\" && exit 1"
  },
  "author": "Amazon Alexa",
  "license": "ISC",
  "dependencies": {
    "ask-sdk-core": "^2.6.0",
    "ask-sdk-model": "^1.18.0",
    "aws-sdk": "^2.326.0"
  }
}
実際にライブラリを使う際には ask-sdk-core を require する。
const Alexa = require('ask-sdk-core');
画面付きデバイスかどうか判定する
supportedInterfaces に Display というプロパティが存在すれば画面付きデバイスとして扱うことができる。
参考資料: SupportedInterfaces | ASK SDK for Node.js
ただし、画面付きデバイスであっても、 Alexa Developer Console で「Displayインターフェース」を有効にしておかないとこの Display プロパティは出現しない。
/**
 * スキルが画面付きデバイスで動作している場合は true を返す。
 * @param requestEnvelope RequestEnvelope オブジェクト
 * @return 画面付きデバイスの場合は true
 */
function supportsDisplay(requestEnvelope) {
    // device と Display は TypeScript の Optional プロパティ
    const hasDisplay =
        requestEnvelope &&
        requestEnvelope.context.System.device &&
        requestEnvelope.context.System.device.supportedInterfaces.Display;
    return !!hasDisplay; // true or false を返す
}
また SDK に getSupportedInterfaces という関数が用意されているのでこれを使っても良い。
export function getSupportedInterfaces(requestEnvelope : RequestEnvelope) : SupportedInterfaces {
    return requestEnvelope.context.System.device.supportedInterfaces;
}
この getSupportedInterfaces 関数の内部では Optional プロパティの値が途中にあるのに存在をチェックしないで参照しているが、それで問題ないのかどうかは気になる。
画面サイズを取得する
Viewport プロパティに pixelWidth と pixelHeight という画像サイズを表すプロパティがあるのでこれを利用する。
/**
 * 画面サイズを返す。
 * @param requestEnvelope RequestEnvelope オブジェクト
 * @return 画面サイズ (width, height) を持つオブジェクト
 */
function getScreenSize(requestEnvelope) {
    // Viewport と pixelWidth と pixelHeight は TypeScript の Optional プロパティ
    const hasDisplayInfo =
        requestEnvelope &&
        requestEnvelope.context.Viewport &&
        requestEnvelope.context.Viewport.pixelWidth &&
        requestEnvelope.context.Viewport.pixelHeight;
    if (hasDisplayInfo) {
        // ViewportState オブジェクトから画面のサイズを取得する
        return {
            width:  requestEnvelope.context.Viewport.pixelWidth,
            height: requestEnvelope.context.Viewport.pixelHeight
        };
    }
    return null; // 画面サイズが無ければ null を返す
}
Viewport プロパティには他にも画面に関する情報を持っている。
例えば Amazon Echo Show (第2世代) の実機では以下の内容が確認できている。
"Viewport": {
    "experiences": [
        {
            "arcMinuteWidth": 346,
            "arcMinuteHeight": 216,
            "canRotate": false,
            "canResize": false
        }
    ],
    "mode": "HUB",
    "shape": "RECTANGLE",
    "pixelWidth": 1280,
    "pixelHeight": 800,
    "dpi": 160,
    "currentPixelWidth": 1280,
    "currentPixelHeight": 800,
    "touch": [
        "SINGLE"
    ],
    "keyboard": [],
    "video": {
        "codecs": [
            "H_264_42",
            "H_264_41"
        ]
    }
}
参考資料:
- ViewportState | ASK SDK for Node.js
- データバインディングコンテキストのViewportプロパティ | Alexa Skills Kit
- スキルのLambda関数でのAPL Viewport特性 | Alexa Skills Kit
スキル呼び出しと同時にカスタムインテントを呼び出したかどうか判定する
requestEnvelope.session.new に Boolean 値が入っているのでこれを利用する。
RequestEnvelope | ASK SDK for Node.js を見ると session プロパティは Optional なので存在しているかどうかのチェックは入れておきたい。
// 特定のリクエスト (インテント) でスキルを呼び出したか
// スキル呼び出しと同時にインテント処理がはじまる場合に true をセット
const invokingSkillWithIntent =
    handlerInput.requestEnvelope.session &&
    handlerInput.requestEnvelope.session.new;
session プロパティには以下のような値が入っている。
"session": {
    "new": false,
    "sessionId": "amzn1.echo-api.session.XXXXXXXX-XXXX-XXXX-XXXX-XXXXXXXXXXXX",
    "application": {
        "applicationId": "amzn1.ask.skill.XXXXXXXX-XXXX-XXXX-XXXX-XXXXXXXXXXXX"
    },
    "user": {
        "userId": "amzn1.ask.account.XXXXXXXX"
    }
}
画面を表示しておく時間を設定する
スキル呼び出し後にカスタムインテントを起動した場合は、発話終了のあとすぐに画面が消えてしまう。
スキル呼び出しと同時にカスタムインテントを呼び出した場合は、なぜか発話終了後に7秒ほど画面が残ったままになる。
そのため、画面を表示しておく時間をある程度コントロールしたい。
SSML の break タグを埋め込むことで無音の時間を作ることができる。
音声合成マークアップ言語(SSML)のリファレンス | Alexa Skills Kit
<speak>
    ここで3秒間一時停止します <break time="3s"/>
    その後続きを読み上げます。
</speak>
以下のように break タグの time 属性で秒またはミリ秒単位で指定することが可能。最大秒数は10秒(10000ミリ秒)まで。
// 画像を表示しておく時間(秒)
// LaunchRequest 後のインテント起動の場合は発話終了直後に画面が消えてしまう
// スキル呼び出しと同時のインテント起動呼び出した場合は発話終了後7秒ほど画面表示が続く
const breakTime = 10 - (invokingSkillWithIntent ? 7 : 0); // 7秒 or 0秒を引く
const speechOutput = 'Hello World! こんにちは、世界。' + `<break time="${breakTime}s"/>`;
Alexa アプリで利用可能なカードを追加する
スキルの応答にカードを追加する | Alexa Skills Kit
ユーザーとAlexaデバイスとの対話には、Amazon Alexaアプリ(Fire OS、Android、iOS、デスクトップウェブブラウザで利用可能なコンパニオンアプリ)に表示するホームカードを追加することができます。ホームカードは、音声での対話について説明したり、音声の対話を補強したりする視覚的なカードです。カスタムスキルでは、応答にこのカードを含めることができます。
ResponseBuilder オブジェクトの withSimpleCard または withStandardCard で Alexa アプリに表示できるカードをレスポンスに追加できる。
handlerInput.responseBuilder
    .withStandardCard(
        'カードのタイトル',
        'Alexaアプリのカードに表示されるテキスト',
        imageURL, // 小さい画像URL
        imageURL) // 大きい画像URL
参考資料:
リクエスト情報をログに出力する
handlerInput.requestEnvelope にリクエスト情報があるのでこれを JSON 文字列化して console.log などで出力すれば良い。
console.log(JSON.stringify(handlerInput.requestEnvelope));
ただし、スキル内で一意に特定可能なユーザーIDなどが含まれているため情報の取り扱いには注意すべき。
カスタムインテントのハンドラ関数サンプルコード
以下にテンプレート的なサンプルコードを置いておく。
// カスタムインテント HelloWorldIntent のハンドラ関数
const HelloWorldIntentHandler = {
canHandle(handlerInput) {
return Alexa.getRequestType(handlerInput.requestEnvelope) === 'IntentRequest'
&& Alexa.getIntentName(handlerInput.requestEnvelope) === 'HelloWorldIntent';
},
handle(handlerInput) {
// リクエスト情報をログに出力
console.log(JSON.stringify(handlerInput.requestEnvelope));
// 特定のリクエスト (インテント) でスキルを呼び出したか
// スキル呼び出しと同時にインテント処理がはじまる場合に true をセット
const invokingSkillWithIntent =
handlerInput.requestEnvelope.session &&
handlerInput.requestEnvelope.session.new;
// 画像を表示しておく時間(秒)
// LaunchRequest 後のインテント起動の場合は発話終了直後に画面が消えてしまう
// スキル呼び出しと同時のインテント起動呼び出した場合は発話終了後7秒ほど画面表示が続く
const breakTime = 10 - (invokingSkillWithIntent ? 7 : 0); // 7秒 or 0秒を引く
// 発話テキストを構築
const speechOutput = 'Hello World! こんにちは、世界。' + `<break time="${breakTime}s"/>`;
// 画面に表示する画像のURL
const imageURL = 'https://niwasawa.github.io/maigo.png';
// 画面付きデバイス判定
if (supportsDisplay(handlerInput.requestEnvelope)) {
// 画面サイズを取得
const screenSize = getScreenSize(handlerInput.requestEnvelope);
// 画面付きデバイス用にコンテンツを追加
handlerInput.responseBuilder.addRenderTemplateDirective({
type: 'BodyTemplate7',
token: 'string',
backButton: 'HIDDEN',
image: {
contentDescription: 'ここに説明文',
sources: [{
"url": imageURL // 画像のURL
}]
},
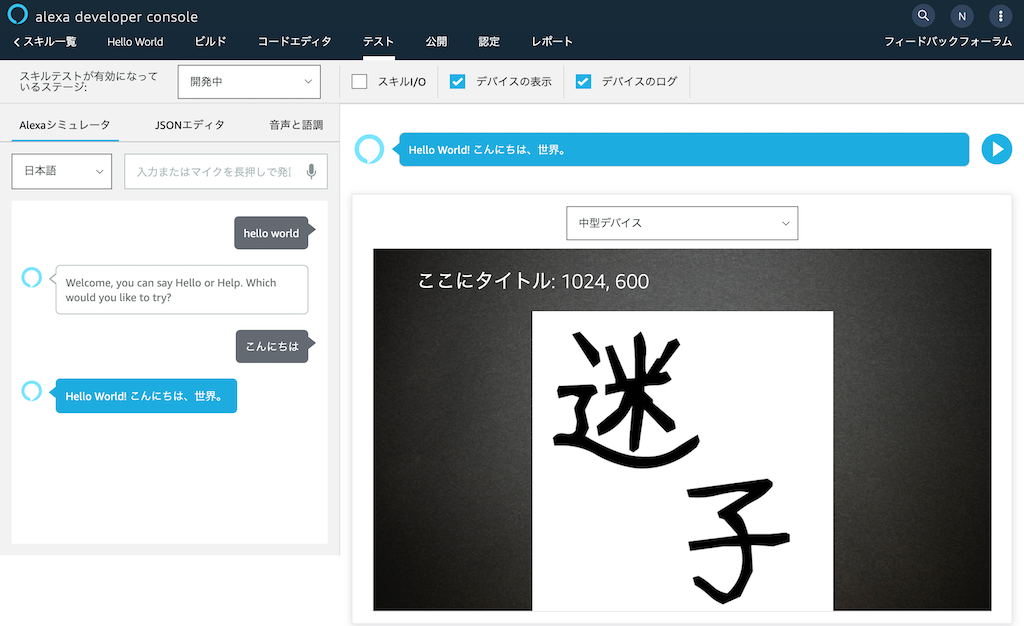
title: 'ここにタイトル: ' + screenSize.width + ', ' + screenSize.height
})
}
//レスポンスの生成
return handlerInput.responseBuilder
.speak(speechOutput) // 発話テキスト
.withStandardCard(
'カードのタイトル',
'Alexaアプリのカードに表示されるテキスト',
imageURL, // 小さい画像URL
imageURL) // 大きい画像URL
.withShouldEndSession(true) // スキルのセッションを終了する
.getResponse();
}
};
Alexa シミュレータによる動作サンプル画像。
参考資料: 画面付きのAlexa搭載デバイス用のスキルの作成
- 画面付きのAlexa搭載デバイスの表示と動作の仕様 | Alexa Skills Kit
- 画面付きのAlexa搭載デバイス用のスキルの作成 | Alexa Skills Kit
- 画面付きEchoデバイス向けスキルデザインのベストプラクティス | Alexa Skills Kit
- 日本語版 Echo Spot に対応したスキルの作り方 : Alexa Blogs