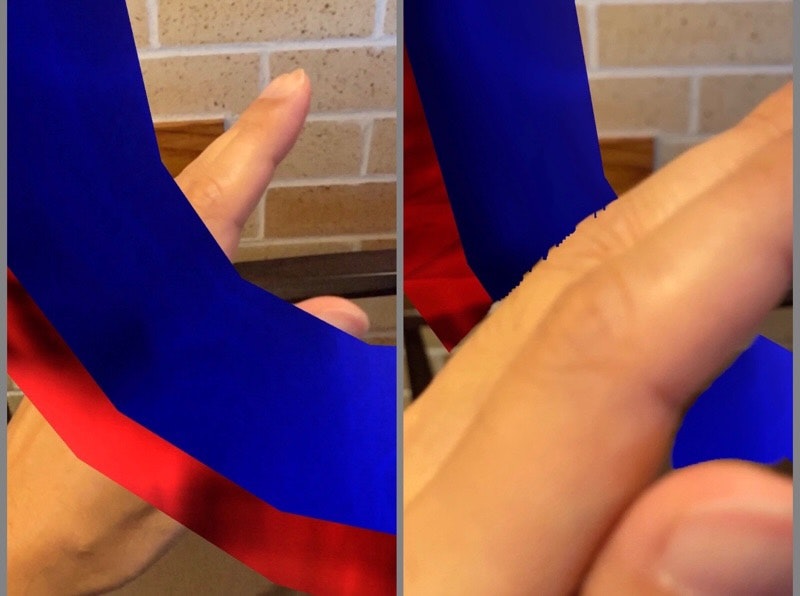
概要
- ARKit 3 の People Occlusion を使用したサンプルアプリを動かす
- Storyboard の状態を修正せず、ソースコードだけで実現する
People Occlusion とは
ARKit 2 までは、AR コンテンツは背景の画像の上にオーバーレイ描画されるだけだった。遠くに置いた AR コンテンツの前に人がいても、ARコンテンツは隠されずに表示されてしまっていた。
ARKit 3 の People Occlusion を使うと、仮想コンテンツと人の距離を考慮して表示してくれる。具体的には、人の位置が仮想コンテンツの位置よりもカメラに近い場合には、仮想コンテンツを隠すように描画する。
ピープルオクルージョン
ARコンテンツが人の手前や後ろに自然に現れるので、AR体験が一段と臨場感あふれるものになりました。楽しいグリーンバックのエフェクトもアプリケーションで使えます。
People Occlusion は A12/A12X Bionic 以降を搭載していないと使えない
iPhone XR以降、11インチiPad Pro、12.9インチiPad Pro(第3世代)、iPad Air(第3世代)、iPad mini(第5世代)で利用できます。
Augmented Reality - ARKit 3 - Apple Developer
People Occlusion and the use of motion capture, simultaneous front and back camera, and multiple face tracking are supported on devices with A12/A12X Bionic chips, ANE, and TrueDepth Camera.
今回の環境
- Xcode 11.0
- ARKit 3
- SceneKit
- Swift 5.1
- iPhone 11 Pro + iOS 13.0
プロジェクトの作成
Xcode にてテンプレートから iOS + Argumented Reality App を選択する。

以下のオプションを選択する。
- Language: Swift
- Content Technology: SceneKit
- User Interface: Storyboard

プロジェクトを作成すると AppDelegate.swift と ViewController.swift という Swift のソースコードが用意される。

ソースコード
ViewController.swift を以下のコードに置き換える。
import UIKit
import SceneKit
import ARKit

class ViewController: UIViewController, ARSCNViewDelegate {

    @IBOutlet var sceneView: ARSCNView!

    override func viewDidLoad() {
        super.viewDidLoad()

        // Set the view's delegate
        sceneView.delegate = self

        // Show statistics such as fps and timing information
        sceneView.showsStatistics = true

        // シーンを生成
        let scene = SCNScene()

        // Set the scene to the view
        sceneView.scene = scene

    }

    override func viewWillAppear(_ animated: Bool) {
        super.viewWillAppear(animated)

        // Create a session configuration
        let configuration = ARWorldTrackingConfiguration()

        // 環境マッピングを有効にする
        configuration.environmentTexturing = .automatic

        // People Occlusion が使える端末か判定
        var message:String;
        if ARWorldTrackingConfiguration.supportsFrameSemantics(.personSegmentationWithDepth) {
            // People Occlusion を使用する
            configuration.frameSemantics = .personSegmentationWithDepth
            message = "Ok! This device supports people occulusion."
        } else {
            message = "No! This device don't support people occulusion."
        }
        print("\(message)")

        // 表示するテキストを用意
        let depth:CGFloat = 0.2 // テキストの厚さ0.2m
        let text = SCNText(string: message, extrusionDepth: depth)
        text.font = UIFont.systemFont(ofSize: 1.0)

        // テキストの色と質感を用意
        let m1 = SCNMaterial()
        m1.diffuse.contents = UIColor.red // 前面に赤色
        // 鏡面反射感を出す
        m1.lightingModel = .physicallyBased
        m1.metalness.contents = 1.0
        m1.metalness.intensity = 1.0
        m1.roughness.intensity = 0.0
        // back material
        let m2 = SCNMaterial()
        m2.diffuse.contents = UIColor.green // 背面に緑色
        m2.lightingModel = .physicallyBased
        m2.metalness.contents = 1.0
        m2.metalness.intensity = 1.0
        m2.roughness.intensity = 0.0
        // extruded sides material
        let m3 = SCNMaterial()
        m3.diffuse.contents = UIColor.blue // 側面に青色
        m3.lightingModel = .physicallyBased
        m3.metalness.contents = 1.0
        m3.metalness.intensity = 1.0
        m3.roughness.intensity = 0.0
        text.materials = [m1, m2, m3] // テキストの色と質感をセット

        // テキストノード作成して、配置する場所を決める
        let textNode = SCNNode(geometry: text)
        textNode.position = SCNVector3(-0.5, -1.5, -0.5)

        // AR空間にテキストノードを追加
        sceneView.scene.rootNode.addChildNode(textNode)

        // Run the view's session
        sceneView.session.run(configuration)
    }

    override func viewWillDisappear(_ animated: Bool) {
        super.viewWillDisappear(animated)

        // Pause the view's session
        sceneView.session.pause()
    }
}
実機での実行結果
実機 (iPhone 11 Pro + iOS 13.0) にインストールして実行してみる。
iPhone 11 Pro は A12 Bionic 以降を搭載しているので People Occlusion が使える。
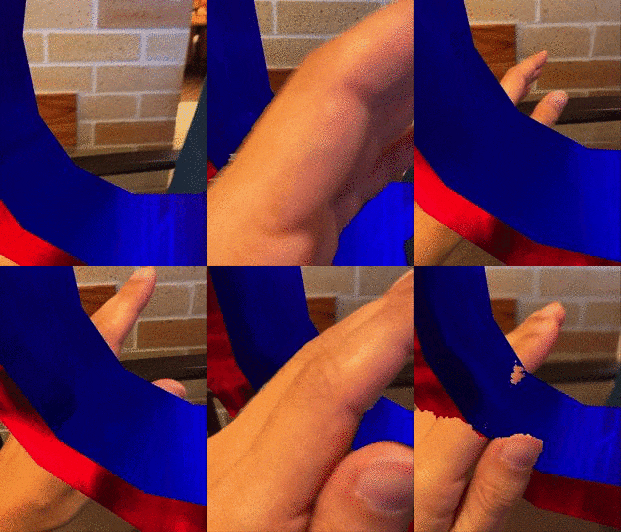
手の位置を考慮して AR コンテンツが描画されている。手が前に来ると AR コンテンツの一部が隠れる。ARKit 2 ではこれができなかった。

