概要
Node-REDの node-red-dashboardノードは、さくっとダッシュボードを作るのに非常に楽に作成することができます。
ただ、ちょっと凝ったことをしようとしたりすると面倒になってくる場合が出てきます。
enebularを使いPoCが完了して、実用に向けたステップアップで先ず UI を Vue.js などに置換える手段として、node-red-contrib-uibuilderノード(以降uibuilderノード) が使えるのではないかということで紹介します。
uibuilderノードの詳細は公式のページを参照していただくとして、個人的に良さそうなポイントをピックアップしてみます。
UIのボタンクリックなどのイベントをフローに通知する機能などがあるので、UIとビジネスロジックの切り分けにも使えそうです。
・ Node-RED公式ダッシュボードの代替として設計されています。オーバーヘッドと制限なし。
・ Node-REDの公式ダッシュボードよりもはるかに軽量でモバイルフレンドリーです(フレームワークとしてAngularを使用しないと仮定)。
・ 任意のあなたが好きなフロントエンドのフレームワークを、少なくともJQuery、VueJS、MoonJS、REACT、UmbrellaJS、Riotでテスト済み。
・ 付属のフロントエンドライブラリは、Node-REDおよびmsgイベント処理への接続を提供します。
準備
enebular editor(IDE)の導入は事前に完了しているものとして進めます。
uibuilderノードを導入・動作チェック
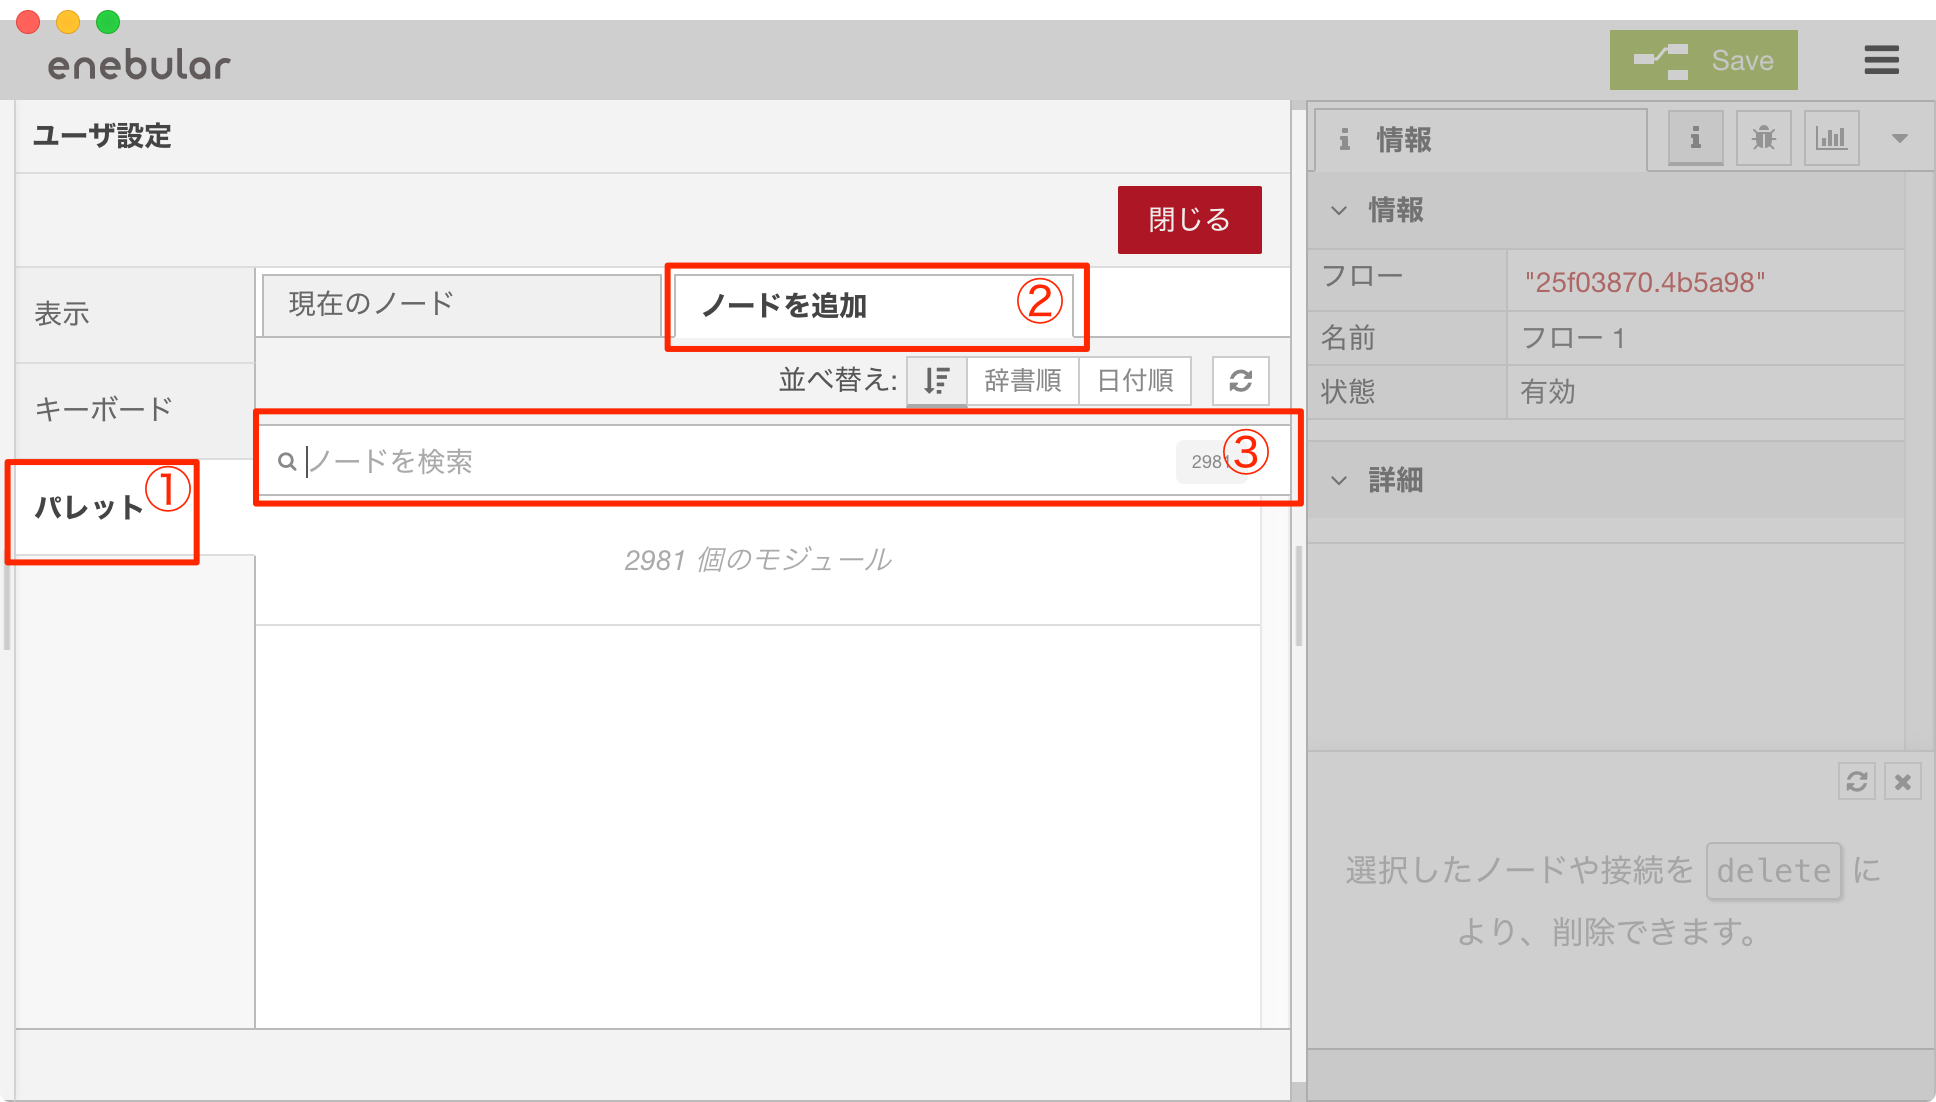
右上のハンバーガーメニュー から 「パレットの管理」を選択
ユーザー設定のダイアログが表示されたら、パレット > ノードを追加 > 「ノードを検索」蘭に"uibuilder"と入力しして、候補から出てきたら「uibuilder」を選択します。


確認のメッセージが表示されるので、「追加」を選択します。

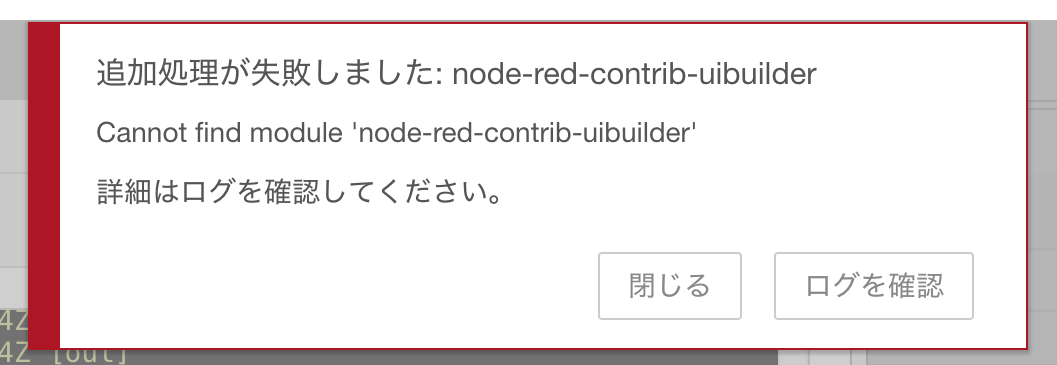
なお、原因は不明ですが1回目は失敗する場合がありますので、エラーが表示されたら「閉じる」を選択して、再度インストールを試みます。
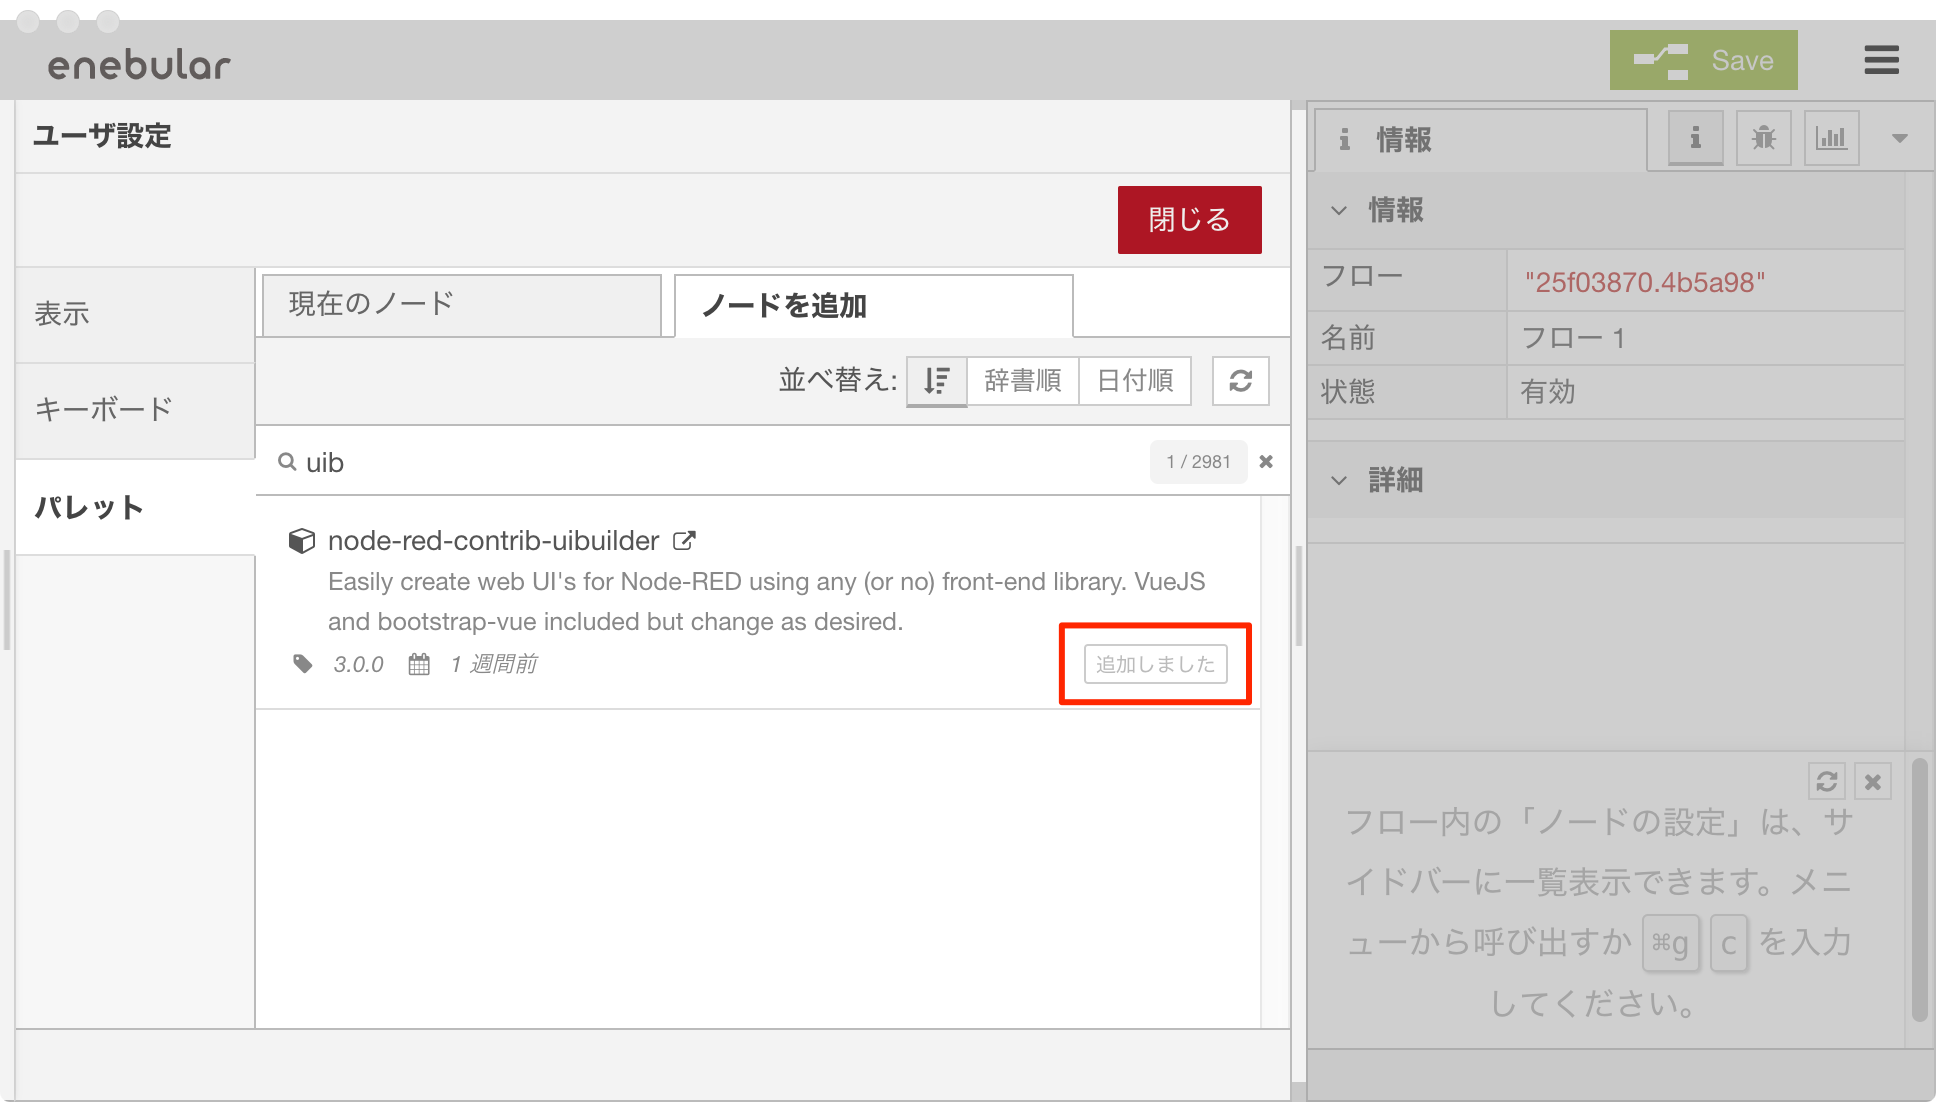
インストールに少々時間がかかりますが、成功すると以下のように表示が "追加しました" に変わります。
追加できたら、「閉じる」を選択してフロー編集画面へ遷移します。
フロー編集
フロー編集画面に戻ったら、フローを編集していきます。
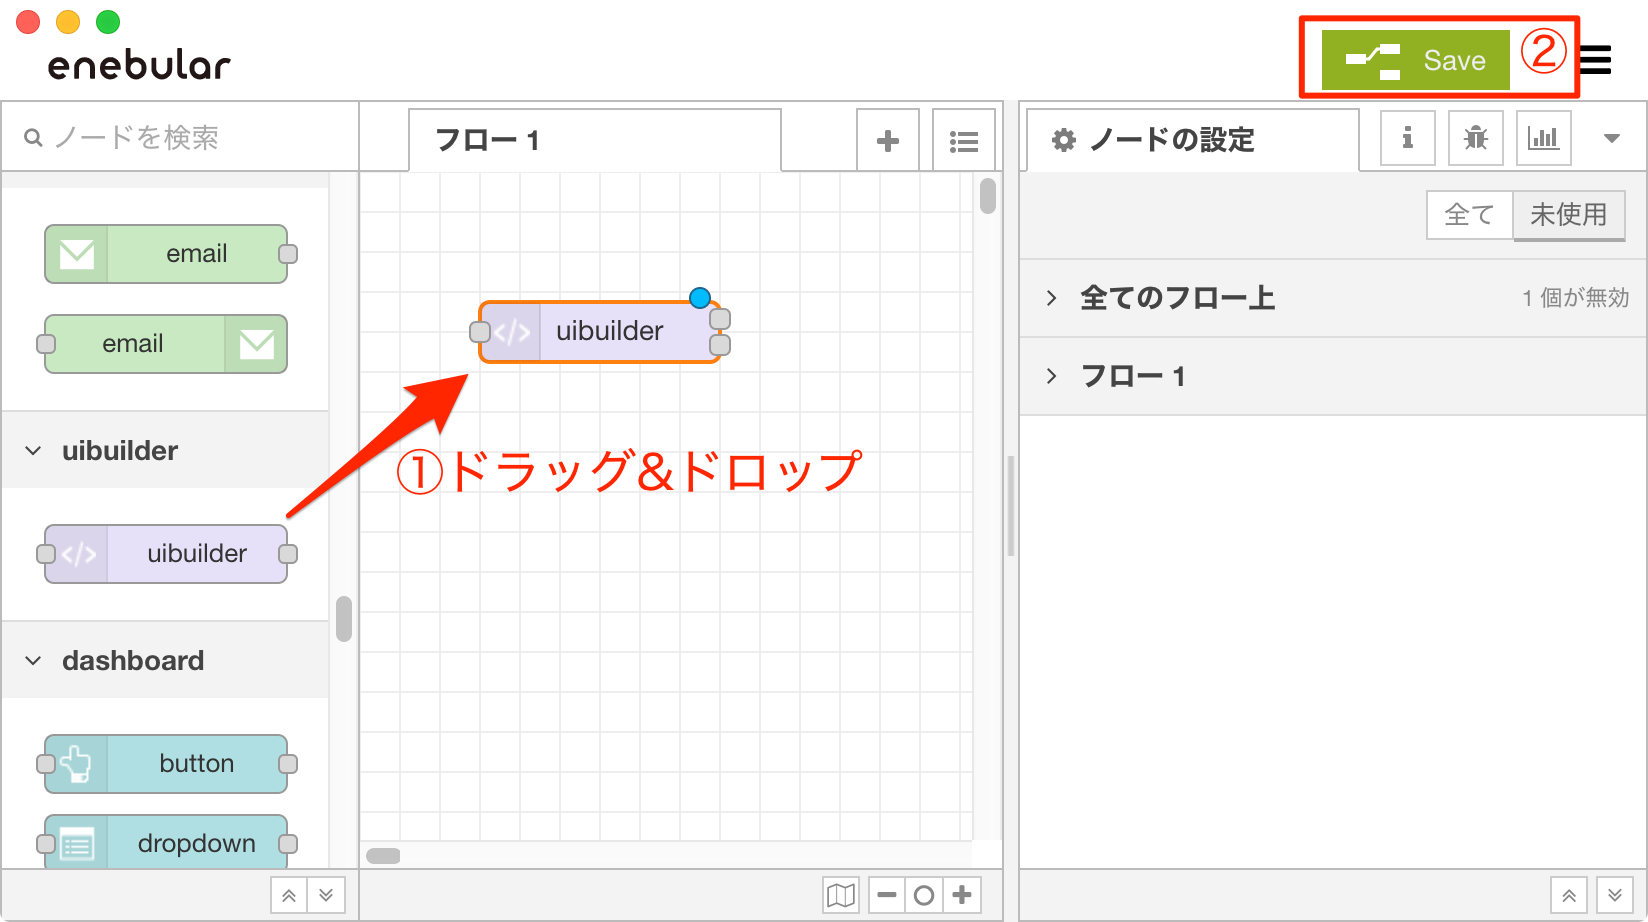
左側の一覧のパレットから、uibuilderグループ > uibuilderブロックをドラッグ&ドロップします。
次に、右上の「Save」ボタンを選択し保存します。
保存が完了したら、配置した uibuilderノード をダブルクリックしノードの編集画面を出します。
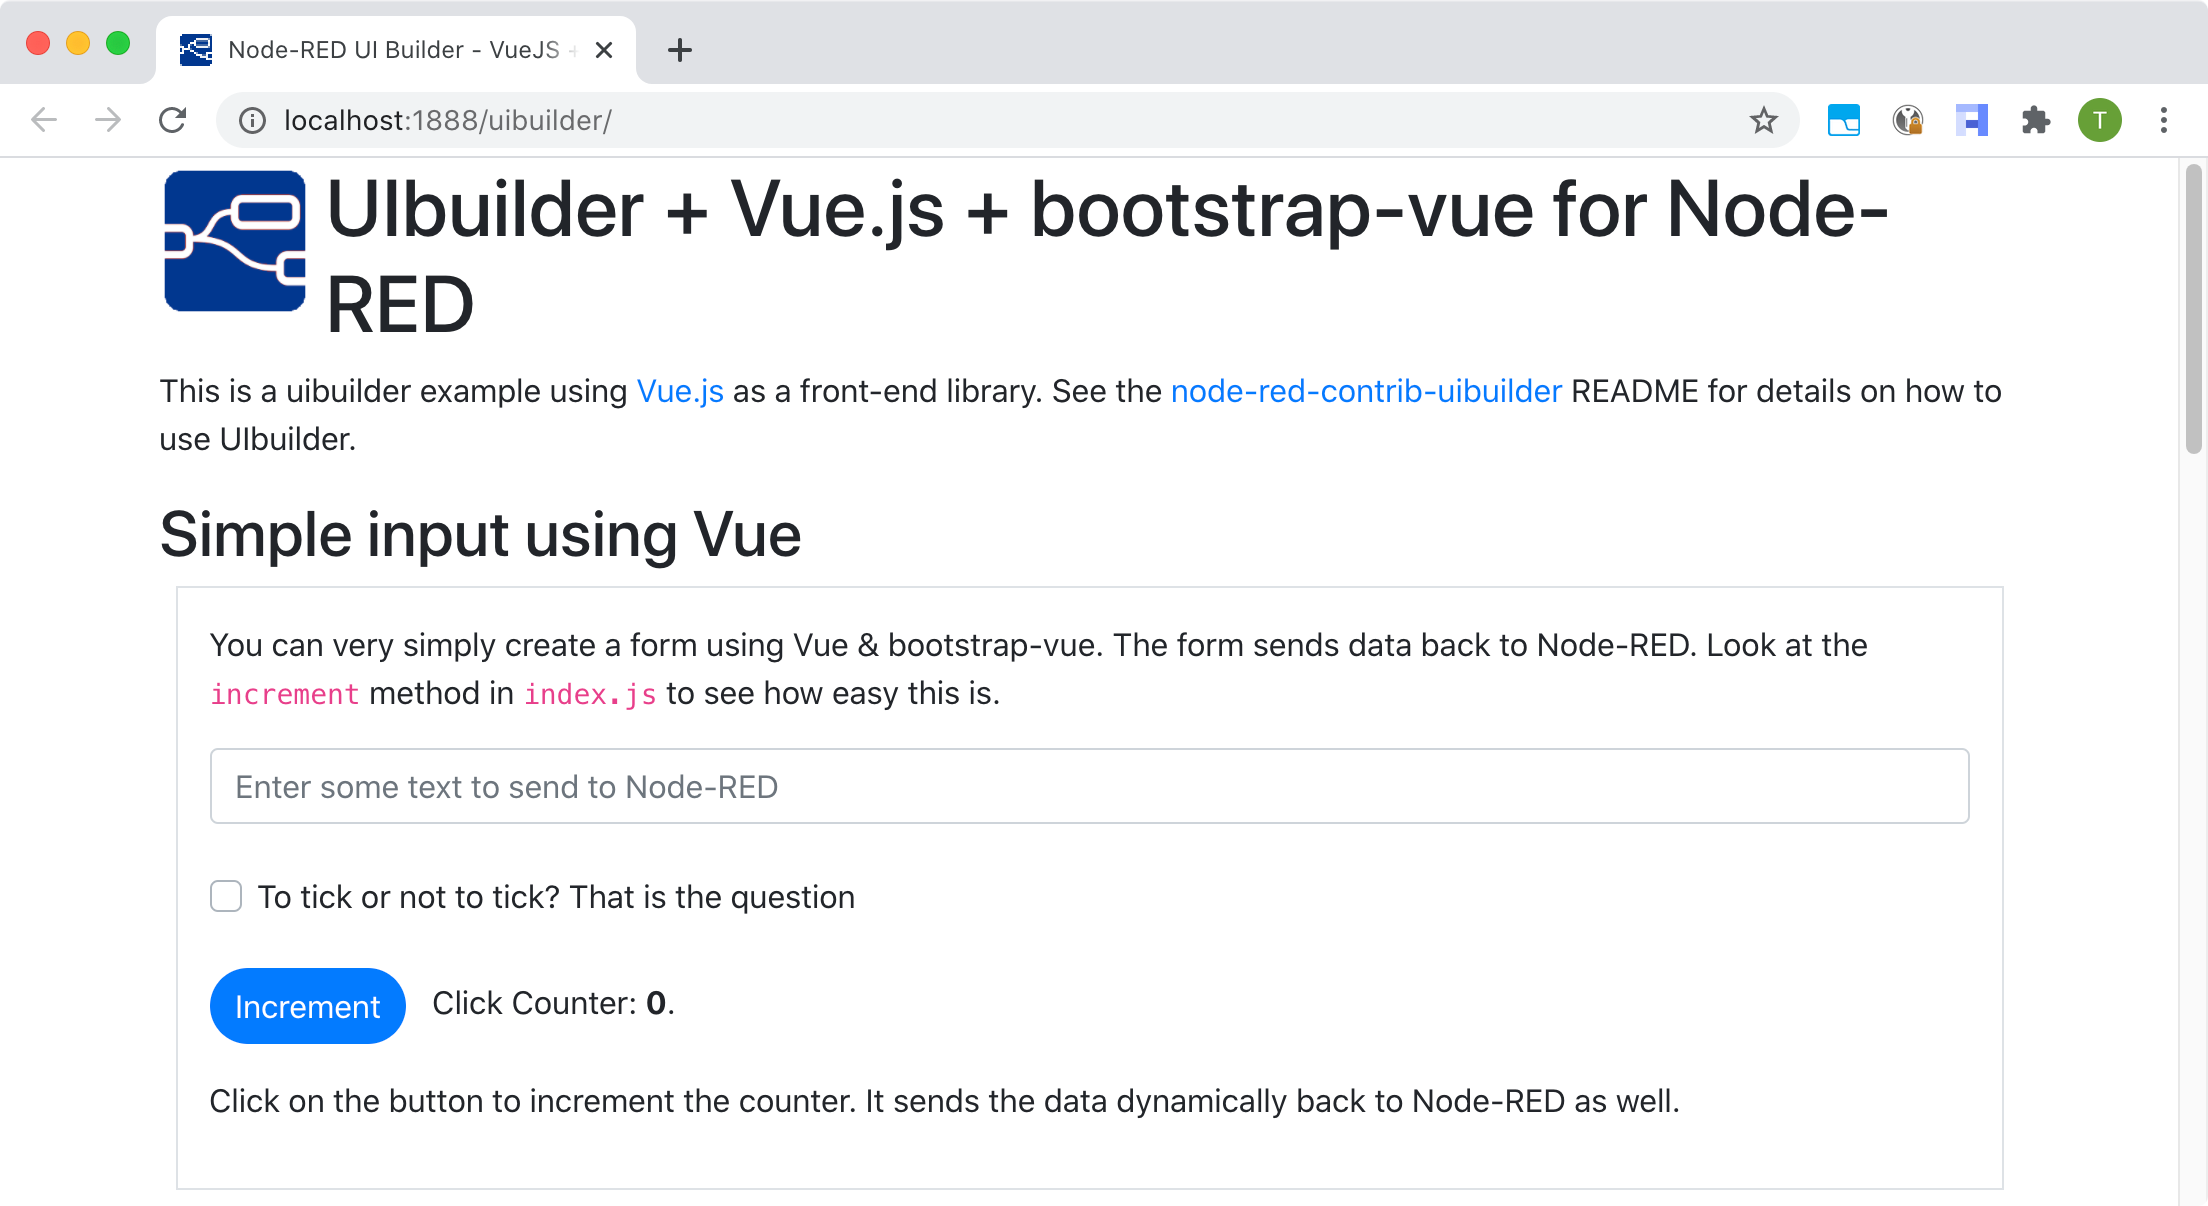
「Open Page: ./uibuilder」ボタンを選択して、動作確認をします。
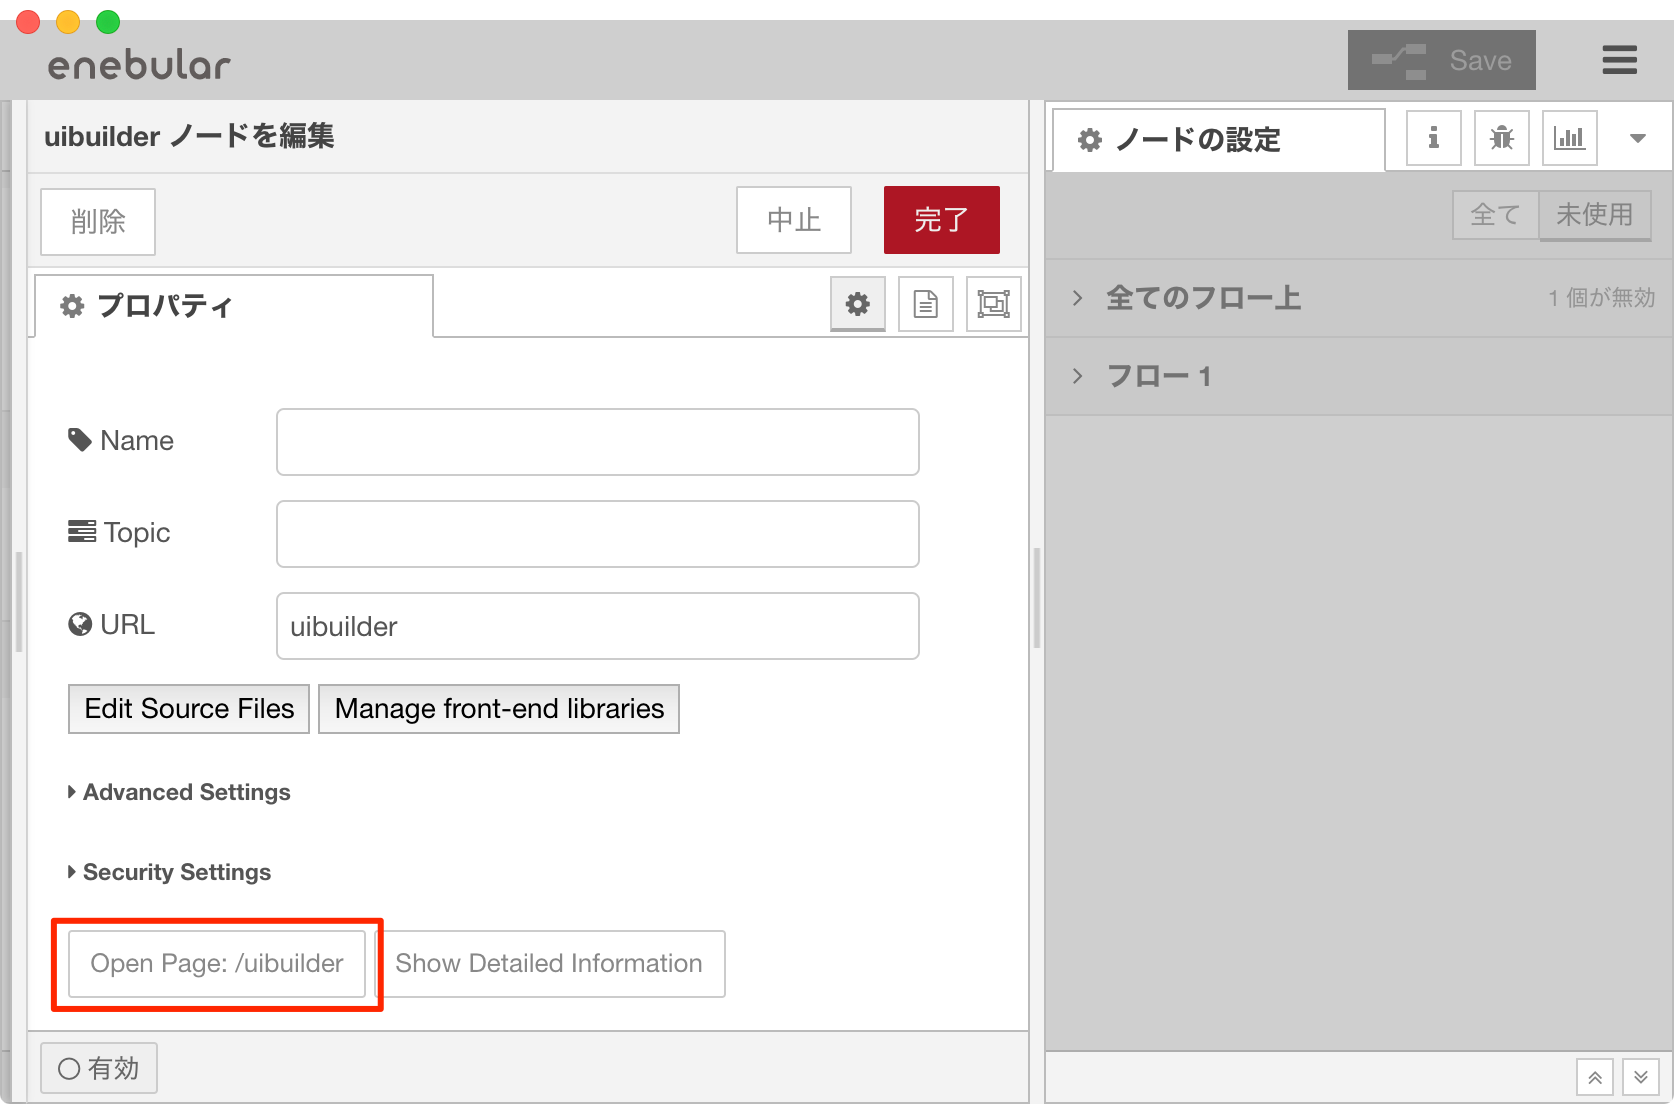
正常に動いている場合、以下のようにデフォルトで入っているテンプレートのサンプル画面が表示されます。
チャート表示のサンプル
ここでは、Node-REDのフローとUI間イベントをやりとりするコードテンプレートコードを残しつつ、チャートを表示するサンプルを紹介します。
chart.js、vue-chart.jsのUIライブラリを追加
再び、uibuilderノードの編集画面を出し、「Manage front-end libraries」を選択します。
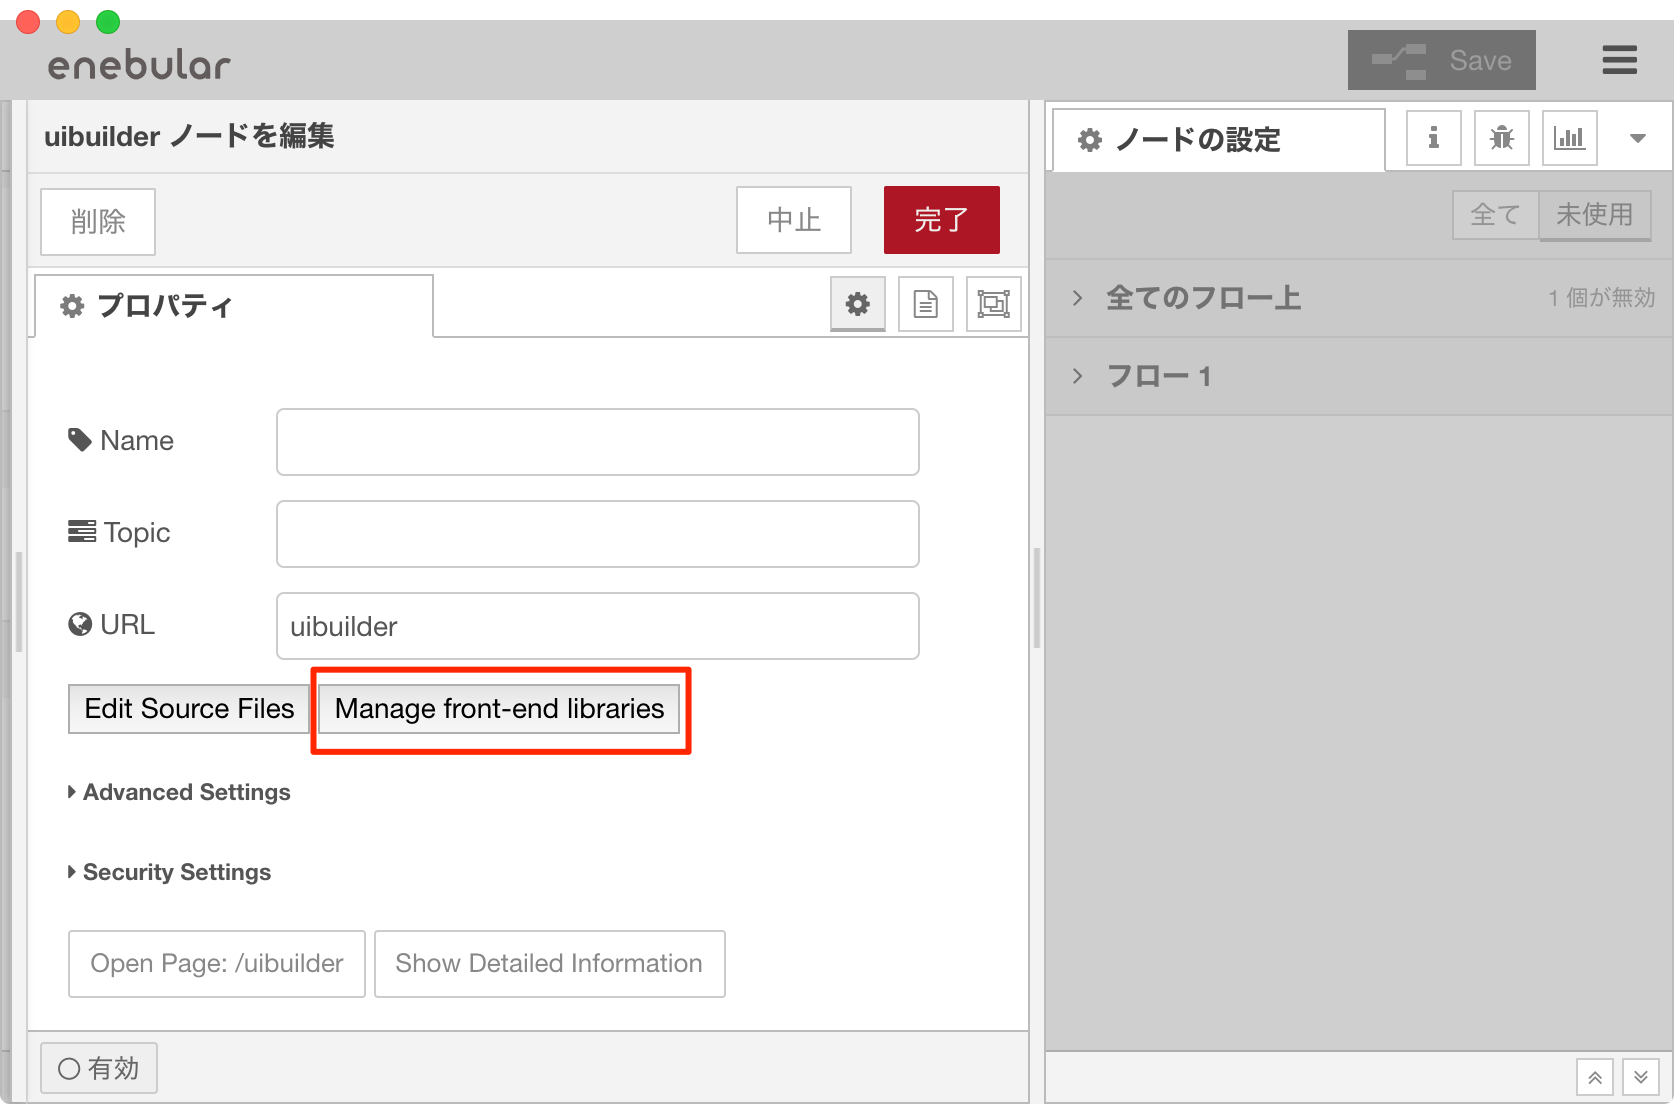
プロパティ編集画面が表示されたら、追加 > 必要なライブラリ名を入力 > インストールの順番でライブラリをインストールしていきます。
ここでは、以下のUIライブラリを導入します。
- vue-chart.js
- chart.js
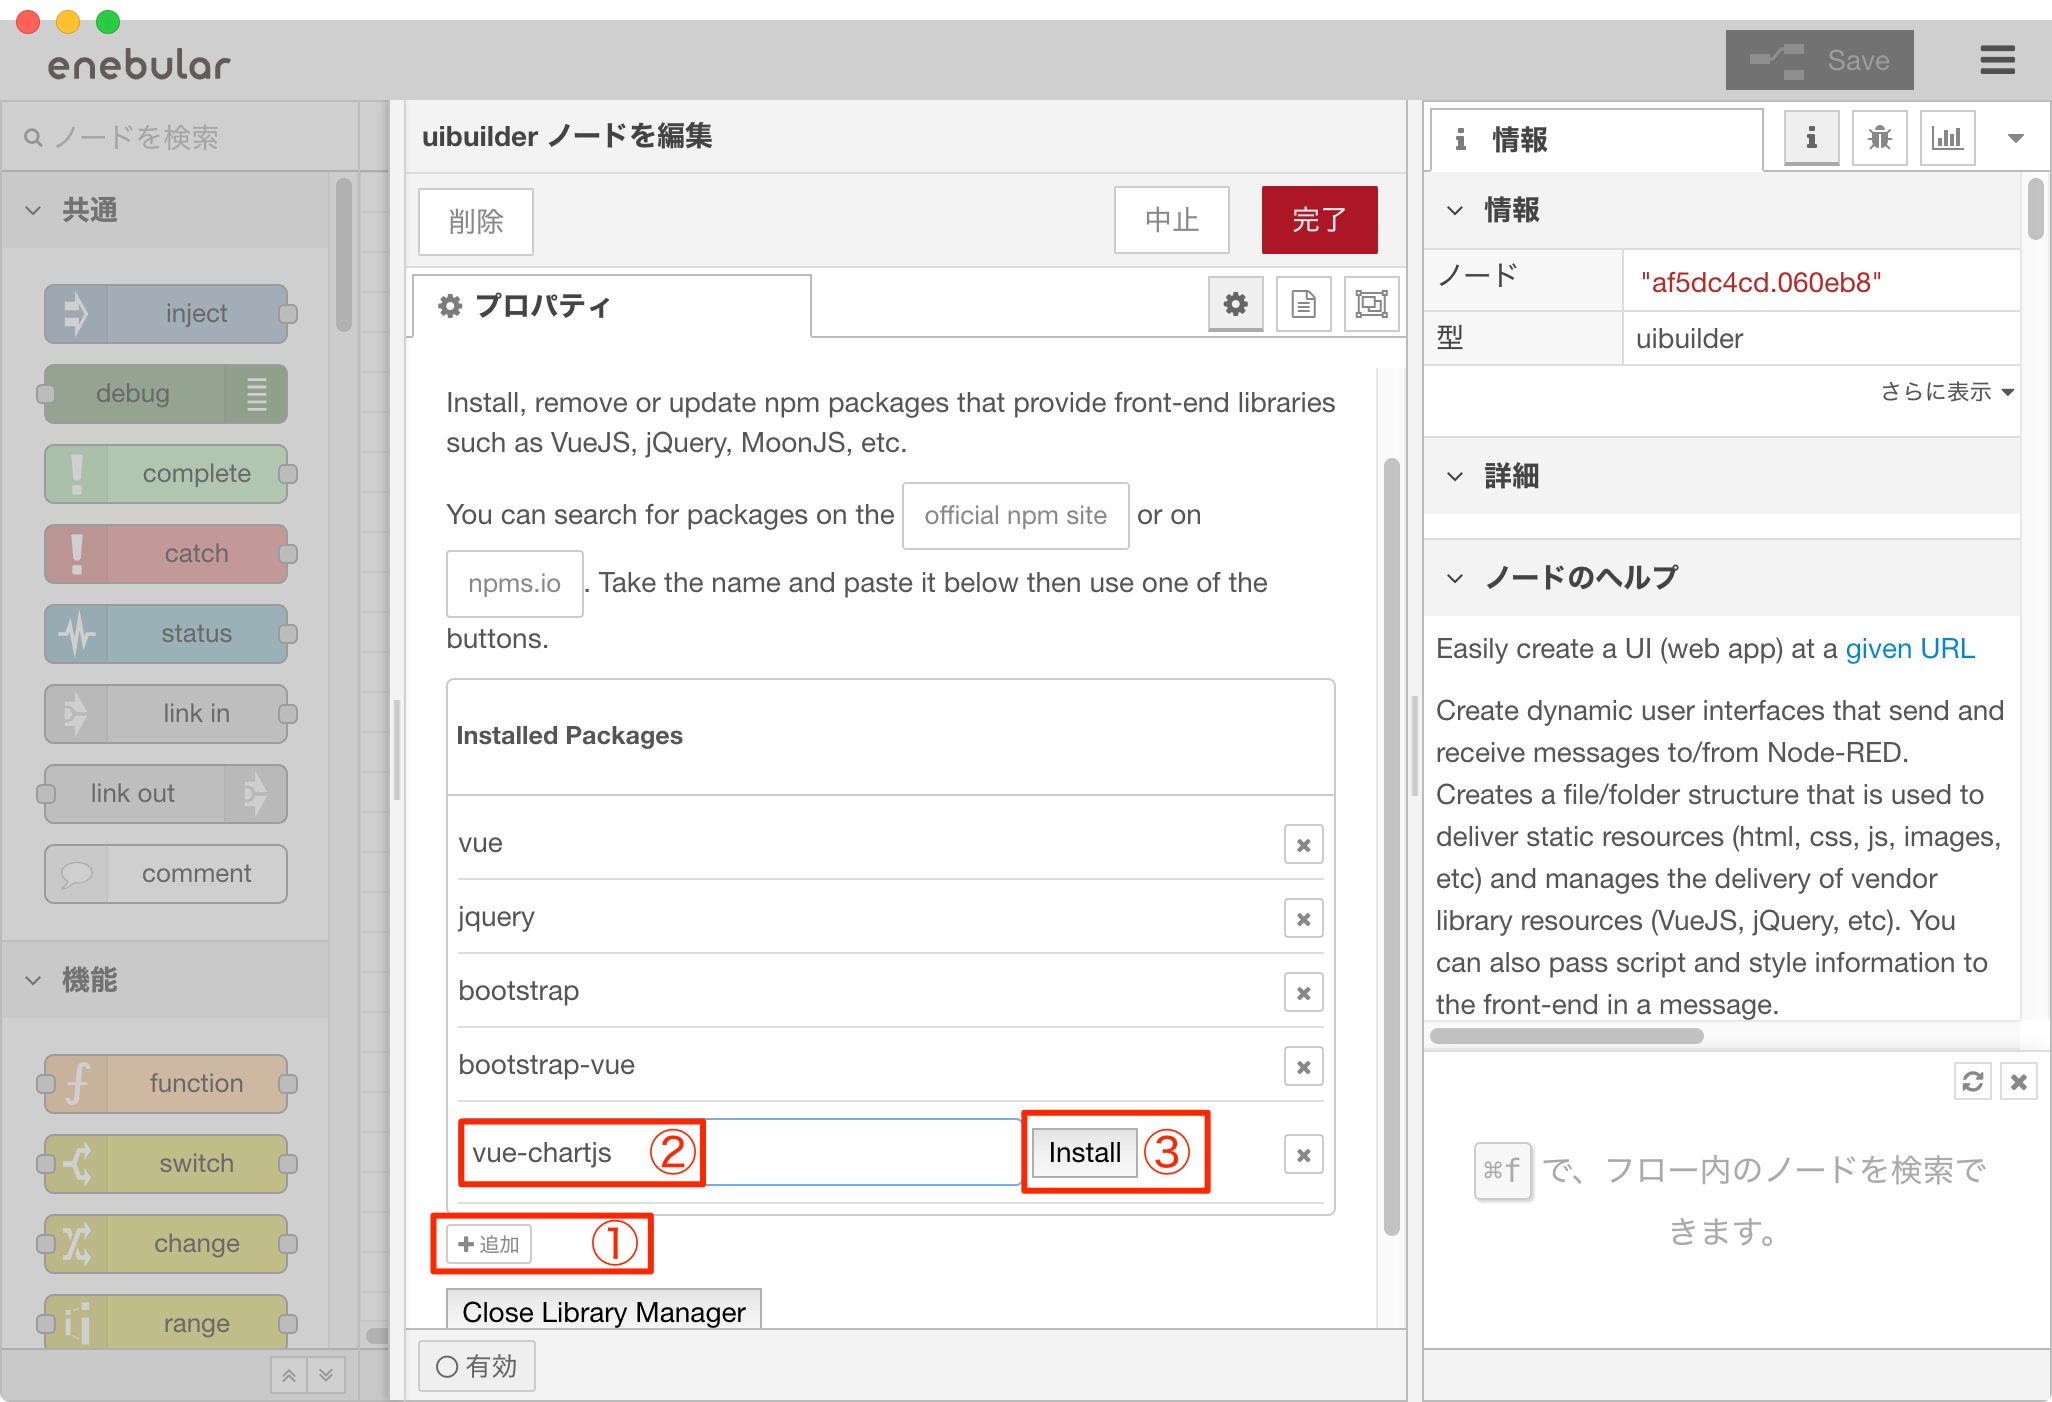
インストールが完了したら下の「Close Library Manager」を選択し、プロパティ編集画面を閉じて、コードを編集していきます。
コードを編集
uibuilderノードの編集画面を出し、「Edit Source Files」を選択します。
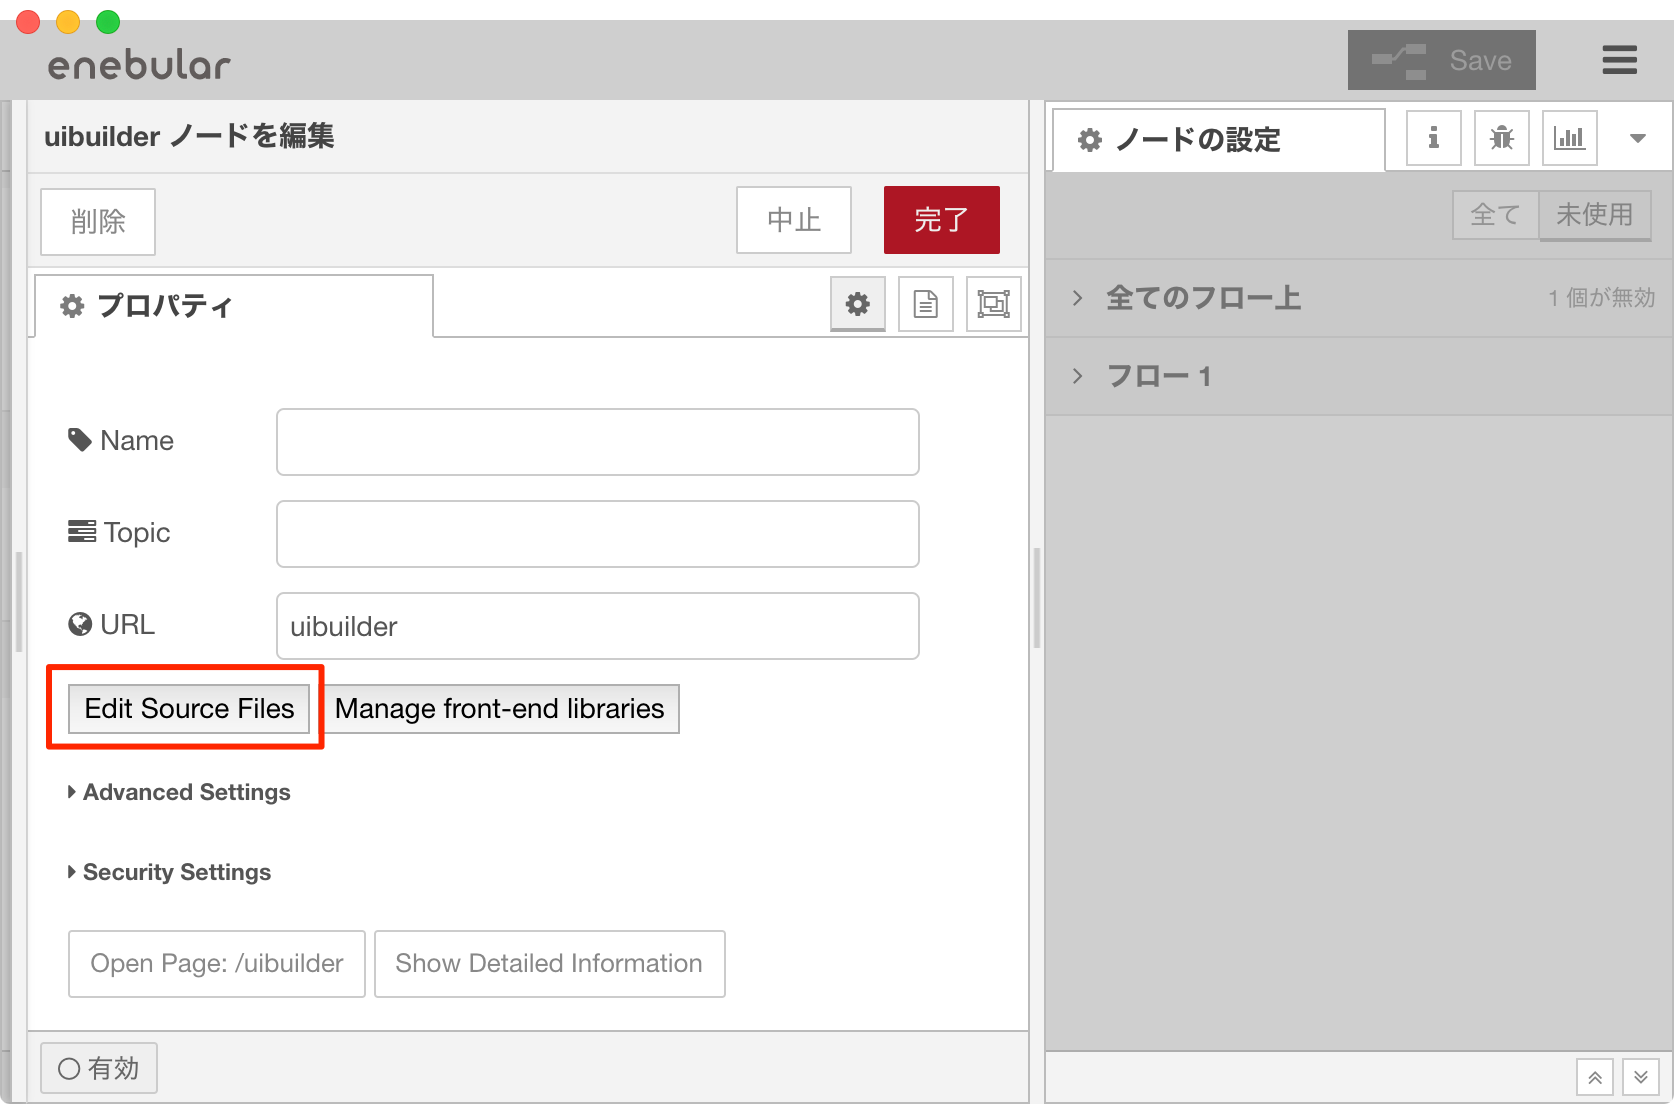
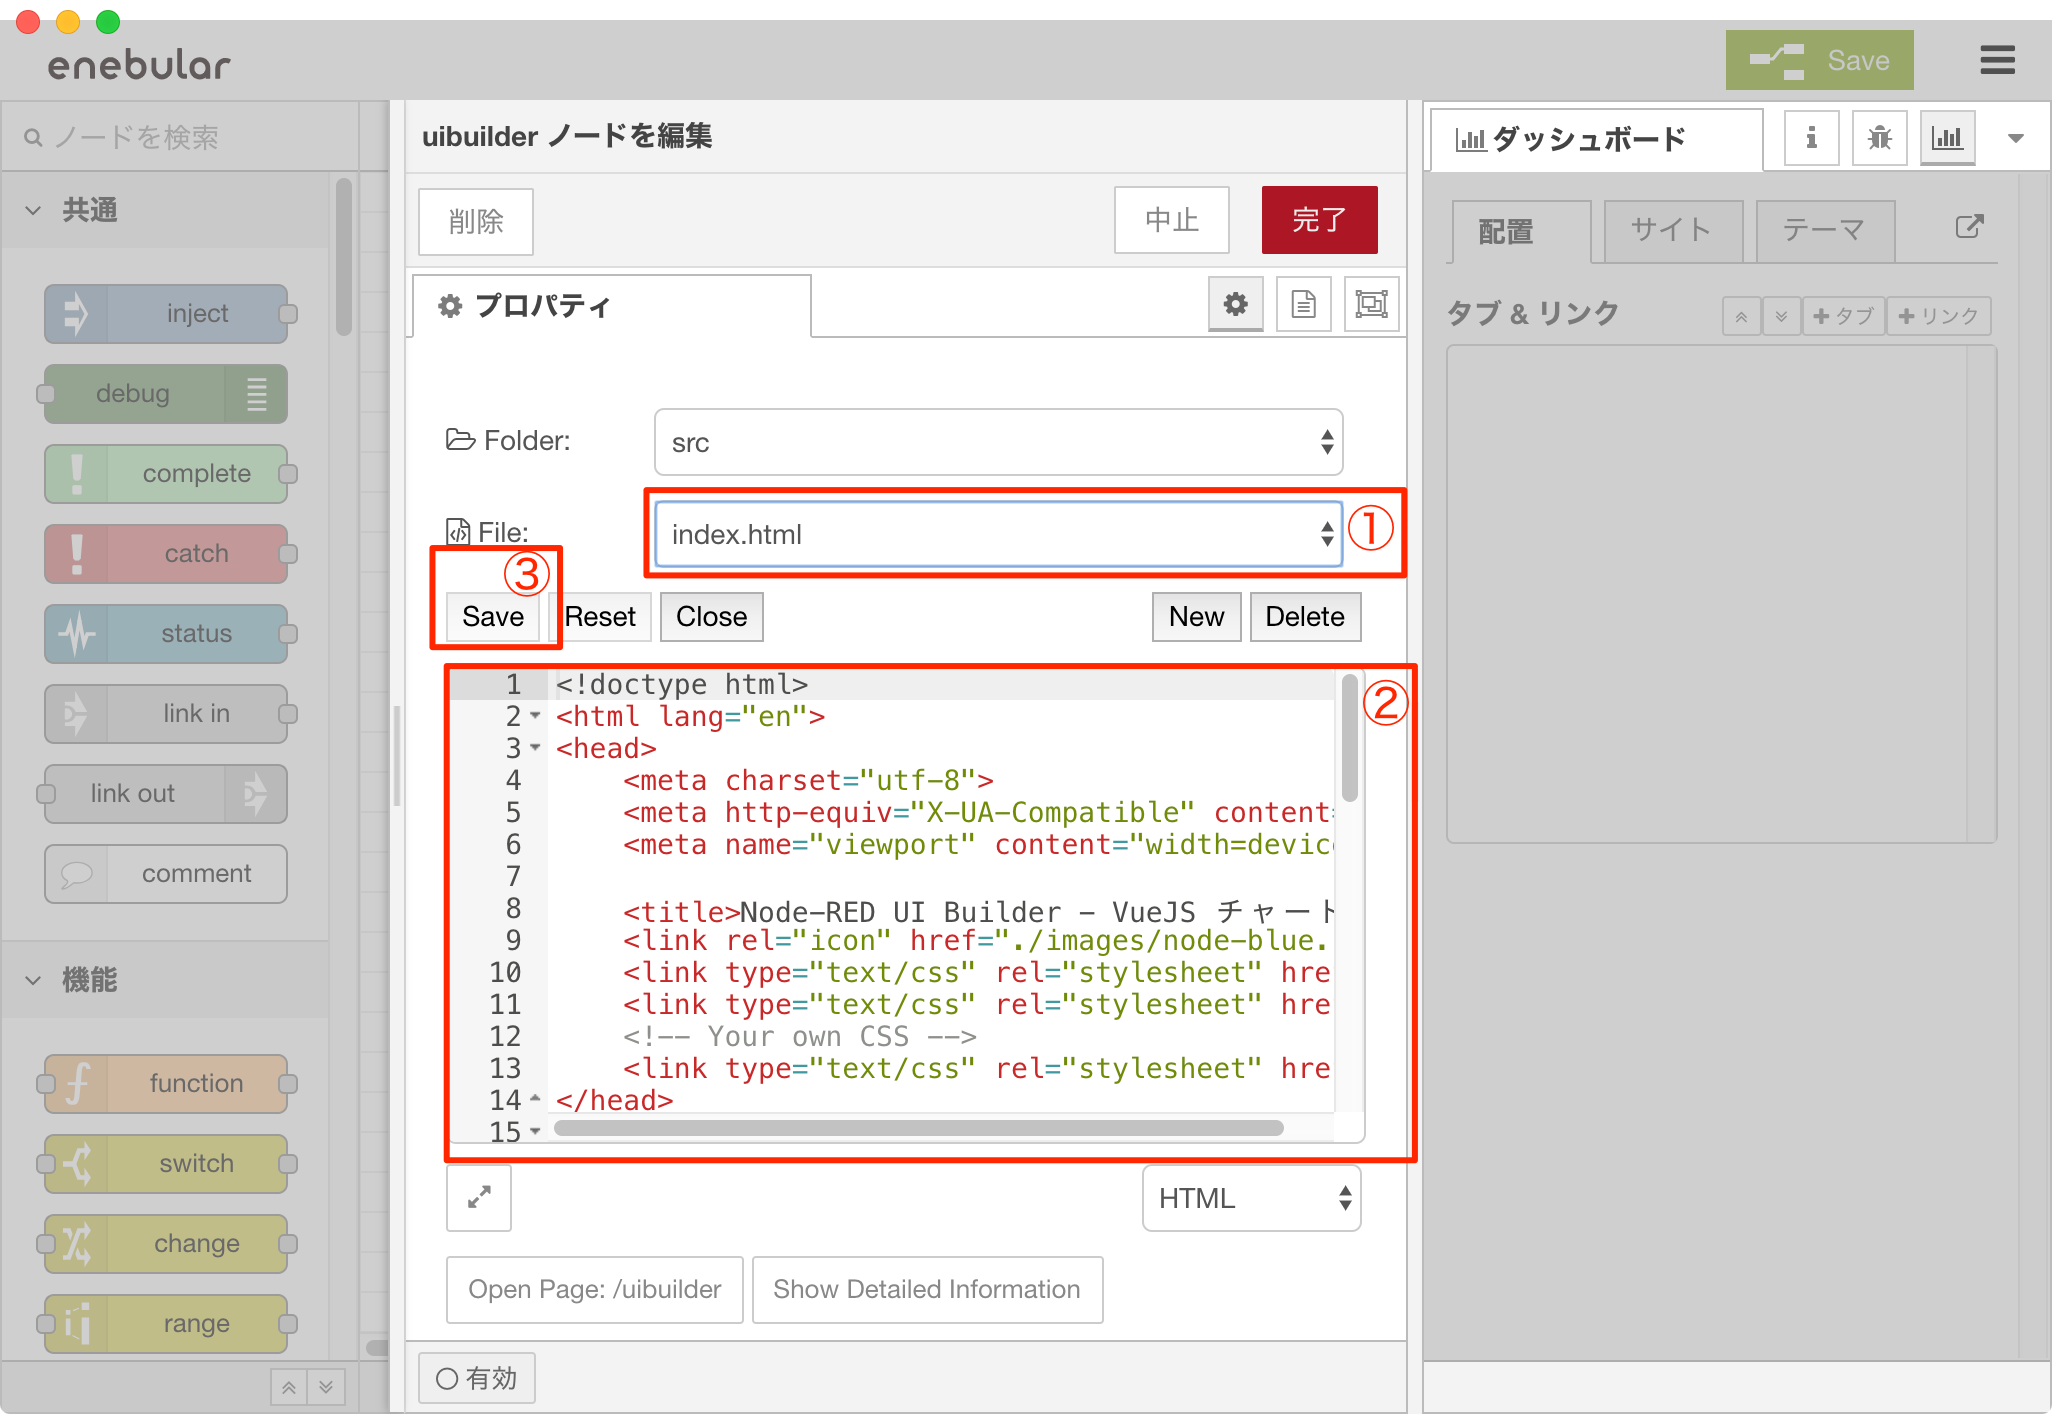
コード編集画面では、以下の順番で次に示すuibuilderノードのコードを記述していきます。
- ①: 編集したい対象のソースコードファイルを選択
- ②: コードを編集
- ③: 「Save」を選択
編集が完了したら右上の「完了」を選択します。
uibuilderノードのコード
コードは、vue-chart.jsのサンプルを引用し今回のダッシュボード向けに埋め込んでいきます。
index.html
index.htmlのサンプルコード。クリックで折りたたみが展開されます
<!doctype html>
<html lang="en">
<head>
    <meta charset="utf-8">
    <meta http-equiv="X-UA-Compatible" content="IE=edge">
    <meta name="viewport" content="width=device-width, initial-scale=1">

    <title>Node-RED UI Builder - VueJS チャートサンプル</title>
    <link rel="icon" href="./images/node-blue.ico">
    <link type="text/css" rel="stylesheet" href="../uibuilder/vendor/bootstrap/dist/css/bootstrap.min.css" />
    <link type="text/css" rel="stylesheet" href="../uibuilder/vendor/bootstrap-vue/dist/bootstrap-vue.css" />
    <!-- Your own CSS -->
    <link type="text/css" rel="stylesheet" href="./index.css" media="all">
</head>
<body>
    <div id="app" v-cloak>
        <b-container id="app_container">
            <h1>チャートサンプル</h1>
            <my-chart></my-chart>
        </b-container>
    </div>

    <!-- Dont forget to use minified versions of libraries for production, non-min versions for development only -->
    <!-- These MUST be in the right order. Note no leading / -->

    <!-- REQUIRED: Socket.IO is loaded only once for all instances. Without this, you don't get a websocket connection -->
    <script src="../uibuilder/vendor/socket.io/socket.io.js"></script>

    <!-- --- Vendor Libraries - Load in the right order --- -->
    <script src="../uibuilder/vendor/vue/dist/vue.js"></script> <!-- dev version with component compiler -->
    <!-- <script src="../uibuilder/vendor/vue/dist/vue.min.js"></script>   prod version with component compiler -->
    <!-- <script src="../uibuilder/vendor/vue/dist/vue.runtime.min.js"></script>   prod version without component compiler -->
    <script src="../uibuilder/vendor/bootstrap-vue/dist/bootstrap-vue.js"></script>

    <!-- REQUIRED: Sets up Socket listeners and the msg object -->
    <script src="./uibuilderfe.js"></script> <!-- dev version -->
    <!-- <script src="./uibuilderfe.min.js"></script>     //prod version -->

    <!-- OPTIONAL: You probably want this. Put your custom code here -->
    <script src="../uibuilder/vendor/chart.js/dist/Chart.js" type="text/javascript"></script>
    <script src="../uibuilder/vendor/vue-chartjs/dist/vue-chartjs.js" type="text/javascript"></script>
    <script src="./index.js"></script>
</body>
</html>
index.js
index.jsのサンプルコード。クリックで折りたたみが展開されます
'use strict'

//
// 今回追加のコード。vue-chartjsのサンプルコードから引用
// https://github.com/apertureless/vue-chartjs/blob/develop/src/examples/BarExample.js
// LICENSED BY: MIT License
//
Vue.component('my-chart', {
  extends: VueChartJs.Bar, // vue-chartjs
  name: 'MyChart',
  mounted () {
    this.renderChart({
      labels: ['January', 'February', 'March', 'April', 'May', 'June', 'July', 'August', 'September', 'October', 'November', 'December'],
      datasets: [
        {
          label: 'Data One',
          backgroundColor: '#f87979',
          data: [40, 20, 12, 39, 10, 40, 39, 80, 40, 20, 12, 11]
        }
      ]
    }, {responsive: true, maintainAspectRatio: false})
  }
})

//
// UI Builderのテンプレートから必要分のみ抜粋
//
var app1 = new Vue({
    el: '#app',
    data: {
        startMsg    : 'Vue has started, waiting for messages',
        feVersion   : '',
        counterBtn  : 0,
        inputText   : null,
        inputChkBox : false,
        socketConnectedState : false,
        serverTimeOffset     : '[unknown]',
        imgProps             : { width: 75, height: 75 },

        msgRecvd    : '[Nothing]',
        msgsReceived: 0,
        msgCtrl     : '[Nothing]',
        msgsControl : 0,

        msgSent     : '[Nothing]',
        msgsSent    : 0,
        msgCtrlSent : '[Nothing]',
        msgsCtrlSent: 0,

        isLoggedOn  : false,
        userId      : null,
        userPw      : null,
        inputId     : '',
    }, // --- End of data --- //
    computed: {
        hLastRcvd: function() {
            var msgRecvd = this.msgRecvd
            if (typeof msgRecvd === 'string') return 'Last Message Received = ' + msgRecvd
            else return 'Last Message Received = ' + this.syntaxHighlight(msgRecvd)
        },
        hLastSent: function() {
            var msgSent = this.msgSent
            if (typeof msgSent === 'string') return 'Last Message Sent = ' + msgSent
            else return 'Last Message Sent = ' + this.syntaxHighlight(msgSent)
        },
        hLastCtrlRcvd: function() {
            var msgCtrl = this.msgCtrl
            if (typeof msgCtrl === 'string') return 'Last Control Message Received = ' + msgCtrl
            else return 'Last Control Message Received = ' + this.syntaxHighlight(msgCtrl)
        },
        hLastCtrlSent: function() {
            var msgCtrlSent = this.msgCtrlSent
            if (typeof msgCtrlSent === 'string') return 'Last Control Message Sent = ' + msgCtrlSent
            //else return 'Last Message Sent = ' + this.callMethod('syntaxHighlight', [msgCtrlSent])
            else return 'Last Control Message Sent = ' + this.syntaxHighlight(msgCtrlSent)
        },
    }, // --- End of computed --- //
    // methods: {}, // --- End of methods --- //

    // Available hooks: beforeCreate,created,beforeMount,mounted,beforeUpdate,updated,beforeDestroy,destroyed, activated,deactivated, errorCaptured

    /** Called after the Vue app has been created. A good place to put startup code */
    created: function() {
        // Example of retrieving data from uibuilder
        this.feVersion = uibuilder.get('version')

        /** **REQUIRED** Start uibuilder comms with Node-RED @since v2.0.0-dev3
         * Pass the namespace and ioPath variables if hosting page is not in the instance root folder
         * e.g. If you get continual `uibuilderfe:ioSetup: SOCKET CONNECT ERROR` error messages.
         * e.g. uibuilder.start('/uib', '/uibuilder/vendor/socket.io') // change to use your paths/names
         * @param {Object=|string=} namespace Optional. Object containing ref to vueApp, Object containing settings, or String IO Namespace override. changes self.ioNamespace from the default.
         * @param {string=} ioPath Optional. changes self.ioPath from the default
         * @param {Object=} vueApp Optional. Reference to the VueJS instance. Used for Vue extensions.
         */
        uibuilder.start(this) // Single param passing vue app to allow Vue extensions to be used.

        //console.log(this)
    },

    /** Called once all Vue component instances have been loaded and the virtual DOM built */
    mounted: function(){
        //console.debug('[indexjs:Vue.mounted] app mounted - setting up uibuilder watchers')

        var vueApp = this  // Reference to `this` in case we need it for more complex functions

        // Example of retrieving data from uibuilder
        vueApp.feVersion = uibuilder.get('version')

        // If msg changes - msg is updated when a standard msg is received from Node-RED over Socket.IO
        // newVal relates to the attribute being listened to.
        uibuilder.onChange('msg', function(msg){
            //console.info('[indexjs:uibuilder.onChange] msg received from Node-RED server:', msg)
            vueApp.msgRecvd = msg
            vueApp.msgsReceived = uibuilder.get('msgsReceived')
        })

        //#region ---- Debug info, can be removed for live use ---- //

        /** You can use the following to help trace how messages flow back and forth.
         * You can then amend this processing to suite your requirements.
         */

        // If we receive a control message from Node-RED, we can get the new data here - we pass it to a Vue variable
        uibuilder.onChange('ctrlMsg', function(msg){
            //console.info('[indexjs:uibuilder.onChange:ctrlMsg] CONTROL msg received from Node-RED server:', msg)
            vueApp.msgCtrl = msg
            vueApp.msgsControl = uibuilder.get('msgsCtrl')
        })

        /** You probably only need these to help you understand the order of processing
         * If a message is sent back to Node-RED, we can grab a copy here if we want to
         */
        uibuilder.onChange('sentMsg', function(msg){
            //console.info('[indexjs:uibuilder.onChange:sentMsg] msg sent to Node-RED server:', msg)
            vueApp.msgSent = msg
            vueApp.msgsSent = uibuilder.get('msgsSent')
        })

        /** If we send a control message to Node-RED, we can get a copy of it here */
        uibuilder.onChange('sentCtrlMsg', function(msg){
            //console.info('[indexjs:uibuilder.onChange:sentCtrlMsg] Control message sent to Node-RED server:', msg)
            vueApp.msgCtrlSent = msg
            vueApp.msgsCtrlSent = uibuilder.get('msgsSentCtrl')
        })

        /** If Socket.IO connects/disconnects, we get true/false here */
        uibuilder.onChange('ioConnected', function(connected){
            //console.info('[indexjs:uibuilder.onChange:ioConnected] Socket.IO Connection Status Changed to:', connected)
            vueApp.socketConnectedState = connected
        })
        /** If Server Time Offset changes */
        uibuilder.onChange('serverTimeOffset', function(serverTimeOffset){
            //console.info('[indexjs:uibuilder.onChange:serverTimeOffset] Offset of time between the browser and the server has changed to:', serverTimeOffset)
            vueApp.serverTimeOffset = serverTimeOffset
        })

        /** If user is logged on/off */
        uibuilder.onChange('isAuthorised', function(isAuthorised){
            //console.info('[indexjs:uibuilder.onChange:isAuthorised] isAuthorised changed. User logged on?:', isAuthorised)
            //console.log('authData: ', uibuilder.get('authData'))
            //console.log('authTokenExpiry: ', uibuilder.get('authTokenExpiry'))
            vueApp.isLoggedOn = isAuthorised
        })

        //#endregion ---- Debug info, can be removed for live use ---- //

    } // --- End of mounted hook --- //

}) // --- End of app1 --- //
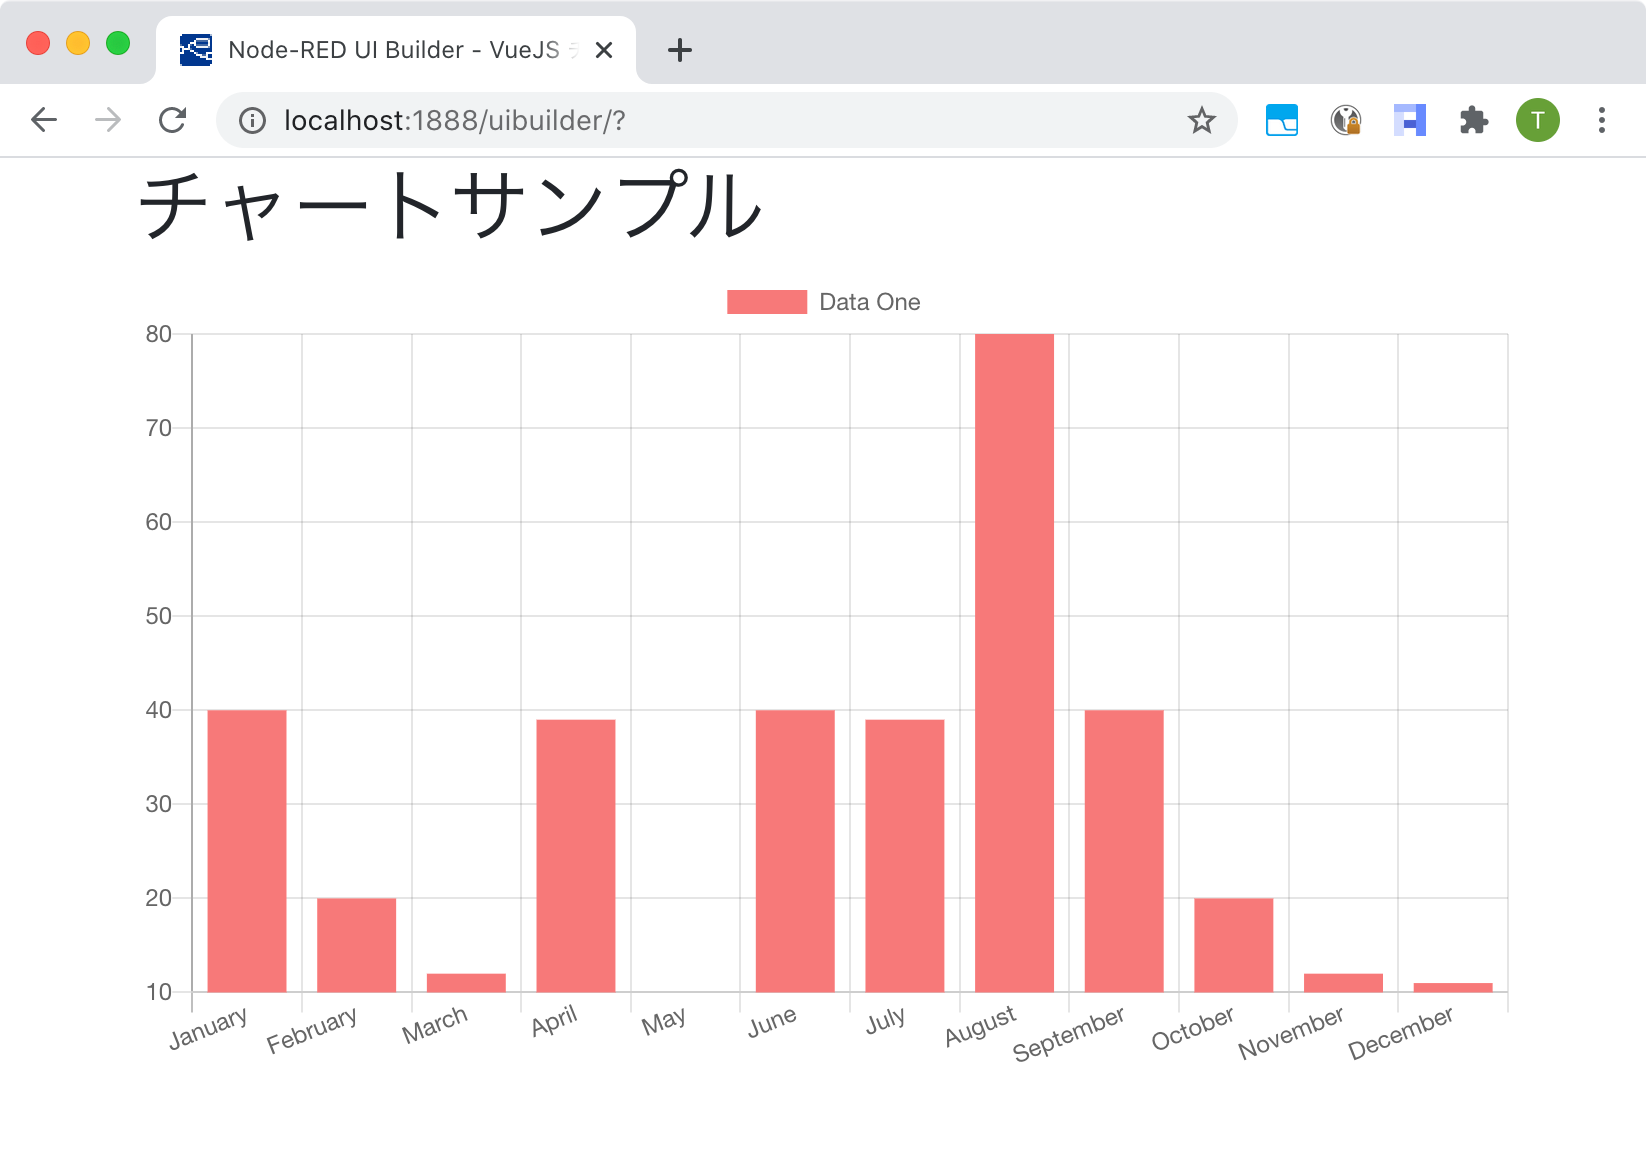
実行結果
まとめ
uibuilderノードの紹介と、enebular(Node-RED) + Vue.js + Chart.js(vue-chart.js)を使ったサンプルを紹介しました。
コード編集画面ではソースコードの管理に階層構造を持たせることができないなど、一部使い勝手でイマイチなところはありますが、NPMのWeekly Downloadsからそこそこは使われていることが見えたり、執筆時点で8日前にV2→V3へのアップグレードがあったりと活発的に更新されているようです。
標準のダッシュボードでは表現しきれないUIを作りたいケースや、すでに標準ダッシュボードを作った後のエンハンスで活用していければと思っています。