はじめに
RSpec(テスティングフレームワーク)を使用してSystem Testを行います。
尚、RSpecではSystem TestのことをSystem Specと呼びます。
System Specを書いたことがない人でも書けるように初歩的な
WebアプリケーションにおけるユーザーCRUD関連
をテストします。
この記事はテストのみの記事ですので前提条件があります。
前提条件
ユーザーの新規作成、編集、ができて、ログインログアウトができて、ログイン時、非ログイン時で機能の使い分けができればOKです。
筆者はユーザー認証にSorceryを使用していますが、Deviseでもgemを使用していなくてもユーザー認証ができればテストは可能です。
①ユーザー(User)の新規作成と編集機能が実装済
②ユーザー認証(ログイン、ログアウト)機能が実装済
③非ログイン時は、ユーザーの新規作成とログインのみが機能として使える
環境
各バージョン
Ruby 2.6.5
Rails 5.2.3
MySQL 5.7.28
RSpec 3.8
capybara 3.31.0
factory_bot_rails 5.1.1
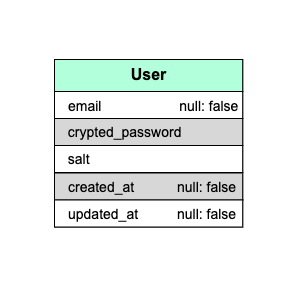
DB設計
以後は自身の設計に合わせて読みかえてください。
ルーティング
Rails.application.routes.draw do
  get 'login', to: 'user_sessions#new'
  post 'login', to: 'user_sessions#create'
  delete 'logout', to: 'user_sessions#destroy'
  get 'sign_up', to: 'users#new'
  resources :users
end
バリデーション
最低限検証したいバリデーションのみ記述します。
①emailが一意であること。(既に登録済のemailがあったらユーザー新規作成できない)
②emailが空でないこと。(emailが空白だとユーザー新規作成できない)
class User < ApplicationRecord
  authenticates_with_sorcery!
  validates :password, length: { minimum: 3 }, if: -> { new_record? || changes[:crypted_password] }
  validates :password, confirmation: true, if: -> { new_record? || changes[:crypted_password] }
  validates :password_confirmation, presence: true, if: -> { new_record? || changes[:crypted_password] }

  # ここより上記はSorceryの機能に必要な記述
  validates :email, uniqueness: true, presence: true
end
実装
準備
- RSpecの準備
- Capybaraの準備
- FactoryBotの準備
- Rspecの実行結果を綺麗に表示
- System Specファイルの作成
- 用語の説明
1.RSpecの準備
group :test do
  gem 'rspec-rails'
$ bundle install
$ rails g rspec:install
$ rm -r ./test
これで必要・不必要なファイルの処理が完了。
2.Capybaraの準備
# See http://rubydoc.info/gems/rspec-core/RSpec/Core/Configuration

require 'capybara/rspec'
group :test do
  gem 'rspec-rails'
  gem 'webdrivers'
end
$ bundle install
$ mkdir spec/support
$ touch spec/support/driver_setting.rb
RSpec.configure do |config|
  config.before(:each, type: :system) do
    # Spec実行時、ブラウザが自動で立ち上がり挙動を確認できる
    # driven_by(:selenium_chrome)

    # Spec実行時、ブラウザOFF
    driven_by(:selenium_chrome_headless)
  end
end
Specのデバッグをする際はdriven_by(:selenium_chrome)を有効にしておくとブラウザで物理的に見ることができるのでわかりやすい。
有効のままだとSpec実行時に毎回ブラウザが立ち上がってしまうので普段はコメントアウトしておきます。
# require only the support files necessary.
#
Dir[Rails.root.join('spec', 'support', '**', '*.rb')].each { |f| require f }
spec/support以下が読み込まれます。
3.FactoryBotの準備
group :development, :test do
  gem 'factory_bot_rails'
$ bundle install
4.Rspecの実行結果を綺麗に表示
--require spec_helper
# 追記
--format documentation
5.System Specファイルの作成
ユーザー関連のSpec、投稿関連のSpec、ユーザー認証のSpec
それぞれのファイルを作成します。
$ mkdir spec/system
$ touch spec/system/users_spec.rb
6.用語の説明
describe、context → テストケースを整理・分類する
before、it → テストコードを実行する
・describe 「テストの対象を記述」
・context 「テストの内容を状況・状態によって分類して記述」
・before 「その領域全体の前提条件を記述」
・it 「期待する動作を文章とコードで記述」
FactoryBotでテストデータを作成
FctoryBotとは、データの作成を簡単にしてくれる機能です。
ここでuserとtaskのデータをあらかじめ作成しておきます。
$ mkdir spec/factories
$ touch spec/factories/users.rb
FactoryBot.define do
  factory :user do
    sequence(:email) { |n| "person#{n}@example.com" }
    password { 'password' }
    password_confirmation { 'password' }
  end
end
sequenceを使用するとデータを複数作成する際に、nに連番の数字を入れることによって一意の文字列を作成することができます。
loginメソッドをModuleへ切り出し
visit login_path
fill_in 'Email', with: user.email
fill_in 'Password', with: 'password'
click_button 'Login'
上記のコードがログインしている状態を再現するコードになりますが、各ファイルでいちいち書くのは面倒なのでメソッドにしてModuleへ切り出してrails_helper.rbでincludeします。
$ touch spec/support/login_module.rb
module LoginModule
  def login(user)
    visit login_path
    fill_in 'Email', with: user.email
    fill_in 'Password', with: 'password'
    click_button 'Login'
  end
end
RSpec.configure do |config|
...

  # FactoryBotの省略
  config.include FactoryBot::Syntax::Methods
  # module読み込み
  config.include LoginModule
end
これでlogin(user)でログイン状態を再現できるようになりました。
ついでにspecを記述していく際にFactoryBotを省略して書けるように設定しておきます。
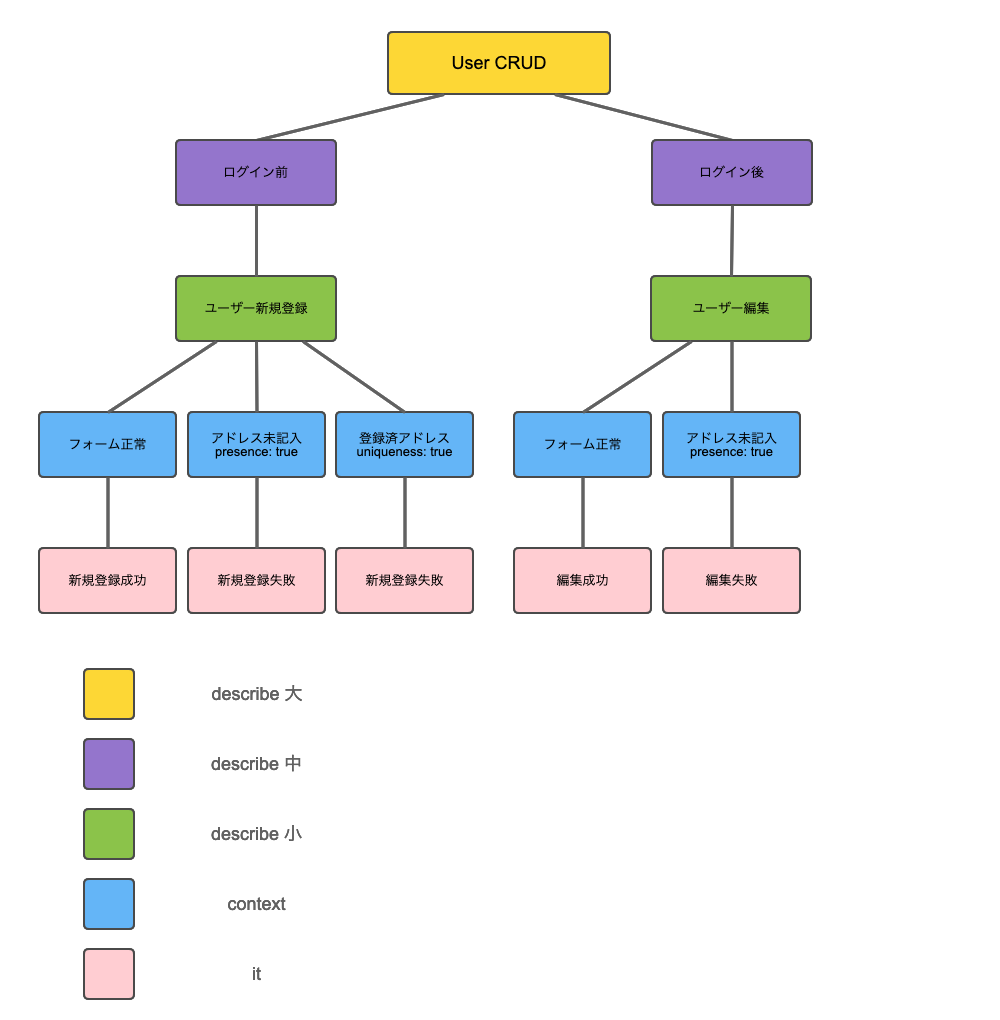
users_spec.rbの実装
このファイルではWebアプリケーションのユーザーCRUD関連のSpecを記述していきます。
今回テストする項目は5つ。
下記の画像のようにツリー構造(以後ツリー画像と呼びます)で分類しました。
色々な状況で分岐させて、it(ピンク)の部分が最終的にテストしたい部分になります。
雛形
まずは雛形。
require 'rails_helper'

RSpec.describe User, type: :system do

end
let
次にletを使用してテストデータを変数のように扱えるようにしていきます。
letの詳しい説明は割愛しますがlet(定義名)の定義名を使用することでテストデータを扱えるように記述します。
require 'rails_helper'

RSpec.describe User, type: :system do
  let(:user) { create(:user) }
  let(:other_user) { create(:user) }
end
黄色(describe 大)
次はツリー画像の色ごと順番に記述していきます。
下の色につれてどんどん入れ子構造にしていきます。
require 'rails_helper'

RSpec.describe User, type: :system do
  let(:user) { create(:user) }
  let(:other_user) { create(:user) }

  describe 'User CRUD' do

  end
end
紫(describe 中)
require 'rails_helper'

RSpec.describe User, type: :system do
  let(:user) { create(:user) }
  let(:other_user) { create(:user) }

  describe 'User CRUD' do
    describe 'ログイン前' do

    end
    describe 'ログイン後' do

    end
end
緑(describe 小)
require 'rails_helper'

RSpec.describe User, type: :system do
  let(:user) { create(:user) }
  let(:other_user) { create(:user) }

  describe 'User CRUD' do
    describe 'ログイン前' do
      describe 'ユーザー新規登録' do

      end
    end
    describe 'ログイン後' do
      describe 'ユーザー編集'
    end
  end
end
青(context)
RSpec.describe User, type: :system do
...

  describe 'User CRUD' do
    describe 'ログイン前' do
      describe 'ユーザー新規登録' do
        context 'フォームの入力値が正常' do

        end
        context 'メールアドレス未記入' do

        end
        context '登録済メールアドレス' do

        end
      end
    end
    describe 'ログイン後' do
      describe 'ユーザー編集'
        context 'フォームの入力値が正常' do

        end
        context 'メールアドレス未記入' do

        end
    end
  end
end
ピンク(it)
itに関しては一つのブロックずつ記述していきます。
新規登録成功
条件
黄:User CRUD
紫:ログイン前
緑:ユーザー新規登録
青:フォーム正常
require 'rails_helper'

RSpec.describe User, type: :system do
...

context 'フォームの入力値が正常' do
  it 'ユーザーの新規作成が成功' do
    # ユーザー新規登録画面へ遷移
    visit sign_up_path
    # Emailテキストフィールドにtest@example.comと入力
    fill_in 'Email', with: 'test@example.com'
    # Passwordテキストフィールドにpasswordと入力
    fill_in 'Password', with: 'password'
    # Password confirmationテキストフィールドにpasswordと入力
    fill_in 'Password confirmation', with: 'password'
    # SignUpと記述のあるsubmitをクリックする
    click_button 'SignUp'
    # login_pathへ遷移することを期待する
    expect(current_path).to eq login_path
    # 遷移されたページに'User was successfully created.'の文字列があることを期待する
    expect(page).to have_content 'User was successfully created.'
  end
end

...
end
新規登録失敗(アドレス未記入)
条件
黄:User CRUD
紫:ログイン前
緑:ユーザー新規登録
青:アドレス未記入
require 'rails_helper'

RSpec.describe User, type: :system do
...

context 'メールアドレス未記入' do
  it 'ユーザーの新規作成が失敗' do
    # ユーザー新規登録画面へ遷移
    visit sign_up_path
    # Emailテキストフィールドをnil状態にする
    fill_in 'Email', with: nil
    # Passwordテキストフィールドにpasswordと入力
    fill_in 'Password', with: 'password'
    # Password confirmationテキストフィールドにpasswordと入力
    fill_in 'Password confirmation', with: 'password'
    # SignUpと記述のあるsubmitをクリックする
    click_button 'SignUp'
    # users_pathへ遷移することを期待する
    expect(current_path).to eq users_path
    # 遷移されたページに'Email can't be blank'の文字列があることを期待する
    expect(page).to have_content "Email can't be blank"
  end
end

...
end
新規登録失敗(登録済アドレス)
条件
黄:User CRUD
紫:ログイン前
緑:ユーザー新規登録
青:登録済アドレス
require 'rails_helper'

RSpec.describe User, type: :system do
...

context '登録済メールアドレス' do
  it 'ユーザーの新規作成が失敗する' do
    # ユーザー新規登録画面へ遷移
    visit sign_up_path
    # Emailテキストフィールドにlet(:user)に定義したユーザーデータのemailを入力
    fill_in 'Email', with: user.email
    # Passwordテキストフィールドにpasswordと入力
    fill_in 'Password', with: 'password'
    # Password confirmationテキストフィールドにpasswordと入力
    fill_in 'Password confirmation', with: 'password'
    # SignUpと記述のあるsubmitをクリックする
    click_button 'SignUp'
    # users_pathへ遷移することを期待する
    expect(current_path).to eq users_path
    # 遷移されたページに'Email can't be blank'の文字列があることを期待する
    expect(page).to have_content "Email has already been taken"
  end
end

...
end
編集成功
条件
黄:User CRUD
紫:ログイン済
緑:ユーザー編集
青:フォーム正常
require 'rails_helper'

RSpec.describe User, type: :system do
...

    describe 'ログイン後' do
      before { login(user) }
        describe 'ユーザー編集' do
          context 'フォームの入力値が正常' do
            it 'ユーザーの編集が成功' do
              visit edit_user_path(user)
              fill_in 'Email', with: 'test@example.com'
              fill_in 'Password', with: 'test'
              fill_in 'Password confirmation', with: 'test'
              click_button 'Update'
              expect(current_path).to eq user_path(user)
              expect(page).to have_content 'User was successfully updated.'
            end
          end
        end
      end
    end
...
end
編集失敗
条件
黄:User CRUD
紫:ログイン済
緑:ユーザー編集
青:アドレス未記入
require 'rails_helper'

RSpec.describe User, type: :system do
...

context 'メールアドレスが未入力' do
  it 'ユーザーの編集が失敗' do
    visit edit_user_path(user)
    fill_in 'Email', with: nil
    fill_in 'Password', with: 'password'
    fill_in 'Password confirmation', with: 'password'
    click_button 'Update'
    expect(current_path).to eq user_path(user)
    expect(page).to have_content "Email can't be blank"
  end
end

...
end
テスト実行
$ bundle exec rspec spec/system/users_spec.rb
これでWebアプリケーションのユーザーCRUD関連のSystem Specの完成です!!!