大量 or 同時に届くWebhookをサーバーレスで手軽に確認するの続き。
はじめに
本稿は自分がElmのmapやJson.Decoderに慣れるお勉強のための投稿になります。
初のElmコーディング+投稿なので、不備があれば指摘ください。
なお、筆者は最近Scalaをメインで使ってるため、一部Scala的な表現での理解を書いていきます。
ニーズ
大量なWebhookの通知内容をFirebaseのUIで確認するのは非常に面倒だったので確認用のViewを作った。
(あと、Elm使ってみたかった)
ソース全体
elm-architecture-tutorialの06-json.elmがそのまま使えそうだったので、そちらを改良。
https://github.com/niso1985/elm-firebase-realtimedatabase-view/blob/master/src/Main.elm
もし使ってみたい場合は
url = "replace your firebase realtime database end point with secret"
の箇所を自分の環境のものに置き換えてみてください。
前回の記事のWebhook通知用URLと同じものでOKです。
辞書形式(連想配列)のJSON Decoder
まずハマったところは、Dictinaryな形のJSON Decoderを作ること。
前回記事に書いたWebhook(要はPOST)でRealtime Databaseにデータを作ると、keyが任意の形で登録されます。
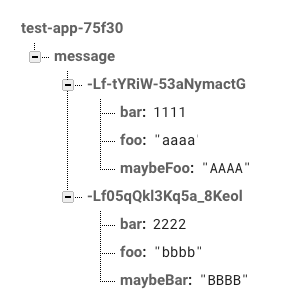
これを一覧表示したいのでGETすると、下記のような辞書形式でJSONがFirebaseから返ってきます。
curl -X GET -H "Content-Type: application/json" https://test-app-75f30.firebaseio.com/message.json?auth=YourSecret
{
	"-Lf-tYRiW-53aNymactG": {
		"bar": 1111,
		"foo": "aaaa",
		"maybeFoo": "AAAA"
	},
	"-Lf05qQkl3Kq5a_8Keol": {
		"bar": 2222,
		"foo": "bbbb",
		"maybeBar": "BBBB"
	}
}
Decoderについては[Elm] Decoder a からいろいろ理解ってしまおうを見て、わかったようなわからないような・・・といった感じだったので、Dictionary形式についてはさらに理解できませんでした。
elm-guideのJSONを見ると最後にdictというのがあったので、Json.Decoder.dictのリファレンスを見てみて、そこから真似てみた結果こうなりました。
type alias PostBody =
    { foo : String
    , bar : Int
    , maybeFoo : Maybe String
    , maybeBar : Maybe String
    }


getPostBody : Cmd Msg
getPostBody =
    Http.get
        { url = "replace your firebase realtime database end point with secret"
        , expect = Http.expectJson GotPostBody postBodyDecoder
        }


postBodyDecoder : Decoder (Dict.Dict String PostBody)
postBodyDecoder =
    Json.Decode.map (Dict.map dbRecordToPostBody) (dict bodyDecoder)


bodyDecoder : Decoder PostBody
bodyDecoder =
    map4 PostBody
        (field "foo" string)
        (field "bar" int)
        (maybe (field "maybeFoo" string))
        (maybe (field "maybeBar" string))


dbRecordToPostBody : String -> PostBody -> PostBody
dbRecordToPostBody _ body =
    body
まず、今回欲しいレコード自体はtype alias PostBodyとして定義。
それに従って、bodyDecoderを定義し直してみました。
Maybe(Optional)な型についてはmaybeをつければ良いだけのようである。なんとも簡単。
getPostBodyについてはtutorialのサンプルを今回の形に合わせるように書き換えてみました。
この部分に関してはまだ理解がちゃんと及んでいないが、TEAが良しなにやってくれるのだろうといい感じに理解することにします。
Dictのシグネチャに悩む
postBodyDecoder : Decoder (Dict.Dict String PostBody)
postBodyDecoder =
    Json.Decode.map (Dict.map dbRecordToPostBody) (dict bodyDecoder)
この部分のコードはJson.Decode.dictのリファレンスから理解できてないまま持ってきたので難しかったです。
(Dict.Dict String PostBody)
postBodyDecoderのシグネチャは上記のとおりだが、はじめはタプルかと思ってたが違った。
どうやらDict.Dictは二引数をコンストラクタに取るレコードであり、Decoderは一つの型パラメータ(名前あってる?)しか取らないため()で括ってるという塩梅だった。
Dict.Dictの第一引数はkeyで第二引数がvalueを表す、まさしくDictionaryなコンストラクタだったわけです。
今回のデータ例でいうと、-Lf-tYRiW-53aNymactGとなっている箇所がStringでkeyとなり、
{
	"bar": 2222,
	"foo": "bbbb",
	"maybeBar": "BBBB"
}
の部分がvalueとなる。
なので、(Dict.Dict String PostBody)は他の言語で言う、key-valueのMapであり、**Scalaで言うと、Map[String, PostBody]**と同じである。
なお、Dict.Dictとかかずとも、Dictでよいので、以降は単にDictとする。
関数本体
ここまでわかったところで関数本体に入っていく。
postBodyDecoder =
    Json.Decode.map (Dict.map dbRecordToPostBody) (dict bodyDecoder)
Json.Decode.mapに関しては、前述の記事内が詳しいのでそちらにお任せ。
要はdict bodyDecoderで得られた内容をDict.map dbRecordToPostBodyで変換して、Decoder (Dict.Dict String PostBody)として返す、ということである。
一応Json.Decoder.mapのシグネチャは、
map : (a -> value) -> Decoder a -> Decoder value
であるが、ScalaではmapがList(1,2,3).map(_ + 1) == List(2,3,4)のように、
左側にある呼び出し元オブジェクトの要素一つずつに対して、右側にあるmap内の関数を適用する
という理解だったので、
Decoder aに対して、a -> valueな関数を適用する
ということを理解するのに謎にハマってしまいました。1
それではそれぞれmapの適用元となる(dict bodyDecoder)と、それを変換する関数(Dict.map dbRecordToPostBody)を見ていきます。
dict bodyDecoder
dictはJson.Decode.dictです。
シグネチャはdict : Decoder a -> Decoder (Dict String a)
bodyDecoder自体は、
bodyDecoder : Decoder PostBody
bodyDecoder =
    map4 PostBody
        (field "foo" string)
        (field "bar" int)
        (maybe (field "maybeFoo" string))
        (maybe (field "maybeBar" string))
という形で、JSONからPostBody型を生成する関数。
これらから、dict bodyDecoderはJSONからDecoder (Dict String PostBody)を生成する関数ということになります。
Firebaseから受け取るDictionaryなJSONをここに渡すと、Decoder (Map[String, PostBody])2な形に変換してくれる関数になっているということです。
Dict.map dbRecordToPostBody
それではdict bodyDecoderで得られたDecoder (Dict String PostBody)に対して、どのような変換がなされるのか見ていきます。
Dict.mapはDictionaryに対してのmapですね。シグネチャは次の通り。
map : (k -> a -> b) -> Dict k a -> Dict k b
ですので、Dictに含まれているkeyの数、dbRecordToPostBodyが呼ばれるということになります。
辞書形式のJSONが2つ受け取っていれば、dbRecordToPostBodyが2回よばれるということですね。
dbRecordToPostBodyは何をしているかと言うと、
dbRecordToPostBody : String -> PostBody -> PostBody
dbRecordToPostBody _ body =
    body
第一引数の値を無視して、第二引数の値のみを返しています。(アンダースコアは使わない値に対して使用します)
dbRecordToPostBodyの第一引数はDictのkeyで、第二引数はDictのvalueです。
今回、辞書形式で得られるkeyの値はFirebaseが勝手につける値なだけで、使用することはないので、必要なPostBodyの部分だけ返している、ということになります。
これよりDict.map dbRecordToPostBodyは**Dict String PostBodyに対して、Dict String PostBodyを返す関数**ということになります。
なんか違和感・・・
ありません?
Dict String PostBodyに対して、Dict String PostBodyを返す関数
って同じやん!って感じじゃないですか?
ここでもう一度Dict.mapを見てみると、Dict.mapは最終的にDict k bを返します。
mapなので、Dictの中身は変換されますが、DictはDictのままです。
それではdbRecordToPostBodyはDictの中身を変換するかと言うと、実はそのまま返しているだけで変換していません。
Dict.mapのシグネチャを見てみても、(k -> a -> b) -> Dict k a -> Dict k bとなっており、**dbRecordToPostBodyで返した値をそのkeyの新しいvalueにするよ!**というものなので、valueの値が変わらなければ、mapする意味なしということになります。
ということで整理します
もう一度この関数に戻ります。
postBodyDecoder : Decoder (Dict.Dict String PostBody)
postBodyDecoder =
    Json.Decode.map (Dict.map dbRecordToPostBody) (dict bodyDecoder)
これはあくまで、Json.Decode.dictから取得してきたコードなので、きちんと考えて作っているわけではありません。
慣れてきたので、整理しましょう!
まず、前述の通り、(Dict.map dbRecordToPostBody)は何もしないので、不要になります。
それではJson.Decode.mapの第一引数である変換関数はどうすればいいでしょうか?
実はこれも不要です。
JSONを取得して、Dictionaryのパラメータを変換したり整形したりする必要があれば、dict bodyDecoderで得られた値を変換するために、Json.Decoder.mapが必要なのです。
今回の場合、dict bodyDecoderの時点で、Decoder (Dict String PostBody)の型で、なおかつ必要なパラメータが完全に得られているので、最終的にはこうなります。
postBodyDecoder : Decoder (Dict.Dict String PostBody)
postBodyDecoder =
    dict bodyDecoder
途中の余計な説明なんなんやったん・・・。
dict bodyDecoderだけの説明だけでええやん・・・。
そしてこれって、
[Elm] Decoder a からいろいろ理解ってしまおう
に書いてあることやん!!
やっと理解できました。
得られたデータをテーブル表示する
それではJSONをPostBodyとして得たテーブル表示してみます。
Elmでテーブル書くときはこんな感じ。
table [ style "border" "solid thin" ]
  [tr []
      [ th [ style "border" "solid thin" ] [ text "foo" ]
      , th [ style "border" "solid thin" ] [ text "bar" ]
      , th [ style "border" "solid thin" ] [ text "maybeFoo" ]
      , th [ style "border" "solid thin" ] [ text "maybeBar" ]
      ],
   tr []
      [ td [ style "border" "solid thin" ] [ text "1111" ]
      , td [ style "border" "solid thin" ] [ text "2222" ]
      , td [ style "border" "solid thin" ] [ text "3333" ]
      , td [ style "border" "solid thin" ] [ text "" ]
      ]
   ]
ふむふむ。
tr tdタグを動的に増やしてあげればいけそうや。
調べると、stack overflowでこんな投稿が見つかったので、List.concatで結合してみるが、うまくいかず・・・。
コメントに書いてある::で結合してみると・・・。
table [ style "border" "solid thin" ]
  (tr []
      [ th [ style "border" "solid thin" ] [ text "foo" ]
      , th [ style "border" "solid thin" ] [ text "bar" ]
      , th [ style "border" "solid thin" ] [ text "maybeFoo" ]
      , th [ style "border" "solid thin" ] [ text "maybeBar" ]
      ]
      :: List.map toTableRow (Dict.values bodies)
  )

toTableRow : PostBody -> Html Msg
toTableRow body =
    tr []
        [ td [ style "border" "solid thin" ] [ text body.foo ]
        , td [ style "border" "solid thin" ] [ text <| String.fromInt body.bar ]
        , td [ style "border" "solid thin" ] [ text <| Maybe.withDefault "" body.maybeFoo ]
        , td [ style "border" "solid thin" ] [ text <| Maybe.withDefault "" body.maybeBar ]
        ]
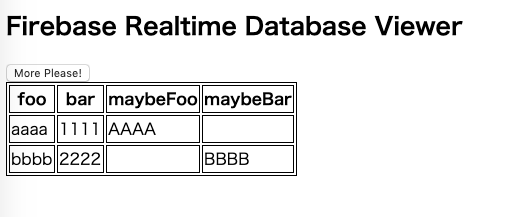
できた!!
感想
今回、はじめてElmを使ってみたが、シグネチャの読み方と、Scalaのコレクション関数にあたる関数の使い方を軽く覚えれば、もともとのScalaの経験を活かして、かなり簡単にフロントがかける気がした。
個人的に、HTMLは今更やる気しないし、JavaScriptは変態言語だしで、直接それらを学ぶ意欲があまりわかない中で、関数型のパラダイムでこうやってプログラムが書けるのはやはり楽しい。
まだまともにElm guideも基礎からわかるElmも読んでいないので、もう少し読み進めると更に理解が深まりそうで、これからが楽しみです!