Vue3で地図を表示するページを作りたいと思い、調べたのでメモです。
Leafletは、モバイルフレンドリーなインタラクティブマップのための代表的なオープンソースのJavaScriptライブラリです。
これをVueコンポーネントとしてラッピングしたのがVue Leaflet(Vue2Leaflet)らしいです。そう、このサイトで説明しているのはVue2LeafletでVue2用でした。
ではVue3版はということで探したところ、こちらのvue-leafletがVue3用らしいです。まだ Beta versionらしいですが、とりあえず使ってみました。ちょっとハマりましたが動きました。
以下の環境で確認しました:
node: v18.16.0
vue: 3.2.47
vue-leaflet: 0.8.4 (0.9.0はうまく動かなかった)
ちなみにVue3は初心者ですので、ちょっとイマイチな記述があったらすみません。
code全体は https://github.com/kyokonishito/vue3leaflet-sample で公開しています。
動くものはこちらです(github pagesで公開):https://kyokonishito.github.io/vue3leaflet-sample/
1. 導入
前提はNode.jsのバージョン 16.0 以上をインストール導入済みです。
1-1. Vue アプリケーションの作成
参考: https://ja.vuejs.org/guide/quick-start.html#creating-a-vue-application
コマンドラインで次のコマンドを実行します:
npm init vue@latest
最初にプロジェクト名を聞かれます。コマンド実行しているフォルダの下に入力したプロジェクト名でフォルダが作成されます。何でもいいのですが、ここではvue3leaflet-testとします。

あとはとりあえず全部デフォルトのNoとしました。
$ npm init vue@latest

Vue.js - The Progressive JavaScript Framework

✔ Project name: … vue3leaflet-test
✔ Add TypeScript? … No / Yes
✔ Add JSX Support? … No / Yes
✔ Add Vue Router for Single Page Application development? … No / Yes
✔ Add Pinia for state management? … No / Yes
✔ Add Vitest for Unit Testing? … No / Yes
✔ Add an End-to-End Testing Solution? › No
✔ Add ESLint for code quality? … No / Yes

Scaffolding project in /Users/nishito/Library/CloudStorage/Box-Box/2023Project/Event/20230531_Db2_30/demo/qiita/vue3leaflet-test...

Done. Now run:

  cd vue3leaflet-test
  npm install
  npm run dev

$
表示された以下のコマンドを実行します:
cd vue3leaflet-test
npm install
npm run dev
最後のコマンド実行後、nodeのHTTPサーバーが実行され、以下が表示されます:

表示されたhttp://localhost:5173/にWeb ブラウザーでアクセスして、以下のようなページが表示されれば導入成功です。

コマンドラインにCTRL+CでHTTPサーバーを停止します。
1-2. vue-leafletの導入
2023年5月1日現在の最新版v0.9.0ではClick eventで経度緯度が取得できないので、1つ前のv0.8.4を導入しています。たぶんそのうち治るので、このissueがClose されたら@0.8.4は不要。
npm i @vue-leaflet/vue-leaflet@0.8.4 leaflet
1-3.(このQiitaのソースのみ必要) bootswatchの導入
これはVue3 + vue-leaflet で地図を表示するだけの場合は不要です。
このQiitaのソースをそのまま使う場合は、見映え用に Bootstrapのテーマbootswatchを使っていますので、必要に応じて導入してください。
npm install bootswatch
2. vue-leaflet で地図表示
以下のようなことができるものを作ります。
- 地図を表示
- 指定した緯度・経度にマーカーを立てて、そこを中央にして地図表示する
- クリックするとその経度、緯度を取得し、そこを中央にして地図表示する
尚使い方はほぼVue Leaflet(Vue2Leaflet)と同じですので、こちらを参照して作成するとよいです。
2-1. 地図を表示
src/App.vueを変更します。src/App.vueの中身を全部削除して、以下に置き換えます。
<template>
  <div style="height:600px; width:800px">
    <l-map ref="map" v-model:zoom="zoom" :use-global-leaflet="false" :center="center">
      <l-tile-layer
        url="https://{s}.tile.openstreetmap.org/{z}/{x}/{y}.png"
        layer-type="base"
        name="OpenStreetMap"
      ></l-tile-layer>
    </l-map>
  </div>
</template>

<script>
import "leaflet/dist/leaflet.css";
import { LMap, LTileLayer } from "@vue-leaflet/vue-leaflet";

export default {
  components: {
    LMap,
    LTileLayer,
  },
  data() {
    return {
      zoom: 15,
      center: [35.6769883, 139.7588499],
    };
  },
};
</script>

<style></style>
https://github.com/vue-leaflet/vue-leaflet のQuickstartに載っているソースがそのままだと動かないのです。よく読むと書いてあるのですが、l-mapに:useGlobalLeaflet="false"を付加しておきます。
上記ソースはQuickstartに載っているソースに、:useGlobalLeaflet="false"を付加して、日本の皇居あたり[35.6769883, 139.7588499]をズームするようにしたものです。
サーバーをnpm run devで起動させ、再びhttp://localhost:5173/にWeb ブラウザーでアクセスすると以下のような地図が表示されます。

2-2. 指定した緯度・経度にマーカーを立てて、そこを中央にして地図表示する
さて地図を表示できたので、よくある使い方として「指定した緯度・経度にマーカーを立てて、そこを中央にして地図表示」してみましょう。
まずは緯度・経度を指定するためのフォームが必要です。ここではbootswatchを使ってフォームを作っています。単なる見映えなのでbootswatchは必須ではないので、好きなcssを使ってもらってもOKです。
2-2-1: bootswatchスタイルシートのインポート(bootswatchのフォームを使う場合)
src/main.jsを以下に書き換えます:
import { createApp } from 'vue'
import App from './App.vue'

import 'bootswatch/dist/cerulean/bootstrap.min.css'

createApp(App).mount('#app')
2-2-2: 緯度・経度を指定するためのフォームとマーカーレイヤーの付加
src/App.vueの<template>・・・</template>部分を以下に変更します。
(bootswatchのフォーム使用)
<template>
  <div class="container">
    <div class="row">
      <div class="col">
        <div class="form-group">
          <label class="col-form-label" for="inputDefault">緯度</label>
          <input type="text" v-model="inputLat" class="form-control" placeholder="緯度" id="inputLat">
        </div>
      </div>
      <div class="col">
        <div class="form-group">
          <label class="col-form-label" for="inputDefault">経度</label>
          <input type="text" v-model="inputLon" class="form-control" placeholder="経度" id="inputLon">
        </div>
      </div>
      <div class="col align-self-end">
        <button type="button" class="btn btn-primary" @click="search">Search</button>
      </div>
    </div>

    <div class="row mt-3">
      <div class="col">
        <div style="height:400px;">
          <l-map ref="map" :zoom="zoom" :use-global-leaflet="false" :center="center">
            <l-tile-layer url="https://{s}.tile.openstreetmap.org/{z}/{x}/{y}.png" layer-type="base"
              name="OpenStreetMap"></l-tile-layer>
            <l-marker :lat-lng="markerLatLng"></l-marker>

          </l-map>
        </div>
      </div>
    </div>

  </div>
</template>
これで地図の上部に入力フォームができました。
Searchボタンにはクリックイベントでsearchを呼び出すように@click="search"をセットしています。
<button type="button" class="btn btn-primary" @click="search">Search</button>
さらに<l-map>の中に、マーカーのレイヤーダグ<l-marker>を経度・緯度がmarkerLatLngにセットして入れています:
<l-map ref="map" :zoom="zoom" :use-global-leaflet="false" :center="center">
            <l-tile-layer url="https://{s}.tile.openstreetmap.org/{z}/{x}/{y}.png" layer-type="base"
              name="OpenStreetMap"></l-tile-layer>
            <l-marker :lat-lng="markerLatLng"></l-marker>
</l-map>
参考: https://leafletjs.com/reference.html#marker
2-2-3: スクリプト修正
src/App.vueの<script>・・・</script>部分を以下に変更します。
<script>
import "leaflet/dist/leaflet.css";
import { LMap, LTileLayer, LMarker } from "@vue-leaflet/vue-leaflet";
export default {
  components: {
    LMap,
    LTileLayer,
    LMarker
  },
  data() {
    return {
      zoom: 15,
      center: [35.6769883, 139.7588499],
      inputLat: 35.6769883,
      inputLon: 139.7588499,
      markerLatLng: [35.6769883, 139.7588499]
    }
  },
  methods: {
    search(e) {
      this.center = [this.inputLat, this.inputLon]
      this.markerLatLng = this.center
    }
  }
}
</script>
LMarkerに関する記述が付加されています。
data()でマーカーを最初に立てる初期値をセットしています。
Searchボタンがクリックされると呼ばれるsearch(e)で地図の中心とマーカーの位置をセットしています。
 methods: {
    search(e) {
      this.center = [this.inputLat, this.inputLon]
      this.markerLatLng = this.center
    }
  }
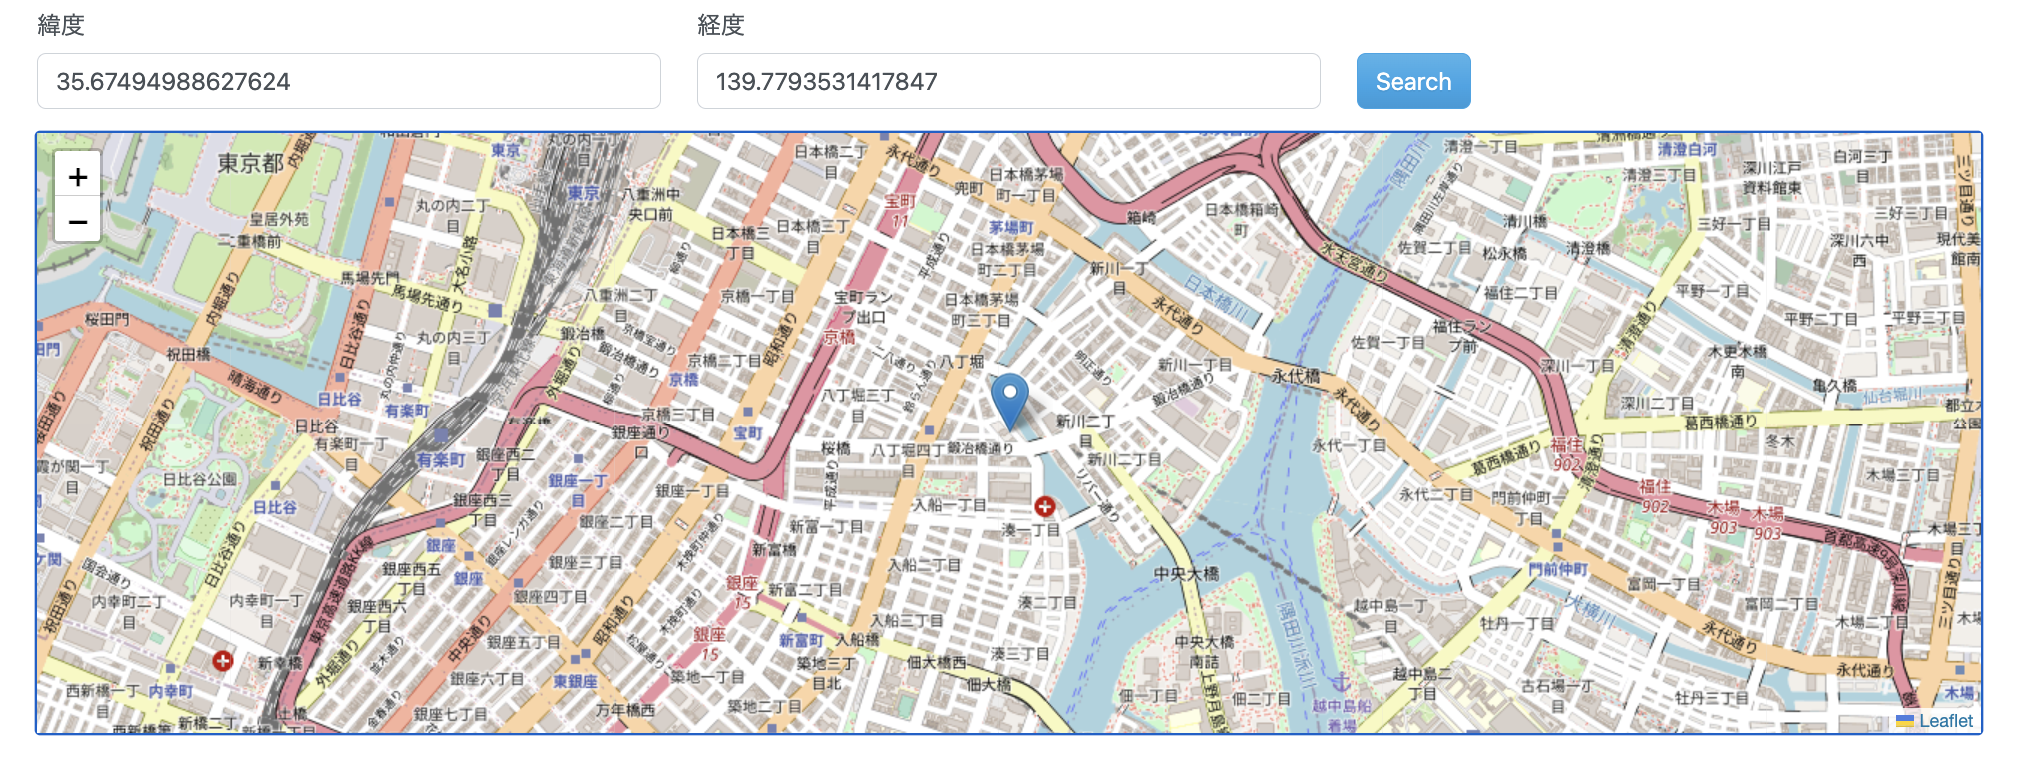
これで以下のような緯度・経度を入力して「Search」ボタンをクリックすると、その場所が中心に表示されるページができました。

2-3. クリックするとその経度、緯度を取得し、そこを中央にして地図表示する
では仕上げとして、「地図をクリックしたらその経度、緯度を取得し、そこを中央にして地図表示する」機能をつけます。
2-3-1: <l-map>にクリックイベントハンドラーを設定
地図上をクリックしたらmoveMarkerを呼び出すように、<l-map>に@click="moveMarker"を設定します。
<l-map ref="map" :zoom="zoom" :use-global-leaflet="false" :center="center" @click="moveMarker">
2-3-2: moveMarker スクリプト付加
以下のようにmethodsの中にmoveMarkerのスクリプトを付加します。
methods: {
    search(e) {
      this.center = [this.inputLat, this.inputLon]
      this.markerLatLng = this.center
    },
    moveMarker(e) {
      if (!e.latlng) { return; }
      this.center = [e.latlng.lat, e.latlng.lng]
      this.markerLatLng = this.center
      this.inputLat=e.latlng.lat
      this.inputLon=e.latlng.lng
    }
  }
最初のif (!e.latlng) { return; }はe.latlngの値がないというエラーが出るので、ググったらこうせよと書いてあったので、入れています。親エレメントにイベントが伝播されて(?)数回moveMarkerが呼ばれてしまうとかのようなのです。詳細はよくわかってないです。すみません。
ちなみにエラーはChromeのDevToolsなどで見ないと見れませんし、止まるわけでもないので、この行はなくて見かけ上動いているようには見えます。
クリックされた緯度・経度はe.latlng.latとe.latlng.lngで取得できます。
これをそれぞれ、中心位置(this.center)、マーカーの位置(this.markerLatLng)、ついでに入力フォームの値(this.inputLat, this.inputLon)に設定して、そこを中央にして地図表示し、マーカの位置も移動させています。
これで完成です。
「地図をクリックしたらその経度、緯度を取得しフォームに入力、そこを中央にして地図表示する」ような画面になりました。
最終的なコードは
https://github.com/kyokonishito/vue3leaflet-sample
にあります。
github pagesでも公開しています:
https://kyokonishito.github.io/vue3leaflet-sample/
3. まとめ
vue-leafletはまだBetaなのでちょっとコツがいるのかもしれません。versionが上がればいろいろ不具合も解消されるかもです。
今後はDb2地理空間分析: Db2の地理空間分析機能と組み合わせてなんか作ろうかと思っています。
