今回やること
今回はルータ間にL2TPv3を使ってトンネルを作っていこうと思います。
IPsecと併用されることがあるみたいなので、トンネリングの勉強をしようと思います。
使用ツール
GNS3
IOS: c2600-adventerprisek9-mz.124-17
L2TPv3とは
休日を使って概要を調べたくらいの知識なので、まとめようと思います。
まとめたうえで構築していこうと思います。
まずL2TPはL2トンネリングプロトコル。
暗号化機能がないです。
そのため、L3のトンネリングプロトコルのIPsecと併用することがあるらしいですね。
L2TPv3を用いて拠点間VPNを構築してあげると、複数拠点のネットワークを
同一セグメントのネットワークにできるようなので、知っておいたほうがいい技術だと思いました。
環境によっては結構使う技術なようなので、実際構築してみて、感覚をつかんでいこうと思います。
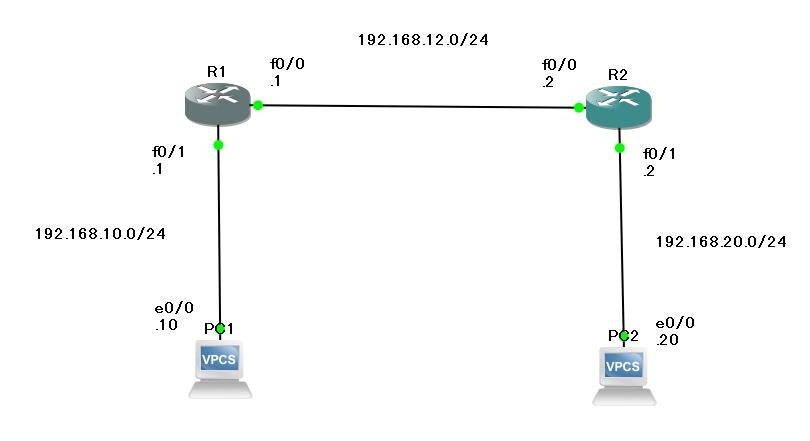
ネットワーク構成図
構成図はIPsecのときとほぼ同じで大丈夫です。
構築
では、実際構築していきたいと思います。
まずはR1からコンフィグ投入です。
トンネルの定義をしていきます。
R1#conf t
Enter configuration commands, one per line.  End with CNTL/Z.
R1(config)#psew
R1(config)#pse
R1(config)#pseudowire-class L2
R1(config)#pseudowire-class L2TP
R1(config)#pseudowire-class L2TPv3
R1(config-pw-class)#
pseudo wire
これなんて読むの!?となりましたが、すーどわいやーらしいですね。
pseudoは、偽りのという意味があるらしい。
疑似ワイヤーなので、トンネルのことかな?と思ってます。
そして、L2TPv3でカプセル化の設定。
R1(config-pw-class)#
R1(config-pw-class)#enca
R1(config-pw-class)#encapsulation l2tp
R1(config-pw-class)#encapsulation l2tpv3
R1(config-pw-class)#
続いて、トンネルの送信元の設定をしてあげます。
R1(config-pw-class)#ip local int f0/0
R1(config-pw-class)#exit
R1(config)#
あとは各インターフェイスの設定をいつも通りやっていきます。
R1(config)#int f0/0
R1(config-if)#ip add 192.168.12.1 255.255.255.0
R1(config-if)#no sh
R1(config-if)#
*Mar  1 00:24:56.441: %LINK-3-UPDOWN: Interface FastEthernet0/0, changed state to up
*Mar  1 00:24:57.442: %LINEPROTO-5-UPDOWN: Line protocol on Interface FastEthernet0/0, changed state to up
R1(config-if)#exit
R1(config)#
R1(config)#int f0/1
R1(config-if)#no sh
R1(config-if)#
さて、トンネルの設定投入です。
R1(config-if)#
R1(config-if)#xco
R1(config-if)#xconnect 192.168.12.2 1 p
R1(config-if)#xconnect 192.168.12.2 1 pw-class L2TPv3
R1(config-if)#end
R1#
これでR1への投入完了です。
続いてR2も同様に投入してあげます。
R2#conf t
Enter configuration commands, one per line.  End with CNTL/Z.
R2(config)#pse
R2(config)#pseudowire-class L2TPv3
R2(config-pw-class)#enca
R2(config-pw-class)#encapsulation l2tpv3
R2(config-pw-class)#ip lo
R2(config-pw-class)#ip local int f0/0
R2(config-pw-class)#exit
R2(config)#int f0/0
R2(config-if)#ip add 192.168.12.2 255.255.255.0
R2(config-if)#no sh
R2(config-if)#exit
R2(config)#
*Mar  1 00:30:42.424: %LINK-3-UPDOWN: Interface FastEthernet0/0, changed state to up
*Mar  1 00:30:43.425: %LINEPROTO-5-UPDOWN: Line protocol on Interface FastEthernet0/0, changed state to up
R2(config)#int f0/1
R2(config-if)#no sh
R2(config-if)#xco
R2(config-if)#xconnect
*Mar  1 00:30:54.836: %LINK-3-UPDOWN: Interface FastEthernet0/1, changed state to up
*Mar  1 00:30:55.838: %LINEPROTO-5-UPDOWN: Line protocol on Interface FastEthernet0/1, changed state to up
R2(config-if)#xconnect 192.168.12.1 1 pw
R2(config-if)#xconnect 192.168.12.1 1 pw-class L2TPv3
R2(config-if)#end
R2#
これでコンフィグ投入完了です。
状態を見てみましょう。
状態確認
実際見てみます。
R1#show l2tp session
           ^
% Invalid input detected at '^' marker.

R1#show l2t
R1#show l2tun
R1#show l2t?
l2tun

R1#show l2?
l2cac  l2tun

R1#show l?
l2cac  l2tun      lat       line
llc2   local-ack  location  logging
login
show l2tp sessionで見れるはずなんですが、IOS古くて対応していない可能性が・・・
実際見れませんでしたが、コンフィグ見直しても合ってそうなのでこれで終わります。
まとめ
今回はIPsecに付随して勉強してみたかった技術をやってみました。
今回のような視点で技術の幅を広げたいですね。
以上となります。