今更感もあるのですが、ある非開発系のプロジェクトのちょっとした自動化をするために使った [Google Script] (https://www.google.com/script/start/) がかなり便利だったので、紹介したいと思います。
Google Script とは
Google Script とは、Google 社が提供している サーバーサイド・スクリプト環境です。Javascript を使って、Gmail や Google Spreadsheet, Google docs, Google Form などを連携させた自動化が簡単に実現できちゃいます。あと、完全にクラウドで管理されているので、サーバーを用意する必要はなし! Google のアカウントさえあれば、他サービスにサインアップしなくても、すぐに使い始めることができます。特に、Javascript 勉強したい人は、自分のメールとか現存しているGoogle Spreadsheet のデータを使ってスクリプトが書けるので、実用性だけでなくコードの勉強だけに集中できます✨
では実例を紹介
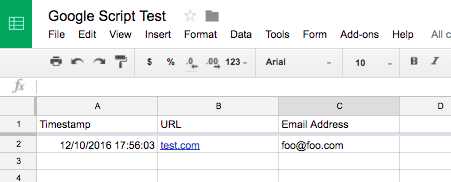
今回作ったものは、Google Form に URL とメールアドレスを入力するフォームを作成し、入力された内容をテンプレートに入れて、指定されたメールアドレスへ送信するというものです。以下は、Google 社の提供している 英語の チュートリアル を参考にしています。
- Google Form からフォームを作成する
- Form にテストデータを入力s流
- フォームの回答を集めた Google Spreadsheet を開く。回答が集められているシートの C1 のセルを「メールアドレス」から「Email Address」に変更する。
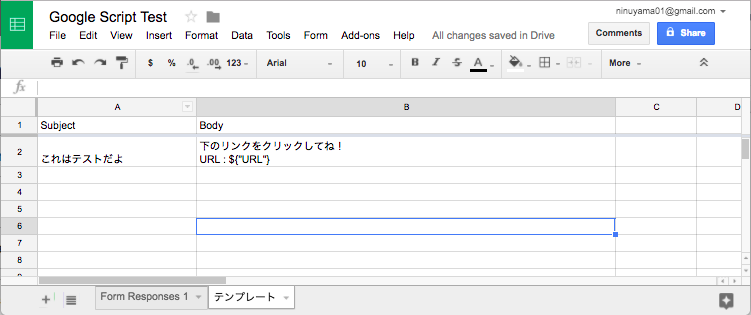
4 - 2シート目を作成し、「テンプレート」と名前をつける。以下のように、テンプレートの内容を作る。
${"URL"}//入力された URL の値が入る
5 - Tools > Script Editor から Google Script に移動する
6 - まずは、メールを送るコードを書きます。これで、sendEmail の Function を選択して実行します。とりあえずは、自分のメールアドレスを送信先として設定し、テストしてみましょう!
function sendEmail() {
  MailApp.sendEmail('送信先のメールアドレス',
                      "件名",
                      "メールの内容")
}
7 - ここまでできたら、フォームの内容をテンプレートに入れるスクリプトを書いていきます。さっきの Function に上書きしてくださいね!
function sendEmail() {
 // 結果のデータが貯められているシートを呼び出す
  var ss = SpreadsheetApp.getActiveSpreadsheet();
  var dataSheet = ss.getSheets()[0];
  var dataRange = dataSheet.getRange(2, 1, dataSheet.getMaxRows() - 1, 3);

 // テンプレートのデータが貯められているシートを呼び出す
  var templateSheet = ss.getSheets()[1];
  var emailTemplate = templateSheet.getRange("B2").getValue();

  // 行ごとのデータをオブジェクトにする
  var objects = getRowsData(dataSheet, dataRange);

  // オブジェクトの中身を開ける
  for (var i = 0; i < objects.length; ++i) {
    var rowData = objects[i];

    //テンプレートに内容を埋めていく
    var emailText = fillInTemplateFromObject(emailTemplate, rowData);
    var emailSubject = templateSheet.getRange("A2").getValue();

  //メールを送る
    MailApp.sendEmail(rowData.emailAddress, emailSubject, emailText);
  }
}

//以下は、「https://developers.google.com/apps-script/articles/mail_merge」からの引用です
// Replaces markers in a template string with values define in a JavaScript data object.
// Arguments:
//   - template: string containing markers, for instance ${"Column name"}
//   - data: JavaScript object with values to that will replace markers. For instance
//           data.columnName will replace marker ${"Column name"}
// Returns a string without markers. If no data is found to replace a marker, it is
// simply removed.
function fillInTemplateFromObject(template, data) {
  var email = template;
  // Search for all the variables to be replaced, for instance ${"Column name"}
  var templateVars = template.match(/\$\{\"[^\"]+\"\}/g);

  // Replace variables from the template with the actual values from the data object.
  // If no value is available, replace with the empty string.
  for (var i = 0; i < templateVars.length; ++i) {
    // normalizeHeader ignores ${"} so we can call it directly here.
    var variableData = data[normalizeHeader(templateVars[i])];
    email = email.replace(templateVars[i], variableData || "");
  }

  return email;
}


//////////////////////////////////////////////////////////////////////////////////////////
//
// The code below is reused from the 'Reading Spreadsheet data using JavaScript Objects'
// tutorial.
//
//////////////////////////////////////////////////////////////////////////////////////////

// getRowsData iterates row by row in the input range and returns an array of objects.
// Each object contains all the data for a given row, indexed by its normalized column name.
// Arguments:
//   - sheet: the sheet object that contains the data to be processed
//   - range: the exact range of cells where the data is stored
//   - columnHeadersRowIndex: specifies the row number where the column names are stored.
//       This argument is optional and it defaults to the row immediately above range;
// Returns an Array of objects.
function getRowsData(sheet, range, columnHeadersRowIndex) {
  columnHeadersRowIndex = columnHeadersRowIndex || range.getRowIndex() - 1;
  var numColumns = range.getEndColumn() - range.getColumn() + 1;
  var headersRange = sheet.getRange(columnHeadersRowIndex, range.getColumn(), 1, numColumns);
  var headers = headersRange.getValues()[0];
  return getObjects(range.getValues(), normalizeHeaders(headers));
}

// For every row of data in data, generates an object that contains the data. Names of
// object fields are defined in keys.
// Arguments:
//   - data: JavaScript 2d array
//   - keys: Array of Strings that define the property names for the objects to create
function getObjects(data, keys) {
  var objects = [];
  for (var i = 0; i < data.length; ++i) {
    var object = {};
    var hasData = false;
    for (var j = 0; j < data[i].length; ++j) {
      var cellData = data[i][j];
      if (isCellEmpty(cellData)) {
        continue;
      }
      object[keys[j]] = cellData;
      hasData = true;
    }
    if (hasData) {
      objects.push(object);
    }
  }
  return objects;
}

// Returns an Array of normalized Strings.
// Arguments:
//   - headers: Array of Strings to normalize
function normalizeHeaders(headers) {
  var keys = [];
  for (var i = 0; i < headers.length; ++i) {
    var key = normalizeHeader(headers[i]);
    if (key.length > 0) {
      keys.push(key);
    }
  }
  return keys;
}

// Normalizes a string, by removing all alphanumeric characters and using mixed case
// to separate words. The output will always start with a lower case letter.
// This function is designed to produce JavaScript object property names.
// Arguments:
//   - header: string to normalize
// Examples:
//   "First Name" -> "firstName"
//   "Market Cap (millions) -> "marketCapMillions
//   "1 number at the beginning is ignored" -> "numberAtTheBeginningIsIgnored"
function normalizeHeader(header) {
  var key = "";
  var upperCase = false;
  for (var i = 0; i < header.length; ++i) {
    var letter = header[i];
    if (letter == " " && key.length > 0) {
      upperCase = true;
      continue;
    }
    if (!isAlnum(letter)) {
      continue;
    }
    if (key.length == 0 && isDigit(letter)) {
      continue; // first character must be a letter
    }
    if (upperCase) {
      upperCase = false;
      key += letter.toUpperCase();
    } else {
      key += letter.toLowerCase();
    }
  }
  return key;
}

// Returns true if the cell where cellData was read from is empty.
// Arguments:
//   - cellData: string
function isCellEmpty(cellData) {
  return typeof(cellData) == "string" && cellData == "";
}

// Returns true if the character char is alphabetical, false otherwise.
function isAlnum(char) {
  return char >= 'A' && char <= 'Z' ||
    char >= 'a' && char <= 'z' ||
    isDigit(char);
}

// Returns true if the character char is a digit, false otherwise.
function isDigit(char) {
  return char >= '0' && char <= '9';
}
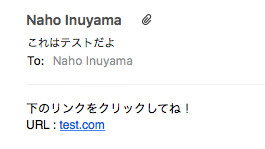
8 - ここまでできたら、実行してみましょう!下記のようなメールが届くはずです。

9 - 最後に、Resouces > Current project's triggers から、トリガーを以下のように設定します。

これで、フォームが送信された時にスプレッドシートのデータを元に、SendEmail の Function を実行します。
これで、設定完了!
最後に
現在エンジニア系の職業でない人で、普段使えるスクリプトを勉強したい時に、 GS は自分のGmail やスプレッドシートのデータを使って学ぶことができるので、実用的でかつコードだけに集中して書いていくことができます。また、ちょっとした作業の自動化が、サーバーなしインストールなしででき、いつでもどこからでも実行することができます。
こちらのチュートリアルから、1から学べるのでぜひ皆さんも使ってみてください!
では、明日は、Nagafuchik さんのGeek Women Japan の裏側のすごい人たちの紹介です!楽しみー!!

