概要
Docker-Desktopが有料になったのでDocker-Desktopを使わずにDockerを使えるように設定してみた
Multipassって何
Multipass は、クラウド的なUbuntu VMをMACとWindowsで作成できるツールとなる。
事前のインストール
Docker
brew install docker
Docker-Compose
brew install docker-compose
Multipass
brew install --cask multipass
上記の三つが無事にインストールできたなら始めましょう
セットアップ手順
VM の立ち上げ
cloud-init.yaml
MultipassでVMを立ち上げる時に cloud-init オプションで初期設定を指定できるので便利な昨日だと思う。
今回は僕が使った cloud-init.yaml を使ってみよう
#cloud-config
apt:
  sources:
    docker.list:
      source: deb [arch=amd64] https://download.docker.com/linux/ubuntu $RELEASE stable
package_update: true
packages:
  - apt-transport-https
  - ca-certificates
  - curl
  - gnupg-agent
  - software-properties-common
  - docker-ce
  - docker-ce-cli
  - containerd.io
  - avahi-daemon
  - libnss-mdns
runcmd:
  - sudo curl -L "https://github.com/docker/compose/releases/download/1.29.2/docker-compose-$(uname -s)-$(uname -m)" -o /usr/local/bin/docker-compose
  - sudo chmod +x /usr/local/bin/docker-compose
  - sudo systemctl daemon-reload
# Dockerグループ作成
groups:
  - docker
# 自動で作成されたユーザーをグループに追加する
system_info:
  default_user:
    groups: [docker]
write_files:
  - content: |
      [Service]
      Type=notify
      ExecStart=
      ExecStart=/usr/bin/dockerd -H fd:// -H tcp://0.0.0.0 --containerd=/run/containerd/containerd.sock -H unix:///var/run/docker.sock
      ExecReload=/bin/kill -s HUP $MAINPID
      TimeoutSec=0
      RestartSec=2
      Restart=always
    path: /lib/systemd/system/docker.service.d/overwrite.conf
    owner: root:root
    permissions: '0644'
power_state:
  mode: reboot
  message: Restarting after configuring Ubuntu for Docker and Docker-Compose
適当なディレクトリを作成して、その中に上記のファイルをコピー
Launchを実行
- $VM_NAME = VMの名前を自由に入力
- $CPU = CPUのコア数(1でいいが、minikubeを使うなら2個以上が必要になる)
- $DISK_SPACE = 指定しないと5GBがデフォルトだがもっと必要だったら指定してください。 例(20GB):
-d 20G
# Ubuntu20.04 LTSをベースにして、Cloudinitの初期設定ファイルを使ってVMを立ち上げる
multipass launch 20.04 --name $VM_NAME -c $CPU -m $MEMORY -d $DISK_SPACE --cloud-init cloud-init.yaml
VMに入ろう
UbuntuVMのシェルを使うには単純なコマンドで
multipass shell $VM_NAME
PUBKEY
入ったらVMをアップデートしよう
sudo apt-get update
の実行で以下のようなエラーが発生するかもしれない
ubuntu@test-vm:~$ sudo apt-get update
Get:1 https://download.docker.com/linux/ubuntu focal InRelease [57.7 kB]
Err:1 https://download.docker.com/linux/ubuntu focal InRelease
  The following signatures couldn't be verified because the public key is not available: NO_PUBKEY 7EA0A9C3F273FCD8
Get:2 http://security.ubuntu.com/ubuntu focal-security InRelease [114 kB]
Hit:3 http://archive.ubuntu.com/ubuntu focal InRelease
Get:4 http://archive.ubuntu.com/ubuntu focal-updates InRelease [114 kB]
Get:5 http://archive.ubuntu.com/ubuntu focal-backports InRelease [108 kB]
Reading package lists... Done
W: GPG error: https://download.docker.com/linux/ubuntu focal InRelease: The following signatures couldn't be verified because the public key is not available: NO_PUBKEY 7EA0A9C3F273FCD8
E: The repository 'https://download.docker.com/linux/ubuntu focal InRelease' is not signed.
N: Updating from such a repository can't be done securely, and is therefore disabled by default.
N: See apt-secure(8) manpage for repository creation and user configuration details.
Err: 1の次の行の最後の文字をコピーしてPUBKEYを取得しよう
以下のコマンドでUbuntuのサーバーからキーをもらえる
sudo apt-key adv --keyserver keyserver.ubuntu.com --recv-keys 7EA0A9C3F273FCD8
取得したら、もう一回アップデートしてみよう
# update取得
sudo apt-get update
# upgrade
# -y オプションを使うとYes/Noを自動にYesにする
sudo apt-get upgrade -y
Dockerをインストール
curl -fsSL https://get.docker.com | sh
外部設定
- デフォルトでDockerのDaemonがVM内のみ聞くので、外部の設定も入れないといけない
sudo nano /lib/systemd/system/docker.service
...
[Service]
Type=notify
# the default is not to use systemd for cgroups because the delegate issues still
# exists and systemd currently does not support the cgroup feature set required
# for containers run by docker
ExecStart=/usr/bin/dockerd -H fd:// --containerd=/run/containerd/containerd.sock
ExecReload=/bin/kill -s HUP $MAINPID
TimeoutSec=0
RestartSec=2
Restart=always
...
ExecStartの行を編集しないといけない
...
[Service]
Type=notify
# the default is not to use systemd for cgroups because the delegate issues still
# exists and systemd currently does not support the cgroup feature set required
# for containers run by docker
ExecStart=/usr/bin/dockerd -H fd:// -H 0.0.0.0 --containerd=/run/containerd/containerd.sock
ExecReload=/bin/kill -s HUP $MAINPID
TimeoutSec=0
RestartSec=2
Restart=always
...
-H 0.0.0.0 を入れると、DaemonにVMとホスト(自分のMAC)のブリッジネットワークも聞くことにする
これで保存して、Daemonを再起動する
sudo systemctl daemon-reload
sudo systemctl restart docker.service
Docker動作確認
VMのまま以下のコマンドを実行
docker ps
結果がOKだったら以下が出力される
CONTAINER ID IMAGE COMMAND CREATED STATUS PORTS NAMES
DockerがTCPでトラフィックをちゃんと取得している確認
nc -zv 127.0.0.1 2375
## 結果は以下のはず
## Connection to 127.0.0.1 2375 port [tcp/*] succeeded!
次はファイルシステムをマウントしないといけないからexit コマンドでHOSTに戻る
マウント
マウントは一つのコマンドで簡単にできる
# 何も複雑に考えなくていいようにHomeディレクトリをマウントする
multipass mount ~ $VM_NAME
※ Mountできないエラーが発生したらシステム設定でディスクアクセスをMultipassあげないといけない
マウントしたどうかを簡単に確認するにはもう一回VMに入ってlsで見る
multipass shell $VM_NAME

cd /Users/<username>
# ls で自分のHOMEを見れるはず
ls
OKだったら exit していい
Docker info
Dockerをホストでやってみるとまだ使えないと思います
docker ps

# daemonに接続できなかったと言われる
VMのDocker情報をみよう
multipass info $VM_NAME
結果情報から必要なのはIPアドレスになる
Name:           vmdocker
State:          Running
IPv4:           192.168.64.5 <-- これ!
                172.17.0.1
                172.19.0.1
Release:        Ubuntu 20.04.4 LTS
Image hash:     6e3ce31fe3a5 (Ubuntu 20.04 LTS)
Load:           0.00 0.00 0.00
Disk usage:     5.3G out of 48.3G
Memory usage:   211.6M out of 1.9G
Mounts:         /Users/<username> => /Users/<username>
                    UID map: 503:default
                    GID map: 20:default
IPアドレスをDOCKER_HOSTにexportする
export DOCKER_HOST=<取得したIP_ADDRESS>
動作確認
これで設定が終わっている
簡単に動作確認したければ以下のコマンドでDocker/HelloWorldを実行しよう!
docker run --rm -t hello-world
OKの場合は以下が表示される
Unable to find image 'hello-world:latest' locally
latest: Pulling from library/hello-world
2db29710123e: Pull complete
Digest: sha256:10d7d58d5ebd2a652f4d93fdd86da8f265f5318c6a73cc5b6a9798ff6d2b2e67
Status: Downloaded newer image for hello-world:latest

Hello from Docker!
This message shows that your installation appears to be working correctly.

To generate this message, Docker took the following steps:
 1. The Docker client contacted the Docker daemon.
 2. The Docker daemon pulled the "hello-world" image from the Docker Hub.
    (amd64)
 3. The Docker daemon created a new container from that image which runs the
    executable that produces the output you are currently reading.
 4. The Docker daemon streamed that output to the Docker client, which sent it
    to your terminal.

To try something more ambitious, you can run an Ubuntu container with:
 $ docker run -it ubuntu bash

Share images, automate workflows, and more with a free Docker ID:
 https://hub.docker.com/

For more examples and ideas, visit:
 https://docs.docker.com/get-started/
終了
これでDocker & Docker-ComposeをDocker Desktopなしで使える!
EXTRA: docker-composeとIDEの場合
今までPycharmでしか設定してないから設定方法は以下
Pycharmの設定
docker-composeを起動
docker-compose up #または docker-compose up -d
-
Pycharmを開く
-
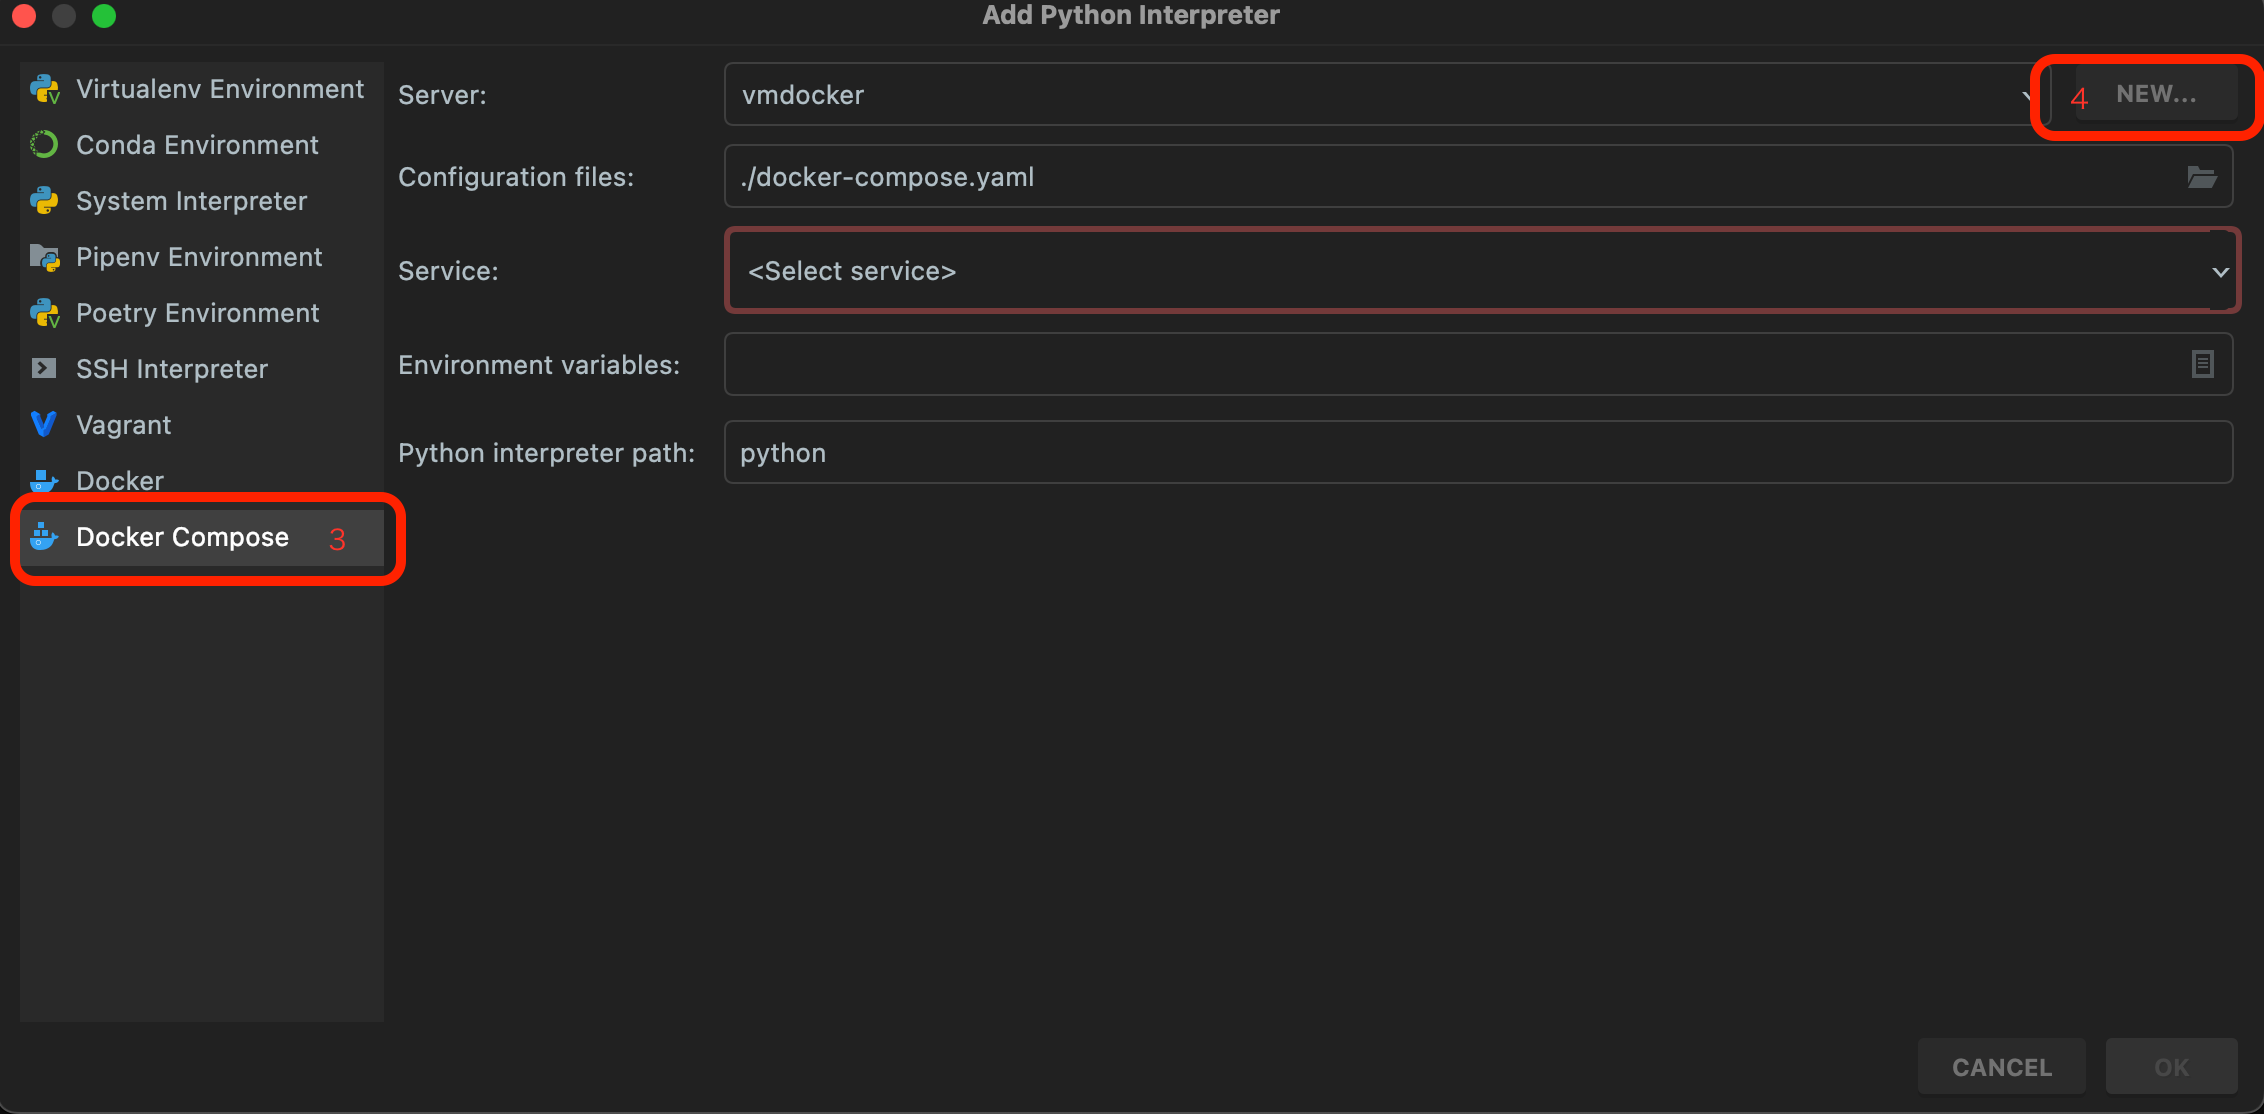
PyCharm Menu > Preferences > Python Interpreter > 歯車アイコン > 追加
-
右側メニューのDocker-Composeを選択
-
右側のNEWをクリック
-
名前は好きな名前を適当にしていい
-
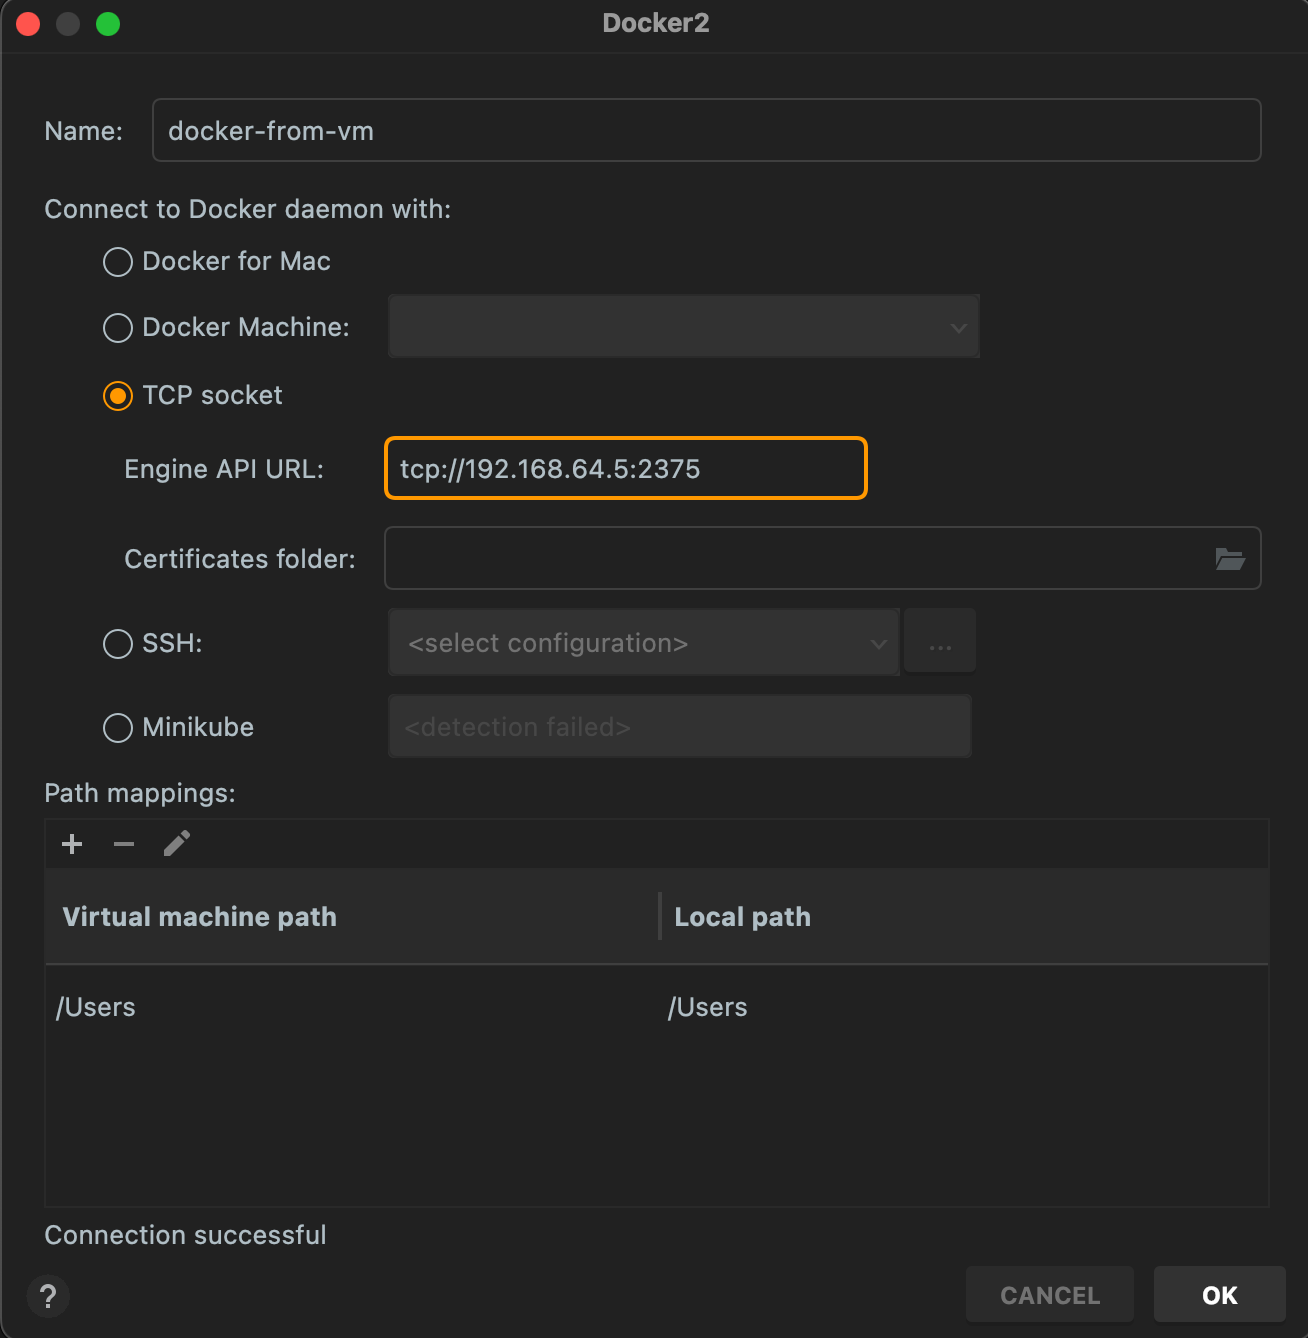
3番目のTCP Socketを選択
-
Engine API URLはDOCKER_HOSTになっているIPを使う
a.tcp://192.168.64.5:2375- TCPの接続になっているから
tcp:// - Dockerを持ってくれているVMのIPアドレスが必要なので僕の場合は
192.168.64.5 - DockerのDaemonのPortは
:2375になっているのでそれも - 正しかったら左下で接続成功と表示される
- TCPの接続になっているから
-
OK押す
-
設定ファイルはプロジェクトのdocker-compose.yaml
-
サービスは当サービス
-
環境変数は必要だったら設定していい
-
Python interpreterのパスはそのままPythonでいいです
-
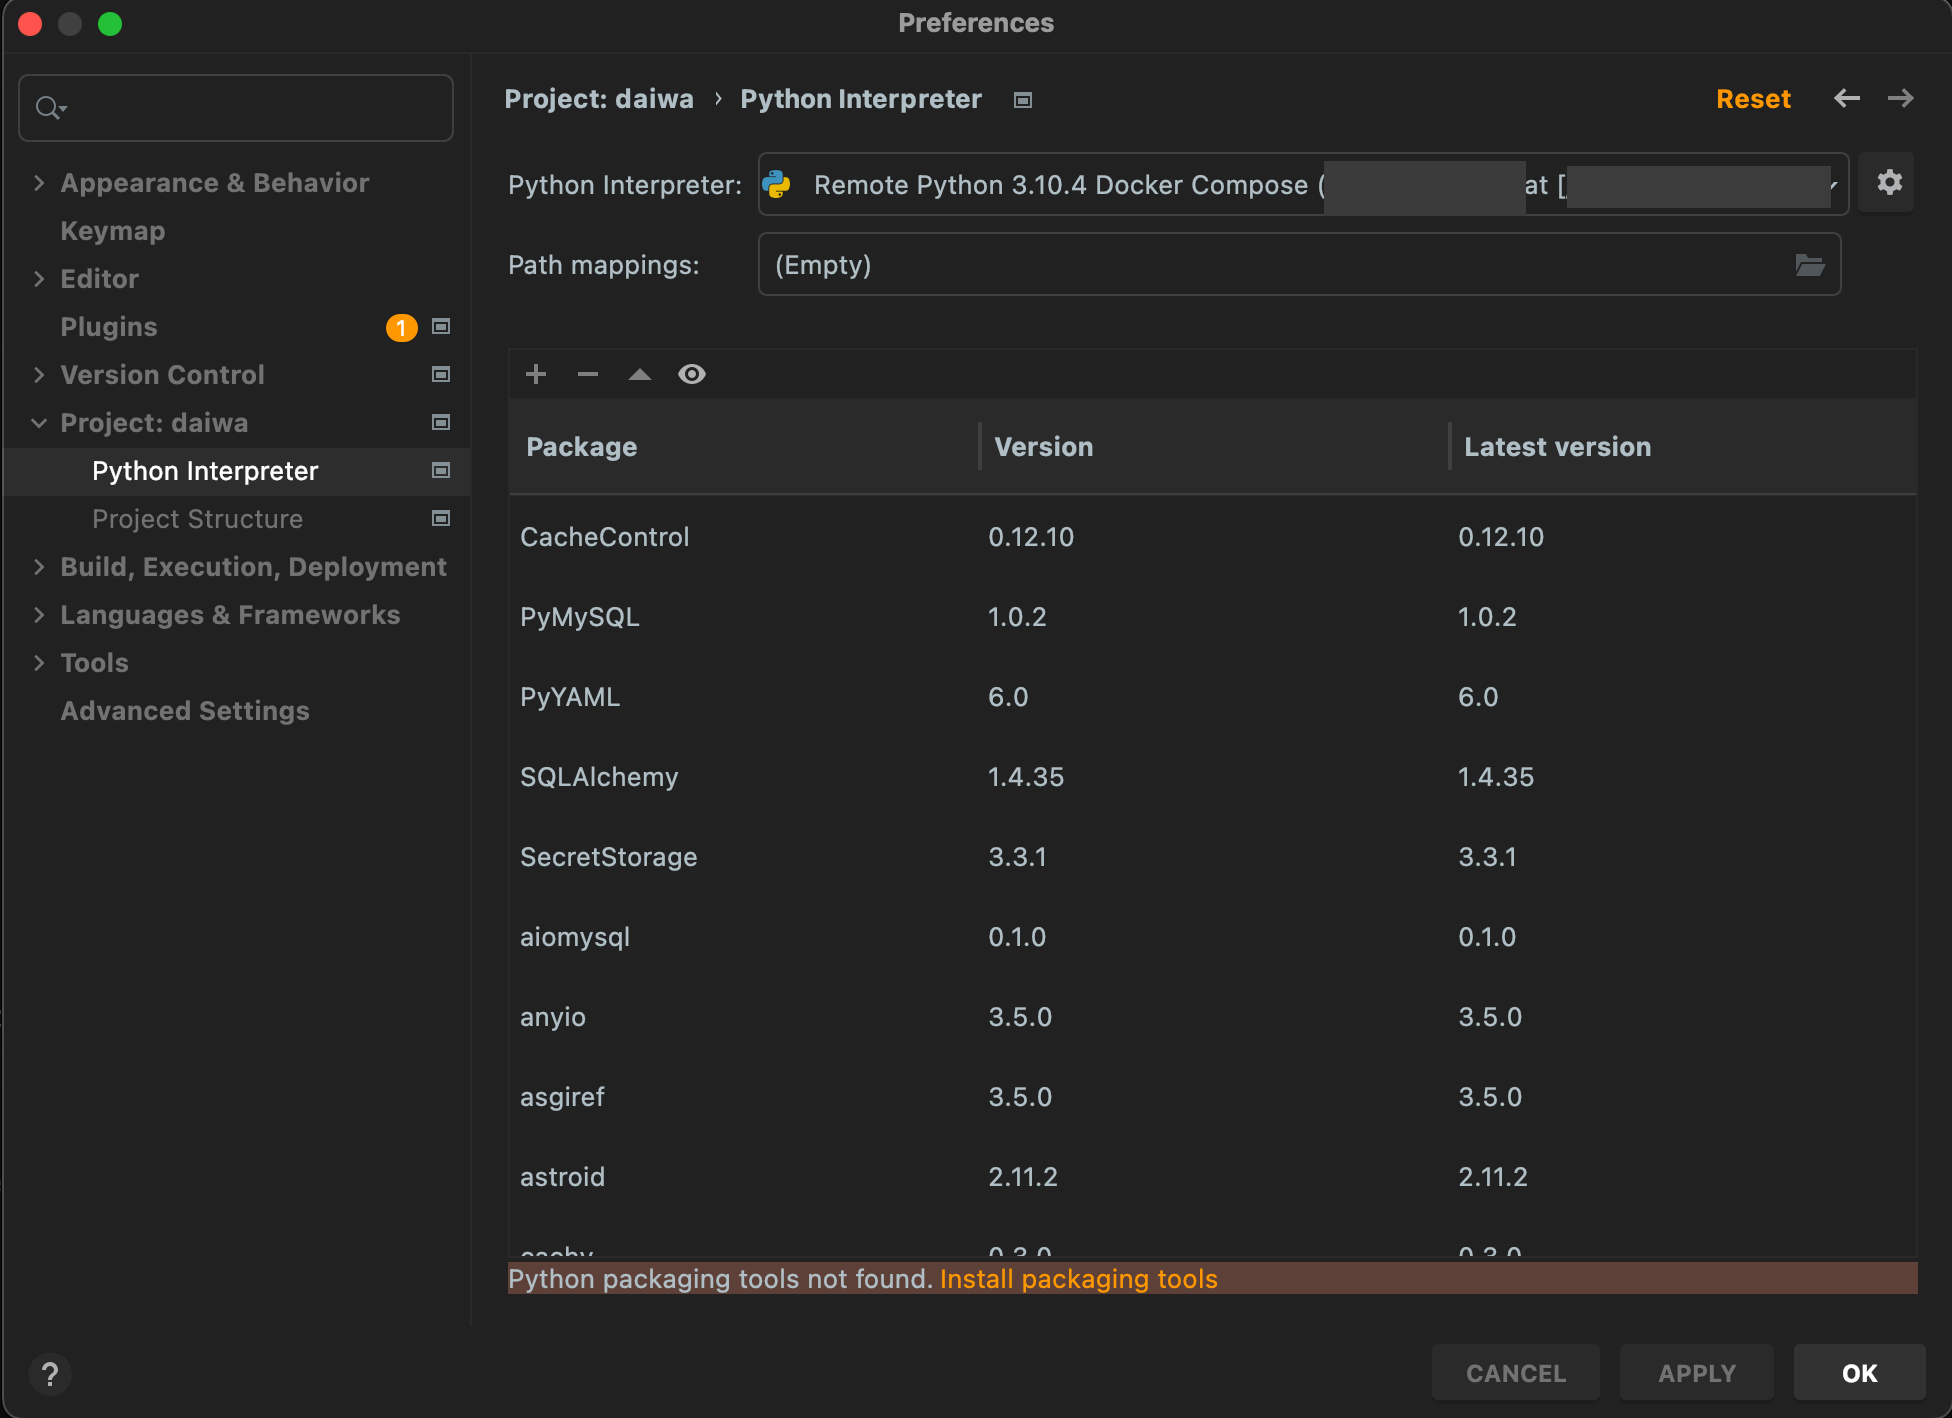
設定がOKだったらパッケージが表示される!
-
最後にOKをクリックして完了
終了
これでPycharm設定がOK!!
FAQ
- 毎回multipassを起動しないといけない?
- multipassはstartupで自動に起動してくれるからしなくてもOK
- VMをStop方法は?
multipass stop $VM_NAME
- DELETE方法は?
-
multipass delete $VM_NAME
※ 削除してもVMの名前が取られているのでまた使いたければ一応パージが必要:multipass purge
-
- PyCharmで赤いラインが消えない またはパッケージ読めてない
- InterpreterはDocker-Composeが動いている前提でパッケージを見ているので当プロジェクトのContainerを
docker-compose upを実行してから使ってみよう
- InterpreterはDocker-Composeが動いている前提でパッケージを見ているので当プロジェクトのContainerを
- この設定でローカル開発でWebServerを
localhostまたは0.0.0.0で見れない- ウェブサーバってContainerから取得してて、Docker-Compose&DockerがVM内で動いているので
0.0.0.0:8080とかではなくVMのIPを使おう0.0.0.0:8080/api/something→192.168.64.5:8080/api/somethingで見てみよう
- ウェブサーバってContainerから取得してて、Docker-Compose&DockerがVM内で動いているので
参考
https://www.cnbeining.com/2021/09/using-docker-and-docker-compose-on-macos-with-multipass/
https://nemzes.net/posts/docker-mac-without-docker-desktop/