読み飛ばしてください
どうも、Windows Formsアプリ職人の限界派遣SESです。
先日アドカレ1日目を投稿しましたが、準備って大切ですね。
私は何も準備をしていなかったので2日目の記事を2日目に書いています。
一人で走るつもりなので、続けるしかないのですがこれはこれで普段文章を書かない私にとってはいい機会なのかもしれません。
本題
プライベートなコーディングってほとんど新しい技術を使ったものが多いですよね?
そんな中、なぜか私はレガシーなWindows Formsアプリ(以下formアプリ)を量産しています。
それは客先で求められる形式がFormアプリだからです。
何を世迷言を言っているんだという気分ですが求められるものを作るのがプロフェッショナルというものらしいので、それに従って技術の切り売りをしているわけです。
ですが、私の所感として新しくFormアプリを作成するのは全くもってオススメできません。
その理由などを愚痴説明していこうと思います。
Windows Formsを使う事の問題点
Formアプリは初心者でも作りやすいという反面、大規模なプロジェクトには向いていないという点などがあげられます。
これはよくMVVM(Model-View-ViewModel)などがデザインパターンが扱えない。という点で問題視されているかと思います。
ですが、もっと根本的な問題があると思います。
デザインがVisualStudioに依存している
FormアプリはVisualStudioがないとまともに作成することが出来ません。
なぜならデザイナーで生成されるコードに依存しているという特徴があるからです。
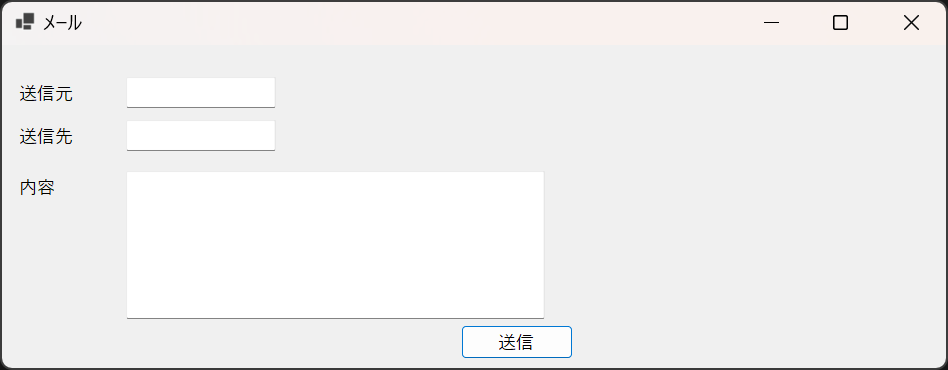
例えば以下のようなメールを送信するためのフォームを作成したとします。

これはGUI操作で配置などができるので比較的直感的に配置することが可能です。
しかし、これによって生成されるコードは以下のように直線的な並びとなるため、どのような構造をしているのか?という情報がひと目見てわかるようにはなっていません。
...
private void InitializeComponent()
{
    label1 = new Label();
    button1 = new Button();
    textBox1 = new TextBox();
    textBox2 = new TextBox();
    label2 = new Label();
    textBox3 = new TextBox();
    label3 = new Label();
    SuspendLayout();
    //
    // label1
    //
    label1.AutoSize = true;
    label1.Location = new Point(12, 35);
    label1.Name = "label1";
    label1.Size = new Size(66, 25);
    label1.TabIndex = 0;
    label1.Text = "送信元";
    //
    // button1
    //
    button1.Location = new Point(459, 280);
    button1.Name = "button1";
    button1.Size = new Size(112, 34);
    button1.TabIndex = 1;
    button1.Text = "送信";
    button1.UseVisualStyleBackColor = true;
    //
    // textBox1
    //
    textBox1.Location = new Point(124, 32);
    textBox1.Name = "textBox1";
    textBox1.Size = new Size(150, 31);
    textBox1.TabIndex = 2;
    //
    // textBox2
    //
    textBox2.Location = new Point(124, 75);
    textBox2.Name = "textBox2";
    textBox2.Size = new Size(150, 31);
    textBox2.TabIndex = 4;
    //
    // label2
    //
    label2.AutoSize = true;
    label2.Location = new Point(12, 78);
    label2.Name = "label2";
    label2.Size = new Size(66, 25);
    label2.TabIndex = 3;
    label2.Text = "送信先";
    //
    // textBox3
    //
    textBox3.Location = new Point(124, 126);
    textBox3.Multiline = true;
    textBox3.Name = "textBox3";
    textBox3.Size = new Size(419, 148);
    textBox3.TabIndex = 6;
    //
    // label3
    //
    label3.AutoSize = true;
    label3.Location = new Point(12, 129);
    label3.Name = "label3";
    label3.Size = new Size(48, 25);
    label3.TabIndex = 5;
    label3.Text = "内容";
    //
    // Form1
    //
    AutoScaleDimensions = new SizeF(10F, 25F);
    AutoScaleMode = AutoScaleMode.Font;
    ClientSize = new Size(583, 323);
    Controls.Add(textBox3);
    Controls.Add(label3);
    Controls.Add(textBox2);
    Controls.Add(label2);
    Controls.Add(textBox1);
    Controls.Add(button1);
    Controls.Add(label1);
    Name = "Form1";
    Text = "メール";
    ResumeLayout(false);
    PerformLayout();
}
...
同様にWindows向けのアプリケーションを作成できるWPFでは同様の画面を以下のように作成することができます。

<Window x:Class="WpfApp1.MainWindow"
        xmlns="http://schemas.microsoft.com/winfx/2006/xaml/presentation"
        xmlns:x="http://schemas.microsoft.com/winfx/2006/xaml"
        xmlns:d="http://schemas.microsoft.com/expression/blend/2008"
        xmlns:mc="http://schemas.openxmlformats.org/markup-compatibility/2006"
        xmlns:local="clr-namespace:WpfApp1"
        mc:Ignorable="d"
        Title="メール" Height="292" Width="304">
    <Grid>
        <TextBox HorizontalAlignment="Left" Margin="71,14,0,0" TextWrapping="Wrap" Text="TextBox" VerticalAlignment="Top" Width="120" />
        <Label Content="送信元" HorizontalAlignment="Left" Margin="17,10,0,0" VerticalAlignment="Top"/>
        <TextBox HorizontalAlignment="Left" Margin="71,46,0,0" TextWrapping="Wrap" Text="TextBox" VerticalAlignment="Top" Width="120" />
        <Label Content="送信先" HorizontalAlignment="Left" Margin="17,42,0,0" VerticalAlignment="Top"/>
        <TextBox HorizontalAlignment="Left" Margin="71,84,0,0" TextWrapping="Wrap" Text="TextBox" VerticalAlignment="Top" Width="219" Height="157" />
        <Label Content="内容" HorizontalAlignment="Left" Margin="17,80,0,0" VerticalAlignment="Top"/>
        <Button Content="送信" HorizontalAlignment="Left" Margin="250,246,0,0" VerticalAlignment="Top" Width="40"/>

    </Grid>
</Window>
同じような構成でもコード量にこれだけの差が出てしまいます。
これによってGitなどで管理する際はコード差分を見ても何が変わっているのか何も理解できない事が多々あります。
変更点のわかりにくさ
先ほどのFormアプリをビルドして→に伸ばしてみると以下のように追従していない問題があります。

ウィンドウサイズも調整出来ないUIは誰も求めていないでしょう。
最低限サイズ変更しても問題ないように調整してあげる必要があります。
いい感じですね、ボタンの位置が追従していますし内容の入力欄も広がっています。
コードはどのように変化するかというと、TableLayoutPanelというオブジェクトが追加されます。
...
//
// tableLayoutPanel1
//
tableLayoutPanel1.ColumnCount = 2;
tableLayoutPanel1.ColumnStyles.Add(new ColumnStyle(SizeType.Absolute, 101F));
tableLayoutPanel1.ColumnStyles.Add(new ColumnStyle(SizeType.Percent, 100F));
tableLayoutPanel1.Controls.Add(label1, 0, 0);
tableLayoutPanel1.Controls.Add(button1, 1, 3);
tableLayoutPanel1.Controls.Add(textBox3, 1, 2);
tableLayoutPanel1.Controls.Add(textBox1, 1, 0);
tableLayoutPanel1.Controls.Add(label3, 0, 2);
tableLayoutPanel1.Controls.Add(textBox2, 1, 1);
tableLayoutPanel1.Controls.Add(label2, 0, 1);
tableLayoutPanel1.Dock = DockStyle.Fill;
tableLayoutPanel1.Location = new Point(0, 0);
tableLayoutPanel1.Margin = new Padding(10);
tableLayoutPanel1.Name = "tableLayoutPanel1";
tableLayoutPanel1.Padding = new Padding(3);
tableLayoutPanel1.RowCount = 4;
tableLayoutPanel1.RowStyles.Add(new RowStyle(SizeType.Absolute, 40F));
tableLayoutPanel1.RowStyles.Add(new RowStyle(SizeType.Absolute, 40F));
tableLayoutPanel1.RowStyles.Add(new RowStyle(SizeType.Percent, 100F));
tableLayoutPanel1.RowStyles.Add(new RowStyle(SizeType.Absolute, 40F));
tableLayoutPanel1.Size = new Size(583, 323);
tableLayoutPanel1.TabIndex = 7;

...
ところどころControls.Addのメソッドが呼ばれていますが、つまりこのTableLayoutPanelを親として配下のTextBoxなどの位置を確定させているというわけです。
これはTableLayoutPanelも同じく子に持つことのできる特性があるため比較的複雑なレイアウトでも崩れずに表示できるメリットがあります。
ですが、先述したように直線的な並びとなるため、ソースコードを見ても直感的に意味を把握しづらく意味を理解できない事が多いです。
これにより、Gitでの変更点はどこか?と見た時にレイアウト調整をしただけでも思った以上に変更点が多く困惑します。
まあ、Gitからデザイナーは見ないんですけどね。
同様の設定をしてもWPFでは構造化されたXMLなので可読性は十分あります。
<Window x:Class="WpfApp1.MainWindow"
        xmlns="http://schemas.microsoft.com/winfx/2006/xaml/presentation"
        xmlns:x="http://schemas.microsoft.com/winfx/2006/xaml"
        xmlns:d="http://schemas.microsoft.com/expression/blend/2008"
        xmlns:mc="http://schemas.openxmlformats.org/markup-compatibility/2006"
        xmlns:local="clr-namespace:WpfApp1"
        mc:Ignorable="d"
        Title="メール" Height="292" Width="351">
    <Grid Margin="10,10,10,10">
        <Grid.ColumnDefinitions>
            <ColumnDefinition Width="60"/>
            <ColumnDefinition Width="*"/>
        </Grid.ColumnDefinitions>
        <Grid.RowDefinitions>
            <RowDefinition Height="30"/>
            <RowDefinition Height="30"/>
            <RowDefinition Height="*"/>
            <RowDefinition Height="30"/>
        </Grid.RowDefinitions>

        <Grid Grid.Column="0" Grid.Row="0">
            <Label Content="送信元" HorizontalAlignment="Left" VerticalAlignment="Center" />
        </Grid>
        <Grid Grid.Column="1" Grid.Row="0">
            <TextBox HorizontalAlignment="Left" TextWrapping="NoWrap" Text="TextBox" VerticalAlignment="Center" Width="120"  />
        </Grid>
        <Grid Grid.Column="0" Grid.Row="1">
            <Label Content="送信先" HorizontalAlignment="Left" VerticalAlignment="Center" />
        </Grid>
        <Grid Grid.Column="1" Grid.Row="1">
            <TextBox HorizontalAlignment="Left" TextWrapping="Wrap" Text="TextBox" VerticalAlignment="Center" Width="120" />
        </Grid>
        <Grid Grid.Column="0" Grid.Row="2">
            <Label Content="内容" HorizontalAlignment="Left" VerticalAlignment="Top" />
        </Grid>
        <Grid Grid.Column="1" Grid.Row="2">
            <TextBox TextWrapping="Wrap" HorizontalAlignment="Stretch" Text="TextBox" VerticalAlignment="Stretch" />
        </Grid>
        <Grid  Grid.Column="1" Grid.Row="3">
            <Button Content="送信" HorizontalAlignment="Right" VerticalAlignment="Center" Width="40"/>
        </Grid>
    </Grid>
</Window>
プロパティの設定が柔軟すぎる点
例えば以下ようなExcelのような表を画面に埋め込む事などができます。

このColumn1というプロパティは一体どこからきているのでしょうか?

この長いプロパティ一覧から探す必要が出てきます。
私は探すのを諦めました。だって見る必要ないんだもん。
この設定もDesigner.csで設定されているため最悪ここから設定したほうが楽なようにも感じますが、「Required method for Designer support - do not modify the contents of this method with the code editor.」と書かれているので触ることも気が引けます。
//
// dataGridView1
//
dataGridView1.ColumnHeadersBorderStyle = DataGridViewHeaderBorderStyle.Single;
dataGridView1.ColumnHeadersHeightSizeMode = DataGridViewColumnHeadersHeightSizeMode.AutoSize;
dataGridView1.Columns.AddRange(new DataGridViewColumn[] { Column1, Column2, Column3, Column4, Column5 });
dataGridView1.Dock = DockStyle.Fill;
dataGridView1.Location = new Point(0, 0);
dataGridView1.Name = "dataGridView1";
dataGridView1.RowHeadersWidth = 62;
dataGridView1.Size = new Size(800, 450);
dataGridView1.TabIndex = 0;
//
// Column1
//
Column1.HeaderText = "Column1";
Column1.MinimumWidth = 8;
Column1.Name = "Column1";
Column1.Width = 150;
//
// Column2
//
Column2.HeaderText = "Column2";
Column2.MinimumWidth = 8;
Column2.Name = "Column2";
Column2.Width = 150;
//
// Column3
//
Column3.HeaderText = "Column3";
Column3.MinimumWidth = 8;
Column3.Name = "Column3";
Column3.Width = 150;
//
// Column4
//
Column4.HeaderText = "Column4";
Column4.MinimumWidth = 8;
Column4.Name = "Column4";
Column4.Width = 150;
//
// Column5
//
Column5.HeaderText = "Column5";
Column5.MinimumWidth = 8;
Column5.Name = "Column5";
Column5.Width = 150;
ちなみに、このように設定しない場合はModelClassを定義して表示する方法なども存在するため、一概に酷い仕様というわけではありません。
また、このプロパティはコードから編集しようとする場合でも大量のプロパティを表示してくるので、覚えてないからと探そうとするとその日の進捗は0になります。

GithubCopilotなどとの相性の悪さ
前述の通り、ほぼVisualStudioに依存した設計です。
Formアプリを作成する際は必ずと言っていいほどGUI操作によるレイアウト設計が必須となります。
つまり、生成AIによってコードを自動生成させるということがしづらいということです。
生成AIは非常に強力で、コメントを書けばその通りに実装する。ということができるなど、クソ雑魚コーダーの私がリストラされそうになったり非常に強い味方になってれます。
Designer.csは先程言った通りコードを編集することを想定していない設計です。
どんなに強力なツールがあったとしても利用できないのでは仕方ありません。
まとめ
他にも問題点は多々ありますが、使わない 理由は示せたと思います。
どうしても使わざるを得ない環境はあるかと思います。
例えば客先のエンジニアが「今までWindowsFormsアプリで作ってきたから次もそれで」といった理由はあり得るかもしれません。
ですが、できるだけ次の世代にはレガシーなコードを残さない事が懸命と思います。
GUIアプリを作るのであればTaruiやElectronといったReactなどを使ってWebライクな開発ができるものなどいろいろあります。
なので、他の選択肢を与えるという点で提案してみるのがオススメです。

