はじめに
本記事の内容は ![]() の続きになります。
の続きになります。
Babylon.js で Oculus Quest で気軽に入れる VRクラブを作る (1)
前回は Oculus Quest で動き回れる VR クラブを作成しました ![]()

今回はもっと VR 的な演出を盛り込んだり、実際に音楽を再生したりして、
実際に盛り上がれる感じの空間として作り込んでいきたいと思います ![]()
![]()
また、今回は音楽再生や波形解析のために Tone.js を使用します ![]()
動作環境
- ホスティングサーバ
- Node.js v11.14.0
- Express 4.17.1
- フロントエンド
- Babylon.js 4.0.3
- Tone.js 13.8.18
音楽の再生/停止を Babylon.js で制御出来るようにする
VR クラブ内で再生する音楽を 3D空間上から制御できるようにします ![]()
1. Tone.js を使用して音楽を再生してみる
まずは VR クラブにマッチしそうな音楽を選定します ![]()
僕は Sonic Pi で作った音源を BGM にすることにしました ![]()
ファイルフォーマットは mp3 にしました。
audio フォルダを作成して music.mp3 を配置しています ![]()
.
├── audio # 新たに audio フォルダを作成し music.mp3 ファイルを配置
│   └── music.mp3
├── images
├── index.html
├── javascripts
├── shaders
└── stylesheets
それでは 前回作成した index.html に Tone.js を CDN 経由で取り込み、
実際に用意した mp3 ファイルを再生してみましょう![]()
<!DOCTYPE html>
<html>

<head>
    <meta http-equiv="Content-Type" content="text/html" charset="utf-8" />
    <title>Babylon Club</title>
    <script src="https://cdn.babylonjs.com/babylon.js"></script>
    <!-- Tone.js を CDN 経由で取り込む -->
    <script src="https://cdnjs.cloudflare.com/ajax/libs/tone/13.8.18/Tone.min.js"></script>
    <style>
        html,
        body {
            overflow: hidden;
            width: 100%;

            height: 100%;
            margin: 0;
            padding: 0;
        }

        #renderCanvas {
            width: 100%;
            height: 100%;
            touch-action: none;
        }
    </style>
</head>

<body>
    <canvas id="renderCanvas"></canvas>
    <script>
        const canvas = document.getElementById('renderCanvas');
        const engine = new BABYLON.Engine(canvas, true);

        // Tone.js の Player を使用して、用意した mp3 の再生を準備する
        const player = new Tone.Player({
            url: '/audio/music.mp3',
            loop: true,
        }).toMaster();

        // mp3 ファイルのロード完了後、自動で mp3 の再生を開始する
        Tone.Buffer.on('load', function () {
            player.start();
        });

        const createScene = () => {
            const scene = new BABYLON.Scene(engine);

            const camera = new BABYLON.FreeCamera('MainCamera', new BABYLON.Vector3(0, 0, 0), scene);
            camera.setTarget(BABYLON.Vector3.Zero());
            camera.attachControl(canvas, true);

            const box = BABYLON.MeshBuilder.CreateBox('Box', { size: 20, sideOrientation: BABYLON.Mesh.BACKSIDE }, scene);
            box.position = BABYLON.Vector3.Zero();

            const shaderMaterial = new BABYLON.ShaderMaterial('floor', scene, './shaders/floor');
            box.material = shaderMaterial;

            const light = new BABYLON.HemisphericLight('AmbientLight', new BABYLON.Vector3(0, 0, 0), scene);

            return scene;
        }

        const scene = createScene();

        const vrHelper = scene.createDefaultVRExperience();
        vrHelper.enableInteractions();

        var _rotationAngle = 0;
        vrHelper.onControllerMeshLoaded.add((webVRController) => {
            var isHorizontalRotate = false;
            const angle = Math.PI / 4;
            webVRController.onPadValuesChangedObservable.add((stateObject) => {
                if (webVRController.hand === 'left') {
                    const matrix = new BABYLON.Matrix();
                    const deviceRotationQuaternion = vrHelper.currentVRCamera.rotationQuaternion;
                    BABYLON.Matrix.FromQuaternionToRef(deviceRotationQuaternion, matrix);

                    const move = new BABYLON.Vector3(stateObject.x * moveSpeed, 0, -stateObject.y * moveSpeed);
                    const addPos = BABYLON.Vector3.TransformCoordinates(move, matrix);
                    vrHelper.position = vrHelper.position.add(addPos)
                } else {
                    if (isHorizontalRotate && Math.abs(stateObject.x) > 0.8) {
                        isHorizontalRotate = false;
                        stateObject.x > 0 ? _rotationAngle++ : _rotationAngle--;

                        var target = BABYLON.Quaternion.FromRotationMatrix(BABYLON.Matrix.RotationY(angle * _rotationAngle));
                        vrHelper.currentVRCamera.rotationQuaternion = target
                    } else if (Math.abs(stateObject.x) < 0.8) {
                        isHorizontalRotate = true
                    }
                }
            });
        });

        const box = scene.getMeshByName('Box')

        var time = 0.0;
        engine.runRenderLoop(() => {
            box.material.setFloat('time', time);
            scene.render();

            time += 0.01;
        });

        window.addEventListener('resize', function () {
            engine.resize();
        });
    </script>
</body>

</html>
index.html を更新して、npm run start を実行後 http://localhost:3000 にアクセスした際に音楽が流れていれば成功です ![]()
2. Babylon.js で 3D空間上に再生/停止を制御するためのボタンを配置する
次に音楽の再生に関わる操作を 3D 空間上で行えるように、再生/停止ボタンを配置することにします ![]()
Babylon.js には 3D 空間上で GUI を作成するための ライブラリ が用意されているため、
それを活用することで簡単に 3D空間上にクリック可能なボタンを配置出来ます。
それでは早速 3D空間上にボタンを配置し、
クリックすることで音楽の再生/停止が切り替えられるようにします ![]()
<!DOCTYPE html>
<html>

<head>
    <meta http-equiv="Content-Type" content="text/html" charset="utf-8" />
    <title>Babylon Club</title>
    <script src="https://cdn.babylonjs.com/babylon.js"></script>

    <!-- Babylon.js の 3D GUI プラグインを CDN 経由で取り込む -->
    <script src="https://cdn.babylonjs.com/gui/babylon.gui.min.js"></script>

    <script src="https://cdnjs.cloudflare.com/ajax/libs/tone/13.8.18/Tone.min.js"></script>
    <style>
        html,
        body {
            overflow: hidden;
            width: 100%;

            height: 100%;
            margin: 0;
            padding: 0;
        }

        #renderCanvas {
            width: 100%;
            height: 100%;
            touch-action: none;
        }
    </style>
</head>

<body>
    <canvas id="renderCanvas"></canvas>
    <script>
        const canvas = document.getElementById('renderCanvas');
        const engine = new BABYLON.Engine(canvas, true);

        // Tone.js の Player を使用して、用意した mp3 の再生を準備する
        const player = new Tone.Player({
            url: '/audio/music.mp3',
            loop: true,
        }).toMaster();

        // 画面上に表示するボタンをクリックした際のコールバック関数
        // 既に Player が mp3 を読み込み済みの時に、
        // 音楽が既に再生されていれば停止、停止されていたら再生を行う
        const onPlayPauseButtonClicked = () => {
            if (player.loaded) {
                if (player.state == 'started') {
                    player.stop()
                } else {
                    player.start()
                }
            }
        }

        const createScene = () => {
            const scene = new BABYLON.Scene(engine);

            const camera = new BABYLON.FreeCamera('MainCamera', new BABYLON.Vector3(0, 0, 0), scene);
            camera.setTarget(BABYLON.Vector3.Zero());
            camera.attachControl(canvas, true);

            const box = BABYLON.MeshBuilder.CreateBox('Box', { size: 20, sideOrientation: BABYLON.Mesh.BACKSIDE }, scene);
            box.position = BABYLON.Vector3.Zero();

            const shaderMaterial = new BABYLON.ShaderMaterial('floor', scene, './shaders/floor');
            box.material = shaderMaterial;

            const light = new BABYLON.HemisphericLight('AmbientLight', new BABYLON.Vector3(0, 0, 0), scene);

            // Babylon.js の GUI ライブラリを使用して、ユーザがクリック可能なボタンを作成する
            // ボタンの名前は PlayPauseButton としている
            const manager = new BABYLON.GUI.GUI3DManager(scene);
            const playPauseButton = new BABYLON.GUI.HolographicButton('PlayPauseButton');
            manager.addControl(playPauseButton);

            // playPauseButton ボタンのポジションを y: -0.2m, z: -5m に配置する
            playPauseButton.position.y = -0.2;
            playPauseButton.position.z = -5;

            // Y軸座標で 180度回転させておく (後に設定するテキストが正面から見られるようにするため)
            playPauseButton.mesh.rotate(BABYLON.Axis.Y, Math.PI, BABYLON.Space.WORLD);

            // playPauseButton ボタンのテキストに Play/Pause というテキストを設定する
            playPauseButton.text = "Play/Pause";
            playPauseButton.onPointerUpObservable.add(onPlayPauseButtonClicked);

            return scene;
        }

        const scene = createScene();

        const vrHelper = scene.createDefaultVRExperience();
        vrHelper.enableInteractions();

        var _rotationAngle = 0;
        vrHelper.onControllerMeshLoaded.add((webVRController) => {
            var isHorizontalRotate = false;
            const angle = Math.PI / 4;
            webVRController.onPadValuesChangedObservable.add((stateObject) => {
                if (webVRController.hand === 'left') {
                    const matrix = new BABYLON.Matrix();
                    const deviceRotationQuaternion = vrHelper.currentVRCamera.rotationQuaternion;
                    BABYLON.Matrix.FromQuaternionToRef(deviceRotationQuaternion, matrix);

                    const move = new BABYLON.Vector3(stateObject.x * moveSpeed, 0, -stateObject.y * moveSpeed);
                    const addPos = BABYLON.Vector3.TransformCoordinates(move, matrix);
                    vrHelper.position = vrHelper.position.add(addPos)
                } else {
                    if (isHorizontalRotate && Math.abs(stateObject.x) > 0.8) {
                        isHorizontalRotate = false;
                        stateObject.x > 0 ? _rotationAngle++ : _rotationAngle--;

                        var target = BABYLON.Quaternion.FromRotationMatrix(BABYLON.Matrix.RotationY(angle * _rotationAngle));
                        vrHelper.currentVRCamera.rotationQuaternion = target
                    } else if (Math.abs(stateObject.x) < 0.8) {
                        isHorizontalRotate = true
                    }
                }
            });
        });

        const box = scene.getMeshByName('Box')

        var time = 0.0;
        engine.runRenderLoop(() => {
            box.material.setFloat('time', time);
            scene.render();

            time += 0.01;
        });

        window.addEventListener('resize', function () {
            engine.resize();
        });
    </script>
</body>

</html>
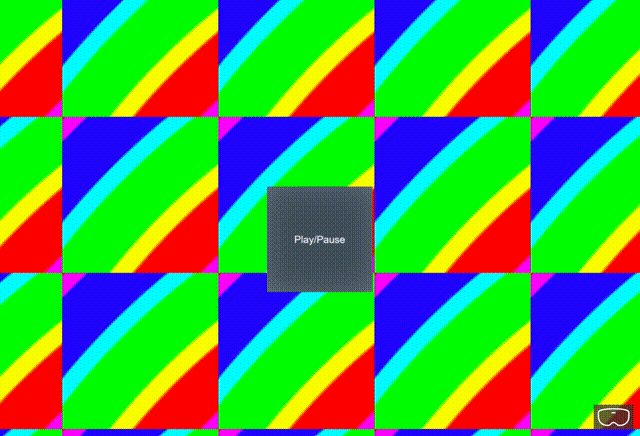
index.html を書き換えたら、再び http://localhost:3000 にアクセスしてみます ![]()

画面中央に Play/Pause というテキストが設定されたボタンが出現し、
クリックすることで音楽の再生/停止が切り替われば成功です ![]()
![]()
音楽の波形解析データを利用してクラブっぽい演出を VR空間に取り入れる
Tone.js では再生中の音源の波形解析をしてデータを取得することが可能です。
波形解析したデータを元に Babylon.js 内の世界に変化をもたらすことで、
より音楽にマッチしたカッコいい空間を演出することが可能になります ![]()
1. Tone.js を使って再生中の音楽の波形データを取得する
Tone.js にはデフォで波形解析を行うための各種クラスが用意されているため、
簡単に波形解析を行うことが可能です ![]()
実際に再生している mp3 ファイルの波形解析してデータを取得してみます ![]()
<!DOCTYPE html>
<html>

<head>
    <meta http-equiv="Content-Type" content="text/html" charset="utf-8" />
    <title>Babylon Club</title>
    <script src="https://cdn.babylonjs.com/babylon.js"></script>

    <!-- Babylon.js の 3D GUI プラグインを CDN 経由で取り込む -->
    <script src="https://cdn.babylonjs.com/gui/babylon.gui.min.js"></script>

    <script src="https://cdnjs.cloudflare.com/ajax/libs/tone/13.8.18/Tone.min.js"></script>
    <style>
        html,
        body {
            overflow: hidden;
            width: 100%;

            height: 100%;
            margin: 0;
            padding: 0;
        }

        #renderCanvas {
            width: 100%;
            height: 100%;
            touch-action: none;
        }
    </style>
</head>

<body>
    <canvas id="renderCanvas"></canvas>
    <script>
        const canvas = document.getElementById('renderCanvas');
        const engine = new BABYLON.Engine(canvas, true);

        // 音楽の入力信号を RMS で取得出来るようにする
        const meter = new Tone.Meter('level');

        // 音楽の波形をフーリエ変換して音の高さごとのスペクトラムを取得する
        // 音の高低の強さが getValue 関数を使用すると配列として取得出来るイメージ
        // 引数の 64 は分解能 (高低の分割数) を指す
        const fft = new Tone.Analyser('fft', 64);

        // ↓ のような音楽の波形を取得する
        // https://info.shimamura.co.jp/digital/knowledge/2014/03/19260/2
        // 引数の 256 は分割数を (波形の分割数) を指す
        const waveform = new Tone.Analyser('waveform', 256);

        // 1秒ごとに再生中の音楽の波形データをログで出力する
        setInterval(() => {
            if (player.state == 'started')
                console.log(meter.getValue(), fft.getValue(), waveform.getValue());
        }, 1 * 1000) // 1s

        const player = new Tone.Player({
            url: '/audio/music.mp3',
            loop: true,
        }).connect(meter).fan(fft, waveform).toMaster();

        const onPlayPauseButtonClicked = () => {
            if (player.loaded) {
                if (player.state == 'started') {
                    player.stop()
                } else {
                    player.start()
                }
            }
        }

        const createScene = () => {
            const scene = new BABYLON.Scene(engine);

            const camera = new BABYLON.FreeCamera('MainCamera', new BABYLON.Vector3(0, 0, 0), scene);
            camera.setTarget(BABYLON.Vector3.Zero());
            camera.attachControl(canvas, true);

            const box = BABYLON.MeshBuilder.CreateBox('Box', { size: 20, sideOrientation: BABYLON.Mesh.BACKSIDE }, scene);
            box.position = BABYLON.Vector3.Zero();

            const shaderMaterial = new BABYLON.ShaderMaterial('floor', scene, './shaders/floor');
            box.material = shaderMaterial;

            const light = new BABYLON.HemisphericLight('AmbientLight', new BABYLON.Vector3(0, 0, 0), scene);

            const manager = new BABYLON.GUI.GUI3DManager(scene);
            const playPauseButton = new BABYLON.GUI.HolographicButton('playPauseButton');
            manager.addControl(playPauseButton);

            playPauseButton.position.y = -0.2;
            playPauseButton.position.z = -5;

            playPauseButton.mesh.rotate(BABYLON.Axis.Y, Math.PI, BABYLON.Space.WORLD);

            playPauseButton.text = "Play/Pause";
            playPauseButton.onPointerUpObservable.add(onPlayPauseButtonClicked);

            return scene;
        }

        const scene = createScene();

        const vrHelper = scene.createDefaultVRExperience();
        vrHelper.enableInteractions();

        var _rotationAngle = 0;
        vrHelper.onControllerMeshLoaded.add((webVRController) => {
            var isHorizontalRotate = false;
            const angle = Math.PI / 4;
            webVRController.onPadValuesChangedObservable.add((stateObject) => {
                if (webVRController.hand === 'left') {
                    const matrix = new BABYLON.Matrix();
                    const deviceRotationQuaternion = vrHelper.currentVRCamera.rotationQuaternion;
                    BABYLON.Matrix.FromQuaternionToRef(deviceRotationQuaternion, matrix);

                    const move = new BABYLON.Vector3(stateObject.x * moveSpeed, 0, -stateObject.y * moveSpeed);
                    const addPos = BABYLON.Vector3.TransformCoordinates(move, matrix);
                    vrHelper.position = vrHelper.position.add(addPos)
                } else {
                    if (isHorizontalRotate && Math.abs(stateObject.x) > 0.8) {
                        isHorizontalRotate = false;
                        stateObject.x > 0 ? _rotationAngle++ : _rotationAngle--;

                        var target = BABYLON.Quaternion.FromRotationMatrix(BABYLON.Matrix.RotationY(angle * _rotationAngle));
                        vrHelper.currentVRCamera.rotationQuaternion = target
                    } else if (Math.abs(stateObject.x) < 0.8) {
                        isHorizontalRotate = true
                    }
                }
            });
        });

        const box = scene.getMeshByName('Box')

        var time = 0.0;
        engine.runRenderLoop(() => {
            box.material.setFloat('time', time);
            scene.render();

            time += 0.01;
        });

        window.addEventListener('resize', function () {
            engine.resize();
        });
    </script>
</body>

</html>
index.html を書き換えたら、http://localhost:3000 にアクセスします。
console.log で波形データを出力しているため、開発者を開き出力について確認出来るようにします ![]()
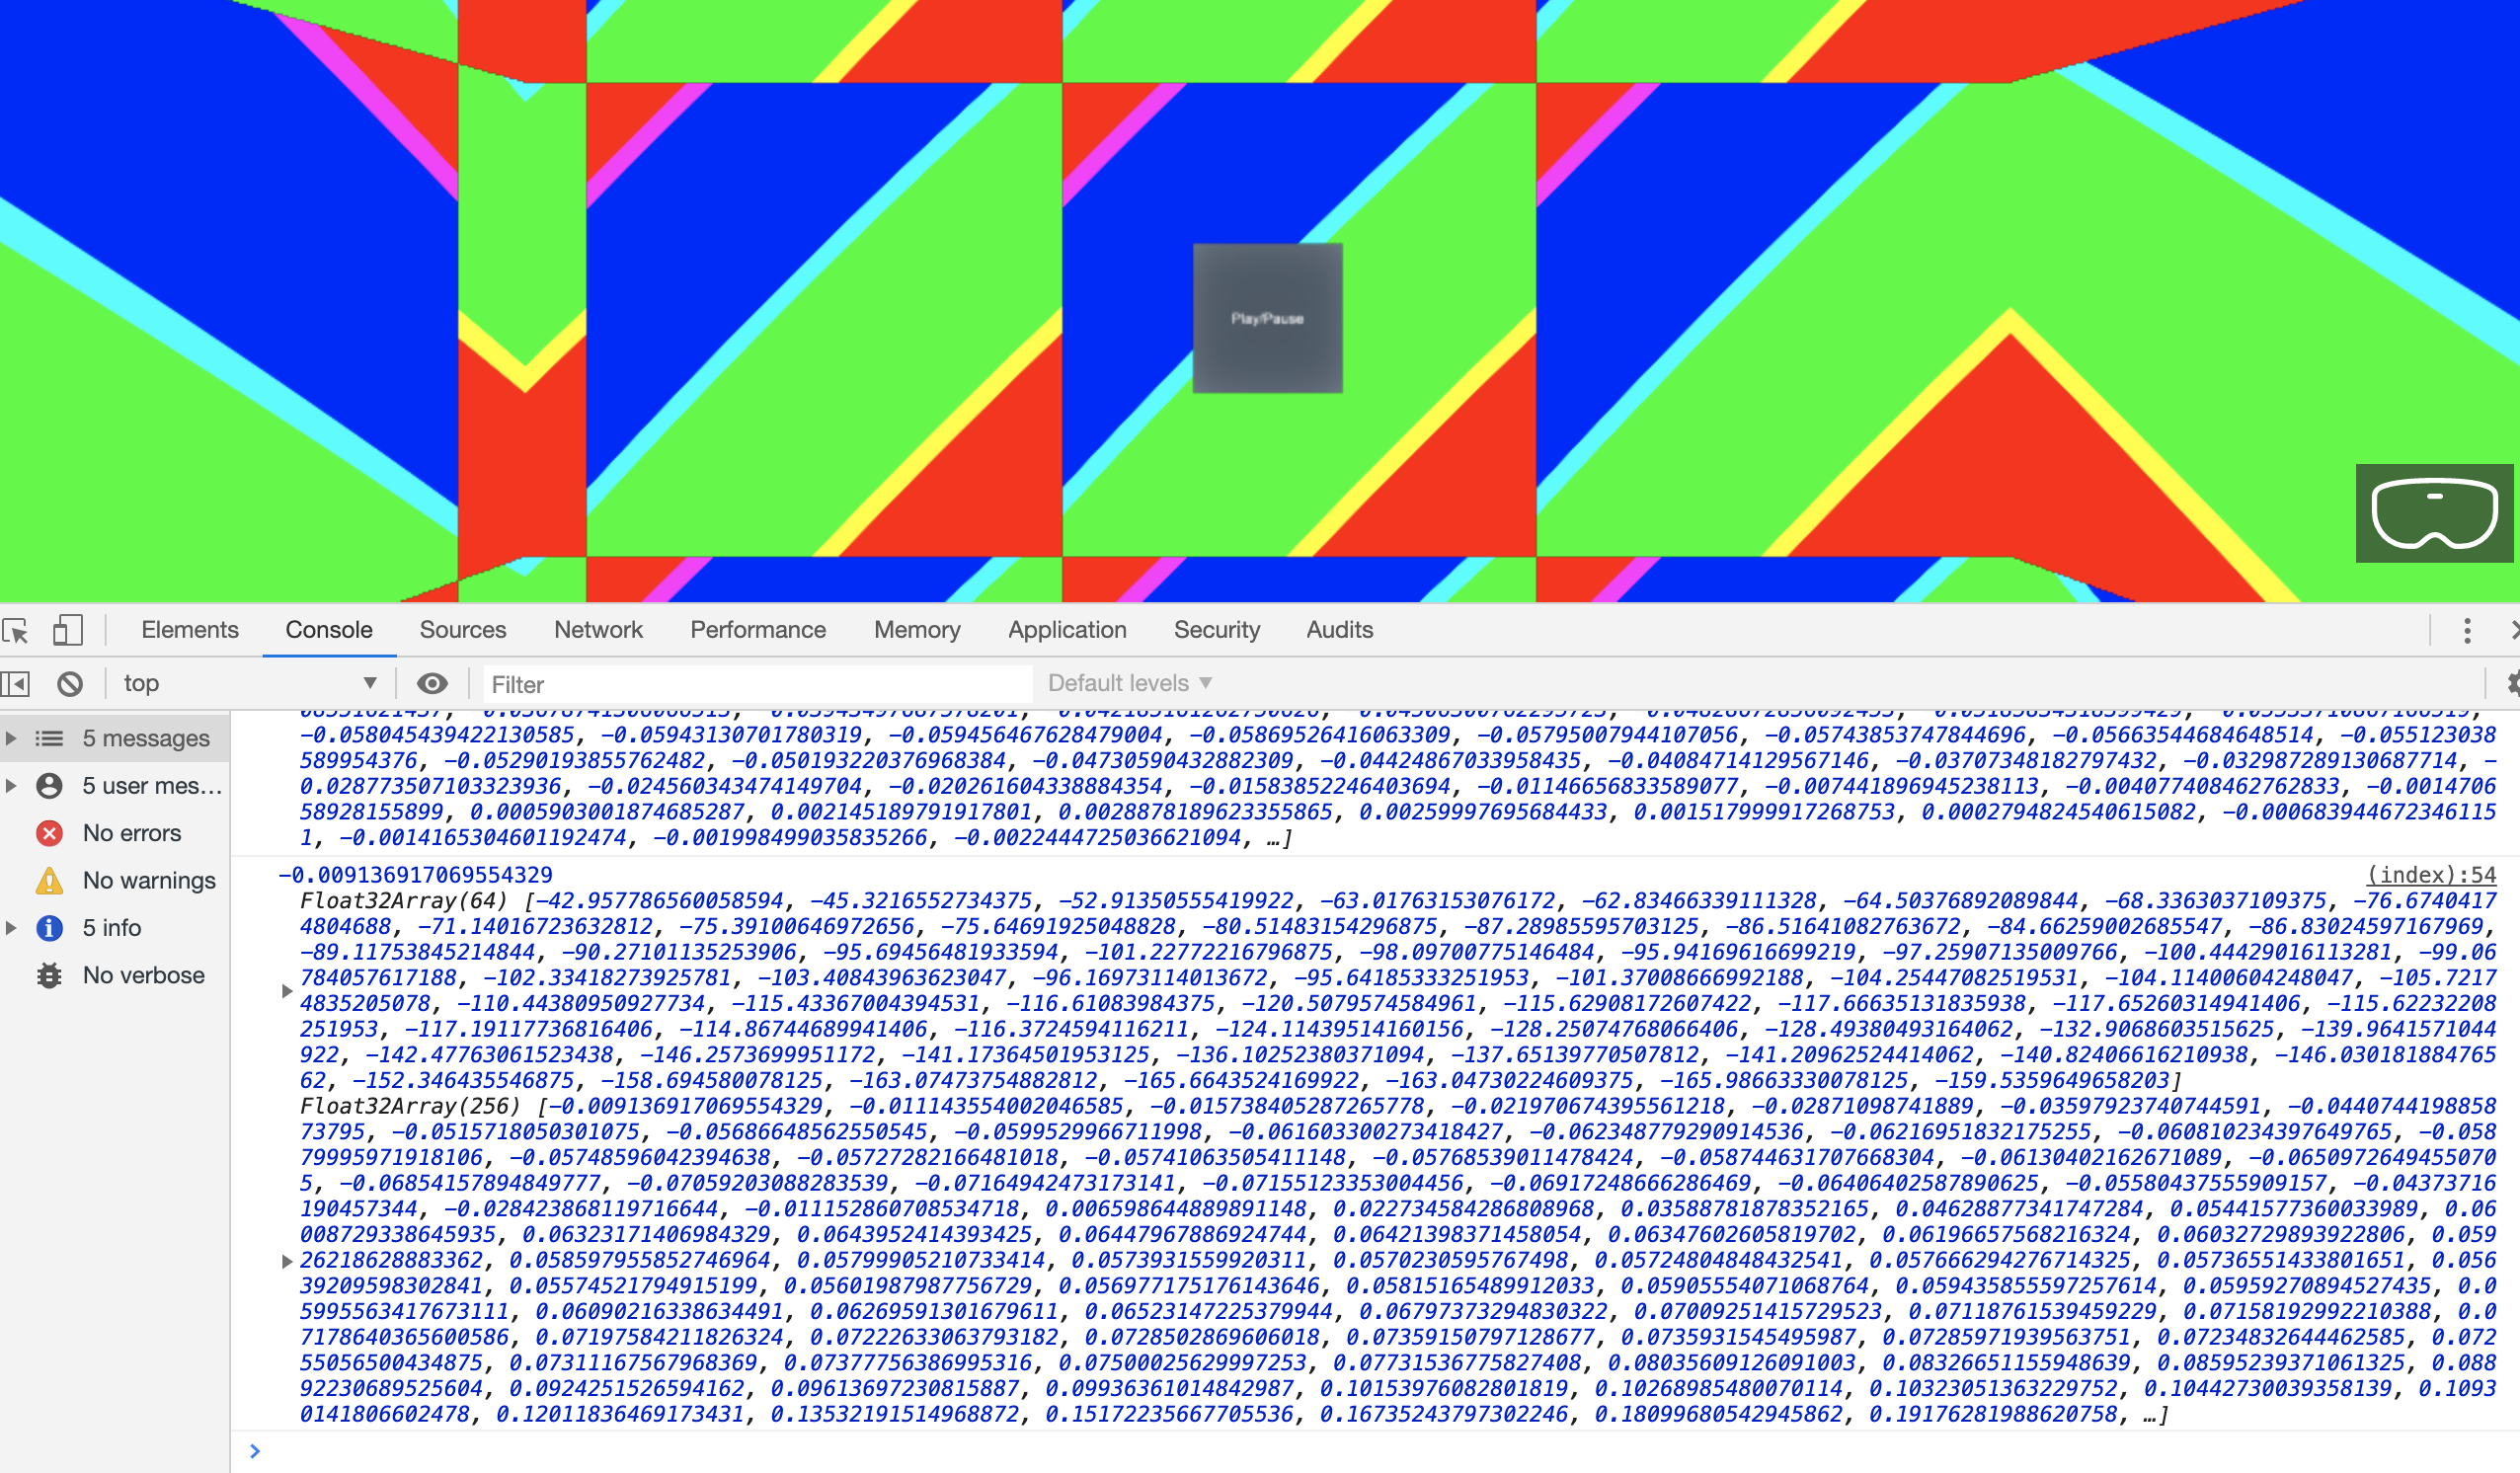
謎の小数が大量に表示されていれば成功です ![]()
これらの値は音楽の再生状況に応じて刻々と変化していきます ![]()
解析データを元にオブジェクトやシェーダーの値を変化させることで、
音楽にマッチした効果を VR 空間上に取り入れる事が可能となります ![]()
2. Tone.js で波形解析したデータを元に VR空間が盛り上がる仕掛けを作る
波形解析は出来たので、あとはフィーリングで VR クラブの中が盛り上がりそうな仕掛けを盛り込んでいきましょう ![]()
![]()
1. 音の強さに応じて立方体を躍動させる
まずは、音の強さに応じて立方体を躍動させてみたいと思います ![]()
先程の index.html 内にあった Tone.Meter を使用して実現します ![]()
<!DOCTYPE html>
<html>

<head>
    <meta http-equiv="Content-Type" content="text/html" charset="utf-8" />
    <title>Babylon Club</title>
    <script src="https://cdn.babylonjs.com/babylon.js"></script>
    <script src="https://cdn.babylonjs.com/gui/babylon.gui.min.js"></script>
    <script src="https://cdnjs.cloudflare.com/ajax/libs/tone/13.8.18/Tone.min.js"></script>
    <style>
        html,
        body {
            overflow: hidden;
            width: 100%;

            height: 100%;
            margin: 0;
            padding: 0;
        }

        #renderCanvas {
            width: 100%;
            height: 100%;
            touch-action: none;
        }
    </style>
</head>

<body>
    <canvas id="renderCanvas"></canvas>
    <script>
        const canvas = document.getElementById('renderCanvas');
        const engine = new BABYLON.Engine(canvas, true);

        // 音楽の入力信号を RMS で取得出来るようにする
        const meter = new Tone.Meter('level');

        // 音楽の波形をフーリエ変換して音の高さごとのスペクトラムを取得する
        // 音の高低の強さが getValue 関数を使用すると配列として取得出来るイメージ
        // 引数の 64 は分解能 (高低の分割数) を指す
        const fft = new Tone.Analyser('fft', 64);

        // ↓ のような音楽の波形を取得する
        // https://info.shimamura.co.jp/digital/knowledge/2014/03/19260/2
        // 引数の 256 は分割数を (波形の分割数) を指す
        const waveform = new Tone.Analyser('waveform', 256);

        const player = new Tone.Player({
            url: '/audio/music.mp3',
            loop: true,
        }).connect(meter).fan(fft, waveform).toMaster();

        const onPlayPauseButtonClicked = () => {
            if (player.loaded) {
                if (player.state == 'started') {
                    player.stop()
                } else {
                    player.start()
                }
            }
        }

        const createScene = () => {
            const scene = new BABYLON.Scene(engine);

            const camera = new BABYLON.FreeCamera('MainCamera', new BABYLON.Vector3(0, 0, 0), scene);
            camera.setTarget(BABYLON.Vector3.Zero());
            camera.attachControl(canvas, true);

            const box = BABYLON.MeshBuilder.CreateBox('Box', { size: 20, sideOrientation: BABYLON.Mesh.BACKSIDE }, scene);
            box.position = BABYLON.Vector3.Zero();

            const shaderMaterial = new BABYLON.ShaderMaterial('Floor', scene, './shaders/floor');
            box.material = shaderMaterial;

            const light = new BABYLON.HemisphericLight('AmbientLight', new BABYLON.Vector3(0, 0, 0), scene);

            const manager = new BABYLON.GUI.GUI3DManager(scene);
            const playPauseButton = new BABYLON.GUI.HolographicButton('PlayPauseButton');
            manager.addControl(playPauseButton);

            playPauseButton.position.y = -0.2;
            playPauseButton.position.z = -5;

            playPauseButton.mesh.rotate(BABYLON.Axis.Y, Math.PI, BABYLON.Space.WORLD);

            playPauseButton.text = "Play/Pause";
            playPauseButton.onPointerUpObservable.add(onPlayPauseButtonClicked);

            // Tone.Meter の値を元に躍動する立方体 MeterBox を作成する
            // 初期位置は原点から 10m 頭上の場所に設置
            const meterBox = BABYLON.MeshBuilder.CreateBox('MeterBox', { size: 1 }, scene);
            meterBox.position = new BABYLON.Vector3(0, 10, 0);

            // MeterBox をカッコよく見せるための各種カラー設定を行うための Material 作成
            const meterBoxMaterial = new BABYLON.StandardMaterial('MeterBoxMaterial', scene);

            // MeterBox の表面色の設定
            meterBoxMaterial.diffuseColor = new BABYLON.Color3(1, 0, 0);

            // 特定の方向から来る光を MeterBox が反射するための設定
            meterBoxMaterial.specularColor = new BABYLON.Color3(0.5, -0.5, 0.7);

            // MeterBox 自身が発光する光の設定
            meterBoxMaterial.emissiveColor = new BABYLON.Color3(0.6, 0.7, 0.8);

            // 全体的な MeterBox の明るさ設定
            meterBoxMaterial.ambientColor = new BABYLON.Color3(1, 1, 1);

            meterBox.material = meterBoxMaterial;

            return scene;
        }

        const scene = createScene();

        const vrHelper = scene.createDefaultVRExperience();
        vrHelper.enableInteractions();

        var _rotationAngle = 0;
        vrHelper.onControllerMeshLoaded.add((webVRController) => {
            var isHorizontalRotate = false;
            const angle = Math.PI / 4;
            webVRController.onPadValuesChangedObservable.add((stateObject) => {
                if (webVRController.hand === 'left') {
                    const matrix = new BABYLON.Matrix();
                    const deviceRotationQuaternion = vrHelper.currentVRCamera.rotationQuaternion;
                    BABYLON.Matrix.FromQuaternionToRef(deviceRotationQuaternion, matrix);

                    const move = new BABYLON.Vector3(stateObject.x * moveSpeed, 0, -stateObject.y * moveSpeed);
                    const addPos = BABYLON.Vector3.TransformCoordinates(move, matrix);
                    vrHelper.position = vrHelper.position.add(addPos);
                } else {
                    if (isHorizontalRotate && Math.abs(stateObject.x) > 0.8) {
                        isHorizontalRotate = false;
                        stateObject.x > 0 ? _rotationAngle++ : _rotationAngle--;

                        var target = BABYLON.Quaternion.FromRotationMatrix(BABYLON.Matrix.RotationY(angle * _rotationAngle));
                        vrHelper.currentVRCamera.rotationQuaternion = target
                    } else if (Math.abs(stateObject.x) < 0.8) {
                        isHorizontalRotate = true
                    }
                }
            });
        });

        const box = scene.getMeshByName('Box')

        // Tone.Meter の値に応じて変化する MeterBox の Mesh 取得
        const meterBox = scene.getMeshByName('MeterBox')

        var time = 0.0;
        engine.runRenderLoop(() => {
            box.material.setFloat('time', time);
            scene.render();

            // Tone.Meter で取得した値を元に MeterBox のスケールを最大で 15倍にする
            const rms = meter.getValue() * 14 + 1;
            meterBox.scaling = new BABYLON.Vector3(rms, rms, rms);

            // 常に X軸方向と Y軸方向に回転させておく設定
            meterBox.rotation.x += 0.01;
            meterBox.rotation.y += 0.01;

            time += 0.01;
        });

        window.addEventListener('resize', function () {
            engine.resize();
        });
    </script>
</body>

</html>
http://localhost:3000 にアクセスしてみます ![]()
頭上で躍動している立方体の存在が確認出来ていれば OK です ![]()
2. 音の高低に応じて地面を躍動させる
次に Tone.Analyser('fft', 64) で取得した音の高低スペクトラムを使用して、
地面を音の高低に応じて動的に躍動させるようにしてみます ![]()
<!DOCTYPE html>
<html>

<head>
    <meta http-equiv="Content-Type" content="text/html" charset="utf-8" />
    <title>Babylon Club</title>
    <script src="https://cdn.babylonjs.com/babylon.js"></script>
    <script src="https://cdn.babylonjs.com/gui/babylon.gui.min.js"></script>
    <script src="https://cdnjs.cloudflare.com/ajax/libs/tone/13.8.18/Tone.min.js"></script>
    <style>
        html,
        body {
            overflow: hidden;
            width: 100%;

            height: 100%;
            margin: 0;
            padding: 0;
        }

        #renderCanvas {
            width: 100%;
            height: 100%;
            touch-action: none;
        }
    </style>
</head>

<body>
    <canvas id="renderCanvas"></canvas>
    <script>
        const canvas = document.getElementById('renderCanvas');
        const engine = new BABYLON.Engine(canvas, true);

        // 音楽の入力信号を RMS で取得出来るようにする
        const meter = new Tone.Meter('level');

        // 音楽の波形をフーリエ変換して音の高さごとのスペクトラムを取得する
        // 音の高低の強さが getValue 関数を使用すると配列として取得出来るイメージ
        // 引数の 64 は分解能 (高低の分割数) を指す
        const fft = new Tone.Analyser('fft', 64);

        // ↓ のような音楽の波形を取得する
        // https://info.shimamura.co.jp/digital/knowledge/2014/03/19260/2
        // 引数の 256 は分割数を (波形の分割数) を指す
        const waveform = new Tone.Analyser('waveform', 256);

        const player = new Tone.Player({
            url: '/audio/music.mp3',
            loop: true,
        }).connect(meter).fan(fft, waveform).toMaster();

        const onPlayPauseButtonClicked = () => {
            if (player.loaded) {
                if (player.state == 'started') {
                    player.stop()
                } else {
                    player.start()
                }
            }
        }

        const createScene = () => {
            const scene = new BABYLON.Scene(engine);

            const camera = new BABYLON.FreeCamera('MainCamera', new BABYLON.Vector3(0, 0, 0), scene);
            camera.setTarget(BABYLON.Vector3.Zero());
            camera.attachControl(canvas, true);

            const box = BABYLON.MeshBuilder.CreateBox('Box', { size: 20, sideOrientation: BABYLON.Mesh.BACKSIDE }, scene);
            box.position = BABYLON.Vector3.Zero();

            const shaderMaterial = new BABYLON.ShaderMaterial('Floor', scene, './shaders/floor');
            box.material = shaderMaterial;

            const light = new BABYLON.HemisphericLight('AmbientLight', new BABYLON.Vector3(0, 0, 0), scene);

            const manager = new BABYLON.GUI.GUI3DManager(scene);
            const playPauseButton = new BABYLON.GUI.HolographicButton('PlayPauseButton');
            manager.addControl(playPauseButton);

            playPauseButton.position.y = -0.2;
            playPauseButton.position.z = -5;

            playPauseButton.mesh.rotate(BABYLON.Axis.Y, Math.PI, BABYLON.Space.WORLD);

            playPauseButton.text = "Play/Pause";
            playPauseButton.onPointerUpObservable.add(onPlayPauseButtonClicked);

            const meterBox = BABYLON.MeshBuilder.CreateBox('MeterBox', { size: 1 }, scene);
            meterBox.position = new BABYLON.Vector3(0, 10, 0);

            const meterBoxMaterial = new BABYLON.StandardMaterial('MeterBoxMaterial', scene);

            meterBoxMaterial.diffuseColor = new BABYLON.Color3(1, 0, 0);
            meterBoxMaterial.specularColor = new BABYLON.Color3(0.5, -0.5, 0.7);
            meterBoxMaterial.emissiveColor = new BABYLON.Color3(0.6, 0.7, 0.8);
            meterBoxMaterial.ambientColor = new BABYLON.Color3(1, 1, 1);

            meterBox.material = meterBoxMaterial;

            // 表面が赤色のマテリアルを作成する
            const redMaterial = new BABYLON.StandardMaterial(scene);
            redMaterial.diffuseColor = new BABYLON.Color3(1.0, 0, 0);

            // 表面が緑色のマテリアルを作成する
            const greenMaterial = new BABYLON.StandardMaterial(scene);
            greenMaterial.diffuseColor = new BABYLON.Color3(0, 1.0, 0);

            // 表面が青色のマテリアルを作成する
            const blueMaterial = new BABYLON.StandardMaterial(scene);
            blueMaterial.diffuseColor = new BABYLON.Color3(0, 0, 1.0);

            // Tone.Analyser('fft', 64) で分解能が 64 のため、64 個のメッシュで床を作成する
            const iteration = 8; // 8 * 8 = 64 (fft.size);
            for (var i = 0; i < iteration; i++) {
                for (var j = 0; j < iteration; j++) {
                    // VR クラブのサイズを取得 (x, y, z 同サイズの立方体のため適当に x のサイズを取得)
                    const boxSize = box.getBoundingInfo().boundingBox.extendSize.x;

                    // VR クラブのサイズを分割して 64 個のメッシュが敷き詰められるように、
                    // 各メッシュのポジションの x と z の値を算出する
                    const splitSize = boxSize / iteration;
                    const splitX = splitSize * i * 2 - boxSize + 1;
                    const splitZ = splitSize * j * 2 - boxSize + 1;

                    // 今回はシリンダーを敷き詰めて床にする
                    // 各シリンダーは算出した x と z の位置に配置していく
                    const groundCylinder = BABYLON.MeshBuilder.CreateCylinder('GroundCylinder', { size: 1 }, scene);
                    groundCylinder.position = new BABYLON.Vector3(splitX, -8, splitZ);
                    groundCylinder.scaling = new BABYLON.Vector3(2, 2, 2);

                    // 何番目に作成したシリンダーかを判定して、
                    // 赤緑青の三色で各シリンダーの色を規則的に設定する
                    const no = (i * iteration + j) % 3;
                    switch (no) {
                        case 0: groundCylinder.material = redMaterial; break;
                        case 1: groundCylinder.material = greenMaterial; break;
                        case 2: groundCylinder.material = blueMaterial; break;
                    }
                }
            }

            return scene;
        }

        const scene = createScene();

        const vrHelper = scene.createDefaultVRExperience();
        vrHelper.enableInteractions();

        var _rotationAngle = 0;
        vrHelper.onControllerMeshLoaded.add((webVRController) => {
            var isHorizontalRotate = false;
            const angle = Math.PI / 4;
            webVRController.onPadValuesChangedObservable.add((stateObject) => {
                if (webVRController.hand === 'left') {
                    const matrix = new BABYLON.Matrix();
                    const deviceRotationQuaternion = vrHelper.currentVRCamera.rotationQuaternion;
                    BABYLON.Matrix.FromQuaternionToRef(deviceRotationQuaternion, matrix);

                    const move = new BABYLON.Vector3(stateObject.x * moveSpeed, 0, -stateObject.y * moveSpeed);
                    const addPos = BABYLON.Vector3.TransformCoordinates(move, matrix);
                    vrHelper.position = vrHelper.position.add(addPos);
                } else {
                    if (isHorizontalRotate && Math.abs(stateObject.x) > 0.8) {
                        isHorizontalRotate = false;
                        stateObject.x > 0 ? _rotationAngle++ : _rotationAngle--;

                        var target = BABYLON.Quaternion.FromRotationMatrix(BABYLON.Matrix.RotationY(angle * _rotationAngle));
                        vrHelper.currentVRCamera.rotationQuaternion = target
                    } else if (Math.abs(stateObject.x) < 0.8) {
                        isHorizontalRotate = true
                    }
                }
            });
        });

        const box = scene.getMeshByName('Box')
        const meterBox = scene.getMeshByName('MeterBox')
        const groundCylinders = scene.getMeshesByID('GroundCylinder')

        var time = 0.0;
        engine.runRenderLoop(() => {
            box.material.setFloat('time', time);
            scene.render();

            const rms = meter.getValue() * 14 + 1;
            meterBox.scaling = new BABYLON.Vector3(rms, rms, rms);

            meterBox.rotation.x += 0.01;
            meterBox.rotation.y += 0.01;

            // 音楽が再生されていれば音の高低の強さに応じて
            // 各シリンダー(床) を上下に躍動させる
            if (player.state == 'started') {
                const fftValues = fft.getValue();
                for (var i = 0; i < fft.size; i++) {
                    groundCylinders[i].position.y = fftValues[i] * 0.05;
                }
            }

            time += 0.01;
        });

        window.addEventListener('resize', function () {
            engine.resize();
        });
    </script>
</body>

</html>
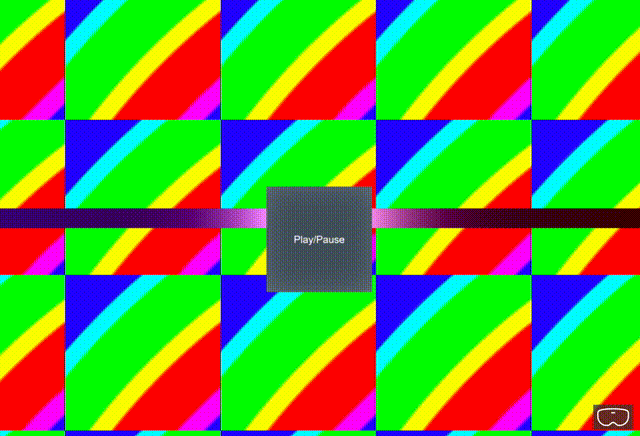
http://localhost:3000 にアクセスしてみます ![]()

![]() のように音楽に合わせて床が躍動していれば成功です
のように音楽に合わせて床が躍動していれば成功です ![]()
![]()
Tone.js で取得した音楽の波形を元にパーティクルを発生させる
Babylon.js には [Solid Particle System (SPS)] (https://doc.babylonjs.com/how_to/solid_particle_system) という仕組みが備わっており、
Mesh をパーティクルとして扱うことが可能です ![]()
今回は SPS を使用して、よりパーティー感のある演出を入れていきます ![]()
具体的に言うと SPS を使用して波形の形を表現してみたいと思います ![]()
<!DOCTYPE html>
<html>

<head>
    <meta http-equiv="Content-Type" content="text/html" charset="utf-8" />
    <title>Babylon Club</title>
    <script src="https://cdn.babylonjs.com/babylon.js"></script>
    <script src="https://cdn.babylonjs.com/gui/babylon.gui.min.js"></script>
    <script src="https://cdnjs.cloudflare.com/ajax/libs/tone/13.8.18/Tone.min.js"></script>

    <style>
        html,
        body {
            overflow: hidden;
            width: 100%;

            height: 100%;
            margin: 0;
            padding: 0;
        }

        #renderCanvas {
            width: 100%;
            height: 100%;
            touch-action: none;
        }
    </style>
</head>

<body>
    <canvas id="renderCanvas"></canvas>
    <script>
        const canvas = document.getElementById('renderCanvas');
        const engine = new BABYLON.Engine(canvas, true);

        // 音楽の入力信号を RMS で取得出来るようにする
        const meter = new Tone.Meter('level');

        // 音楽の波形をフーリエ変換して音の高さごとのスペクトラムを取得する
        // 音の高低の強さが getValue 関数を使用すると配列として取得出来るイメージ
        // 引数の 64 は分解能 (高低の分割数) を指す
        const fft = new Tone.Analyser('fft', 64);

        // ↓ のような音楽の波形を取得する
        // https://info.shimamura.co.jp/digital/knowledge/2014/03/19260/2
        // 引数の 256 は分割数を (波形の分割数) を指す
        const waveform = new Tone.Analyser('waveform', 256);

        const player = new Tone.Player({
            url: '/audio/music.mp3',
            loop: true,
        }).connect(meter).fan(fft, waveform).toMaster();

        const onPlayPauseButtonClicked = () => {
            if (player.loaded) {
                if (player.state == 'started') {
                    player.stop()
                } else {
                    player.start()
                }
            }
        }

        const createScene = () => {
            const scene = new BABYLON.Scene(engine);

            const camera = new BABYLON.FreeCamera('MainCamera', new BABYLON.Vector3(0, 0, 0), scene);
            camera.setTarget(BABYLON.Vector3.Zero());
            camera.attachControl(canvas, true);

            const box = BABYLON.MeshBuilder.CreateBox('Box', { size: 20, sideOrientation: BABYLON.Mesh.BACKSIDE }, scene);
            box.position = BABYLON.Vector3.Zero();

            const shaderMaterial = new BABYLON.ShaderMaterial('Floor', scene, './shaders/floor');
            box.material = shaderMaterial;

            const light = new BABYLON.HemisphericLight('AmbientLight', new BABYLON.Vector3(0, 0, 0), scene);

            const manager = new BABYLON.GUI.GUI3DManager(scene);
            const playPauseButton = new BABYLON.GUI.HolographicButton('PlayPauseButton');
            manager.addControl(playPauseButton);

            playPauseButton.position.y = -0.2;
            playPauseButton.position.z = -5;

            playPauseButton.mesh.rotate(BABYLON.Axis.Y, Math.PI, BABYLON.Space.WORLD);

            playPauseButton.text = "Play/Pause";
            playPauseButton.onPointerUpObservable.add(onPlayPauseButtonClicked);

            const meterBox = BABYLON.MeshBuilder.CreateBox('MeterBox', { size: 1 }, scene);
            meterBox.position = new BABYLON.Vector3(0, 7, 0);

            const meterBoxMaterial = new BABYLON.StandardMaterial('MeterBoxMaterial', scene);

            meterBoxMaterial.diffuseColor = new BABYLON.Color3(1, 0, 0);
            meterBoxMaterial.specularColor = new BABYLON.Color3(0.5, -0.5, 0.7);
            meterBoxMaterial.emissiveColor = new BABYLON.Color3(0.6, 0.7, 0.8);
            meterBoxMaterial.ambientColor = new BABYLON.Color3(1, 1, 1);

            meterBox.material = meterBoxMaterial;

            const redMaterial = new BABYLON.StandardMaterial(scene);
            redMaterial.diffuseColor = new BABYLON.Color3(1.0, 0, 0);

            const greenMaterial = new BABYLON.StandardMaterial(scene);
            greenMaterial.diffuseColor = new BABYLON.Color3(0, 1.0, 0);

            const blueMaterial = new BABYLON.StandardMaterial(scene);
            blueMaterial.diffuseColor = new BABYLON.Color3(0, 0, 1.0);

            const boxSize = box.getBoundingInfo().boundingBox.extendSize.x;

            const iteration = 8; // 8 * 8 = 64 (fft.size);
            for (var i = 0; i < iteration; i++) {
                for (var j = 0; j < iteration; j++) {
                    const splitSize = boxSize / iteration;
                    const splitX = splitSize * i * 2 - boxSize + 1;
                    const splitZ = splitSize * j * 2 - boxSize + 1;

                    const groundCylinder = BABYLON.MeshBuilder.CreateCylinder('GroundCylinder', { size: 1 }, scene);
                    groundCylinder.position = new BABYLON.Vector3(splitX, -10, splitZ);
                    groundCylinder.scaling = new BABYLON.Vector3(2, 2, 2);

                    const no = (i * iteration + j) % 3;
                    switch (no) {
                        case 0: groundCylinder.material = redMaterial; break;
                        case 1: groundCylinder.material = greenMaterial; break;
                        case 2: groundCylinder.material = blueMaterial; break;
                    }
                }
            }

            return scene;
        }

        const scene = createScene();

        const vrHelper = scene.createDefaultVRExperience();
        vrHelper.enableInteractions();

        var _rotationAngle = 0;
        vrHelper.onControllerMeshLoaded.add((webVRController) => {
            var isHorizontalRotate = false;
            const angle = Math.PI / 4;
            webVRController.onPadValuesChangedObservable.add((stateObject) => {
                if (webVRController.hand === 'left') {
                    const matrix = new BABYLON.Matrix();
                    const deviceRotationQuaternion = vrHelper.currentVRCamera.rotationQuaternion;
                    BABYLON.Matrix.FromQuaternionToRef(deviceRotationQuaternion, matrix);

                    const move = new BABYLON.Vector3(stateObject.x * moveSpeed, 0, -stateObject.y * moveSpeed);
                    const addPos = BABYLON.Vector3.TransformCoordinates(move, matrix);
                    vrHelper.position = vrHelper.position.add(addPos);
                } else {
                    if (isHorizontalRotate && Math.abs(stateObject.x) > 0.8) {
                        isHorizontalRotate = false;
                        stateObject.x > 0 ? _rotationAngle++ : _rotationAngle--;

                        var target = BABYLON.Quaternion.FromRotationMatrix(BABYLON.Matrix.RotationY(angle * _rotationAngle));
                        vrHelper.currentVRCamera.rotationQuaternion = target
                    } else if (Math.abs(stateObject.x) < 0.8) {
                        isHorizontalRotate = true
                    }
                }
            });
        });

        const box = scene.getMeshByName('Box')
        const meterBox = scene.getMeshByName('MeterBox')
        const groundCylinders = scene.getMeshesByID('GroundCylinder')

        var time = 0.0;
        engine.runRenderLoop(() => {
            box.material.setFloat('time', time);

            const rms = meter.getValue() * 14 + 1;
            meterBox.scaling = new BABYLON.Vector3(rms, rms, rms);

            meterBox.rotation.x += 0.01;
            meterBox.rotation.y += 0.01;

            if (player.state == 'started') {
                const fftValues = fft.getValue();

                for (var i = 0; i < fft.size; i++) {
                    groundCylinders[i].position.y = fftValues[i] * 0.05;
                }
            }

            scene.render();
            time += 0.01;
        });

        // Solid Particle System (SPS) の使用を宣言する
        const SPS = new BABYLON.SolidParticleSystem('SPS', scene);

        // ビルボードを有効にする (負荷軽減のため)
        // http://nn-hokuson.hatenablog.com/entry/2017/03/24/211211
        SPS.billboard = true;

        // パーティクル自体は回転させず、カラーもテクスチャのアップデートしない (負荷軽減のため)
        SPS.computeParticleRotation = false;
        SPS.computeParticleColor = false;
        SPS.computeParticleTexture = false;

        // 波形を可視化するために使用する平面 WaveformPlain をサイズ 0.1m で作成する
        const waveformPlane = BABYLON.Mesh.CreatePlane('WaveformPlain', 0.1, scene)

        const boxSize = box.getBoundingInfo().boundingBox.extendSize.x;

        // SPS で平面 WaveformPlain を波形解析の分解能 (256個) 扱えるようにする
        // 各平面は VR クラブ内の横幅いっぱいになるように配置される
        // 波形の様子が見やすくするように平面群はカメラの正面に配置して、
        // 縦幅を 3倍にして、色を配置場所に応じて変化させている
        SPS.addShape(waveformPlane, waveform.size, {
            positionFunction: function (particle, i, s) {
                particle.position.x = (s / waveform.size) * boxSize * 2 - boxSize;
                particle.position.z = -8;
                particle.scaling.y = 3.0

                particle.color = new BABYLON.Color4(
                    particle.position.y / boxSize + 0.5,
                    particle.position.z / boxSize + 0.5,
                    particle.position.x / boxSize + 0.5,
                    1.0
                );
            }
        });

        // WaveformPlain はもう使用しないため破棄する
        waveformPlane.dispose();

        // SPS に追加した平面群を扱う Mesh を作成する
        const spsMesh = SPS.buildMesh();

        // SPS のパーティクルアップデート前に
        // パーティクルを変化させるのに使用する波形データを
        // waveformValues 変数に保持しておく
        // (updateParticle で waveform.getValue() を大量に実行したくないため)
        var waveformValues;
        SPS.beforeUpdateParticles = function () {
            waveformValues = waveform.getValue();
        }

        // SPS のパーティクルを全てアップデートする
        SPS.updateParticle = function (particle) {
            // パーティクルのグローバルインデックスは idx という変数で取得可能
            const waveformValue = waveformValues[particle.idx]
            particle.position.x = (particle.idx / waveform.size) * boxSize * 2 - boxSize;

            // 波を表現するためにパーティクルの位置 Y を波形に合わせて上下させる
            particle.position.y = waveformValue * boxSize;

            particle.color = new BABYLON.Color4(
                particle.position.y / boxSize + 0.5,
                particle.position.z / boxSize + 0.5,
                particle.position.x / boxSize + 0.5,
                1.0
            );
        }

        // シーンのレンダリング前に SPS で管理している
        // パーティクルをアップデートする (SPS.updateParticle が呼ばれる)
        scene.registerBeforeRender(() => {
            SPS.setParticles();
        })

        window.addEventListener('resize', function () {
            engine.resize();
        });
    </script>
</body>

</html>
http://localhost:3000 にアクセスしてみます ![]()
音楽を再生した時に目の前の平面の行列が波形っぽく動いていれば成功です ![]()
ある程度音楽に合わせた演出が出来てきたので、実際に Quest で見てみましょう ![]()
Quest で動作確認する
それでは 前回と同様の手順 で現状の VR クラブ内の様子を Quest で確認します ![]()
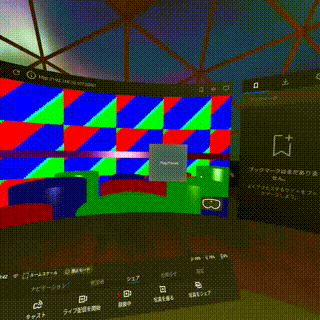
無事に Quest 内でも見られました ![]()
![]()
多少パフォーマンスにも気を使いながら改修してきたので、
Quest でもちゃんと FPS は安定して出てるように感じました ![]()
Quest で見た感じ躍動する床のシリンダーがそれなりに迫力ありましたが、
目の前の波形や頭上の躍動する立方体はそれっぽい感があるだけで
あまり迫力や臨場感は感じませんでした ![]()
おわりに
今回は Tone.js を使って実際に音楽にマッチした演出を導入してみました ![]()
本当は波形解析したデータを利用して、更にダイナミックな演出を取り入れる予定だったのですが、
めちゃくちゃ本質とは関係ないところで時間を食ってしまいそうだったため断念しました ![]()
![]()
次回は折角 Tone.js を使用しているので音楽にリバーブ掛けてみたり、
ユーザが何らかのアクションを起こすと音楽に介入できる仕組みを作る予定です ![]()