みなさんこんにちは。
昔clamav使ったファイルのウイルススキャンをやったことがあって、それを思い出そうと思って適当なライブラリを作ったのですが、本当に適当すぎる作りになっちゃって、いや、これこのままだとさすがに恥ずかしすぎるやろ、って思いまして、ちょいと手直しすることにしたのです。
手直ししているときに、どんなふうに直すか、だけでなく、どんな風に使ってもらえるかを考えていたら、やっぱりinterface用意しておくのが都合がいいね、って感じになりました。
というわけで、interface を使ってよりユーザフレンドりーなライブラリを目指してみましょう。
interface
はじめにinterfaceの解説をするので、不要な人は飛ばしてください。
interfaceとは
PHPにおいてinterfaceとは、あるクラスを定義するときに必要な公開メソッドをまとめたもの、です。
こんな風に書きます。
<?php

interface Sequence
{

    public function factorial(int $num): int;

    public function permutation(int $num, int $factors): int;
}
ここには、単純な階乗と順列の計算をするメソッドが定義されていますが、動作の中身はありません。中身は別に実装する必要があります。
<?php
require_once './Sequence.php';

class RecursiveSequence implements Sequence
{

    public function factorial(int $num): int
    {
        if ($num === 0) {
            return 1;
        }

        return $num * $this->factorial($num - 1);
    }

    public function permutation(int $num, int $factors): int
    {
        return $this->factorial($num) / $this->factorial($num - $factors);
    }
}
interfaceの中身を実装したクラスに対しては、implements Sequence のように書かきます。
このような class <class_name> implements <interface_name>と書いたとき、<class_name> は <interface_name> の実装であるといいます。
あとは、これを使うだけ。
<?php

require './Sequence.php';
require './RecursiveSequence.php';

$obj = new RecursiveSequence;

echo $obj->factorial(1), "\n";
echo $obj->factorial(3), "\n";
echo $obj->factorial(10), "\n";

echo $obj->permutation(3, 2), "\n";
echo $obj->permutation(5, 3), "\n";
echo $obj->permutation(10, 5), "\n";
動作させると
# php test.php
1
6
3628800
6
60
30240
となります。
interfaceの特徴
大雑把には以下のような特徴があります。
- 型宣言に使える
- interfaceをimplementsしたクラスは、interfaceで宣言したメソッドをすべて実装していないとエラーが出る
- interfaceも継承できる
- implementsに複数のinterfaceを指定できる
interfaceを型宣言に使える
普通のクラス名と同じく、interfaceも型宣言に使えます。
メソッドの返り値
<?php
require_once './Sequence.php';
require_once './RecursiveSequence.php';

class Factory
{
    public function create(): Sequence
    {
        return new RecursiveSequence;
    }
}
一方で、引数でも使えて
<?php

require './Sequence.php';
require './Factory.php';

$obj = (new Factory)->create();
test($obj);

function test(Sequence $obj)
{
    echo $obj->factorial(1), "\n";
    echo $obj->factorial(3), "\n";
    echo $obj->factorial(10), "\n";

    echo $obj->permutation(3, 2), "\n";
    echo $obj->permutation(5, 3), "\n";
    echo $obj->permutation(10, 5), "\n";
}
こんな風になります。
PHP7.4以降で追加されるプロパティの型宣言でも、interfaceを使うことができます。
<?php

require_once './Sequence.php';
require_once './RecursiveSequence.php';

class Some
{
    private Sequence $obj;

    public function __construct()
    {
        $this->obj = new RecursiveSequence;
    }

    public function getObj()
    {
        return $this->obj;
    }
}

$some = new Some;

echo get_class($some->getObj()), "\n";
// RecursiveSequence
宣言されたメソッドがそろっていないとエラー
interfaceをimplementsしたクラスは、すべてのメソッドを不足なく実装する必要があります。
以下のような場合はコンソールで実行するとエラーが出ます。
<?php

require_once './Sequence.php';

/**
 * Sequence の permutationが実装されていないパターンん
 */
class Dame1 implements Sequence
{
    public function factorial(int $num): int
    {
        return 1;
    }
}

$obj = new Dame1;
// Fatal error: Class Dame1 contains 1 abstract method and must therefore be declared abstract or implement the remaining methods (Sequence::permutation) in /var/www/dame1.php on line 5
<?php

require_once './Sequence.php';

/**
 * Sequence の permutationが実装されていないパターンん
 */
class Dame2 implements Sequence
{
    public function factorial(int $num): int
    {
        return 1;
    }

    public function permutation(int $num, int $factors): string
    {
        return "1";
    }
}

$obj = new Dame2;
// Fatal error: Declaration of Dame2::permutation(int $num, int $factors): string must be compatible with Sequence::permutation(int $num, int $factors): int in /var/www/dame2.php on line 15
継承できる
interfaceを継承することもできます。
別のクラスを継承しつつ、implementsを指定することもできます。
<?php

require_once './Sequence.php';
require_once './RecursiveSequence.php';

interface OtherSequence extends Sequence
{

}

class Test2 extends RecursiveSequence implements OtherSequence
{

}

$obj = new Test2;
echo $obj->permutation(10, 3), "\n";
// 720
implementsに複数のinterfaceを指定できる
クラス定義のimplementsには、複数のinterfaceを指定することができます。
<?php

interface Factorial
{
    public function factorial(int $num): int;
}

interface Permutation
{
    public function permutation(int $num, int $factors): int;
}

// 複数のinterfaceを実装できる
class Some implements Factorial, Permutation
{
    public function factorial(int $num): int
    {
        return 1;
    }

    public function permutation(int $num, int $factors): int
    {
        return 1;
    }
}

$some = new Some;

test($some);//  Factorial
test2($some);// Permutation

function test(Factorial $obj)
{
    echo 'Factorial', "\n";
}

function test2(Permutation $obj)
{
    echo 'Permutation', "\n";
}
ここでSomeは、FactorialであってPermutationでもあるということになります。
自作ライブラリにinterfaceを!
clamAVを使ったウイルススキャン
これですね。
https://github.com/niisan-tokyo/web-clamav-php/
前回の記事用に作ったリモートのclamdサーバにウイルススキャンしてもらうライブラリです。
https://qiita.com/niisan-tokyo/items/798c945ab4da26c31d16
旧実装の問題点
何が問題だったかって、ここですよね
$manager = new Niisan\ClamAV\Manager(['url' => 'clamav']);
このManagerの中身はリモートのclamdサーバにファイルを分割して投げるという、実装になっています。しかし、ウイルススキャンの方法は前回の記事でみたように、少なくとも2つはあります。
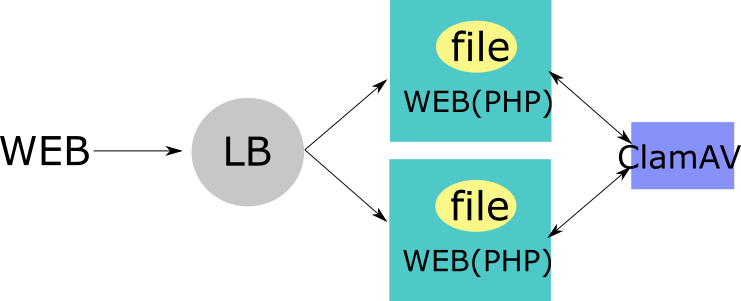
つまるところ、このようなManagerの実装をそのまま使うコードだと、別実装を使おうとしても、すべてのコードの中で、このManagerを使っている部分を探し出し、置き換え、さらに動作も初めから見直す必要があります。
さらに自作せにゃならんとなれば、その実装まではいるので、ことさら面倒です。
interfaceを使って実装の陰を消す
とりあえず、実装を直に使っている状況はよろしくないということで、interfaceを通して使うようにしましょう。interfaceを通しておけば、そのinterfaceでやりたいこと、つまり、存在するメソッドとその使い方がわかります。
今回はウイルススキャンなので、こんな感じに作ってみます。
<?php
namespace Niisan\ClamAV;

interface Scanner
{

    /**
     * Ping to scanner server or socket
     *
     * When the scan server is not connected,
     * throw RuntimeException.
     *
     * @return boolean
     * @throws \RuntimeException
     */
    public function ping() :bool;

    /**
     * Scan a file.
     *
     * When the file have some virus, this method return false,
     * otherwise return true.
     *
     * @param string $file_path
     * @return boolean
     */
    public function scan(string $file_path): bool;
}
接続確認のpingと、ファイルスキャンするscanがあればいいといった感じですね。
次にこれを生成するクラスとしてFactoryを実装します。
<?php
namespace Niisan\ClamAV;

use Niisan\ClamAV\Scanners\RemoteScanner;

class ScannerFactory
{
    public static function create(array $config): Scanner
    {
        return new RemoteScanner($config);
    }
}
createの返り値をScannerにしておきます。
さらに、前回作成したManagerとやらを、Scannerを実装したRemoteScannerとして定義しなおします。
<?php
namespace Niisan\ClamAV\Scanners;

use Generator;
use Niisan\ClamAV\Scanner;

class RemoteScanner implements Scanner
{

    private $port = 3310;
    private $url;

    public function __construct(array $option)
    {
        if (empty($option['url'])) {
            throw new \RuntimeException('ClamAV server host is not input.');
        }

        $this->url = $option['url'];
        $this->port = $option['port'] ?? $this->port;
    }

    /**
     * @inheritDoc
     */
    public function ping(): bool
    {
        // 何かの処理
        return true;
    }

    /**
     * @inheritDoc
     */
    public function scan(string $file_path): bool
    {
        // 何かの処理
        return $this->checkMessage($message, 'OK');
    }
}
そして、先にManagerをnewしていた部分をFactoryで置き換えます。
$scanner = \Niisan\ClamAV\ScannerFactory::create([
    'host' => 'example.com'
]);
一見して、newしていたところをScannerFactory::create()に変えただけですが、この関数の返り値の型がScannerとなっていますので、このコード中の$scannerは、とりあえずpingとscanが実装された何か、という状態になります。
実装を追加して好きなほうを選べるようにする
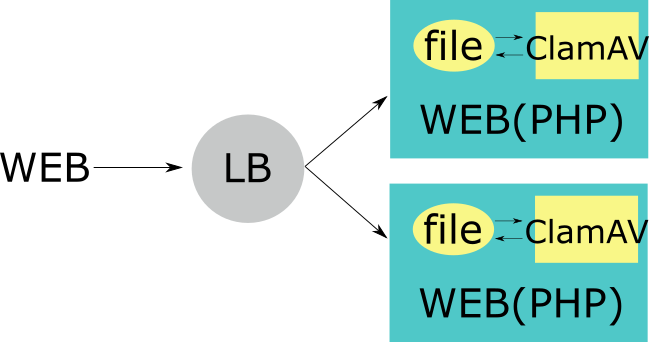
さて、このライブラリはリモートのclamdサーバを使うことを前提にしていましたが、サーバ一台しかないとかで同じサーバにclamdを動作させている場合もあると思い、それ用の実装を用意してみましょう。
<?php
namespace Niisan\ClamAV\Scanners;

use Niisan\ClamAV\Scanner;

class LocalScanner implements Scanner
{

    private $path;

    public function __construct(array $options = [])
    {
        if (! isset($options['path'])) {
            throw new \RuntimeException("Socket path not given, i.e. ['path' => /var/run/clamav/clamd.ctl");
        }

        $this->path = $options['path'];
    }

    /**
     * @inheritDoc
     */
    public function ping(): bool
    {
        // いろいろな実装
        return true;
    }

    /**
     * @inheritDoc
     */
    public function scan(string $file_path): bool
    {
        // いろいろな実装
        return $this->checkMessage($message, 'OK');
    }
この実装もScannerの実装になっているので、もともとあったRemoteScannerと同じように使えるはずです。
新しくできた実装を使うために、Factoryを改造します。
<?php
namespace Niisan\ClamAV;

use Niisan\ClamAV\Scanners\RemoteScanner;
use Niisan\ClamAV\Scanners\LocalScanner;

class ScannerFactory
{
    public static function create(array $config): Scanner
    {
        return ($config['driver'] === 'local') ? new LocalScanner($config): new RemoteScanner($config);
    }
}
あとは、Factoryを使っているところで
$scanner = \Niisan\ClamAV\ScannerFactory::create([
    'driver' => 'remote',
    'host' => 'example.com'
]);
こんな感じで使えます。
このFactoryからはLocalScannerとRemoteScannerの二つをとりうるわけですが、同じinterface Scanner の実装になっているので、少なくとも pingとscanのみを使っている限りは、使い方は保証されています。
最終的な使用法
この前とあまり変わらないですが、こんな感じです。
composer require niisan-tokyo/web-clamav-php:v0.2.1
でライブラリをインストールするなり更新するなりしてから
<!DOCTYPE html>
<head>
    <meta charset="utf-8" />
</head>
<body>
    <h1>ファイルを送信</h1>
    <form action="file.php" enctype="multipart/form-data" method="POST">
        <input type="file" name="upfile" /><br>
        <button type="submit" name="go">送信する</button>
    </form>
</body>
<?php
require 'vendor/autoload.php';

use Niisan\ClamAV\ScannerFactory;

$file = $_FILES['upfile'];

$scanner = ScannerFactory::create([
    'driver' => 'remote',
    'url' => 'clamav'
]);

$result = true;
if ($file) {
    $start = microtime(true);
    $result = $scanner->scan($file['tmp_name']);
    $resTime = microtime(true) - $start;
}

?>
<!DOCTYPE html>
<head>
    <meta charset="utf-8" />
</head>
<body>
<h1>問題<?php if ($result) {?> なし <?php } else {?> あり <?php } ?>!</h1>
時間: <?php echo $resTime ?><br>
    <a href="index.html">戻る</a>
</body>
でいけます。
もしも、ローカルのclamdサーバで使うときは
$scanner = ScannerFactory::create([
    'driver' => 'local',
    'path' => '/var/run/clamav/clamd.ctl'
]);
としてやればよいです。
まとめ
こんな感じで、interfaceを使ってライブラリの使い勝手を少しだけ上げてみました。
ここまでくればDIとかもできるので、そっちへの応用も記事化しようかなって思います。
今回はこんなところです。