PyMeshLabとは
Meshlabをpythonのモジュールとして使えるようにしたものです.
詳細は公式のドキュメントを参照してください.
本記事では,以下の環境で動作確認しています.
- WSL2: Ubuntu 20.04.4 LTS
- Python 3.8.0
- pymeshlab: 2022.2.post2
インストール
pip install pymeshlab
サンプルデータのダウンロード
Meshlabのサイトからサンプルデータをダウンロードすることができます.
本記事ではこのデータを使って説明します.
import urllib
from pathlib import Path
import zipfile

url = "https://www.meshlab.net/data/sample_meshes.zip"
dst_path = Path(url).name

# ファイルダウンロード
with urllib.request.urlopen(url) as web_file, open(dst_path, 'wb') as local_file:
    local_file.write(web_file.read())

# zipファイル解凍
with zipfile.ZipFile(dst_path) as zf:
    zf.extractall(Path(dst_path).stem)
基本的な使い方
pymeshlabでは,MeshSetオブジェクトを作ってメッシュの処理を行います.
データの読み込み・保存
import pymeshlab

ms = pymeshlab.MeshSet()
ms.load_new_mesh('./sample_meshes/sample/bunny2.ply')

# メッシュデータを取得
m = ms.current_mesh()

# 頂点座標などをnumpy型で取得できる
v_matrix = m.vertex_matrix() # 頂点座標
f_matrix = m.face_matrix() # 面を構成する頂点ID
e_matrix = m.edge_matrix() # エッジを構成する頂点ID (このサンプルデータだと空)

# メッシュデータを保存
ms.save_current_mesh('./sample_meshes/sample/bunny2_save.ply')
複数データの読み込み
このMeshSetオブジェクトは,GUI版のMeshlabのProjectウィンドウに相当し,複数のメッシュデータを読み込むことができます.
ms = pymeshlab.MeshSet()

# 1個目のメッシュデータ読み込み
ms.load_new_mesh('./sample_meshes/sample/bunny2.ply')
print(f"現在のメッシュID: {ms.current_mesh_id()}, データ数: {ms.number_meshes()}")

# 2個目のメッシュデータ読み込み
ms.load_new_mesh('./sample_meshes/sample/bunny2.ply')
print(f"現在のメッシュID: {ms.current_mesh_id()}, データ数: {ms.number_meshes()}")
現在のメッシュID: 0, データ数: 1
現在のメッシュID: 1, データ数: 2
カレントのメッシュIDはset_current_meshで切り替えることができます.
print(f"現在のメッシュID: {ms.current_mesh_id()}")
idx = 0
if ms.mesh_id_exists(idx):
    ms.set_current_mesh(idx)
    print(f"現在のメッシュID: {ms.current_mesh_id()}")
現在のメッシュID: 1
現在のメッシュID: 0
フィルターの適用
Meshlabに実装されているデータ処理の機能をフィルターを適用する方法で使用することができます.
使用できるフィルターの一覧は公式ドキュメントのフィルター一覧を参照してください.
例として,メッシュの凸包を生成する場合は,以下のようになります.
ms = pymeshlab.MeshSet()
ms.load_new_mesh('./sample_meshes/sample/bunny2.ply')
ms.generate_convex_hull()
ms.save_current_mesh('./sample_meshes/sample//bunny2_convex_hull.ply')
メッシュの表示
環境構築
polyscopeを使用してメッシュを表示させることができます.
pip install polyscope
pipのバージョンが低いと以下のようなエラーが出ます。
ERROR: Command errored out with exit status 1: /home/ub20/.pyenv/versions/3.8.0/bin/python3.8 -u -c 'import sys, setuptools, tokenize; sys.argv[0] = '"'"'/tmp/pip-install-7u_oyqmv/polyscope/setup.py'"'"'; __file__='"'"'/tmp/pip-install-7u_oyqmv/polyscope/setup.py'"'"';f=getattr(tokenize, '"'"'open'"'"', open)(__file__);code=f.read().replace('"'"'\r\n'"'"', '"'"'\n'"'"');f.close();exec(compile(code, __file__, '"'"'exec'"'"'))' install --record /tmp/pip-record-d8iiywde/install-record.txt --single-version-externally-managed --compile Check the logs for full command output.
この場合は、pip install --upgrade pipでバージョンを最新のものにしてください.
その他の詳細は公式サイトのインストールマニュアルを参照してください.
また、WSL上で表示させようとした場合,ディスプレイの設定をしないと以下のようなエラーが出てしまいます.
>>> import polyscope as ps
>>> ps.init()
GLFW emitted error: X11: The DISPLAY environment variable is missing
Traceback (most recent call last):
  File "<stdin>", line 1, in <module>
  File "/home/ub20/.pyenv/versions/3.8.0/lib/python3.8/site-packages/polyscope/core.py", line 14, in init
    psb.init(backend)
RuntimeError: [polyscope] ERROR: Failed to initialize glfw
WSL2の導入とGUI環境の構築とsshfsしたものもgnome-openしたい!! [Ubuntu18.04/20.04] - Qiitaの記事を参考にして,ディスプレイの設定を行ってください.
私の環境では以下の手順を実行して動作することが確認できました。
Windows上で
- https://sourceforge.net/projects/vcxsrv/ からVcXsrvをダウンロード、デフォルトの設定でインストール
- インストールしたXLaunchのソフトを起動、"Additional parameters for VcXsrv"に -acを追加
- ファイアウォールの設定でパブリック側のアクセスを許可
WSL上で
-
sudo apt install libgl1-mesa-dev xorg-devを実行 -
~/.bashrcファイルにexport DISPLAY=$(cat /etc/resolv.conf | grep nameserver | awk '{print $2}'):0.0のコマンドを追加して、ターミナル再起動 - 以下のコマンドを実行し、xeyesのディスプレイが表示されることを確認
sudo apt install x11-apps
xeyes
表示
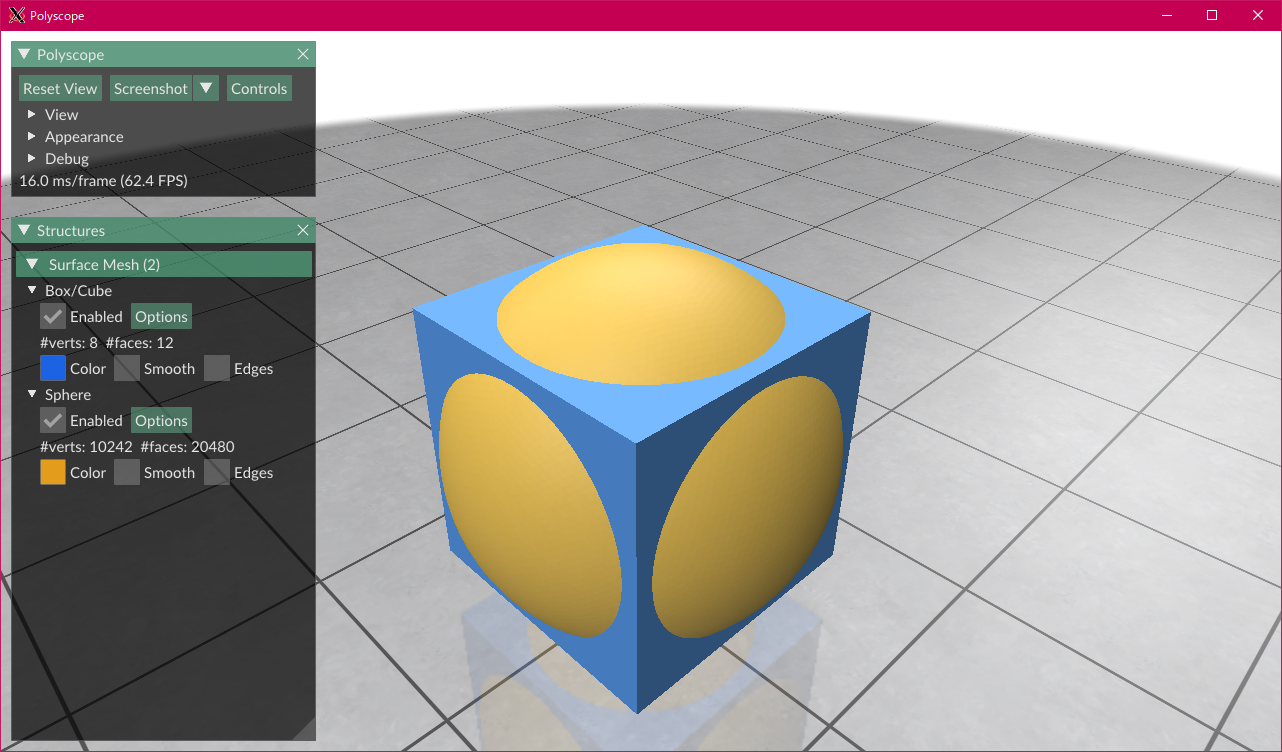
MeshSetにロードされているメッシュデータをまとめて表示できます.
import pymeshlab

ms = pymeshlab.MeshSet()
ms.create_cube(size=3) # 立方体を作成するフィルタ
ms.create_sphere(radius=2, subdiv=5) # 球を作成するフィルタ
ms.show_polyscope()
GUIでメッシュデータごとに表示・非表示などの設定ができます.

polyscopeのリセット
JupyterLabなどで繰り返しMeshSetの作成をしていると過去のメッシュデータがpolyscopeのビューワーにずっと残ってしまうことがあります.
その場合は,以下のようにpolyscopeに登録されたメッシュデータを一旦クリアしてから,再度MeshSetの作成をしてください.
import polyscope as ps
ps.remove_all_structures() # polyscopeに登録されたメッシュデータがすべて削除される