DifyをDocker composeで動かすときのメモ
もはや何番煎じかわからないのですが、インストールのメモです
ついでに docker-compose.yamlを読んで気になるところを残しておきました
作業環境
- OS 名
Microsoft Windows 11 Enterprise - バージョン
10.0.26100 ビルド 26100 - システムの種類
x64-ベース PC - システム SKU
LENOVO_MT_21CC_BU_Think_FM_ThinkPad X1 Carbon Gen 10 - プロセッサ
12th Gen Intel(R) Core(TM) i5-1235U、1300 Mhz、10 個のコア、12 個のロジカル プロセッサ - インストール済みの物理メモリ (RAM)
16.0 GB
あまり強いPCとは言えませんね。普通のスペックです
Difyバージョン
- Difyバージョン
1.1.2
docker compose インストール
全てはここに載っています。一次ソースは大事なので必ず公式を確認しましょう。
https://docs.dify.ai/ja-jp/getting-started/install-self-hosted/docker-compose
基本的には git clone して docker compose up -d するだけです。便利ですね。
※WSL2環境のDockerで実行しています。
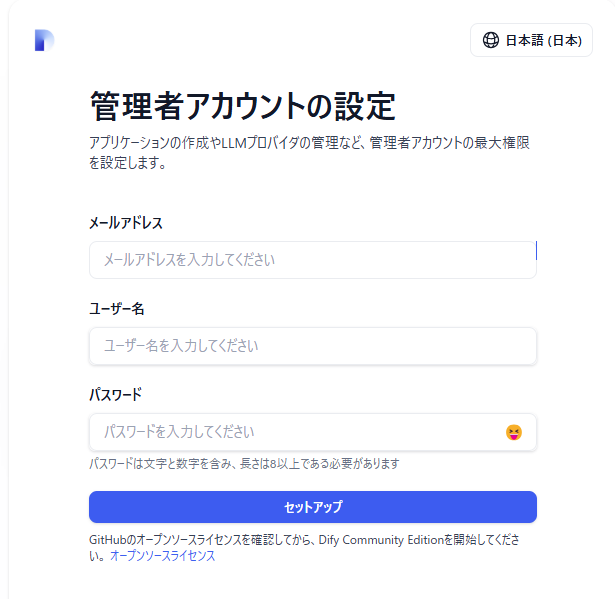
管理者アカウントの設定
※ 既に port 80 or 443 で動作しているアプリケーションがある場合はポートが競合してしまいます。停止しておきましょう。sudo systemctl stop apache2
http://localhost/install
にアクセスすると、管理者アカウントの設定画面が出ます。
ログイン
作成したアカウントでログインすれば完了です
設定一覧
.env で設定の変更が可能です
一覧は以下を参照
https://docs.dify.ai/ja-jp/getting-started/install-self-hosted/environments
Docker環境を深掘りする
ver 1.1.2 では合計10個のコンテナが起動します。
$ docker compose ps
NAME                     IMAGE                                       COMMAND                  SERVICE         CREATED       STATUS                    PORTS
docker-api-1             langgenius/dify-api:1.1.2                   "/bin/bash /entrypoi…"   api             5 hours ago   Up 11 minutes             5001/tcp
docker-db-1              postgres:15-alpine                          "docker-entrypoint.s…"   db              5 hours ago   Up 11 minutes (healthy)   5432/tcp
docker-nginx-1           nginx:latest                                "sh -c 'cp /docker-e…"   nginx           5 hours ago   Up 4 minutes              0.0.0.0:80->80/tcp, 0.0.0.0:443->443/tcp
docker-plugin_daemon-1   langgenius/dify-plugin-daemon:0.0.6-local   "/bin/bash -c /app/e…"   plugin_daemon   5 hours ago   Up 11 minutes             0.0.0.0:5003->5003/tcp
docker-redis-1           redis:6-alpine                              "docker-entrypoint.s…"   redis           5 hours ago   Up 11 minutes (healthy)   6379/tcp
docker-sandbox-1         langgenius/dify-sandbox:0.2.10              "/main"                  sandbox         5 hours ago   Up 10 minutes (healthy)
docker-ssrf_proxy-1      ubuntu/squid:latest                         "sh -c 'cp /docker-e…"   ssrf_proxy      5 hours ago   Up 4 minutes              3128/tcp
docker-weaviate-1        semitechnologies/weaviate:1.19.0            "/bin/weaviate --hos…"   weaviate        5 hours ago   Up 11 minutes
docker-web-1             langgenius/dify-web:1.1.2                   "/bin/sh ./entrypoin…"   web             5 hours ago   Up 11 minutes             3000/tcp
docker-worker-1          langgenius/dify-api:1.1.2                   "/bin/bash /entrypoi…"   worker          5 hours ago   Up 11 minutes             5001/tcp
docker-compose.yaml
generate_docker_composeで生成されるので、このファイルは直接編集してはいけません
設定を変更したい場合は docker-compose-template.yamlを編集して再生成するか、.envを編集する必要があります
環境変数はアンカーで設定されている
.envを読み込んで、shared-api-worker-envにアンカーが設定されています。
環境変数を何ヶ所も使用するため、工夫が見られますね。
x-shared-env: &shared-api-worker-env
  CONSOLE_API_URL: ${CONSOLE_API_URL:-}
  CONSOLE_WEB_URL: ${CONSOLE_WEB_URL:-}
  ...
この記述により、同じ環境変数群を各サービスに適用でき、設定の重複を避けることができます
    environment:
      # Use the shared environment variables.
      <<: *shared-api-worker-env
      # Startup mode, 'api' starts the API server.
      MODE: api
      SENTRY_DSN: ${API_SENTRY_DSN:-}
※ ちなみにこれは docker-compose のではなく YAML のお作法です。(初めて知りました)
データの永続化
コンテナは終了するとデータごと消えるため、データの永続化がどうなっているかが気になります
必要なサービスにはこのように volume のマウント設定がされていました、安心ですね
    volumes:
      - ./volumes/db/data:/var/lib/postgresql/data
依存関係
dbとredisは多くのサービスからの依存関係が設定されていました
db起動前にアプリケーションが起動してしまい、起動に失敗することを防いでくれていますね
   depends_on:
      - db
      - redis
ヘルスチェック
postgres, redis, sandboxにはヘルスチェックの指定がありました。
    healthcheck:
      # ensure bucket was created before proceeding
      test: [ "CMD-SHELL", "curl -s -f -u Administrator:password http://localhost:8091/pools/default/buckets | grep -q '\\[{' || exit 1" ]
      interval: 10s
      retries: 10
      start_period: 30s
      timeout: 10s
ネットワーク
複数のネットワークが定義されています
networks:
  # create a network between sandbox, api and ssrf_proxy, and can not access outside.
  ssrf_proxy_network:
    driver: bridge
    internal: true
  milvus:
    driver: bridge
  opensearch-net:
    driver: bridge
    internal: true
-
ssrf_proxy_networkは、Sandbox、API、ssrf_proxyなどの間で内部通信を行うために内部(internal: true)のブリッジネットワークとして設定されています -
milvusやopensearch-netなど、各サービス間の専用ネットワークも定義されています
セキュリティ
デフォルトでセキュリティにかなり配慮された設定になっています
- SSRF(Server Side Requesかt Forgery)攻撃対策として、専用のプロキシサーバー(squid)が構成されています
- 内部ネットワーク内でプロキシを利用することで、不要な外部アクセスを制限し、攻撃のリスクを軽減します
デフォルトではOFFですが、.envでCSP(Content-Security-Policy)の設定も可能です。
-
ドキュメントによると、ONにすると以下のURLがホワイトリストに追加されるようです
*.sentry.io http://localhost:* http://127.0.0.1:* https://analytics.google.com https://googletagmanager.com https://api.github.com
最後に
1064行のなかなか読み応えのある docker-compose.yaml なので、ぜひ興味を持った人は眺めてみてください。
以上、Difyをdocker-composeで動かしてみた所感でした。