日本語で書くべきと思いつつ。。。英語の勉強がてらどうぞ読んで下さい!
Speaking formally...
When creating apps that rely heavily on user input, validation is a keystone of user experience. For users, the experience should be smooth and unobtrusive, and for developers, the implementation should be simple and not bog down the already cumbersome tasks of assembling HTML forms. The Vue ecosystem, while still relatively young, is vibrant, and the number of options for any specific task can be daunting, especially when there isn't yet an established winner in a given space. For form validation, VeeValidate is a solid choice
Why VeeValidate?
Sometimes the scope of your app is such that it isn't quite necessary to bring in a fully-fledged UI framework like Element, but you don't want to roll your own validation. Enter VeeValidate. It's a sleek validation library based on Laravel's validation framework. It is feature-rich and simple to work with, including a multitude of validations out of the box.
Getting started
Detailed information for everything can be found on the official docs.
Installation
First, install with npm or yarn or your method of choice.
npm install vee-validate --save
CDN loading is also available. I like ES6, so let's import it as a module and instruct Vue to load it with Vue.use():
import Vue from 'vue';
import VeeValidate from 'vee-validate';

Vue.use(VeeValidate);
And you're ready to go!
First validation
In order to set up a simple validation, we'll need to add our HTML form elements and tell VeeValidate our rules. First we'll add a simple name field. We're nice so we'll allow alphanumeric characters, but we're not monsters, so no special characters. The library allows us to do this with the alpha_num directive. And we want to make this field required, too. We can combine these two rules into one using a pipe, like required|alpha_num. The snippet below shows this.
<div id="app">
  <p>
    Name: <input :class="{ error: errors.has('name') }" type="text" v-validate="'required|alpha_num'" name="name">
    <span v-show="errors.has('name')" class="error">{{ errors.first('name') }}</span>
  </p>
  <input type="submit" value="Submit">
</div>
The star of this show is v-validate="'required|alpha_num'". This allows us to specify the validation rules. Note that it takes a string, so you need to wrap the rules in another set of single quotes. We also add code to display the error messages and add some CSS styling based on its error state. VeeValidate uses the input's name property to identify it in its internal error bag, so we can reference it with errors.has('name') or errors.first('name'). For now we're just grabbing the first error message, but there are a variety of operations you can perform to get some or all error messages to display as you wish.
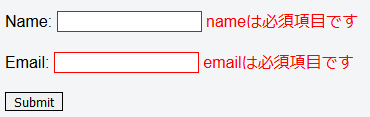
In action it looks like this:

Not bad! Let's throw in an email field for good measure. Add it to the html:
  <p>
    Email: <input :class="{ error: errors.has('email') }" type="text" v-validate="'required|email'" name="email">
    <span v-show="errors.has('email')" class="error">{{ errors.first('email') }}</span>
  </p>
And off we go!

Changing behavior
By default, VeeValidate applies validation on input, but sometimes this isn't desirable. On that email field, for example, maybe we want to give the user a chance to fill it out before telling them that the format isn't correct, or maybe we want to wait until pressing the submit button to validate. Luckily these things are configurable: we can set validation to fire on blur events instead of input, or not to fire at all by default. We're going to choose the latter option for the next demonstration and defer validation until the submit button is pressed.
The first step to achieving this is to define our validation rules using .disable. Adding this to the directive informs VeeValidate that validation should not be perform from DOM events. Instead we will call the validation programmatically. We can accomplish this by making this change to each of the validation rules:
v-validate.disable="'required|alpha_num'"
With this, the user can enter totally invalid information and be none the wiser. That is, of course, until we lay down the law and stop them from submitting their bogus info. Let's do just that.
First we need to tell our submit button to do something.
<input type="submit" value="Submit" @click="validateForm">
We've added a @click event to fire a validateForm method. Our new javascript looks a little something like this:
Vue.use(VeeValidate)

new Vue({
  el: '#app',
  methods: {
  	validateForm() {
    	this.$validator.validateAll();
    }
  }
});
VeeValidate provides a $validator object that we can use to programmatically interact with the validation system. In this case, calling validateAll() fires the validations once and only once. Note that it is an asynchronous operation and returns a promise!

Spiffy indeed! Recall above that we used the errors object to display the messages. We can use it again in the validateForm() method to make something useful out of our form. Observe the following changes to the method:
    validateForm() {
    	this.$validator.validateAll().then(() => {

        if (!this.errors.any()) {
          alert('woo no errors');
          // call form submission logic
        }
      });
    }
This is just the barest of barebones applications. The API is rich and can easily be used to implement whatever sort of behavior you're looking for.
If you want to fiddle with the code as presented up to this point, check out this jsfiddle.
Beyond the basics
VeeValidate is a solid library with a depth and breadth of configuration options and functionality. We'll briefly take a look at a few of the things that are possible.
Localization
Qiita is still a world of 日本人のエンジニア, so naturally the ability to display errors in the appropriate language is a must. Luckily, this too is simple. Just import the language file and tell the validator to use it.
import ja from 'vee-validate/dist/locale/ja'
import VeeValidate, { Validator } from 'vee-validate';

Validator.localize('ja');
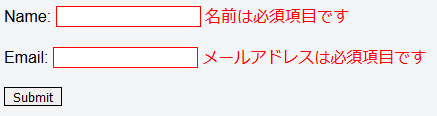
And without any further tweaks, you get Japanese error messages!
Of course, those nasty attribute names need some work. It should go without saying that you can use your own localization files to customize attribute names and error messages as you wish; everything is totally customizable. We can also use the data-vv-as directive to set the attribute name directly! Just change the inputs like so:
<input :class="{ error: errors.has('name') }" type="text" v-validate.disable="'required|alpha_num'"
name="name" data-vv-as="名前">
And the errors follow suit.
Recently support was also added for the vue i18n plugin, making errors even easier than ever.
Styling
Look back in the HTML of our form and recall this ugly bit of class definition:
:class="{ error: errors.has('name') }"
Surely this isn't necessary? you might be inclined to think. And you would be correct. Let's clean this up a little. VeeValidate allows a slew of configuration options to be passed at the time of setup. You can check out a full list of options at the docs. The one we're interested now is classes, so let's tell VeeValidate to use it.
const config = {
	classes: true
}

Vue.use(VeeValidate, config);
And then edit the input to remove the style:
<input type="text" v-validate.disable="'required|alpha_num'" name="name" data-vv-as="名前">
And classes will automatically be added based on the state of the validation. The default classes are as follows:
{
  touched: 'touched', // the control has been blurred
  untouched: 'untouched', // the control hasn't been blurred
  valid: 'valid', // model is valid
  invalid: 'invalid', // model is not valid
  pristine: 'pristine', // control has not been interacted with
  dirty: 'dirty' // control has been interacted with
}
Note: At the time of writing it seems there's an issue that sometimes causes the invalid class to be added by default, so I have left it out of the final code for now.
I filed an issue and it has been fixed.
In conclusion
VeeValidate offers a simple and easy to use but at the same time highly extensible standalone form validation solution. It is still missing a few features, and there are a few bugs and other wrinkles to be ironed out, but it is under heavy and active development, and the developer is friendly and responsive to issues. To anyone looking to get their feet wet with open source software and make their first pull request, this could be a good place to start.
The capabilities of this library extend far beyond what was covered in this post. It can do custom validation rules, asynchronous server-side API validations, validation of multiple fields, validate on different types of events, and a multitude of other useful things.
It's a charming library with promise and potential, so feel free to give it a shot.
The final code can be fiddled with on this jsfiddle.