はじめに
Android Advent Calendar 2019の12日目です。
今日は箸休めに、最近の技術に関することではなくViewの操作に関することを書きます。
タイトルは「子孫ビューの相対Rect情報を取得してオーバーレイから切り抜く」で、今回はActivity側で、内包するFragentが持つViewの、特定の親ViewGroupからの相対Rect(矩形の座標)情報を取得して操作する例を、オーバーレイを切り抜く自作サンプルコードを元に説明します。
すごく抽象的な説明で分かりにくいと思うので、ちょっと図で説明を。
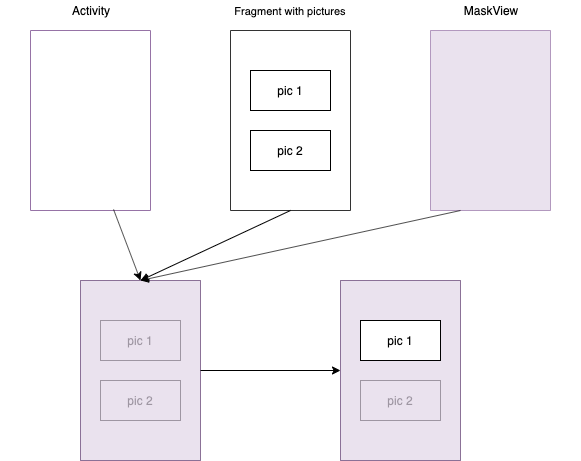
ActivityがMainFragmentと、Activity全体を覆うMaskView(半透明のオーバーレイ)をレイアウトとして持っているとします。
※MaskViewは独自定義のカスタムビューで、オーバーレイの色や特定のRect範囲を透明にするメソッドを持っています。後ほど触れます。
そしてFragmentが持っている特定のView(上記画像でいうPic1)の、Activityからの相対Rect情報を取得し、その座標範囲のMaskViewを動的に透明にすることで、「切り抜いた」ように見せます。
gifイメージは以下です。ここでは、FABを押下した時に1枚目の画像の範囲のオーバーレイを切り抜いています。
また、サンプルアプリは以下からどうぞ。
キーになるのはoffsetDescendantRectToMyCoords
この時キーになるのが、ViewGroupのoffsetDescendantRectToMyCoordsメソッドです。
Offset a rectangle that is in a descendant's coordinate space into our coordinate space.
子孫ビューがマージンなどを指定していたり、ネストの階層でwrap_contentを使っていたりしても、それらを踏まえて親ViewGroupの座標空間の中での座標を取得できます。
今回の場合、以下のようにActivityのレイアウトにcontainerと、その子main_fragmentがあります。このmain_fragmentが内包するViewの、containerからの相対的なRect情報を取得することで、container全体を覆うmaskから対象範囲を切り抜くことができます。
<androidx.constraintlayout.widget.ConstraintLayout xmlns:android="http://schemas.android.com/apk/res/android"
    xmlns:app="http://schemas.android.com/apk/res-auto"
    xmlns:tools="http://schemas.android.com/tools"
    android:id="@+id/container"
    android:layout_width="match_parent"
    android:layout_height="match_parent"
    tools:context=".MainActivity">

    <androidx.fragment.app.FragmentContainerView
        android:id="@+id/main_fragment"
        android:name="com.example.nichiyoshi.maskclipsample.MainFragment"
        android:layout_width="match_parent"
        android:layout_height="match_parent"
        app:layout_constraintTop_toTopOf="parent"
        app:layout_constraintStart_toStartOf="parent"/>

    <com.example.nichiyoshi.maskclipsample.MaskView
        android:id="@+id/mask"
        android:layout_width="match_parent"
        android:layout_height="match_parent"
        app:layout_constraintTop_toTopOf="parent"
        app:layout_constraintStart_toStartOf="parent"/>

    <com.google.android.material.floatingactionbutton.FloatingActionButton
        android:id="@+id/fab"
        android:layout_width="wrap_content"
        android:layout_height="wrap_content"
        android:layout_margin="@dimen/fab_margin"
        app:srcCompat="@drawable/ic_scissors"
        app:layout_constraintEnd_toEndOf="parent"
        app:layout_constraintBottom_toBottomOf="parent"/>

</androidx.constraintlayout.widget.ConstraintLayout>
前準備:カスタムMaskView
以下のMaskViewは、半透明の黒(#80000000)でViewの範囲をpaintし、かつ clipWithRect(rect: Rect)メソッドを呼ばれると、引数で指定されたRectの範囲を透明にして再描画します。
class MaskView @JvmOverloads constructor(
    context: Context, attrs: AttributeSet? = null, defStyleAttr: Int = 0
) : View(context, attrs, defStyleAttr) {


    private val backgroundPaint = Paint().apply {
        color = Color.parseColor("#80000000")
    }

    private val clearPaint = Paint().apply {
        xfermode = PorterDuffXfermode(PorterDuff.Mode.CLEAR)
    }

    private var clipRect: Rect? = null

    fun clipWithRect(rect: Rect) {
        clipRect = rect
        postInvalidate()
    }

    override fun draw(canvas: Canvas) {
        super.draw(canvas)
        setLayerType(LAYER_TYPE_HARDWARE, null)

        canvas.drawRect(0f, 0f, width.toFloat(), height.toFloat(), backgroundPaint)

        clipRect?.let { rect ->
            canvas.drawRect(rect, clearPaint)
        }
    }

}
なお、こちらの記事を参考にさせていただきました。
全体像
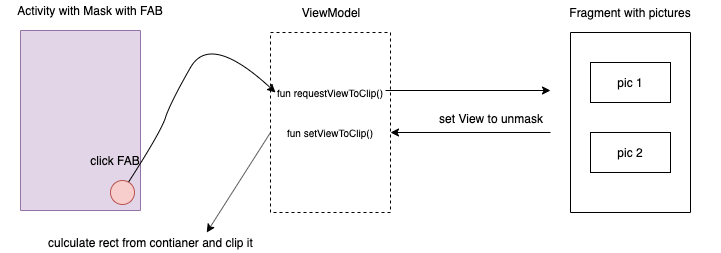
ActivityとMainFragmentでViewModelを共有し、ActivityのFABが押下された時にViewModelのrequestViewToClip関数が呼ばれます。それを監視しているMainFragmentでは切り抜くべき対象のView(pic1)をViewModelのsetViewToClip関数で指定し、それを監視しているActivityが先ほどのoffsetDescendantRectToMyCoords関数でcontainerからの相対Rect範囲を取得し、その範囲をMaskViewから切り抜きます。
class MainActivity : AppCompatActivity() {

    private val viewModel by viewModels<MainViewModel>()

    override fun onCreate(savedInstanceState: Bundle?) {
        super.onCreate(savedInstanceState)
        setContentView(R.layout.activity_main)

        fab.setOnClickListener {
            viewModel.requestViewToClip()
        }

        viewModel.viewToClip.observe(this) { targetView ->
            Rect().apply {
                targetView.getDrawingRect(this)
                container.offsetDescendantRectToMyCoords(targetView, this)
                mask.clipWithRect(this)
            }
        }
    }
}
※observe(this){}の箇所はKTXを使っています。
class MainViewModel: ViewModel() {

    private val _viewToClip = MutableLiveData<View>()
    val viewToClip: LiveData<View> = _viewToClip

    fun setViewToCLip(view: View) {
        _viewToClip.postValue(view)
    }

    private val _requestViewToClip = MutableLiveData<Unit>()
    val requestViewToClip: LiveData<Unit> = _requestViewToClip

    fun requestViewToClip() {
        _requestViewToClip.postValue(Unit)
    }

}
class MainFragment: Fragment(R.layout.fragment_main) {

    private val viewModel by activityViewModels<MainViewModel>()

    override fun onViewCreated(view: View, savedInstanceState: Bundle?) {
        super.onViewCreated(view, savedInstanceState)

        image1.scaleType = ImageView.ScaleType.FIT_CENTER
        image2.scaleType = ImageView.ScaleType.FIT_CENTER

        // loads images from free image provider "pakutaso"
        image1.load("https://www.pakutaso.com/shared/img/thumb/cat9302341_TP_V.jpg")
        image2.load("https://www.pakutaso.com/shared/img/thumb/cat9302331_TP_V.jpg")

        viewModel.requestViewToClip.observe(viewLifecycleOwner) {
            viewModel.setViewToCLip(image1)
        }
    }

}
※ by activityViewModelsはViewModelのデリゲートプロパティです。
※class MainFragment: Fragment(R.layout.fragment_main) の箇所は、Fragment LayoutId コンストラクタを利用しています。
おわりに
ちょっと分かりづらい説明になってしまいましたが、以上です。
ソースコートはGitHubにあげています。
https://github.com/nichiyoshi/clip_mask_sample