EC2はインスタンスの状態がrunningになっている時間に対して課金されます。
なので学習が終わったらインスタンスを止める必要があるのですが、
再起動ごとにIPアドレスが変わるためいささか面倒です。
- インスタンスを起動
- PuTTYの設定を変更してSSH接続
- Jupyter Notebookを起動
- ブラウザからHTTPS接続
- インスタンスを停止(忘れると死ぬ)
今回はこれを設定とスクリプトの力で解決していきます。
下準備
前記事(AWSのGPUインスタンスでJupyter Notebookを実行する(Windows 2018/07版))のセッティングを前提とします。
IAMでユーザーを作る
参考:AWS・IAM(Identity and Access Management)ユーザの作成
IAMでユーザーを作りアクセスキーIDとシークレットキーを準備します。
アクセスの種類は「プログラムによるアクセス」、
ポリシーは「DataScientist」あたりを選択してください。
ローカルのPythonにboto3とpyperclipを入れる
pip3 install boto3
pip3 install pyperclip
PuTTyのデフォルト設定を作る

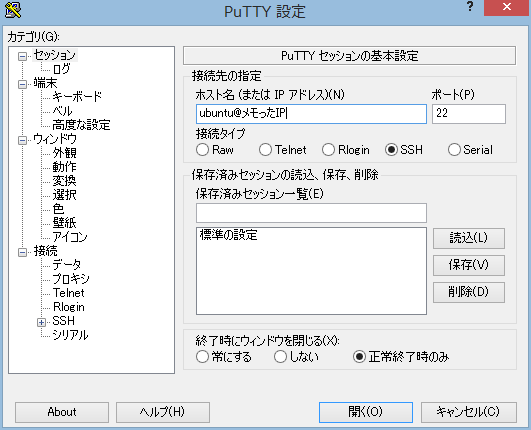
画像は使いまわしですが、この画面(/セッション)から前回の設定を「標準の設定」に保存してください。
ログイン時の自動実行を設定する
参考:ubuntuでログイン時にシェルスクリプトを自動実行
一旦PuTTyでログインし、viか何かでホームディレクトリの.bashrcを編集します。
vi ~/.bashrc
ファイルの最後に
source activate tensorflow_p36
jupyter notebook
を加えればOK。これでログイン時に勝手に仮想環境からJupyter Notebookが立ち上がります。
スクリプト
KEY_ID = 'アクセスキーID'
SECRET = 'シークレットキー'
REGION = 'ap-northeast-1' #東京
INSTANCE_ID = 'インスタンスのID(EC2コンソールから確認してください)'
PUTTY_PATH = r'PuTTY-ranvisを置いたパス\putty.exe'

import boto3
from time import sleep
import winreg
import subprocess
import pyperclip

def main():
    instance = get_instance()
    instance_ip = start_instance(instance)
    sleep(5) #エラーが発生する場合は待機時間を長くする
    edit_reg(instance_ip)
    subprocess.Popen([PUTTY_PATH, '-load', 'Default Settings'])
    pyperclip.copy('https://{0}:8888'.format(instance_ip))
    print(pyperclip.paste()+'をクリップボードにコピーしました')
    stop_instance(instance)

def get_instance():
    session = boto3.session.Session(region_name=REGION,
                                    aws_access_key_id=KEY_ID,
                                    aws_secret_access_key=SECRET)
    return session.resource('ec2').Instance(INSTANCE_ID)

def start_instance(instance):
    instance.start()
    instance.wait_until_running()
    return instance.public_ip_address

def edit_reg(instance_ip):
    reg_path = r'Software\SimonTatham\PuTTY\Sessions\Default%20Settings'
    with winreg.OpenKeyEx(winreg.HKEY_CURRENT_USER,
                          reg_path,
                          access=winreg.KEY_WRITE) as key:
        winreg.SetValueEx(key, 'HostName', 0,
                          winreg.REG_SZ,
                          'ubuntu@'+instance_ip)

def stop_instance(instance):
    while True:
        tmp = input('インスタンスを停止する場合は"stop"と入力してください >>')
        if tmp == 'stop' : break
    instance.stop()
    instance.wait_until_stopped()

main()
このスクリプトがやってくれることは以下の通りです。
- インスタンスを起動してIPアドレスを取得
- PuTTyのデフォルト設定を書き換え
- PuTTyをデフォルト設定で起動(セキュリティの警告は手動…)
- 「https:// IPアドレス :8888」をクリップボードに格納
- 任意のタイミングでインスタンスを停止
インスタンスの停止には時間がかかるので気長に待ってください。
お疲れ様でした。
参考
Windowsのパスがうまく指定\表示できない問題 in Python
Boto3に再入門してみた
puttyの設定を別PCに移行する
winreg でレジストリを読み書きするサンプルコード
Puttyを再考する。 puttyのコマンドまとめ