弊社が提供しているタカノメサービスについて、GCP Workflowsを用いることで調査結果の出力フローを自動化することができました。本稿では、構築したワークフローの概要を紹介いたします。
開発背景
陸ごみ散布状況の調査サービスであるタカノメにおいて、調査のたびに調査結果を出力しています。これまではローカル上でPythonスクリプトを動かす必要があり、コードバージョンや秘密鍵の管理、環境構築面での課題がありました。そこで、社内の管理ページから調査結果を出力指示できるようにし、運用スタッフがコードを触らなくても良いように改善することとなりました。
ワークフローの構築
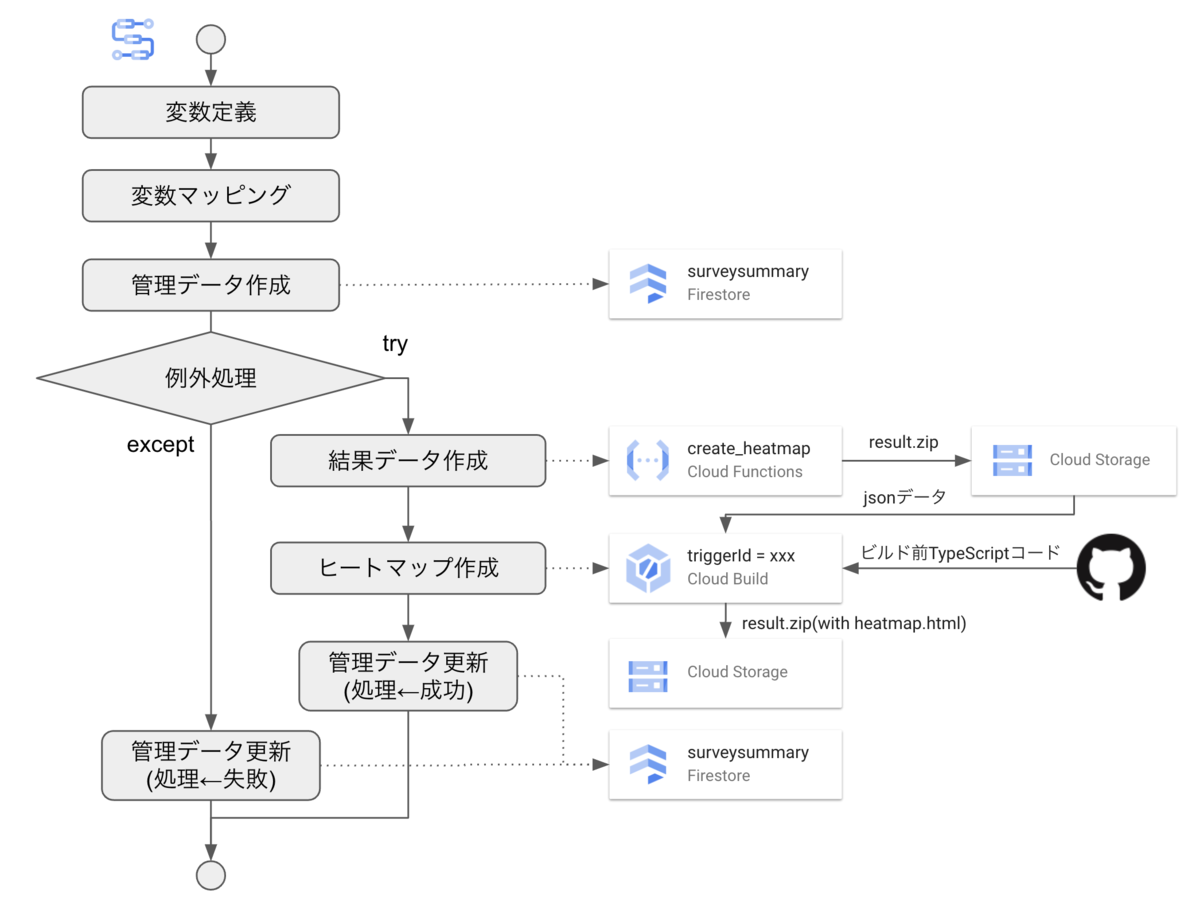
下図の様に構築しました。大まかな流れは以下の通りです。
- 変数定義: GCPプロジェクトID(projectId), ワークフローの実行ID(executionId), Cloud BuildのトリガーID(triggerId)を定義する
- 変数マッピング: firestoreで配列型のフィールドを追加するため、配列データを型変換する
- 管理データ作成: 調査結果の管理データを作成する。このデータで、ワークフローの処理成否も記録する
- 通常処理
- Cloud Functionsにて、調査結果データ(csv, xlsx, json)を作成する
- Cloud Buildにて、調査結果のヒートマップhtmlを作成する
- 管理データにワークフローの処理OKを記録する
- 例外処理: 調査結果を作成できなかった場合、管理データにワークフローの処理NGを記録する
1. 変数定義
以下の通り、変数を定義しました。
main:
    params: [input]  # ワークフロー呼び出し時に指定したパラメータがinputに入る
    steps:
    - setParams:
        assign:
            - projectId: ${sys.get_env("GOOGLE_CLOUD_PROJECT_ID")}  # 実行しているワークフローのプロジェクトID
            - executionId: ${sys.get_env("GOOGLE_CLOUD_WORKFLOW_EXECUTION_ID")}  # ワークフローの実行ID
            - triggerId: "実行したいCloud BuildのトリガーID"
            - targetIdsForFiretore: []   # 次のステップで変数マッピングする際に値を設定する
GCP Workflowsではいくつかの環境変数が事前に定義されていて、ワークフロー上で読み出すことができます1。
2. 変数マッピング
ワークフローからfirestoreのフィールドを追加するとき、Method: googleapis.firestore.v1.projects.databases.documents.createDocumentで定義されているフォーマットに従ってフィールドを指定する必要があります。プリミティブな型(string, timestampなど)であれば、以下の様に フィールド名.型Valueの形式で指定すればOKです。
            fields:
              hoge:
                stringValue: ${input.hoge}
              foo:
                timestampValue: ${time.format(sys.now())}
問題は配列型のデータの場合で、json形式での配列をそのままフィールド名.arrayValueに渡してもエラーになります。arrayValueは
            fields:
              bar:
                arrayValue:
                  values:
                    - stringValue: "aaa"
                    - stringValue: "bbb"
                    - stringValue: "ccc"
という形で、arrayValue.values[]下に stringValue: "xxx" や timestampValue: YYYY-MM-DDTHH:mm:ss の配列を渡す必要があります2。
そこで、以下の様にfor文でlist型のtargetIdsForFiretoreに要素を足し込んでいくことで対応しています。
    - mappingForFirestore:
        for:
            value: v
            in: ${input.targetIds}
            steps:
                - getStep:
                    assign:
                        - newValue:
                            stringValue: ${v}
                        - targetIdsForFiretore: ${list.concat(targetIdsForFiretore, newValue)}
3. 管理データ作成
前ステップで準備したtargetIdsForFiretoreおよびinputに渡した各パラメータを基に、firestoreに管理データdocumentを追加します。
callにてgoogleapis.firestore.v1.projects.databases.documents.createDocumentコネクタを指定し、argsにcollection名やdocumentのIDを指定することでdocumentを作成できます。なお、timestampValueにはISO8601フォーマットの日時文字列を渡すことができます。
    - createSurveySummaryFirestore:
        call: googleapis.firestore.v1.projects.databases.documents.createDocument
        args:
          parent: ${ "projects/" + projectId + "/databases/(default)/documents" }
          collectionId: surveysummary
          documentId: ${executionId}  # documentはワークフローごとに作成する
          body:
            fields:
              targetIds:
                arrayValue:
                  values: ${targetIdsForFiretore}
              name:
                stringValue: ${input.name}
              createdAt:
                timestampValue: ${time.format(sys.now())}
              status:
                stringValue: "prepare"
        result: resp
処理結果で403が返る場合、ワークフローを実行しているサービスアカウントのIAM権限でFirestoreの書き込み権限があるか確認してください。
4. 通常処理
調査結果データ(csv, xlsx)の作成と、ヒートマップhtmlの作成を順に行います。前者はCloud Functions、後者はCloud Buildで実施しますが、いずれも状況によっては失敗する可能性があります。
そこで、通常処理をtry文、例外処理をexcept文で対処します。
    - createSurveyResultSteps:
        try:
            steps:
            - accumulateSurveyResult:
               # 通常時の処理1: Cloud Functionsを呼び出し、調査結果データを作成する
            - buildRenderer:
               # 通常時の処理2: Cloud Buildを呼び出し、ヒートマップhtmlを作成する
            - updateSurveySummaryFirestoreOnSuccess:
               # 通常時の処理3: 管理データについて、処理成功を記録する
        except:
            as: e
            steps:
            - logStep:
               # 例外時の処理1: エラーをロギングする
            - updateSurveySummaryFirestoreOnError:
               # 例外時の処理2: 管理データについて、処理失敗を記録する
4.1. Cloud Functionsにて、調査結果データ(csv, xlsx, json)を作成する
事前に定義したFunctionのcreate_survey_resultを呼び出します。本Functionはus-east1に定義してあるので、下記の通り呼び出します。
            - accumulateSurveyResult:
                call: http.post
                args:
                    url: ${ "https://us-east1-" + $projectId + ".cloudfunctions.net/create_survey_result" }
                    body:
                        request_id: ${executionId}
                        target_ids: ${input.targetIds}
                    auth:
                        type: OIDC
                result: response
このFunctionは要認証で定義しています。ワークフローにおいては、auth.type = OIDCを指定することでサービスアカウントのOpenId Connect トークンをAuthorizationヘッダのBearerに付与することができます。こうして、Functionを認証付きで実行することができます。
4.2. Cloud Buildにて、調査結果のヒートマップhtmlを作成する
Cloud Buildを呼び出すには、googleapis.cloudbuild.v1.projects.triggers.run コネクタを使用します。呼び出しにあたり、projectIdおよびtriggerIdの指定が必要です。また、body.substitutions._変数名 に値を渡すことでビルド時の変数値を指定できます。
            - buildRenderer:
                call: googleapis.cloudbuild.v1.projects.triggers.run
                args:
                  projectId: ${projectId}
                  triggerId: ${triggerId}
                  body:
                    substitutions:
                      _REQUEST_ID: ${executionId}  # ワークフローの実行IDを渡し、前ステップで作成した調査結果データを参照できるようにする
                result: runResult
4.3. 管理データにワークフローの処理OKを記録する
一連の処理が成功したことを管理データに記録します。googleapis.firestore.v1.projects.databases.documents.patchによりdocumentをupsertできます。今回は処理結果のフィールド(status)だけを更新したいので、updateMaskでstatusを指定します。
            - updateSurveySummaryFirestoreOnSuccess:
                call: googleapis.firestore.v1.projects.databases.documents.patch
                args:
                  name: ${ "projects/" + projectId + "/databases/(default)/documents/surveysummary/" + executionId}  # ここでcollectionIdとdocumentIdを指定する
                  updateMask:
                    fieldPaths: [ "status" ]  # 値を更新したいフィールドの一覧をここで指定する
                  body:
                    fields:
                      status:
                        stringValue: "success"
                result: resp
5. 例外処理
通常処理の途中で例外が発生し、調査結果を作成できないときに本フローを実行します。本フローではエラーが発生したことの記録が必要だったため、ロギングへのログ出力と管理データへの失敗記録を行っています。
        except:
            as: e
            steps:
            - logStep:
                call: sys.log
                args:
                    text: ${json.encode_to_string(e)}
                    severity: ERROR
            - updateSurveySummaryFirestoreOnError:  # 記載省略。4.3節の内容からstringValueへの代入値を変えただけになるため
ワークフローの呼び出し
フロントエンド側から直接呼び出すことはできないため、Workflows呼び出し用のCloud Functionsを定義しました。
Cloud Functions for Firebaseであれば、公式の@google-cloud/workflowsライブラリを利用できます。createExecutionを呼び出す際、execution.argumentにJSON文字列を渡します。すると、ワークフローに実行時引数(ワークフローのyaml中のinput変数)にデータを渡すことができます。
import * as functions from "firebase-functions";
import { ExecutionsClient, WorkflowsClient } from "@google-cloud/workflows";

export const dispatchCreateSurveyResultWorkflow = functions.https.onCall(
  async (data: Record<string, unknown>) => {
    const config: Record<string, string> = JSON.parse(
      process.env.FIREBASE_CONFIG || "{}"
    );
    const projectId = config["projectId"] || "your-project-id";
    const region = "us-east1";
    if (!data["name"] || !data["targetIds"]) {
      return;
    }

    const client = new ExecutionsClient();
    const parent = new WorkflowsClient().workflowPath(
      projectId,
      region,  // Workflowsのあるリージョン
      "create_survey_result_workflow"  // Workflows名
    );
    await client.createExecution({
      parent,
      execution: {
        argument: JSON.stringify(data),
      },
    });
    return {};
  }
);
あとはフロントエンドからhttpsCallableなどを使って本Functionを呼び出せば、ワークフローを走らせることができます。