VagrantをHyper-Vで動かそうとしたところいくつかハマったので、一通りの流れをメモ。
環境
- ホストOS…Windows 10 Pro
- ゲストOS…CentOS 7
- ターミナル…Git Bash
Hyper-V
インストール
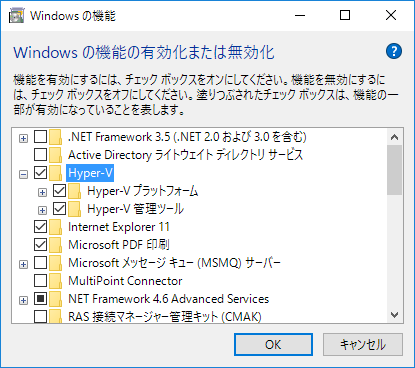
「プログラムと機能」→「Windowsの機能の有効化または無効化」から「Hyper-V」にチェックを入れる。もし「Hyper-V プラットフォーム」にチェックが入れられない場合、BIOSの設定で仮想化支援機能(Intel VT-d)をオンにする必要がある。
仮想スイッチの作成
「Hyper-V マネージャー」を立ち上げて1、左側のツリーから自マシンを選択、右側の「仮想スイッチマネージャー」を開く。Vagrantで作成した仮想マシンを外部と通信させたいので、「外部」を選択して仮想スイッチを作成しておく。
Vagrant
インストール
Vagrantの公式サイトからインストーラを落としてきて実行する。再起動するとコマンドプロンプトやPowerShell、Git Bashからvagrantコマンドが使えるようになる。ただし、Hyper-Vを使うときは管理者権限で起動する必要があることに注意する。
Hyper-V also requires that you execute Vagrant with administrative privileges. Creating and managing virtual machines with Hyper-V requires admin rights. Vagrant will show you an error if it does not have the proper permissions.
Usage - Hyper-V Provider - Vagrant by HashiCorp
以後のコマンドはすべて管理者権限で起動したGit Bashを前提としている。
init
ProviderにHyper-Vが選べるCentOS 7ということで、今回はserveit/centos-7を使う。適当なディレクトリをつくり、Vagrantにboxを追加して初期化する。
$ mkdir Vagrant
$ cd Vagrant
$ vagrant box add serveit/centos-7
$ vagrant init serveit/centos-7
up…の前に
通常であればこのままvagrant upするところだが、今回の環境では2つほど問題が起きて動かないので先に修正する。
get_vm_status.ps1の修正
この手順はVagrant 1.8.5から不要になりました(2016/07/27)
Windows 10からHyper-Vの設定が保存されている場所が変わったらしく、以下のエラーが出て仮想マシンの情報取得に失敗する。
An error occurred while executing a PowerShell script. This error
is shown below. Please read the error message and see if this is
a configuration error with your system. If it is not, then please
report a bug.

Script: get_vm_status.ps1
Error:

発生場所 C:\HashiCorp\Vagrant\embedded\gems\gems\vagrant-1.8.4\plugins\providers\hyperv\scripts\get_vm_status.ps1:21 文字:8
+ } catch $ExceptionType {
+        ~
Catch ブロックにステートメント ブロックがありません。
発生場所 C:\HashiCorp\Vagrant\embedded\gems\gems\vagrant-1.8.4\plugins\providers\hyperv\scripts\get_vm_status.ps1:21 文字:24
+ } catch $ExceptionType {
+                        ~
式またはステートメントのトークン '{' を使用できません。
    + CategoryInfo          : ParserError: (:) [], ParseException
    + FullyQualifiedErrorId : MissingCatchHandlerBlock
対策としては、既に修正済みのスクリプトが作られているのでこれをダウンロードしてきてget_vm_status.ps1を置き換える。この問題はVagrantの次のリリース(1.8.5?)で修正されるはずされました。
ファイル共有オプションの修正
Hyper-Vを使う場合、ホストOS-ゲストOS間のファイル共有は「ホストOSのディレクトリをsambaで共有してゲストOSからアクセス」という方法になるのだが、以下のエラーが出て設定に失敗する。
==> default: Mounting SMB shared folders...
(省略)
The error output from the last command was:

mount: wrong fs type, bad option, bad superblock on //192.168.***.*/*********************************,
       missing codepage or helper program, or other error
       (for several filesystems (e.g. nfs, cifs) you might
       need a /sbin/mount.<type> helper program)

       In some cases useful info is found in syslog - try
       dmesg | tail or so.
どうやらVagrantはバージョン1.8からsambaの認証方法を変更したのだが、boxにインストールされているsambaが新しい認証方法に対応していないためにこのエラーが起きる(らしい)。
Vagrant 1.8 changed SMB mounting to use the more secure credential file mechanism. However, many operating systems ship with an outdated filesystem type for SMB out of the box which does not support this.
SMB - Synced Folders - Vagrant by HashiCorp
この問題は、Vagrantfileのファイル共有設定でmount_optionsにホストOSのユーザ名(USERNAME)とパスワード(PASSWORD)を指定することで回避できる。ただし、パスワードが平文で記録されてしまうのでセキュリティ的には好ましくない。ゲストOS側のsambaを更新すればいいような気もするので要調査。
Vagrant.configure("2") do |config|
  (省略)
  config.vm.synced_folder ".", "/vagrant", type: "smb", mount_options: ["username=USERNAME","password=PASSWORD"]
  (省略)
end
up & ssh
ここまできたら、仮想マシンを立ち上げてSSHで入れるか確認する。**upするときに--provider=hypervをつけるのを忘れないように。**つけ忘れるとVirtualBoxをインストールしようとするので、Ctrl+Cで止める。
$ vagrant up --provider=hyperv
(途中でホストOSのユーザ名とパスワードを聞かれるので入力)

$ vagrant ssh
[vagrant@centos7 vagrant]$
ホストOSのVagrantfileがあるディレクトリとゲストOSの/vagrantが共有されているはずなので、適当にファイルを作ったりして動作を確かめると良い。
その他
- Git Bashだと
upの途中で入力するパスワードが隠れない(Your console doesn't support hiding input.らしい) - 仮想マシンのIPを固定できない?
-
Windows+QでCortanaを出して「hyper-v」で検索するとラク ↩