はじめに
Vue.jsでSPAを作っているとURLが変わらないので、Google Analyticsで情報が充分に取得できないのではないかという懸念があったので調べてみたが、実際には問題なく取得することができたので方法を簡単にまとめる。
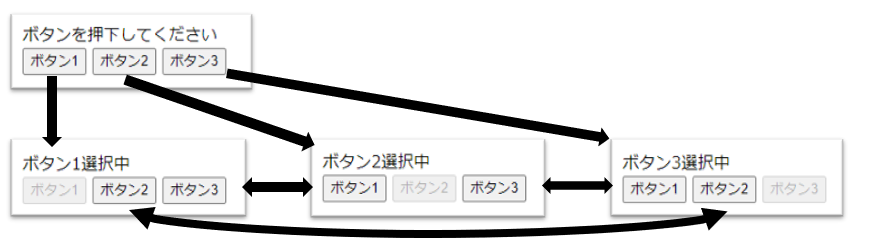
なお、今回は以下のような簡易な画面遷移をするSPAで、
- ページロード時は、/ のパスに遷移したことにする
- ボタン1を押下時は /#button1 のパスに遷移したことにする
- ボタン2を押下時は /#button2 のパスに遷移したことにする
- ボタン3を押下時は /#button3 のパスに遷移したことにする
という仕様にする。
コンテンツ
コンテンツは、index.htmlとapp.jsの簡易な構成とする。
index.html
<html>
  <head>
    <style>
      [v-cloak] { display: none }
    </style>
    <meta charset="utf-8">
    <title>Google Analytics SPAおためし</title>
  </head>
  <body>
    <div id="myapp" v-cloak>
      <div v-if="button_desabled">ボタンを押下してください</div>
      <div v-if="button1_enabled">ボタン1選択中</div>
      <div v-if="button2_enabled">ボタン2選択中</div>
      <div v-if="button3_enabled">ボタン3選択中</div>
      <button v-on:click="button1_clicked" v-bind:disabled="button1_enabled">ボタン1</button> <button v-on:click="button2_clicked" v-bind:disabled="button2_enabled">ボタン2</button> <button v-on:click="button3_clicked" v-bind:disabled="button3_enabled">ボタン3</button>
    </div>

    <!-- Vue.js を読み込む -->
    <script src="https://cdn.jsdelivr.net/npm/vue/dist/vue.js"></script>
    <script src="https://www.googletagmanager.com/gtag/js?id=${ga_mesurement_id}"></script>
    <script src="app.js"></script>
  </body>
</html>
${ga_mesurement_id} には、Google Analyticsの設定ページで払い出された「測定ID」を設定する。

app.js
window.dataLayer = window.dataLayer || []
function gtag () { dataLayer.push(arguments) }
gtag('js', new Date())

const app = new Vue({
  el: '#myapp',
  data: function () {
    return {
      button_desabled: true,
      button1_enabled: false,
      button2_enabled: false,
      button3_enabled: false
    }
  },
  created: function () {
    gtag('config', '${ga_mesurement_id}', { page_path: '/' })
  },
  methods: {
    button1_clicked: function () {
      this.button_desabled = false
      this.button1_enabled = true
      this.button2_enabled = false
      this.button3_enabled = false
      gtag('config', '${ga_mesurement_id}', { page_path: '/#button1' })
    },
    button2_clicked: function () {
      this.button_desabled = false
      this.button1_enabled = false
      this.button2_enabled = true
      this.button3_enabled = false
      gtag('config', '${ga_mesurement_id}', { page_path: '/#button2' })
    },
    button3_clicked: function () {
      this.button_desabled = false
      this.button1_enabled = false
      this.button2_enabled = false
      this.button3_enabled = true
      gtag('config', '${ga_mesurement_id}', { page_path: '/#button3' })
    }
  }
})

app.$mount('#myapp')
ここも、それほど難しいことはない。
Google Analyticsを
window.dataLayer = window.dataLayer || []
function gtag () { dataLayer.push(arguments) }
gtag('js', new Date())
で初期化し、あとはアクセス記録をしたい箇所で
gtag('config', '${ga_mesurement_id}', { page_path: '[パス]' })
とすれば良い。
実際にコンテンツにアクセスしてボタンを押してみると……
以下のような感じで、Google Analyticsのコンソール上でpage_pathで指定した単位でアクセスが分計できている。
これで、SPAでもいろいろな分析ができるようになった!
