はじめに
2025年3月15日のWhat's Newで、AWS CodePipelineが他のパイプラインを直接実行できるようになったという発表があった。
しかも
The action also supports cross-account pipeline triggering.
ということで、従来は以前書いた以下の記事のような感じで、Amazon EventBridgeで連携をしなければパイプライン完了時のクロスアカウントのパイプライン呼び出しができなかったのが、AWS CodePipelineネイティブの機能で対応可能になったようだ。
一方で、本記事を書いている時点で、この新機能を使ったクロスアカウントのパイプライン呼び出しの方法がマニュアルには書かれていなくて、AI Agentに聞いても分からずで途方に暮れてしまう人が出てくると推測される。
本記事では、Terraformを使ってこの新機能のクロスアカウントのパイプライン呼び出しを自動化する。
前提知識としては、以下があると読みやすい。
- Terraformについてのある程度の知識がある
- AWS CodePipelineの構築経験がある
- IAMのクロスアカウント運用(stsによる権限移譲)に関するプラクティスを理解している
IAMの設定
今回、Terraformでは、パイプライン実行元についてはデフォルトプロバイダ、実行先をaws.crossaccountのエイリアスで構築する。
実行先の設定
実行先では、実行元のアカウントに対して、codepipeline:StartPipelineExecutionの権限を委譲するIAMロールを新規に作成しておく。
最小権限のポリシーに従うには、resourcesの設定をaws_codepipeline.example_crossaccount.arnにして、このパイプライン以外を実行できないように制限しておこう(IAMは何も宣言しない場合Denyになる)。
本記事では、実行先のAWS CodePiplineリソースであるaws_codepipeline.example_crossaccountの構築については特に例示しない。以下のリンクに記載しているような最小構成のパイプラインを作って実験してみよう。
resource "aws_iam_role" "crossaccount_assume" {
  provider = aws.crossaccount

  name               = local.iam_crossaccount_assume_role_name
  assume_role_policy = data.aws_iam_policy_document.crossaccount_assume_assume.json
}

data "aws_iam_policy_document" "crossaccount_assume_assume" {
  statement {
    effect = "Allow"

    actions = [
      "sts:AssumeRole",
    ]

    principals {
      type = "AWS"
      identifiers = [
        aws_iam_role.codepipeline.arn,
      ]
    }
  }
}

resource "aws_iam_role_policy" "crossaccount_assume" {
  provider = aws.crossaccount

  name   = local.iam_crossaccount_assume_policy_name
  role   = aws_iam_role.crossaccount_assume.id
  policy = data.aws_iam_policy_document.crossaccount_assume_custom.json
}

data "aws_iam_policy_document" "crossaccount_assume_custom" {
  statement {
    sid = "AllowCodePipelineExecution"

    effect = "Allow"

    actions = [
      "codepipeline:StartPipelineExecution",
    ]

    resources = [
      aws_codepipeline.example_crossaccount.arn,
    ]
  }
}
実行元の設定
実行元では、既存のパイプラインの権限に、以下の権限を追加する。
上で作成した実行先のIAMロースにstsするための設定だ。
resource "aws_iam_role" "codepipeline" {
  name               = local.iam_codepipeline_role_name
  assume_role_policy = data.aws_iam_policy_document.codepipeline_assume.json
}

data "aws_iam_policy_document" "codepipeline_assume" {
  statement {
    effect = "Allow"

    actions = [
      "sts:AssumeRole",
    ]

    principals {
      type = "Service"
      identifiers = [
        "codepipeline.amazonaws.com",
      ]
    }
  }
}

resource "aws_iam_role_policy" "codepipeline" {
  name   = local.iam_codepipeline_policy_name
  role   = aws_iam_role.codepipeline.id
  policy = data.aws_iam_policy_document.codepipeline_custom.json
}

data "aws_iam_policy_document" "codepipeline_custom" {
  # 中略 他に必要なポリシーをここで設定しておく

+ statement {
+   sid = "AllowAssuneRole"
+
+   effect = "Allow"
+
+   actions = [
+     "sts:AssumeRole",
+   ]
+
+   resources = [
+     aws_iam_role.crossaccount_assume.arn,
+   ]
+  }
}
AWS CodePipelineの設定
実行元のAWS CodePipelineには、以下のステージを追加しよう。
肝になるのがrole_arn = aws_iam_role.crossaccount_assume.arnで、これを設定することで、ひとつ前の章で作ったaws.crossaccountのアカウントのロールに対してstsを実行することが可能になる。
nameは何を設定しても良いが、category, owner, providerは以下のように設定しないと正しく動作しないので注意が必要だ。
あとは、configurationで、実行先のAWS CodePipelineのパイプライン名を書いておけばよい。
なお、AWS CodePipelineは実行元と実行先で同じ名前が設定可能だが、こう設定すると、実行先のパイプライン名を正しく検知してトリガしていた。実装が謎だ……。
resource "aws_codepipeline" "example" {
  name     = local.codepipeline_pipeline_name
  role_arn = aws_iam_role.codepipeline.arn

  pipeline_type = "V2"

  # 中略。triggerやartifact_storeに加えて、必要なステージを入れておく

+ stage {
+   name = "Invoke"
+    action {
+     run_order = 1
+     name      = "Invoke"
+     category  = "Invoke"
+     owner     = "AWS"
+     provider  = "CodePipeline"
+     version   = "1"
+     role_arn  = aws_iam_role.crossaccount_assume.arn
+
+     configuration = {
+       PipelineName = aws_codepipeline.example_crossaccount.name
+     }
+   }
+ }
}
従来の構成よりもかなりリソース数少なく設定可能になったと感じる。
いざ、動かす
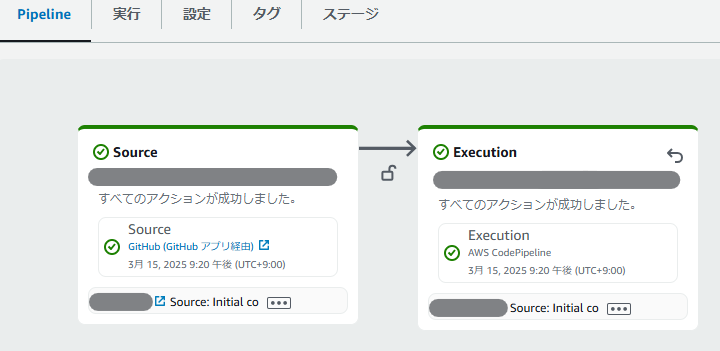
上記まで行ってからterraform applyすると、以下のようにパイプラインが順次起動して、両方正常終了するのが分かる。
なお、本機能でのパイプライン実行は非同期であるため、実行元アカウントで完了まで見届けるには別の方法を検討する必要があることを留意していただきた
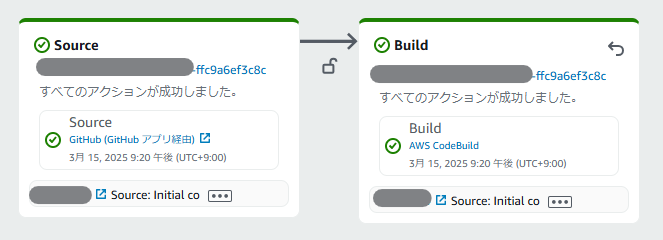
実行先
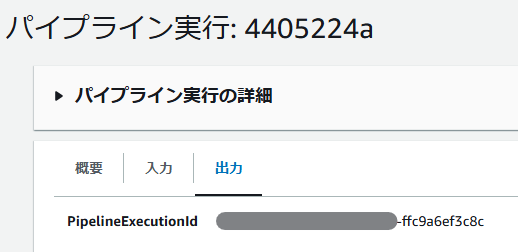
この画像だけだと分かりにくいが、実行元の「パイプライン実行」の出力と、実行先のアクション実行IDが一致していることから、実際にクロスアカウントの呼び出しが正解したと判断して良いだろう。
これで、CI/CDパイプラインの構築が以前よりも楽に行えるようになった!


