はじめに
自分のプロジェクト内部に閉じたALB配下のOSSを使うのに、インターネット経由で平文は不安!だけどローカルなものだし暗号化はしておきたいよね!でもお金はかけたくない!という時のためのオレオレ証明書作成方法。
先に言っておくとおくと、
- マネコンの画面ポチポチができる環境なのであれば、AWS Certificate ManagerのプライベートCA経由でのルート証明書発行がめちゃくちゃ簡単なので、素直にそっちを使った方が良い。どうせローカル利用であれば大した金額にはならない(ACMのプライベートCAは、Terraformではルート証明書の発行までやってくれないので、フルIaCを目指すのであればこの案は採用できない)
- 自分で
opensslコマンド作ってファイル作って良い環境なのであれば、その方が楽 - じゃあ何のためにやったんだよ……
という内容なので、あまり参考にはならないかもしれない。
前提条件
以下が前提条件。
- Terraformはなんとなく分かる
- SSL証明書関連がなんとなくわかる。
opensslコマンドで自分で証明書発行したことがないとちょっとつらい
あと、環境的には、
- EC2でHTTPサーバが起動している
- EC2の前段のALBの構築は完了していて、ターゲットグループにEC2インスタンスをアタッチ済み
- セキュリティグループでHTTPSの穴あけができている
- あとは443ポートで受け付けるリスナーを作って、構築済みターゲットグループに転送するだけの状態
になっているところからスタートする。
Terraformの内容
全体構成
以下のようなフォルダ構成とする
.
├── 00_main.tf
├── 01_variables.tf
├── 02_data_sources.tf
├── 11_alb.tf
└── 12_acm.tf
00_main.tf はプロバイダ定義しか書いていないので、テキトーに設定しておく。
01_variables.tf には、内部で参照するALBとターゲットグループのリソース名を定義しておく。
variable "prefix" {
  default = "ACMTest"
}

locals{
  alb_name = "${var.prefix}-ALB"
  tg_name  = "${var.prefix}-TG"
}
02_data_sources.tf も、内部で使うデータリソースを定義するだけ。
data "aws_alb" "https_test" {
  name = "${local.alb_name}"
}

data "aws_alb_target_group" "https_test" {
  name = "${local.tg_name}"
}
ALBの設定
ここからが本番。
今回は、ACMに証明書登録して参照する方法を採用しているため、certificate_arnにはこの後定義するaws_acm_certificateのARNを設定する。それ以外は特に普通のALBの設定。
resource "aws_alb_listener" "https_test" {
  load_balancer_arn = "${data.aws_alb.https_test.arn}"
  port              = "443"
  protocol          = "HTTPS"
  ssl_policy        = "ELBSecurityPolicy-2016-08"
  certificate_arn   = "${aws_acm_certificate.https_test.arn}"

  default_action {
    type             = "forward"
    target_group_arn = "${data.aws_alb_target_group.https_test.arn}"
  }
}
ルート証明書の作成
次がそのARNの証明書の設定。
今回はコマンドとかを使わずにフルIaCでALBをHTTPS化することを目的にしているため、TerraformのTLSプロバイダを使う。
まずは、オレオレルート証明書を作る部分から。
tls_private_key で algorithm = "RSA"するのが、opensslでいう $ openssl genrsa 2048 に該当する。
鍵を作ったら、その鍵を使って $ openssl req -new -x509 … しているイメージだ。
作った証明書は local_file リソースでファイル出力して保管しておく。
resource "tls_private_key" "https_test_root" {
  algorithm = "RSA"
}

resource "tls_self_signed_cert" "https_test_root" {
  key_algorithm   = "${tls_private_key.https_test_root.algorithm}"
  private_key_pem = "${tls_private_key.https_test_root.private_key_pem}"

  subject {
    common_name  = "HTTPS_TEST_ROOT"
  }

  validity_period_hours = 87600

  is_ca_certificate = true

  allowed_uses = [
   "digital_signature",
   "crl_signing",
   "cert_signing",
  ]
}

resource "local_file" "https_test_root_key" {
  filename = "https_test_root.key"
  content  = "${tls_private_key.https_test_root.private_key_pem}"
}

resource "local_file" "https_test_root_pem" {
  filename = "https_test_root.crt"
  content  = "${tls_self_signed_cert.https_test_root.cert_pem}"
}
サーバ証明書の作成
ルート証明書ができたら今度はサーバ証明書の作成。
ルート証明書同様、tls_private_key で鍵を作って、今度は tls_cert_request リソースでその鍵を使って $ openssl req -new … で証明書署名要求(CSR)を作成する。最後に tls_locally_signed_cert リソースで $ openssl x509 -req …してサーバ証明書を作成する。
今回は、ALBのデフォルト名をそのまま使うので、CNやDNS名には*.ap-northeast-1.elb.amazonaws.comを設定する。
resource "tls_private_key" "https_test" {
  algorithm = "RSA"
}

resource "tls_cert_request" "https_test" {
  key_algorithm   = "${tls_private_key.https_test.algorithm}"
  private_key_pem = "${tls_private_key.https_test.private_key_pem}"

  subject {
    common_name  = "*.ap-northeast-1.elb.amazonaws.com"
  }

  dns_names = [
    "*.ap-northeast-1.elb.amazonaws.com",
  ]
}

resource "tls_locally_signed_cert" "https_test" {
  cert_request_pem   = "${tls_cert_request.https_test.cert_request_pem}"

  ca_key_algorithm   = "${tls_private_key.https_test_root.algorithm}"
  ca_private_key_pem = "${tls_private_key.https_test_root.private_key_pem}"
  ca_cert_pem        = "${tls_self_signed_cert.https_test_root.cert_pem}"

  validity_period_hours = 87600

  is_ca_certificate = false
  set_subject_key_id = true

  allowed_uses = [
    "key_encipherment",
    "digital_signature",
    "server_auth",
    "client_auth",
  ]
}

resource "local_file" "https_test_key" {
  filename = "https_test.key"
  content  = "${tls_private_key.https_test.private_key_pem}"
}

resource "local_file" "https_test_cert_pem" {
  filename = "https_test_cert.pem"
  content  = "${tls_locally_signed_cert.https_test.cert_pem}"
}
これで証明書が作れたので、ACMにアタッチしてあげればよい。
certificate_chain でルート証明書を紐づけてあげる(これをやらないとブラウザが良い感じに処理してくれないように思われる)。
Nameタグが画面表示に使われるので、何か設定をしておこう。
resource "aws_acm_certificate" "https_test" {
  private_key       = "${tls_private_key.https_test.private_key_pem}"
  certificate_body  = "${tls_locally_signed_cert.https_test.cert_pem}"
  certificate_chain = "${tls_self_signed_cert.https_test_root.cert_pem}"

  tags = {
    Name = "[テキトーな名前]"
  }
}
動かしてみる
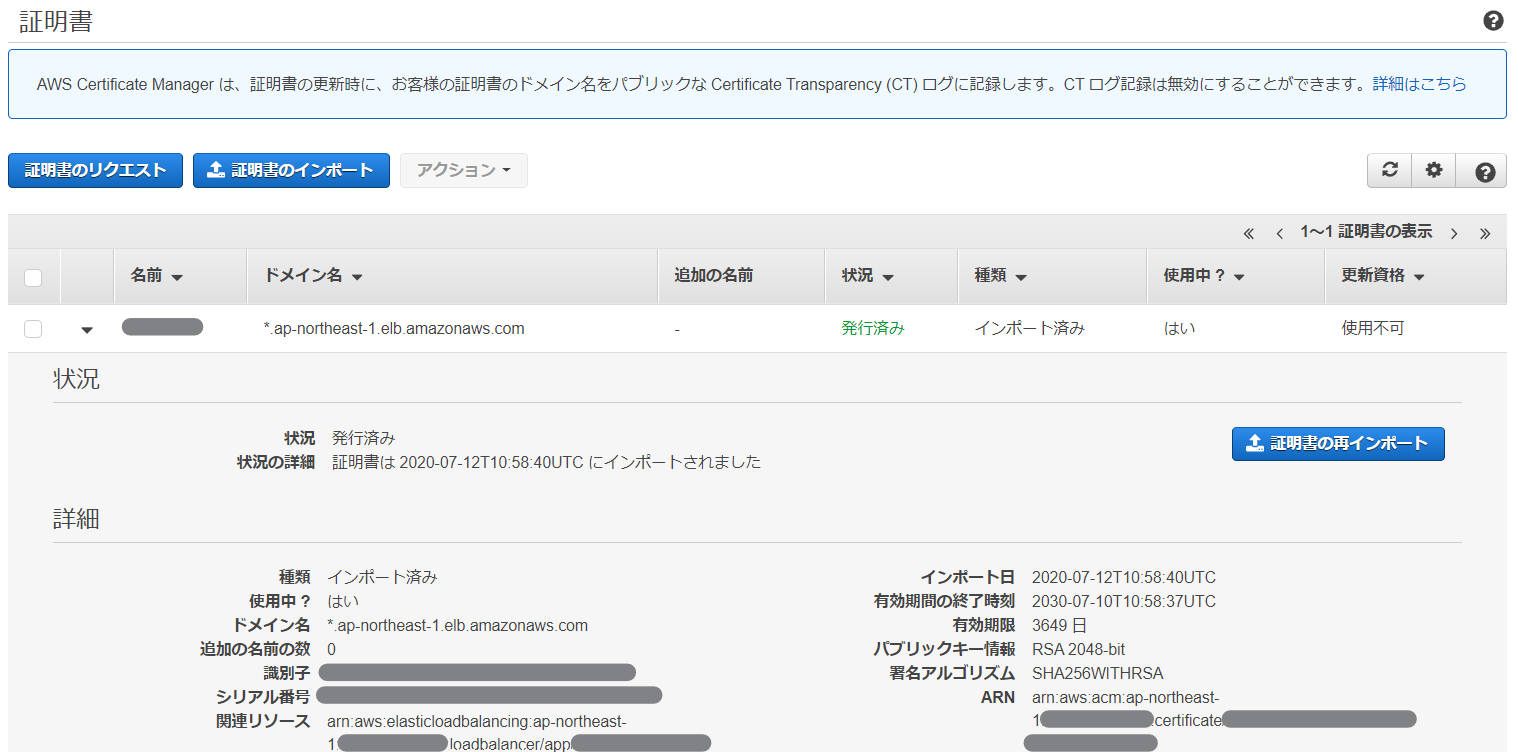
さて、これで terraform applyすれば
といった感じで、ACMに証明書が登録される。
これで、ALBのDNS名にhttps://~でアクセスすれば、いつもの「信頼されていないサイト」の画面が出るので、```terraform apply``` したディレクトリに出力されている https_test_root.crt の内容を、このあたりのサイトを参考にしつつ、ルート証明書に登録すれば良い。
これで、エラー画面を経由せずにHTTPS化したALBにアクセスできたぞ!
※危険なのでProduction環境では絶対にやらないように。最初に書いた通り、素直にACMのプライベートCA使うのが楽だよ!
その他
正常性確認が終わった後のゴミ掃除は以下のサイトを参考にすればOK。
(何回もトライ&エラーで消したりしていた)
