はじめに
AWS WAF+Terraform記事第3弾。
基本のルール設定編の続き。
今回は、ロギングの設定ついて確認をしていく。
第2弾の記事は直接は関係ないので、参考程度に見ておいていただければ。
Firehoseの設定が必要なのでやや複雑になる。
ロギングの設定
ロギングの設定には、aws_wafv2_web_acl_logging_configuration のリソースを使う。
resource "aws_wafv2_web_acl_logging_configuration" "iprestriction" {
  log_destination_configs = [aws_kinesis_firehose_delivery_stream.web_acl_log.arn]
  resource_arn            = aws_wafv2_web_acl.iprestriction.arn
}
これで、Firehose と Web ACL を繋ぐイメージだ。
で、Firehoseについては以下のように設定をする。
なお、公式ドキュメントに書かれている通り、Firehose のストリーム名は aws-waf-logs- で始まっていないと terraform apply がエラーになるため、注意が必要だ(固定で設定されるIAMで、上記のストリーム名しか権限を与えていないため)。
Firehose には S3 バケットへのアクセス権限を設定しておこう。
################################################################################
# Kinesis Firehose                                                             #
################################################################################
locals {
  firehose_stream_name = "aws-waf-logs-iprestriction"
}

resource "aws_kinesis_firehose_delivery_stream" "web_acl_log" {
  name        = local.firehose_stream_name
  destination = "s3"

  s3_configuration {
    role_arn   = aws_iam_role.firehose.arn
    bucket_arn = aws_s3_bucket.web_acl_log.arn
  }
}

################################################################################
# S3                                                                           #
################################################################################
resource "aws_s3_bucket" "web_acl_log" {
  bucket = local.bucket_name
  acl    = "private"
}

################################################################################
# IAM Role for Kinesis Firehose                                                #
################################################################################
resource "aws_iam_role" "firehose" {
  name               = local.firehose_role_name
  assume_role_policy = data.aws_iam_policy_document.firehose_assume.json
}

data "aws_iam_policy_document" "firehose_assume" {
  statement {
    effect = "Allow"

    actions = [
      "sts:AssumeRole",
    ]

    principals {
      type = "Service"
      identifiers = [
        "firehose.amazonaws.com",
      ]
    }
  }
}

resource "aws_iam_role_policy_attachment" "firehose" {
  role       = aws_iam_role.firehose.name
  policy_arn = aws_iam_policy.firehose_custom.arn
}

resource "aws_iam_policy" "firehose_custom" {
  name   = local.firehose_policy_name
  policy = data.aws_iam_policy_document.firehose_custom.json
}

data "aws_iam_policy_document" "firehose_custom" {
  statement {
    effect = "Allow"

    actions = [
      "s3:AbortMultipartUpload",
      "s3:GetBucketLocation",
      "s3:GetObject",
      "s3:ListBucket",
      "s3:ListBucketMultipartUploads",
      "s3:PutObject",
    ]

    resources = [
      "*",
    ]
  }
}
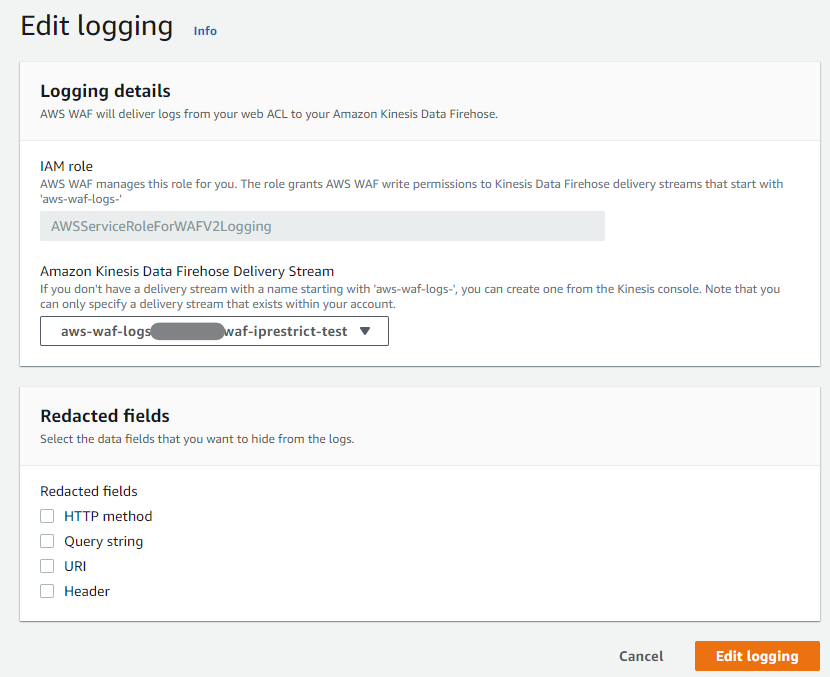
この設定を行うと、マネージメントコンソールでロギングの設定が Enabled になる。
Edit logging のボタンを押すと、以下のように詳細を確認できる。
これで WAF を設定しているリソースにアクセスすると、以下のようにログが出力される。
{
  "timestamp": 1607851908001,
  "formatVersion": 1,
  "webaclId": "arn:aws:wafv2:ap-northeast-1:xxxxxxxxxxxx:regional/webacl/waf-iprestrict-test-webacl/xxxxxxxx-xxxx-xxxx-xxxx-xxxxxxxxxxxx",
  "terminatingRuleId": "iprestriction",
  "terminatingRuleType": "REGULAR",
  "action": "BLOCK",
  "terminatingRuleMatchDetails": [],
  "httpSourceName": "APIGW",
  "httpSourceId": "xxxxxxxxxxxx:xxxxxxxxxx:prod",
  "ruleGroupList": [],
  "rateBasedRuleList": [],
  "nonTerminatingMatchingRules": [],
  "httpRequest": {
    "clientIp": "xxx.xxx.xxx.xxx",
    "country": "JP",
    "headers": [
      {
        "name": "Accept",
        "value": "*/*"
      },
      {
        "name": "CloudFront-Forwarded-Proto",
        "value": "https"
      },
      {
        "name": "CloudFront-Is-Desktop-Viewer",
        "value": "true"
      },
      {
        "name": "CloudFront-Is-Mobile-Viewer",
        "value": "false"
      },
      {
        "name": "CloudFront-Is-SmartTV-Viewer",
        "value": "false"
      },
      {
        "name": "CloudFront-Is-Tablet-Viewer",
        "value": "false"
      },
      {
        "name": "CloudFront-Viewer-Country",
        "value": "JP"
      },
      {
        "name": "Host",
        "value": "xxxxxxxxxx.execute-api.ap-northeast-1.amazonaws.com"
      },
      {
        "name": "User-Agent",
        "value": "curl/7.61.1"
      },
      {
        "name": "Via",
        "value": "2.0 xxxxxxxxxxxxxxxxxxxxxxxxxxxxxxxx.cloudfront.net (CloudFront)"
      },
      {
        "name": "X-Amz-Cf-Id",
        "value": "xxxxxxxxxxxxxxxxxxxxxxxxxxxxxxxxxxxxxxxxxxxxxxxxxxxxxxxx"
      },
      {
        "name": "X-Amzn-Trace-Id",
        "value": "Root=xxxxxxxxxxxxxxxxxxxxxxxxxxxxxxxxxxx"
      },
      {
        "name": "X-Forwarded-For",
        "value": "xxx.xxx.xxx.xxx, xxx.xxx.xxx.xxx"
      },
      {
        "name": "X-Forwarded-Port",
        "value": "443"
      },
      {
        "name": "X-Forwarded-Proto",
        "value": "https"
      },
      {
        "name": "Content-Length",
        "value": "0"
      },
      {
        "name": "Connection",
        "value": "Keep-Alive"
      }
    ],
    "uri": "/prod/employee",
    "args": "id=00001",
    "httpVersion": "HTTP/1.1",
    "httpMethod": "GET",
    "requestId": "xxxxxxxxxxxxxxxx"
  }
}
Redacted fields って何だ?
↑のキャプチャに Redacted fields という項目がある。
これは、ログにセンシティブな情報を記録しないようにするための設定だ。
設定した項目について、ログ上でマスクされるようになる。
たとえば、User Agent について表示したくない場合、aws_wafv2_web_acl_logging_configuration のリソースを以下のように設定すれば良い。
resource "aws_wafv2_web_acl_logging_configuration" "iprestriction" {
  log_destination_configs = [aws_kinesis_firehose_delivery_stream.web_acl_log.arn]
  resource_arn            = aws_wafv2_web_acl.iprestriction.arn

  redacted_fields {
    single_header {
      name = "user-agent"
    }
  }
}
こうすることで、ログ中の該当のヘッダ項目が
      {
        "name": "User-Agent",
        "value": "REDACTED"
      },
といった具合にマスクされる。上記の通り、この設定についてはケースインセンシティブのようだ。
ちなみに、複数設定する場合は、
resource "aws_wafv2_web_acl_logging_configuration" "iprestriction" {
  log_destination_configs = [aws_kinesis_firehose_delivery_stream.web_acl_log.arn]
  resource_arn            = aws_wafv2_web_acl.iprestriction.arn

  redacted_fields {
    query_string {}
  }

  redacted_fields {
    single_header {
      name = "user-agent"
    }
  }
}
と、redacted_fields のブロックを書き並べれば良い。
ただし、Terraformのバグで single_header 以外は設定されない(無視される)。
残念ながら、マネージメントコンソールなりCLIから設定する必要がありそうだ……。早くバグフィックスされることを切に願う……。
ともあれ、これで一通りの Web ACL の設定はできるようになった!
あとはルールの設定に慣れるだけだ!

