はじめに
2021年6月に、API GatewayはStep Functions Express Workflowをトリガできるようになり、より柔軟にマイクロサービスのアプリケーション開発をする際の幅が広がった。
一方で、Step Functionsのインプット/アウトプットには癖があり、それなりに癖のあるAPI Gatewayと組み合わせるとよりワケが分からなくなる。
今回は、ログを確認しながら実際にAPI Gateway+Step Functions+Lambdaで作るREST APIをどのように実現すると良いかを書いてみる。
必要となる前提知識は、
- Terraformをある程度書いたことがある(本記事ではリソースをTerraformで作る前提としている)
- API Gatewayをある程度構築したことがある(OpenAPIによる構築方法もそれなりに理解している)
- Step Functionsはちょっとだけ知っていればOK
あたりだ。普段書いている記事よりも少しハードルが高い。
API Gatewayの構築については、過去の記事も参考にしていただきたい。
構成図
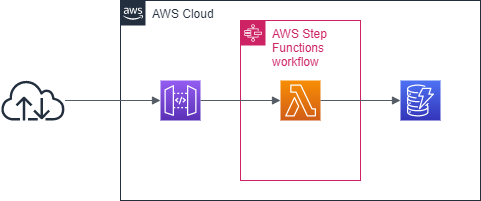
構成図は以下のようなイメージになる。
API Gatewayは、prodのステージに/student?id=xxxxxなPUTメソッドを持つ。
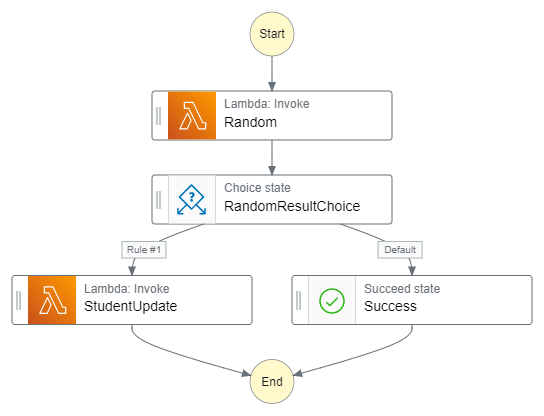
StepFunctions では、渡されたIDの生徒について、ランダムに遅刻かセーフかを判定して、遅刻の場合はDynamoDBをカウントするようなステートマシンを作成する。
ステートマシンの詳細は後程記載する。
API Gatewayの構築
API Gatewayはシンプルに以下のように作ろう。
全然シンプルに見えないが、だいたいこれがStep Functionsと統合して作る場合の最小セットと考えてもらいたい。
IAM
API Gatewayにはstates:StartSyncExecutionをつけておけば良いので、サクッと以下のように作っておく。
resource "aws_iam_role" "apigateway_stepfunctions_integrate" {
  name               = local.rest_api_stepfunctions_integrate_role_name
  assume_role_policy = data.aws_iam_policy_document.apigateway_stepfunctions_integrate_assume.json
}

data "aws_iam_policy_document" "apigateway_stepfunctions_integrate_assume" {
  statement {
    effect = "Allow"

    actions = [
      "sts:AssumeRole",
    ]

    principals {
      type = "Service"
      identifiers = [
        "apigateway.amazonaws.com",
      ]
    }
  }
}

resource "aws_iam_role_policy" "apigateway_stepfunctions_integrate_custom" {
  name   = local.rest_api_stepfunctions_integrate_policy_name
  role   = aws_iam_role.apigateway_stepfunctions_integrate.id
  policy = data.aws_iam_policy_document.apigateway_stepfunctions_integrate_custom.json
}

data "aws_iam_policy_document" "apigateway_stepfunctions_integrate_custom" {
  statement {
    effect = "Allow"

    actions = [
      "states:StartSyncExecution",
    ]

    resources = [
      "*",
    ]
  }
}
API Gateway
API Gateway本体の特筆すべき部分は、x-amazon-apigateway-integrationでStep FunctionsのARNを渡すのではなく、この部分はあくまでもアクションを指定し、requestTemplatesでARNを渡す。少し変わったやり方だ。
また、今回は、クエリパラメータで渡ってきた?id=00001といった文字列をStep FunctionsのInputとして渡すモデルにするため、requestTemplatesでパラメータから渡す部分を指定する。
応答については、この後記載するように、StepFunctionsの応答はシンプルなOK/NGにして、レスポンステンプレートを使って、resultを編集するモデルにしているため、正常応答時は、responseTemplatesでVTLを定義して、messageを分岐させている。
Step Functionsが起動できた後のresponseTemplatesは、Step Functionsの解説後に記載する。
resource "aws_api_gateway_rest_api" "example" {
  name = local.api_gateway_name
  body = data.template_file.apigateway_body.rendered
}

resource "aws_api_gateway_stage" "prod" {
  stage_name    = "prod"
  rest_api_id   = aws_api_gateway_rest_api.example.id
  deployment_id = aws_api_gateway_deployment.for_prod.id
}

resource "aws_api_gateway_deployment" "for_prod" {
  rest_api_id = aws_api_gateway_rest_api.example.id

  triggers = {
    redeployment = sha1(join(",", list(
      jsonencode(data.template_file.apigateway_body.rendered),
    )))
  }

  lifecycle {
    create_before_destroy = true
  }
}

data "template_file" "apigateway_body" {
  template = file("${path.module}/apigateway_body.yaml")

  vars = {
    api_gateway_name                  = local.api_gateway_name
    step_functions_integration_role   = aws_iam_role.apigateway_stepfunctions_integrate.arn
    step_functions_student_update_arn = aws_sfn_state_machine.student_update.arn
    response_template_student_put     = replace(replace(data.template_file.response_template_student_put.rendered, "\"", "\\\""), "\n", "\\n")
  }
}

data "template_file" "response_template_student_put" {
  template = file("${path.module}/apigateway_response_template_student_put.vtl")
}
---
swagger: "2.0"
info:
  description: "Step Function統合テスト用API Gateway"
  version: "2021-09-12T05:00:12Z"
  title: "${api_gateway_name}"
basePath: "/prod"
schemes:
- "https"
paths:
  /student:
    put:
      consumes:
      - "application/json"
      produces:
      - "application/json;charset=UTF8"
      responses:
        "200":
          description: "200 response"
        "400":
          description: "400 response"
        "500":
          description: "500 response"
      x-amazon-apigateway-integration:
        credentials: "${step_functions_integration_role}"
        httpMethod: "POST"
        uri: "arn:aws:apigateway:ap-northeast-1:states:action/StartSyncExecution"
        responses:
          default:
            statusCode: "200"
            responseTemplates:
              application/json;charset=UTF8: "${response_template_student_put}"
          "400":
            statusCode: "400"
            responseTemplates:
              application/json;charset=UTF8: "
                #set($context.error.message = \"Bad Parameter.\")
                {
                  \"data\": \"\",
                  \"errorMessage\": \"Bad Parameter.\"
                }"
          "5\\d{2}":
            statusCode: "500"
            responseTemplates:
              application/json;charset=UTF8: "
                #set($context.error.message = \"Internal Error.\")
                {
                  \"data\": \"\",
                  \"errorMessage\": \"Internal Error.\"
                }"
        requestTemplates:
          application/json: "{
              \"input\": \"{
                \\\"id\\\": \\\"$input.params('id')\\\"
              }\",
                \"stateMachineArn\": \"${step_functions_student_update_arn}\"
              }"
        passthroughBehavior: "when_no_match"
        timeoutInMillis: 29000
        type: "aws"
# set($outputJson = $util.parseJson($input.path('$.output')))
{
# if($outputJson.RandomResult.Payload.result == "OK")
  #set($context.responseOverride.status = 200)
  "data": "",
  "message": "In time."
# elseif($outputJson.RandomResult.Payload.result == "NG")
# if($outputJson.StudentUpdateResult.Payload.result == "OK")
# set($context.responseOverride.status = 200)
  "data": "",
  "message": "Late."
# else
# set($context.responseOverride.status = 500)
  "data": "",
  "message": "Internal Server Error."
# end
# else
# set($context.responseOverride.status = 500)
  "data": "",
  "message": "Internal Server Error."
# end
}
Lambdaの構築
Lambdaは
- ランダムでOK/NGを返すもの
- DynamoDBをカウントアップするもの
を作っておく。
それぞれ、超簡単に作る。
エラーハンドリング等はお粗末だったり、DynamoDBで数値のインクリメントするならデータ型をNで定義しろよとか色々ツッコミどころがあると思うが、目を瞑っておいていただきたい。
LambdaのアクセスするDynamoDBと、アクセス許可用のIAMロール
今回、LambdaからはDynamoDBにアクセスするため、以下のテーブルを作り権限を付与しておく。
DynamoDB
とりあえず、データを入れる機能を作るのが面倒なので、aws_dynamodb_table_itemで1レコードだけは入れておこう。
resource "aws_dynamodb_table" "student" {
  name         = local.dynamodb_table_name
  billing_mode = "PAY_PER_REQUEST"

  hash_key = "id"

  attribute {
    name = "id"
    type = "S"
  }
}

resource "aws_dynamodb_table_item" "student" {
  table_name = aws_dynamodb_table.student.name
  hash_key   = aws_dynamodb_table.student.hash_key
  range_key  = aws_dynamodb_table.student.range_key

  item = <<ITEM
{
  "id": {"S": "00001"},
  "name": {"S": "Taro"},
  "late_count": {"S": "0"}
}
ITEM
}
IAMロール
resource "aws_iam_role" "for_lambda" {
  name               = local.lambda_role_name
  assume_role_policy = data.aws_iam_policy_document.lambda_assume.json
}

data "aws_iam_policy_document" "lambda_assume" {
  statement {
    effect = "Allow"

    actions = [
      "sts:AssumeRole",
    ]

    principals {
      type = "Service"
      identifiers = [
        "lambda.amazonaws.com",
      ]
    }
  }
}

resource "aws_iam_role_policy" "lambda_custom" {
  role   = aws_iam_role.for_lambda.id
  name   = local.lambda_policy_name
  policy = data.aws_iam_policy_document.lambda_custom.json
}

data "aws_iam_policy_document" "lambda_custom" {
  statement {
    effect = "Allow"

    actions = [
      "dynamodb:GetItem",
      "dynamodb:UpdateItem",
      "logs:CreateLogGroup",
      "logs:CreateLogStream",
      "logs:PutLogEvents",
    ]

    resources = [
      "*",
    ]
  }
}
ランダムでOK/NGを返すもの
Pythonコード
import random

def lambda_handler(event, context):
    random_number = random.randint(0,1)

    if random_number == 0:
        return {"result": "NG"}
    else:
        return {"result": "OK"}
Terraform
data "archive_file" "random" {
  type        = "zip"
  source_dir  = "../scripts/random"
  output_path = "../outputs/random.zip"
}

resource "aws_lambda_function" "random" {
  function_name    = local.lambda_random_function_name
  filename         = data.archive_file.random.output_path
  role             = aws_iam_role.for_lambda.arn
  handler          = "random.lambda_handler"
  source_code_hash = data.archive_file.random.output_base64sha256
  runtime          = "python3.6"

  memory_size = 128
  timeout     = 30
}
DynamoDBをカウントアップするもの
Pythonコード
import os
import boto3
from boto3.dynamodb.conditions import Key

dynamodb = boto3.resource('dynamodb')
table    = dynamodb.Table(os.environ['DYNAMODB_TABLE_NAME'])

def update_item(id, late_count):
    try:
        table.update_item(
            Key={'id': id},
            UpdateExpression="set late_count = :late_count",
            ExpressionAttributeValues={':late_count': str(late_count)}
        )
    except Exception as error:
        print(error)
        raise Exception('DynamoDB Error')

def get_item(id):
    try:
        response = table.get_item(
            Key={'id': id}
        )
        return response['Item']
    except Exception as error:
        print(error)
        raise Exception('DynamoDB Error')

def lambda_handler(event, context):
    print(event)

    status_code = 200

    try:
        event['id']
    except:
        print("Required input 'id' not found.")
        status_code = 400

    if status_code == 200:
        try:
            item = get_item(event['id'])
        except:
            print("get_item() error.")
            status_code = 500

    if status_code == 200:
        try:
            update_item(event['id'], int(item['late_count'])+1)
        except:
            print("update_item() error.")
            status_code = 500

    if status_code == 200:
        return {'result': 'OK'}
    else:
        return {'result': 'NG'}
Terraform
data "archive_file" "student_update" {
  type        = "zip"
  source_dir  = "../scripts/student_update"
  output_path = "../outputs/student_update.zip"
}

resource "aws_lambda_function" "student_update" {
  function_name    = local.lambda_student_update_function_name
  filename         = data.archive_file.student_update.output_path
  role             = aws_iam_role.for_lambda.arn
  handler          = "student_update.lambda_handler"
  source_code_hash = data.archive_file.student_update.output_base64sha256
  runtime          = "python3.6"

  memory_size = 128
  timeout     = 30

  environment {
    variables = {
      DYNAMODB_TABLE_NAME = aws_dynamodb_table.student.name,
    }
  }
}
Step Functionsを構築する
さて、いよいよStep Functionsだ。
IAMロールの作成
とは言え、例によってまずはIAMで権限付与をしておこう。
Principalsに指定するサービスはstates.amazonaws.comだ。
今回、ログを出力してあれこれ確認するので、ActionsにはCloudWatch Logs関連の権限を付与しておく。
また、Lambdaを実行するのでlambda:InvokeFunctionも必要だ。
resource "aws_iam_role" "stepfunctions" {
  name               = local.stepfunctions_role_name
  assume_role_policy = data.aws_iam_policy_document.stepfunctions_assume.json
}

data "aws_iam_policy_document" "stepfunctions_assume" {
  statement {
    effect = "Allow"

    actions = [
      "sts:AssumeRole",
    ]

    principals {
      type = "Service"
      identifiers = [
        "states.amazonaws.com",
      ]
    }
  }
}

resource "aws_iam_role_policy" "stepfunctions_custom" {
  role   = aws_iam_role.stepfunctions.id
  name   = local.stepfunctions_policy_name
  policy = data.aws_iam_policy_document.stepfunctions_custom.json
}

data "aws_iam_policy_document" "stepfunctions_custom" {
  statement {
    effect = "Allow"

    actions = [
      "logs:CreateLogDelivery",
      "logs:GetLogDelivery",
      "logs:UpdateLogDelivery",
      "logs:DeleteLogDelivery",
      "logs:ListLogDeliveries",
      "logs:PutResourcePolicy",
      "logs:DescribeResourcePolicies",
      "logs:DescribeLogGroups",
    ]

    resources = [
      "*",
    ]
  }
  statement {
    effect = "Allow"

    actions = [
      "lambda:InvokeFunction",
    ]

    resources = [
      "${aws_lambda_function.random.arn}:*",
      "${aws_lambda_function.student_update.arn}:*",
    ]
  }
}
Step Functionsの構築
Step Functions自体は、TerraformのIaCは非常に簡単だ。
中身は外部ファイルで書くことになるので。
Express Workflowにする場合は、type = "EXPRESS"を指定する。
ログはCloudWatch Logsの出力設定をしておこう。
resource "aws_sfn_state_machine" "student_update" {
  name     = local.statemachine_student_update_name
  role_arn = aws_iam_role.stepfunctions.arn
  type     = "EXPRESS"

  definition = data.template_file.student_update.rendered

  logging_configuration {
    log_destination        = "${aws_cloudwatch_log_group.statemachine_student_update.arn}:*"
    include_execution_data = true
    level                  = "ALL"
  }
}

data "template_file" "student_update" {
  template = file("${path.module}/stepfunctions_student_update.json")

  vars = {
    lambda_random_arn         = aws_lambda_function.random.arn
    lambda_student_update_arn = aws_lambda_function.student_update.arn
  }
}

resource "aws_cloudwatch_log_group" "statemachine_student_update" {
  name              = "/aws/vendedlogs/states/${local.statemachine_student_update_name}-Logs"
  retention_in_days = 3
}
ASLの作成
さて、Step Functionsの内容はASLというJSONで記述する。
ぶっちゃけ、このJSONだけ見ても意味不明だと思うので、Step Functions Workflow Studioが描いてくれたワークフロー図を貼っておく。Step Functions Workflow Studio、超便利かと思いきや、結局中身を詳細に書いていこうとすると自力部分が結構でてくるので、フローのひな型を作ったらその後は自分で書いていくのが良さそうだ。
※そもそもIaCと組み合わせるのであれば、ARNなんかは外部から渡してあげたいし……。
上記のワークフロー図を現したASLが以下だ。
{
  "Comment": "Student Late Count Update (on Random) State Machine",
  "StartAt": "Random",
  "States": {
    "Random": {
      "Type": "Task",
      "Resource": "arn:aws:states:::lambda:invoke",
      "Parameters": {
        "Payload.$": "$",
        "FunctionName": "${lambda_random_arn}:$LATEST"
      },
      "ResultPath": "$.RandomResult",
      "Next": "RandomResultChoice"
    },
    "RandomResultChoice": {
      "Type": "Choice",
      "Choices": [
        {
          "Variable": "$.RandomResult.Payload.result",
          "StringEquals": "NG",
          "Next": "StudentUpdate"
        }
      ],
      "Default": "Success"
    },
    "StudentUpdate": {
      "Type": "Task",
      "Resource": "arn:aws:states:::lambda:invoke",
      "Parameters": {
        "Payload.$": "$",
        "FunctionName": "${lambda_student_update_arn}:$LATEST"
      },
      "ResultPath": "$.StudentUpdateResult",
      "End": true
    },
    "Success": {
      "Type": "Succeed"
    }
  }
}
ログから見る各ステートのインプットとアウトプットの関係性
さて、Step Functionsのインプットとアウトプットについては、例によってクラスメソッド先生の解説記事が分かりやすいが、実際これってどのようにログが流れているのだろうか?
早速、ONにしたログを眺めながら確認してみよう。
Step Functionsへのインプットとなる情報
これは、API GatewayのresponseTemplatesで指定した値がそのまま入ってくると思って良い。
        requestTemplates:
          application/json: "{
              \"input\": \"{
                \\\"id\\\": \\\"$input.params('id')\\\"
              }\",
                \"stateMachineArn\": \"${step_functions_student_update_arn}\"
              }"
{
    "id": "1",
    "type": "ExecutionStarted",
    "details": {
        "input": "{ \"id\": \"00001\" }",
        "inputDetails": {
            "truncated": false
        },
        "roleArn": "arn:aws:iam::XXXXXXXXXXXX:role/XXXXXXXXXXXX"
    },
    "previous_event_id": "0",
    "event_timestamp": "1632144225604",
    "execution_arn": "arn:aws:states:ap-northeast-1:XXXXXXXXXXXX:express:XXXXXXXXXXXX:XXXXXXXX-XXXX-XXXX-XXXX-XXXXXXXXXXXX:XXXXXXXX-XXXX-XXXX-XXXX-XXXXXXXXXXXX"
}
Lambda⇒Step Functionsに渡す情報
便宜上、先にアウトプットについて記載しておく。
今回、random.pyが返す{"result": "OK/NG"}の情報を判定したい。
これを、Step Functionsは以下のようにして返してくるようだ。
重要なのは、Payloadで、ここに応答した情報が設定されている。
{
    "id": "5",
    "type": "TaskSucceeded",
    "details": {
        "output": "{\"ExecutedVersion\":\"$LATEST\",\"Payload\":{\"result\":\"OK\"},\"SdkHttpMetadata\":{\"AllHttpHeaders\":{\"X-Amz-Executed-Version\":[\"$LATEST\"],\"x-amzn-Remapped-Content-Length\":[\"0\"],\"Connection\":[\"keep-alive\"],\"x-amzn-RequestId\":[\"XXXXXXXX-XXXX-XXXX-XXXX-XXXXXXXXXXXX\"],\"Content-Length\":[\"16\"],\"Date\":[\"Mon, 20 Sep 2021 13:23:45 GMT\"],\"X-Amzn-Trace-Id\":[\"root=X-XXXXXXXX-XXXXXXXXXXXXXXXXXXXXXXXX;parent=XXXXXXXXXXXXXXXX;sampled=1\"],\"Content-Type\":[\"application/json\"]},\"HttpHeaders\":{\"Connection\":\"keep-alive\",\"Content-Length\":\"16\",\"Content-Type\":\"application/json\",\"Date\":\"Mon, 20 Sep 2021 13:23:45 GMT\",\"X-Amz-Executed-Version\":\"$LATEST\",\"x-amzn-Remapped-Content-Length\":\"0\",\"x-amzn-RequestId\":\"XXXXXXXX-XXXX-XXXX-XXXX-XXXXXXXXXXXX\",\"X-Amzn-Trace-Id\":\"root=X-XXXXXXXX-XXXXXXXXXXXXXXXXXXXXXXXX;parent=XXXXXXXXXXXXXXXX;sampled=1\"},\"HttpStatusCode\":200},\"SdkResponseMetadata\":{\"RequestId\":\"XXXXXXXX-XXXX-XXXX-XXXX-XXXXXXXXXXXX\"},\"StatusCode\":200}",
        "outputDetails": {
            "truncated": false
        },
        "resource": "invoke",
        "resourceType": "lambda"
    },
    "previous_event_id": "4",
    "event_timestamp": "1632144225702",
    "execution_arn": "arn:aws:states:ap-northeast-1:XXXXXXXXXXXX:express:XXXXXXXXXXXX:XXXXXXXX-XXXX-XXXX-XXXX-XXXXXXXXXXXX:XXXXXXXX-XXXX-XXXX-XXXX-XXXXXXXXXXXX:XXXXXXXX-XXXX-XXXX-XXXX-XXXXXXXXXXXX"
}
応答項目を次のインプットとして渡したい場合は、ResultPathを使う
"ResultPath": "$.RandomResult",
とすることで、結果的にTaskStateExitedでは以下のように応答される。
ResultPathを設定しない場合は、1つ前の情報がそのまま次のステートのインプットに渡される。気を付けなければいけないのは、API Gatewayの場合、最初に渡されたインプット情報を持ち回るケースが多いだろうということ。上書きしてしまわないよう、うまく持ち回る設計をしよう。
{
    "id": "6",
    "type": "TaskStateExited",
    "details": {
        "name": "Random",
        "output": "{\"id\":\"00001\",\"RandomResult\":{\"ExecutedVersion\":\"$LATEST\",\"Payload\":{\"result\":\"OK\"},\"SdkHttpMetadata\":{\"AllHttpHeaders\":{\"X-Amz-Executed-Version\":[\"$LATEST\"],\"x-amzn-Remapped-Content-Length\":[\"0\"],\"Connection\":[\"keep-alive\"],\"x-amzn-RequestId\":[\"XXXXXXXX-XXXX-XXXX-XXXX-XXXXXXXXXXXX\"],\"Content-Length\":[\"16\"],\"Date\":[\"Mon, 20 Sep 2021 13:23:45 GMT\"],\"X-Amzn-Trace-Id\":[\"root=X-XXXXXXXX-XXXXXXXXXXXXXXXXXXXXXXXX;parent=XXXXXXXXXXXXXXXX;sampled=1\"],\"Content-Type\":[\"application/json\"]},\"HttpHeaders\":{\"Connection\":\"keep-alive\",\"Content-Length\":\"16\",\"Content-Type\":\"application/json\",\"Date\":\"Mon, 20 Sep 2021 13:23:45 GMT\",\"X-Amz-Executed-Version\":\"$LATEST\",\"x-amzn-Remapped-Content-Length\":\"0\",\"x-amzn-RequestId\":\"XXXXXXXX-XXXX-XXXX-XXXX-XXXXXXXXXXXX\",\"X-Amzn-Trace-Id\":\"root=X-XXXXXXXX-XXXXXXXXXXXXXXXXXXXXXXXX;parent=XXXXXXXXXXXXXXXX;sampled=1\"},\"HttpStatusCode\":200},\"SdkResponseMetadata\":{\"RequestId\":\"XXXXXXXX-XXXX-XXXX-XXXX-XXXXXXXXXXXX\"},\"StatusCode\":200}}",
        "outputDetails": {
            "truncated": false
        }
    },
    "previous_event_id": "5",
    "event_timestamp": "1632144225703",
    "execution_arn": "arn:aws:states:ap-northeast-1:XXXXXXXXXXXX:express:XXXXXXXXXXXX:XXXXXXXX-XXXX-XXXX-XXXX-XXXXXXXXXXXX:XXXXXXXX-XXXX-XXXX-XXXX-XXXXXXXXXXXX:XXXXXXXX-XXXX-XXXX-XXXX-XXXXXXXXXXXX"
}
Step Functions⇒Lambdaに渡す情報
これは、ASLのParametersで値が設定される。
例えば、StudentUpdateには
      "Parameters": {
        "Payload.$": "$",
        "FunctionName": "${lambda_student_update_arn}:$LATEST"
      },
としているため、先ほどのoutputが渡っていくことになるのだ。
このとき、実際にStep Functions⇒Lambdaには以下のように情報が渡される。
Lambdaでは、Payload以下の情報がeventとして入ってくるので、Pythonコード上では、event['id']でアクセスできるということになる。
これ、PythonではJSON⇔辞書型の変換をサクッとやってくれるが、Golangで実装する場合は渡し方を気を付けないと構造体に割り付けることができないと思われるので注意が必要だ。
{
    "id": "10",
    "type": "TaskScheduled",
    "details": {
        "parameters": "{\"FunctionName\":\"arn:aws:lambda:ap-northeast-1:XXXXXXXX:function:XXXXXXXX:$LATEST\",\"Payload\":{\"id\":\"00001\",\"RandomResult\":{\"ExecutedVersion\":\"$LATEST\",\"Payload\":{\"result\":\"NG\"},\"SdkHttpMetadata\":{\"AllHttpHeaders\":{\"X-Amz-Executed-Version\":[\"$LATEST\"],\"x-amzn-Remapped-Content-Length\":[\"0\"],\"Connection\":[\"keep-alive\"],\"x-amzn-RequestId\":[\"XXXXXXXX-XXXX-XXXX-XXXX-XXXXXXXXXXXX\"],\"Content-Length\":[\"16\"],\"Date\":[\"Mon, 20 Sep 2021 13:12:17 GMT\"],\"X-Amzn-Trace-Id\":[\"root=X-XXXXXXXX-XXXXXXXXXXXXXXXXXXXXXXXX;parent=XXXXXXXXXXXXXXXX;sampled=1\"],\"Content-Type\":[\"application/json\"]},\"HttpHeaders\":{\"Connection\":\"keep-alive\",\"Content-Length\":\"16\",\"Content-Type\":\"application/json\",\"Date\":\"Mon, 20 Sep 2021 13:12:17 GMT\",\"X-Amz-Executed-Version\":\"$LATEST\",\"x-amzn-Remapped-Content-Length\":\"0\",\"x-amzn-RequestId\":\"XXXXXXXX-XXXX-XXXX-XXXX-XXXXXXXXXXXX\",\"X-Amzn-Trace-Id\":\"root=X-XXXXXXXX-XXXXXXXXXXXXXXXXXXXXXXXX;parent=XXXXXXXXXXXXXXXX;sampled=1\"},\"HttpStatusCode\":200},\"SdkResponseMetadata\":{\"RequestId\":\"XXXXXXXX-XXXX-XXXX-XXXX-XXXXXXXXXXXX\"},\"StatusCode\":200}}}",
        "region": "ap-northeast-1",
        "resource": "invoke",
        "resourceType": "lambda"
    },
    "previous_event_id": "9",
    "event_timestamp": "1632143537086",
    "execution_arn": "arn:aws:states:ap-northeast-1:XXXXXXXXXXXX:express:XXXXXXXXXXXX:XXXXXXXX-XXXX-XXXX-XXXX-XXXXXXXXXXXX:XXXXXXXX-XXXX-XXXX-XXXX-XXXXXXXXXXXX:XXXXXXXX-XXXX-XXXX-XXXX-XXXXXXXXXXXX"
}
ということで、動かしてみる。
さて、色々と動作を確認してみたが、
$ curl -i -X PUT https://2m1aq92yp5.execute-api.ap-northeast-1.amazonaws.com/prod/student?id=00001
としてみよう。
{
  "data": "",
  "message": "In time."
}
ないし、
{
  "data": "",
  "message": "Late."
}
が返却されたかと思う。"In time"ではDynamoDBのlate_countがインクリメントされず、"Late"ではインクリメントされるのが確認できるはずだ。
これで、API Gateway+Step Functions+Lambdaの実装ができるようになった!

