はじめに
Vue.js + Axios でSPAを作ると、サーバとの連携もサクサクできて驚くほど簡単に Web アプリケーションを作ることができる。
一方で、プリミティブな Vue.js ではシンプルな機能の SPA になるために、ブラウザバックを使うことができない。
そんなときに Vue Router の出番である。
……いやいや、そんな簡単な話ではない。
そもそも、SPA である以上は、SPA に合わせた画面デザインであるべきなのである。
もっと言えば、画面デザインありきなのであれば、SPA は必ずしもベストな解決手段ではないのではある(別に、使ってはいけないという話でもない)。
それを踏まえて、タイトルの通り、ブラウザバックを解決する手段の一つとして、Vue Router は使える、というのを念頭に置いた上で、今回の記事は読んでいただきたい。
※多分、Vue Router 自体は、複数の SPA 間の情報のやりとりをスムースに解決して、より簡潔に大きな SPA のプロジェクトをまとめ上げるためのものなのだろう、と解釈している。
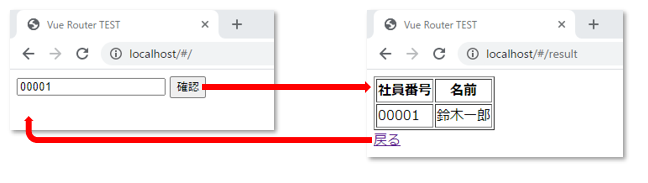
今回作るのは、以下のように二つの画面を遷移するといったシンプルなものだ。CDN 版を用いて、Vue CLI は使用しない前提とする。
それでも、基本のキの部分をまとめるにはちょうど良いハンズオンになるかと思う。
なお、Vue.js についての基本のキについては触れていない。
環境構築は以下の過去記事を参考にしてもらえればと思う。
構成要素
以下の4つのファイルから構成される。
- index.html
- router.js
- home.js
- result.js
それぞれのファイルは以下のような内容となる。
<html>
  <head>
    <style>
      [v-cloak] { display: none }
    </style>
    <meta charset="utf-8">
    <title>Vue Router TEST</title>
  </head>
  <body>
    <div id="app">
      <router-view></router-view>
    </div>

    <script type="text/x-template" id="home-template">
      <div>
        <input type="text" v-model="employee_id" placeholder="社員番号(5桁)を入力">
        <button v-on:click="search_employee" v-bind:disabled="is_invalid">確認</button>
      </div>
    </script>

    <script type="text/x-template" id="result-template">
      <div>
        <table border="1">
          <tr><th>社員番号</th><th>名前</th></tr>
          <tr><td>{{ employee_data['id'] }}</td><td>{{ employee_data['name'] }}</td></tr>
        </table>
        <router-link :to="{ name: 'home', params: { default_id: employee_data['id'] } }" replace>戻る</router-link>
      </div>
    </script>

    <script src="https://cdn.jsdelivr.net/npm/vue/dist/vue.js"></script>
    <script src="https://unpkg.com/vue-router/dist/vue-router.js"></script>
    <script src="home.js"></script>
    <script src="result.js"></script>
    <script src="router.js"></script>
  </body>
</html>
const routes = [
  { path: '/', name: 'home', component: Home, props: true },
  { path: '/result', name: 'result', component: Result, props: true }
]

const router = new VueRouter({
  routes
})

const app = new Vue({
  router
})
app.$mount('#app')
const EmployeeTable = [
  { id: '00001', name: '鈴木一郎' },
  { id: '00002', name: '佐藤次郎' },
  { id: '00003', name: '田中三郎' },
  { id: '00004', name: '高橋四郎' }
]

const Home = {
  template: '#home-template',
  props: {
    default_id: {
      type: String,
      default: ''
    }
  },
  data: function () {
    return {
      employee_table: EmployeeTable,
      employee_info: false,
      employee_data: {},
      employee_id: this.default_id,
      is_invalid: true
    }
  },
  created: function () {
    this.is_invalid = this.default_id.length !== 5
  },
  watch: {
    employee_id: function (newVal, oldVal) {
      this.is_invalid = newVal.length !== 5
    }
  },
  methods: {
    search_employee: function () {
      if (this.employee_table.find((v) => v.id === this.employee_id) === undefined) {
        this.employee_data.id = this.employee_id
        this.employee_data.name = 'エラー!IDが見つかりません!'
      } else {
        this.employee_data = this.employee_table.find((v) => v.id === this.employee_id)
      }
      this.$router.push({ name: 'result', params: { employee_data: this.employee_data } })
    }
  }
}
const Result = {
  template: '#result-template',
  props: {
    employee_data: {
      type: Object,
      default: function () {
        return {}
      }
    }
  }
}
ルーティングの設定
Vue Router の基本は、HTML の
    <div id="app">
      <router-view></router-view>
    </div>
の部分に、ルーティングが一致したコンポーネントを描画する。
ルーティングの設定は、以下で行える。
const routes = [
  { path: '/', name: 'home', component: Home, props: true },
  { path: '/result', name: 'result', component: Result, props: true }
]
つまり、/ では Home のコンポーネントを呼び出すし、/result では Result のコンポーネントを呼び出す。
簡単!
あとは、通常の Vue.js のアプリと同様に、
const app = new Vue({
  router
})
app.$mount('#app')
で呼び出してあげよう。
今回の範囲では、以下の部分は「おまじない」程度に考えておいて問題ない。
const router = new VueRouter({
  routes
})
コンポーネントの定義
コンポーネントの定義は、
const Home = {
  template: '#home-template',
  props: {(中略)},
  data: function () {(中略)},
  created: function () {(中略)},
  watch: {(中略)},
  methods: {(中略)},
  ……
}
な感じで、普通の Vue.js のコンポーネントとして定義してあげればよい。
今回くらいのボリュームであれば、route.js に書いてしまっても差し支えないが、将来大きくなる可能性を踏まえると、ファイルを分けておいた方が管理面では楽になるので無難であろう。
なお、通常の Vue.js のコンポーネントと同様なので、template も無理にここに書く必要はなく、HTML 中で <script type="text/x-template" id="home-template"> が使える。Vue CLI であればあまり気にする必要もないが、CDN 版では HTML ファイル内で編集できた方がエディタの機能が使えて楽なので、x-template を使っていこう。
ページ遷移
ページ遷移は、HTML の中で記述する場合は、
<router-link :to="{ name: 'home', params: { default_id: employee_data['id'] } }" replace>戻る</router-link>
と書き、JavaScript 中に記載する場合は、
this.$router.push({ name: 'result', params: { employee_data: this.employee_data } })
と書く。
router.push() でも書けるが、eslint でエラーになるので、上記のような記述にしている。
ポイントは、params で各コンポーネントにパラメータとして props で定義した情報を渡せるということだ。
const Home = {
  (中略)
  props: {
    default_id: {
      type: String,
      default: ''
    }
  },
const Result = {
  (中略)
  props: {
    employee_data: {
      type: Object,
      default: function () {
        return {}
      }
    }
  }
}
といった感じで、受けたいパラメータを props で定義しておくことと、ルートの設定時に props: true として有効化しておく必要があるので注意。
const routes = [
  { path: '/', name: 'home', component: Home, props: true },
  { path: '/result', name: 'result', component: Result, props: true }
]
index.html の router-link に書いてある replace 属性は、これを設定しておくと、繊維元がブラウザバックで表示されなくなる。サーバに何度もデータ送信をしたくない場合等は、これを設定して遷移するという方法も可能だ。
ということで、Vue Router を使えば、SPA でのページ遷移も簡単に表現できる。
「はじめに」に書いた通り、「必要に応じて」使っていくことが重要である。