はじめに
初心者向けシリーズ。
前回の記事で「Vue.js、チョットワカッテキタ」な感じになってきたら。
以下の通りに実行していけば、S3の静的Webサイトホスティング上でVue CLIでビルドしたVue.jsのHello Worldが動くようになる。
Vue CLIはけっこうすごくて、これを使いこなせるとJavaScriptの静的コンテンツのCI/CDを回せるようになる。楽しい。
手順
1. yumのアップデート
$ sudo yum update
2. Node.jsのインストール(npmがNode.jsに含まれる)
Vue.jsの静的解析はESLintという強力なlinterがあるので、それを動かすためにnpmを入れておく。
Node.jsについては、予め、rpm.nodesource.com でサポートバージョンを確認しておく。今回は、記事を書いたタイミングでサポートされている14をインストールする。
$ curl -sL https://rpm.nodesource.com/setup_14.x | sudo bash -
$ sudo yum install -y nodejs
3. Vue CLIのインストール
npmを -g でインストールするときは /usr/lib を触ったりすることもあるので、sudo で実行。
$ sudo npm install -g @vue/cli @vue/cli-init
4. プロジェクトの作成
$ vue init webpack test
質問に答えていくとプロジェクトが作られる。

プロジェクト名とか説明とかAuthorは適当に設定して、ビルドはランタイムを入れよう。
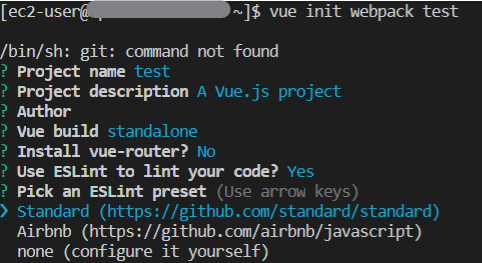
今回はVue-Routerは使わないのでNo、ESLintはStandardなチェックをするように入れておく。
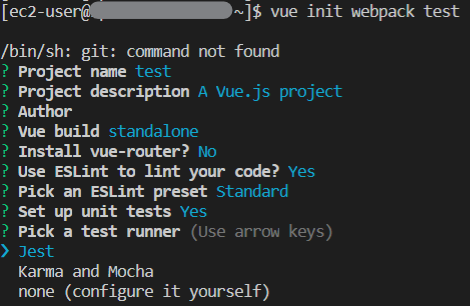
単体テストはしておけるように、テストランナーでJestを入れておく。

NPMかYarnか選択できるが、今回はNPMを使う。
これでしばらく待つと、コマンドが終了し、以下のディレクトリ構造のプロジェクトが作成される。
test
├── .babelrc
├── build
│   ├── build.js
│   ├── check-versions.js
│   ├── logo.png
│   ├── utils.js
│   ├── vue-loader.conf.js
│   ├── webpack.base.conf.js
│   ├── webpack.dev.conf.js
│   └── webpack.prod.conf.js
├── config
│   ├── dev.env.js
│   ├── index.js
│   ├── prod.env.js
│   └── test.env.js
├── .editorconfig
├── .eslintignore
├── .eslintrc.js
├── .gitignore
├── index.html
├── package.json
├── package-lock.json
├── .postcssrc.js
├── README.md
├── src
│   ├── App.vue
│   ├── assets
│   │   └── logo.png
│   ├── components
│   │   └── HelloWorld.vue
│   └── main.js
├── static
│   └── .gitkeep
└── test
    └── unit
        ├── .eslintrc
        ├── jest.conf.js
        ├── setup.js
        └── specs
            └── HelloWorld.spec.js
5. おためしコンテンツの作成
ディレクトリ構造の内、src部分が実際にコンテンツを作っていく部分になる。
今回は、以下のようにsrcを修正してみよう。
- assets/logo.png を削除(使わない)
- App.vueを修正
- HelloWorld.vueを修正
<template>
  <div id="app">
    <HelloWorld/>
  </div>
</template>

<script>
import HelloWorld from './components/HelloWorld'

export default {
  name: 'App',
  components: {
    HelloWorld
  }
}
</script>

<style>
# app {
  font-family: 'Avenir', Helvetica, Arial, sans-serif;
  -webkit-font-smoothing: antialiased;
  -moz-osx-font-smoothing: grayscale;
  text-align: center;
  color: #2c3e50;
  margin-top: 60px;
}
</style>
<template>
  <div class="hello">
    <h1>{{ message }}</h1>
  </div>
</template>

<script>
export default {
  name: 'HelloWorld',
  data () {
    return {
      message: "Hello World!!"
    }
  }
}
</script>

<style scoped>
h1 {
  font-weight: normal;
}
</style>
6. 構文チェック
スクリプトを書いたら構文チェックをしておこう。
$ npm run lint
↑の例ではあえてESLintに引っかかるエラーを入れてある。
実行すると、
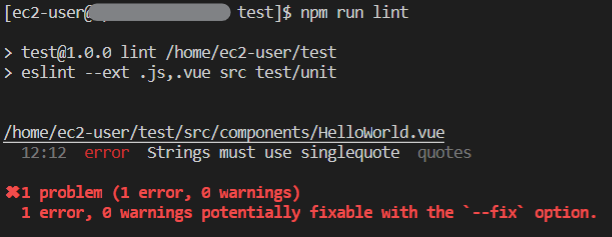
というエラーが出るはずなので、
(前略)
<script>
export default {
  name: 'HelloWorld',
  data () {
    return {
      message: 'Hello World!!'  // ★ダブルクォートをシングルクォートに修正
    }
  }
}
</script>
(以下略)
と修正すればエラーが解消するはずだ。
7. テストコードの作成
ディレクトリ構造の内、test部分がテストコードを記述する部分だ。
Vue.jsのテスト自体は色々やり方があるので、以下のコンテンツを見てもらうと分かりやすい。
以下で、Vue Test Utilsのモジュールをインストールする
$ npm install --save-dev @vue/test-utils
今回のテストだと、使用しない機能の部分でエラーが出てしまうので、それを修正しておく。
詳細な説明はこちらを参照。
module.exports = {
  (中略)
  testURL: 'http://localhost/',
  (中略)
}
さて、これができたらテストコードを書く。
といっても、今回はおためし程度なので、デフォルトをちょっといじる程度にしておこう。
import { shallowMount } from '@vue/test-utils'
import HelloWorld from '@/components/HelloWorld.vue'

describe('HelloWorld.vue', () => {
  it('should render correct contents', () => {
    const wrapper = shallowMount(HelloWorld)
    expect(wrapper.vm.$el.querySelector('.hello h1').textContent).toEqual('Hello World!!')
  })
})
これで、テストを実行する。
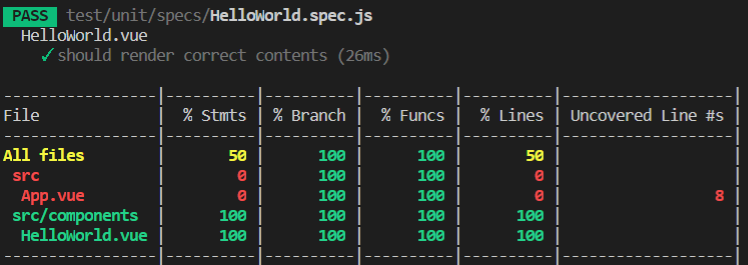
$ npm run unit
↓こんな感じで、テストの成否とカバレッジを表示してくれる。
今回の例では、App.vueのテストを作っていないのでカバレッジが0%になっている。
8. ビルド
コンテンツをビルドする。
$ npm run build
すると、distディレクトリが作られ、アップロード用のファイルが以下のように出力される。
dist
├── index.html
└── static
    ├── css
    │   ├── app.3e445f0fd3565060e18da48a5a8354c0.css
    │   └── app.3e445f0fd3565060e18da48a5a8354c0.css.map
    └── js
        ├── app.19b1235d26d10f952294.js
        ├── app.19b1235d26d10f952294.js.map
        ├── manifest.2ae2e69a05c33dfc65f8.js
        ├── manifest.2ae2e69a05c33dfc65f8.js.map
        ├── vendor.3bf08807642cffd4f854.js
        └── vendor.3bf08807642cffd4f854.js.map
9. S3バケットを作成
…の前にコンフィグ設定
$ aws configure
AWS Access Key ID [None]: xxxxxxxxxxxxxxxxxxxx
AWS Secret Access Key [None]: xxxxxxxxxxxxxxxxxxxxxxxxxxxxxxxxxxxxxxxx
Default region name [None]: ap-northeast-1
Default output format [None]: json
今度こそバケットを作成
$ aws s3 mb s3://neruneruo-vuejs-test-bucket
$ aws s3 ls
静的Webサイトホスティングの設定
$ aws s3 website s3://neruneruo-vuejs-test-bucket --index-document index.html
ファイルをアップロード
$ aws s3 cp dist s3://neruneruo-vuejs-test-bucket --acl public-read --recursive
これで、静的WebサイトホスティングのURLにアクセスしたら「Hello World!!」が表示されたはずだ。
あとは、package.json に
  "scripts": {
    (中略)
    "deploy": "npm run lint && npm run test && aws s3 cp dist s3://neruneruo-vuejs-test-bucket --acl public-read --recursive",
    (中略)
  }
を書いておけば、
$ npm run deploy
で良い感じに構文解析しつつテストコードを走らせてからデプロイができる!