はじめに
AWS Verified Accessは、AWSが提供する、VPNなしでAWS上に構築したアプリケーションに接続するための仕組みだ。
ゼロトラストの理念に従ったポリシーベースのアクセス制御を行うことができ、デバイスやID認証を行ったユーザのみを対象にアプリケーションにアクセスさせられる。
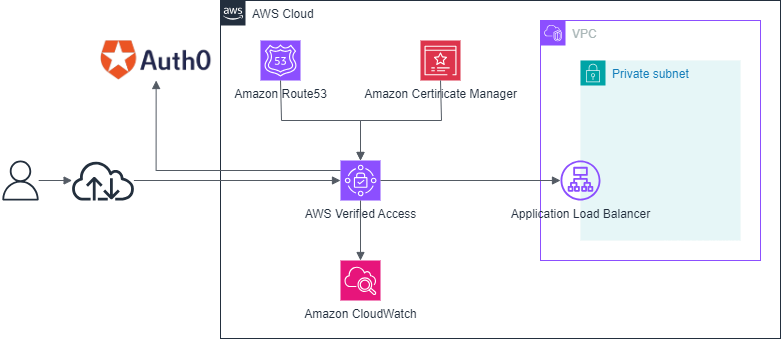
今回は、このAWS Verified Accessを、Auth0の認証を行ったユーザのみアクセスできるように構築する。
本記事の内容を読むにあたっての前提知識は以下の通り。
- Auth0で簡易的な認証アプリケーションを作ったことがある
- TerraformでVPCのリソース構築を行ったことがある
また、今回の構成(AWS Verified AccessからALBに繋ぐ)にする場合、パブリックなドメインが必要になるため、取得してAmazon Route53にパブリックホストゾーンを作成しておこう。以降のサンプルでは、route53_hostzone_nameにはexample.comを、route53_sub_hostzone_nameにはava.example.comを設定していることを前提にする。
アプリケーションのドメイン名を入力する必要があります。これは、ユーザーがアプリケーションにアクセスするために使用するパブリック DNS 名です。また、このドメイン名と一致する CN を含むパブリック SSL 証明書を入力する必要があります。を使用して証明書を作成またはインポートできます AWS Certificate Manager。
例えば、お名前ドットコムで取得したドメインをAmazon Route53に設定する場合は、以下のクラスメソッド先生のページを参考にしていただきたい。
関連リソース
VPCとプライベートサブネットの作成
プライベートサブネットを持ったVPCを作っておく。この部分の作成については今回の記事の本筋ではないので割愛する。
AWS Verified Accessエンドポイント用のサブドメインの設定とACM証明書発行
ava.example.comのサブドメイン名でACMの証明書を発行して、CNAMEレコードをAmazon Route53のexample.comのホストゾーンに登録して検証を完了させる。
検証が完了していないと、AWS Verified Accessのリソース作成時にエラーになるため注意しよう。
data "aws_route53_zone" "example" {
  name = local.route53_hostzone_name
}

resource "aws_acm_certificate" "example" {
  domain_name       = local.route53_sub_hostzone_name
  validation_method = "DNS"

  lifecycle {
    create_before_destroy = true
  }
}

resource "aws_route53_record" "example" {
  for_each = {
    for dvo in aws_acm_certificate.example.domain_validation_options : dvo.domain_name => dvo
  }

  zone_id = data.aws_route53_zone.example.zone_id

  name = each.value.resource_record_name
  type = each.value.resource_record_type
  records = [
    each.value.resource_record_value
  ]
  ttl = 60
}
Application Load Balancerの作成
今回は、プライベートサブネットのInternalなやりとりしかないので、HTTPSではなくHTTPのALBを作成する。
ポイントになるのは、セキュリティーグループのインバウンドルールで、上記構成図の通り、このLBのエンドポイントを呼び出すのはAWS Verified Accessのみにしておくのが望ましい。referenced_security_group_idにAWS Verified AccessのセキュリティグループIDを設定しておこう。
設定せずに全開放でも良いが、やはりベストプラクティスである最小権限構成にはしておいた方が良いだろう。
なお、今回は簡易的に実行するため、ALBのバックエンドをAWS Lambda関数にしている。AWS Lambda関数の内容は後半に記載している。
resource "aws_lb" "example" {
  depends_on = [aws_s3_bucket_policy.alb_log]

  name               = local.alb_name
  load_balancer_type = "application"
  internal           = true

  subnets = [
    aws_subnet.private.id,
    aws_subnet.private2.id,
  ]

  security_groups = [
    aws_security_group.alb.id,
  ]

  access_logs {
    bucket  = aws_s3_bucket.alb_log.id
    enabled = true
  }
}

resource "aws_lb_listener" "example" {
  load_balancer_arn = aws_lb.example.arn
  port              = 80
  protocol          = "HTTP"

  default_action {
    type             = "forward"
    target_group_arn = aws_lb_target_group.example.arn
  }
}

resource "aws_lb_target_group" "example" {
  name        = local.alb_tg_name
  target_type = "lambda"
}

resource "aws_lb_target_group_attachment" "example" {
  depends_on = [aws_lambda_permission.alb]

  target_group_arn = aws_lb_target_group.example.arn
  target_id        = aws_lambda_function.example.arn
}

resource "aws_security_group" "alb" {
  name        = local.alb_sg_name
  description = "Security Group for ALB"
  vpc_id      = aws_vpc.for_verified_access.id

  tags = {
    Name = local.alb_sg_name
  }
}

resource "aws_vpc_security_group_ingress_rule" "alb" {
  security_group_id = aws_security_group.alb.id

  ip_protocol = "tcp"
  from_port   = 80
  to_port     = 80
  referenced_security_group_id = aws_security_group.for_verified_access.id

  tags = {
    Name = "allow-https-from-verified-access-sg"
  }
}

resource "aws_vpc_security_group_egress_rule" "alb" {
  security_group_id = aws_security_group.alb.id

  ip_protocol = "-1"
  cidr_ipv4   = "0.0.0.0/0"

  tags = {
    Name = "allow-any"
  }
}
監査要件等、必要に応じて、以下のようにALBのアクセスログをAmaozon S3バケットに保存するようにしておく。
resource "aws_s3_bucket" "alb_log" {
  bucket = local.s3_alb_log_bucket_name
}

resource "aws_s3_bucket_ownership_controls" "alb_log" {
  bucket = aws_s3_bucket.alb_log.id

  rule {
    object_ownership = "BucketOwnerEnforced"
  }
}

resource "aws_s3_bucket_public_access_block" "alb_log" {
  bucket = aws_s3_bucket.alb_log.id

  block_public_acls       = true
  block_public_policy     = true
  ignore_public_acls      = true
  restrict_public_buckets = true
}

resource "aws_s3_bucket_policy" "alb_log" {
  bucket = aws_s3_bucket.alb_log.id
  policy = data.aws_iam_policy_document.alb_log.json
}

data "aws_iam_policy_document" "alb_log" {
  statement {
    principals {
      type        = "Service"
      identifiers = ["logdelivery.elasticloadbalancing.amazonaws.com"]
    }

    actions = [
      "s3:PutObject",
    ]

    resources = [
      "${aws_s3_bucket.alb_log.arn}/*",
    ]
  }
}
Auth0関連の設定
Auth0クライアント
Auth0のクライアントは以下の通り設定する。コールバックの許容URLには、以下の通り、http://ava.example.com/oauth2/idpresponseをコールバックできるよう設定しておく。
resource "auth0_client" "aws_verified_access" {
  name        = "AWS Verified Access"
  description = "AWS Verified Access Login"
  app_type    = "regular_web"

  custom_login_page_on                = true
  is_first_party                      = true
  is_token_endpoint_ip_header_trusted = false
  oidc_conformant                     = true
  require_proof_of_possession         = false

  callbacks = ["https://${local.route53_sub_hostzone_name}/oauth2/idpresponse"]

  grant_types = [
    "authorization_code",
    "implicit",
    "refresh_token",
    "client_credentials",
  ]

  jwt_configuration {
    alg                 = "RS256"
    lifetime_in_seconds = 36000
    secret_encoded      = false
  }

  refresh_token {
    leeway          = 0
    token_lifetime  = 31557600
    rotation_type   = "non-rotating"
    expiration_type = "non-expiring"
  }
}

resource "auth0_client_credentials" "aws_verified_access" {
  client_id = auth0_client.aws_verified_access.id

  authentication_method = "client_secret_post"
}
Auth0ユーザ
Auth0のユーザを以下のように設定する。今回、department=="Engineering"な所属の人のみアプリケーションにアクセス可能として、それ以外をブロックする設定をしたいため、user_metadataで所属部門を追加設定するようにしている。
resource "auth0_user" "user" {
  password       = "xxxxxxxxxxxxxxxx"
  email          = "xxx@example.com"
  email_verified = true

  connection_name = "Username-Password-Authentication"

  user_metadata = jsonencode({
    department = "Engineering"
  })
}
Auth0 Actions
user_metadataは設定するだけではAWS Verified Accessに情報を渡すことができないため、以下の通りログイン後に実行されるAuth0 Actionsを設定することで、AWS Verified Accessのポリシー確認時にdepartmentが参照可能になる。
resource "auth0_action" "add_custom_claims" {
  name    = "add_custom_user_claims"
  runtime = "node18"
  deploy  = true

  supported_triggers {
    id      = "post-login"
    version = "v3"
  }

  code = <<EOF
exports.onExecutePostLogin = async (event, api) => {
  api.idToken.setCustomClaim('department', event.user.user_metadata?.department);
  api.accessToken.setCustomClaim('department', event.user.user_metadata?.department);
};
EOF
}

resource "auth0_trigger_action" "add_custom_claims_to_post_login" {
  trigger   = "post-login"
  action_id = auth0_action.add_custom_claims.id
}
AWS Verified Accessの構築
いよいよ本題だ。AWS Verified Accessは、
- AWS Verified Accessインスタンス
- AWS Verified Access信頼プロバイダ
- AWS Verified Accessグループ
- AWS Verified Accessエンドポイント
から構成される。エンドポイントには、セキュリティグループの設定が必要であることに留意しよう。
AWS Verified Accessインスタンス
ここは特に難しいことは特にない。以下でインスタンスの作成が可能だ。
resource "aws_verifiedaccess_instance" "example" {
  description = "AWS Verified Access Example Instance"

  tags = {
    Name = local.verified_access_instance_name
  }
}
AWS Verified Access信頼プロバイダ
AWS Verified Access信頼プロバイダは、設定する内容がたくさんあるように見えるが、Auth0の各種エンドポイントはほぼ固定なので、一度設定してしまえば以降は流用が可能はなずだ。
作成した信頼プロバイダはaws_verifiedaccess_instance_trust_provider_attachmentを使ってインスタンスと紐づけをしておこう。
policy_reference_nameはこの後も使用するので適切な長さで意味の分かる名前を設定する。
resource "aws_verifiedaccess_trust_provider" "example" {
  policy_reference_name = "auth0"
  description           = "Example Auth0 Trust Provider"

  trust_provider_type      = "user"
  user_trust_provider_type = "oidc"

  oidc_options {
    issuer                 = "https://${var.auth0_domain}/"
    authorization_endpoint = "https://${var.auth0_domain}/authorize"
    token_endpoint         = "https://${var.auth0_domain}/oauth/token"
    user_info_endpoint     = "https://${var.auth0_domain}/userinfo"
    client_id              = auth0_client_credentials.aws_verified_access.client_id
    client_secret          = auth0_client_credentials.aws_verified_access.client_secret
    scope                  = "openid"
  }

  tags = {
    Name = local.verified_access_trust_provider_name
  }
}

resource "aws_verifiedaccess_instance_trust_provider_attachment" "example" {
  verifiedaccess_instance_id       = aws_verifiedaccess_instance.example.id
  verifiedaccess_trust_provider_id = aws_verifiedaccess_trust_provider.example.id
}
AWS Verified Accessグループ
こちらも別段難しくはない。policy_documentのCedar構文が初見だと戸惑うが、決して難しいものではないため短期間の習熟も可能だと考える。
今回の例は全許容だ。本当はあまりよりしくないが、今回の構成はお試しであることと、ここを通過したトラフィックが、この後のAWS Verified Accessエンドポイントのポリシーで引っ掛けられることを確認しておきたいため、あえてこのようにしている。
resource "aws_verifiedaccess_group" "example" {
  depends_on = [aws_verifiedaccess_instance_trust_provider_attachment.example]

  verifiedaccess_instance_id = aws_verifiedaccess_instance.example.id

  policy_document = <<EOF
permit(principal, action, resource) when {
  true
};
EOF

  tags = {
    Name = local.verified_access_group_name
  }
}
AWS Verified Accessエンドポイント
ACMの証明書やALBなど、これまで作ってきたリソースを埋めていけば良い。
今回は、このリソースのpolicy_documentで所属部門のチェックを行う。
Auth0アプリで設定したdepartmentは、context.auth0.departmentで参照が可能であるため、今回、policy_documentの中で参照しつつフィルタ動作を検証してみよう(実際の検証は動作確認フェーズで実施)。
Cedar構文によるポリシードキュメントの書き方は、公式のユーザーガイドを参照。
ポリシーアシスタントによるテストも可能であるため、活用すると良い。
resource "aws_verifiedaccess_endpoint" "example_alb" {
  attachment_type = "vpc"
  description     = "Example ALB Endpoint"
  endpoint_type   = "load-balancer"

  security_group_ids       = [aws_security_group.for_verified_access.id]
  verified_access_group_id = aws_verifiedaccess_group.example.id

  endpoint_domain_prefix = "alb"
  domain_certificate_arn = aws_acm_certificate.example.arn
  application_domain     = aws_acm_certificate.example.domain_name

  load_balancer_options {
    load_balancer_arn = aws_lb.example.arn
    port              = 80
    protocol          = "http"
    subnet_ids        = aws_lb.example.subnets
  }

  policy_document = <<EOF
permit(principal, action, resource) when {
  context.${aws_verifiedaccess_trust_provider.example.policy_reference_name}.department == "Engineering"
};
EOF

  tags = {
    Name = local.verified_access_endpoint_name
  }
}
セキュリティグループは、今回は443ポートを使用する。
HTTPSのインバウンドトラフィックのみ有効化しておけば良い。
resource "aws_security_group" "for_verified_access" {
  name        = local.verified_access_sg_name
  description = "Security Group for AWS Verified Access"
  vpc_id      = aws_vpc.for_verified_access.id

  tags = {
    Name = local.verified_access_sg_name
  }
}

resource "aws_vpc_security_group_ingress_rule" "verified_access" {
  security_group_id = aws_security_group.for_verified_access.id

  ip_protocol = "tcp"
  from_port   = 443
  to_port     = 443
  cidr_ipv4   = "0.0.0.0/0"

  tags = {
    Name = "allow-ssl"
  }
}

resource "aws_vpc_security_group_egress_rule" "verified_access" {
  security_group_id = aws_security_group.for_verified_access.id

  ip_protocol = "-1"
  cidr_ipv4   = "0.0.0.0/0"

  tags = {
    Name = "allow-any"
  }
}
また、エンドポイントのドメインに対するCNAMEレコードの設定が必要であるため、以下を追加しておこう。
resource "aws_route53_record" "example_sub_ns_ava" {
  zone_id = data.aws_route53_zone.example.zone_id

  name    = "ava"
  type    = "CNAME"
  ttl     = 60
  records = [aws_verifiedaccess_endpoint.example_alb.endpoint_domain]
}
AWS Verified Accessのログ出力設定
設定は以上であるが、監査対応でログ保存が必要なケースもあるかと思う。そういうケースは、以下のaws_verifiedaccess_instance_logging_configurationでIaCで実装が可能だ。
include_trust_contextはtrueにすると、OpenID Connectの認証結果や渡された情報をダンプされるようになる。接続がうまくいかない時にはtrueに変更の上、デバッグをしてみていただきたい。
resource "aws_cloudwatch_log_group" "for_verified_access" {
  name = local.log_group_name
}

resource "aws_verifiedaccess_instance_logging_configuration" "example" {
  verifiedaccess_instance_id = aws_verifiedaccess_instance.example.id

  access_logs {
    include_trust_context = false

    cloudwatch_logs {
      enabled   = true
      log_group = aws_cloudwatch_log_group.for_verified_access.id
    }
  }
}
いざ、動かす!
さて、ここまで来たらあとは動かすだけだ。
ALBのバックエンドで、以下のLambda関数を実行するよう設定しておこう。
import pprint


def lambda_handler(event, context):
    return {
        "statusCode": 200,
        "statusDescription": "200 OK",
        "isBase64Encoded": False,
        "headers": {"Content-Type": "text/html; charset=utf-8"},
        "body": "<html><body><p>Hello World!!</p></body></html>",
    }
TerraformのApply後にhttps://ava.example.com/にアクセスすると、Auth0の認証画面が表示される。
作成したAuth0ユーザでログインすると……
動いた!
Auth0ユーザのuser_metadataのdepartmentを"Sales"等に変更して再度TerraformのApply後にアクセスすると、ちゃんとCedarポリシーの評価結果で403 Unauthorizedが返却されることが確認できる。
これで、お手軽かつセキュアにAWS上で実行しているアプリケーションアクセスが可能になった!
AWS Verified Accessエンドポイントの作成はまあまあ時間がかかるので気長に待とう。
今回記事を書くにあたり何度かエンドポイント作成の時間を測定したが、だいたい、15分以上20分以内くらいに完了している。
追記: せっかくだからアプリケーション側でユーザ情報を自由に参照したい
さて、今回の記事では、コンテキストを参照してCedarのアクセス制御をするためにトークンにuser_metadataを載せることで情報の引き渡しをしたが、実際のアプリケーションでは/userinfoのAPIを実行して必要な情報だけを参照できる方が望ましいだろう。
ということで、せっかくAuth0の認証をしてトークンを払い出しているのだから、それを使ってLambdaからAPIを実行しよう!
……と思ったら、できませんでした。
AWS Verified Accessは、IdPが作ったトークンに対して再度AWS Verified Access側で署名をしてしまう。
このため、アプリケーションに渡ってきたトークンを使ってAuth0のAPIを実行することができなかった。
制限事項として呑み込み、今回の方法で必要な情報をアプリケーションに渡すようにするのがよさそうだ

