はじめに
AWSの開発をしていると、そのうちにAWSに閉じず、GitHub/GitLab、New Relic/Datadog/Grafana、Attlasian製品等、いろいろなSaaSやOSSを使うようになって、複数のID管理が必要になってくる。それぞれのIDをよりセキュアにするために、MFAの設定も同じ数だけ持たなくてはならず、ログイン管理自体がトイルになってくる。
今回は、上記のようなトイル解消のソリューションであるIDaaSのAuth0を使って、AWSへのログインを肩代わりしてSSOできるようにする。
Auth0を初めて利用するところからでも始められるように書いているつもりであるため、前提知識としては、以下があれば良い。
- Terraformの基本的な知識
- AWSのIAM関する基本的な知識
全体の流れとしては、以下のClassmethod先生の記事をベースにしているので、本記事を読んで分からない方は、まずはこの記事でGUIベースでの理解をしておくと入りが良いだろう。
Auth0のTerraformプロバイダの設定
まずは、Auth0のTerraformプロバイダの設定が必要から始めよう。
この部分はTerraformによる自動化はできないため、以下のQuick Startを見ながら、Auth0のMachine to Machine Applicationを作成しよう。
ドメイン、クライアントID、クライアントシークレットが作成できたら、以下のようにシェルスクリプトを作成しておこう。もちろん、.gitignoreにスクリプトを入れて間違えてCommitしないようにしておこう。
export TF_VAR_auth0_domain=xxx-xxxxxxxxxxxxxxxx.us.auth0.com
export TF_VAR_auth0_client_id=xxxxxxxxxxxxxxxxxxxxxxxxxxxxxxxx
export TF_VAR_auth0_client_secret=xxxxxxxxxxxxxxxxxxxxxxxxxxxxxxxxxxxxxxxxxxxxxxxxxxxxxxxxxxxxxxxx

echo TF_VAR_auth0_domain=${TF_VAR_auth0_domain}
echo TF_VAR_auth0_client_id=${TF_VAR_auth0_client_id}
echo TF_VAR_auth0_client_secret=${TF_VAR_auth0_client_secret}
sourceコマンドでこのスクリプトを食わせれば、TerraformのVariablesを引数指定せずとも設定されるようになる。
あとは、以下の通りプロバイダの設定をすれば準備完了だ。
terraform {
  required_providers {
    auth0 = {
      source = "auth0/auth0"
    }
  }
}

provider "auth0" {
  domain        = var.auth0_domain
  client_id     = var.auth0_client_id
  client_secret = var.auth0_client_secret
}

variable "auth0_domain" {
  type = string
}

variable "auth0_client_id" {
  type = string
}

variable "auth0_client_secret" {
  type = string
}
Auth0クライアントアプリケーションの作成
Auth0のSAML認証をするためには、以下のようにクライアントアプリケーションを作成する。
https://${data.aws_region.current.name}.signin.aws.amazon.com/samlは、AWSのSAML認証用のログイン用エンドポイントだ。
resource "auth0_client" "aws_management_console" {
  name        = "AWS Management Console"
  description = "AWS Management Console Login"
  app_type    = "regular_web"

  custom_login_page_on                = true
  is_first_party                      = true
  is_token_endpoint_ip_header_trusted = false
  oidc_conformant                     = true
  require_proof_of_possession         = false

  callbacks = ["https://${data.aws_region.current.name}.signin.aws.amazon.com/saml"]

  grant_types = [
    "authorization_code",
    "implicit",
    "refresh_token",
    "client_credentials",
  ]

  jwt_configuration {
    alg                 = "RS256"
    lifetime_in_seconds = 36000
    secret_encoded      = false
  }

  refresh_token {
    leeway          = 0
    token_lifetime  = 31557600
    rotation_type   = "non-rotating"
    expiration_type = "non-expiring"
  }

  addons {
    samlp {
      audience = "https://${data.aws_region.current.name}.signin.aws.amazon.com/saml"
      mappings = {
        email = "http://schemas.xmlsoap.org/ws/2005/05/identity/claims/emailaddress"
        name  = "http://schemas.xmlsoap.org/ws/2005/05/identity/claims/name"
      }
      create_upn_claim                   = false
      passthrough_claims_with_no_mapping = false
      map_unknown_claims_as_is           = false
      map_identities                     = false
      name_identifier_format             = "urn:oasis:names:tc:SAML:2.0:nameid-format:persistent"
      name_identifier_probes = [
        "http://schemas.xmlsoap.org/ws/2005/05/identity/claims/emailaddress"
      ]
    }
  }
}
AWS側の設定
次の、AWS側の設定を入れていく。
AWS側では
- IAM SAML IDプロバイダー
- IAMロール
- IAMポリシー(必要であれば)
を作成する。
IAM SAML IDプロバイダーの作成
IAM SAML IDプロバイダーの作成でポイントとなるのは、aws_iam_saml_provider.auth0.saml_metadata_documentのプロパティだ。
ここには、Auth0のSAMLのメタデータXMLが必要になる。参考記事ではダウンロードして設定しているが、今回は自動化が目的なので、httpデータソースを使い、XMLで返ってきたレスポンスBodyを設定する。
httpデータソースのURLとして指定しているhttps://${var.auth0_domain}/samlp/metadata/${auth0_client.aws_management_console.id}は、Auth0のSAMLのメタデータを取得するためのエンドポイントだ。
data "http" "aws_management_console_samlp_metadata" {
  url = "https://${var.auth0_domain}/samlp/metadata/${auth0_client.aws_management_console.id}"
}

resource "aws_iam_saml_provider" "auth0" {
  name                   = local.iam_saml_provider_auth0
  saml_metadata_document = data.http.aws_management_console_samlp_metadata.response_body
}
IAMロールの作成
続いて、先ほど作ったIAM SAML IDプロバイダーを信頼されたエンティティのプリンシパルに設定したIAMロールを作成する。
今回はお試しでIAMロールにAdministratorAccessのポリシーを設定しているが、実際はセキュリティ要件に合わせて変更をしよう。
resource "aws_iam_role" "auth0" {
  name               = local.iam_auth0_admin_role_name
  assume_role_policy = data.aws_iam_policy_document.auth0_assume.json
}

data "aws_iam_policy_document" "auth0_assume" {
  statement {
    effect = "Allow"

    actions = [
      "sts:AssumeRoleWithSAML",
    ]

    principals {
      type        = "Federated"
      identifiers = [aws_iam_saml_provider.auth0.arn]
    }

    condition {
      test     = "StringEquals"
      variable = "SAML:aud"
      values   = ["https://${data.aws_region.current.name}.signin.aws.amazon.com/saml"]
    }
  }
}

resource "aws_iam_role_policy_attachment" "auth0" {
  role       = aws_iam_role.auth0.id
  policy_arn = "arn:aws:iam::aws:policy/AdministratorAccess"
}
Auth0のログインフローにSAML認証を組み込む
続いて、Auth0のログイン時に、先ほど作成したクライアントアプリケーション(auth0_client" "aws_management_console)を組み込む。
参考記事では「ルールを作成する」とあるが、以下のAuth0のTerafformプロバイダーのドキュメントで
Warning
This resource is deprecated. Refer to the guide on how to migrate from rules to actions and manage your actions using theauth0_actionresource.
とあるように、いつか無くなってしまうかもしれないものを使うのではなく、移行先のリソースで作成する。
auth0_action.saml_attributes_mappingでログイン後に動作するスクリプト(Action)を作成して、auth0_trigger_actions.login_flowで実際にログイン後の処理として組み込む、といった流れだ。
AWS側のSAML認証への渡し方のリファレンスは、以下のユーザーガイドを参考にしていただきたい。
resource "auth0_action" "saml_attributes_mapping" {
  name    = "SAML Attributes Mapping"
  runtime = "node18"
  deploy  = true

  supported_triggers {
    id      = "post-login"
    version = "v3"
  }

  code = <<-EOT
  exports.onExecutePostLogin = async (event, api) => {
    api.samlResponse.setAttribute(
      "https://aws.amazon.com/SAML/Attributes/Role",
      [
        "${aws_iam_role.auth0.arn},${aws_iam_saml_provider.auth0.arn}",
      ]
    );
    api.samlResponse.setAttribute("https://aws.amazon.com/SAML/Attributes/RoleSessionName", event.user.email);
  };
EOT
}

resource "auth0_trigger_actions" "login_flow" {
  trigger = "post-login"

  actions {
    id           = auth0_action.saml_attributes_mapping.id
    display_name = auth0_action.saml_attributes_mapping.name
  }
}
Auth0のユーザーの作成
さて、最後にログインするためのユーザーを作成する。
ここは特に難しいことはない。
resource "auth0_user" "example" {
  password       = "****************"
  email          = "****************"
  email_verified = true

  connection_name = "Username-Password-Authentication"
}
いざ、動かす!
動かす前に、Auth0でログイン認証するためのURLを取得できるようにしておこう。
参考記事でAuth0のコンソールから確認する方法が記載されているが、Terraformで以下のように確認が可能だ。
output "identity_provider_login_url" {
  value = "https://${var.auth0_domain}/samlp/${auth0_client.aws_management_console.id}"
}
上記をterraform applyした後にidentity_provider_login_urlで出力されたURLにアクセスしてみよう。
すると、以下の通りログイン用の画面が表示される。
ここで、auth0_user.exampleで作成したメールアドレスとパスワードでログインすると、
今回作成したIAMロールでマネージメントコンソールアクセスができる。
これで、Auth0経由でセキュアにログインができるようになった!
今回の設定では、作成したユーザにMFAの作成をしていないため、AWSコンソールアクセスよりもむしろセキュリティ強度は下がっている。Auth0の設定でしっかりとMFAを作成するようにして、よりセキュアなSSOをできるようにしていこう。
おまけ: 複数IAMロールへのsts:AssumeRoleWithSAML
AWSのSAMLアサーションでは、Roleを複数渡すことが可能だ。
auth0_action.saml_attributes_mapping.codeを以下のように追記してみよう。
※今回は簡略化するために同じロールを設定しているが、実際は別のロールを設定する。
resource "auth0_action" "saml_attributes_mapping" {
  // (中略)
  code = <<-EOT
  exports.onExecutePostLogin = async (event, api) => {
    api.samlResponse.setAttribute(
      "https://aws.amazon.com/SAML/Attributes/Role",
      [
        "${aws_iam_role.auth0.arn},${aws_iam_saml_provider.auth0.arn}",
+       "${aws_iam_role.auth0.arn},${aws_iam_saml_provider.auth0.arn}",
      ]
    );
    api.samlResponse.setAttribute("https://aws.amazon.com/SAML/Attributes/RoleSessionName", event.user.email);
  };
EOT
}
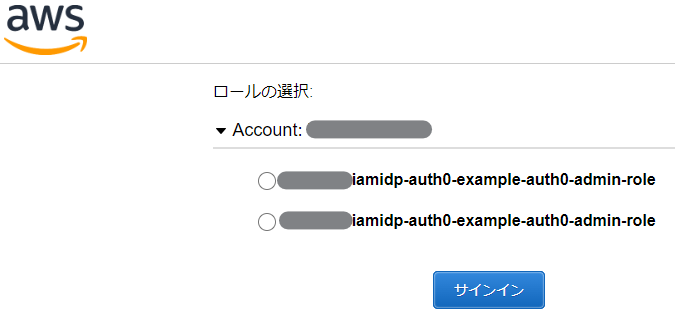
これで再度ログインをすると、AWSのマネージメントコンソールにリダイレクトされる前に以下のページが表示される。
1つのアカウントで複数のロールも、マルチアカウントも設定が可能で、複数のシステム担当をしている場合などは、これは非常に便利な機能だ。
おまけ: AWS CLIでのSAML認証を通したトークン取得
Terraform等のIaCを利用している場合、IAMのクレデンシャル情報をローカルに保持しておきたくないので、AWS CLIのsts assume-role等を使って一時的にトークンを払い出す運用を行っているケースがあるかと思う。
同様の事を、sts assume-role-with-samlで行うことが可能だ。
ただし、SAMLアサーションを取得する必要があるが、これを一息で簡単にとる方法がないため、以下のブログ記事のようなひと手間が必要になる。


