aliexpressやBangoodで3ドル程度で買えるProMicroは、物によってはArduino Leonardとして認識されます…
以下はちょっとした勉強用資料の下書きです。
最初にmicroUSBポートでパソコンにつないだ状態で右列の上から2番目にLEDの負極(足が短い方)を刺して、右列の上から4番目にLEDの正極を刺して、LEDが点灯することを確認します。
Blinkする場合は例えば左列の上から4番目にLEDの負極を刺して、(1kΩの抵抗を噛まして)
左列の上から5番目にLEDの正極を刺して
int LedPin=2;
// the setup function runs once when you press reset or power the board
void setup() {
  // initialize digital pin 13 as an output.
  pinMode(LedPin, OUTPUT);
}

// the loop function runs over and over again forever
void loop() {
  digitalWrite(LedPin, HIGH);   // turn the LED on (HIGH is the voltage level)
  delay(1000);              // wait for a second
  digitalWrite(LedPin, LOW);    // turn the LED off by making the voltage LOW
  delay(1000);              // wait for a second
}
とやってアップロードすれば良いです。
同じように9番まで動く事を確認します。
次はアナログ(HIGH LOWだけではなく0から255とか)を出力できるかを調べます。
左列の最下段(9)にLEDの正極、左列の上から4番目(GND)に負極を繋げて以下のスケッチを書き込みます。徐々に明るくなって徐々に暗くなります。
int LedPin=9;
// the setup function runs once when you press reset or power the board
void setup() {
  // initialize digital pin 13 as an output.
  pinMode(LedPin, OUTPUT);
}

// the loop function runs over and over again forever
void loop() {
  int i;

  for (i=0; i<256; i++){
   analogWrite(LedPin, i);
   delay(10);
  }

  for (i=255; i>=0; i--){
   analogWrite(LedPin, i);
   delay(10);
  }

}
これを 4とかに変えると徐々にではなく一気に明るくなったり消えたりしてうまくいきません。
他の数字とピンで試してみると、
「3,5,6,9」では徐々に暗くなったり明るくなったりというのがちゃんと動きます。
ここまでで、
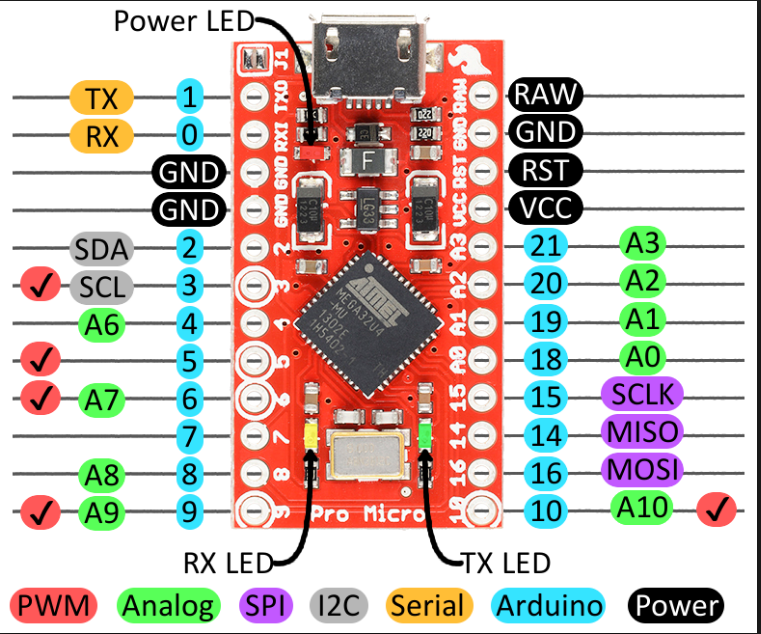
- 「ピン配置図の内、Arduinoのスケッチ指定のピンNOは水色のところの数字」
- 「PWMチェックがついているピンはHIGHかLOWだけでなく256段階の値を出力できる」
ことが分かるかと思います。
スイッチの取得
int switchNo=2;
int ledPin=5;

void setup() {
  //start serial connection
  Serial.begin(9600);
  //configure pin2 as an input and enable the internal pull-up resistor
  pinMode(switchNo, INPUT_PULLUP);
  pinMode(ledPin, OUTPUT);

}

void loop() {
  //read the pushbutton value into a variable
  int sensorVal = digitalRead(switchNo);
  //print out the value of the pushbutton
  Serial.println(sensorVal);

  // Keep in mind the pullup means the pushbutton's
  // logic is inverted. It goes HIGH when it's open,
  // and LOW when it's pressed. Turn on pin 13 when the
  // button's pressed, and off when it's not:
  if (sensorVal == HIGH) {
    digitalWrite(ledPin, LOW);
  } else {
    digitalWrite(ledPin, HIGH);
  }
}