概要
今日はPHPからMariaDBへ接続し、該当テーブルからデータを取得して画面へ表示するサンプルを書いてみます。
画面側に表示するのはSmartyテンプレートエンジンを利用します。
開発環境
Raspberry PIにApacheとPHPがインストールされている前提です。
今回使うバージョンは以下の通りです。
※環境構築については以下のサイトを参照してください。
# Apacheのバージョン確認です。
pi@raspberrypi:~ $ apachectl -v
Server version: Apache/2.4.54 (Raspbian)
Server built:   2022-06-09T04:26:43

# PHPのバージョン確認です。
pi@raspberrypi:~ $ php -v
PHP 7.4.30 (cli) (built: Jul  7 2022 15:51:43) ( NTS )
Copyright (c) The PHP Group
Zend Engine v3.4.0, Copyright (c) Zend Technologies
    with Zend OPcache v7.4.30, Copyright (c), by Zend Technologies
pi@raspberrypi:~ $

# MariaDBのバージョン確認です。
pi@raspberrypi:~ $ sudo mysql -uroot
Welcome to the MariaDB monitor.  Commands end with ; or \g.
Your MariaDB connection id is 32
Server version: 10.0.28-MariaDB-2+b1 Raspbian testing-staging

Copyright (c) 2000, 2016, Oracle, MariaDB Corporation Ab and others.

Type 'help;' or '\h' for help. Type '\c' to clear the current input statement.

MariaDB [(none)]>
MariaDBにDBユーザを追加及び接続確認
以下のコマンドでDBユーザを追加します。
そしてDBへ権限も付与します。
# MariaDBへ接続
pi@raspberrypi:~ $ sudo mysql -uroot
Welcome to the MariaDB monitor.  Commands end with ; or \g.
Your MariaDB connection id is 33
Server version: 10.0.28-MariaDB-2+b1 Raspbian testing-staging

Copyright (c) 2000, 2016, Oracle, MariaDB Corporation Ab and others.

Type 'help;' or '\h' for help. Type '\c' to clear the current input statement.

# 新規ユーザを追加と権限を付与のコマンドを実行
MariaDB [(none)]> GRANT ALL ON *.* TO "pi"@"localhost" IDENTIFIED BY "Password";
Query OK, 0 rows affected (0.00 sec)

# MariaDBを終了
MariaDB [(none)]> exit

# 追加した新規DBユーザでログインする
pi@raspberrypi:~ $ mysql -upi -pPassword
Welcome to the MariaDB monitor.  Commands end with ; or \g.
Your MariaDB connection id is 34
Server version: 10.0.28-MariaDB-2+b1 Raspbian testing-staging

Copyright (c) 2000, 2016, Oracle, MariaDB Corporation Ab and others.

Type 'help;' or '\h' for help. Type '\c' to clear the current input statement.

MariaDB [(none)]>
データベースとテーブルを作成
下記のコマンドでデータベースを作成とテーブルを作成します。
# webというデータベース名を作成
MariaDB [(none)]> create database web;
Query OK, 1 row affected (0.02 sec)

# 作成したwebデータベースを選択
MariaDB [(none)]> use web;
Database changed

# 選択したデータベースに次のテーブルを作成
MariaDB [web]> create table product (id int, name varchar(10), col varchar(10));
Query OK, 0 rows affected (0.12 sec)
データを手動で登録
次のSQLコマンドからテストデータを登録します。
# webデータベースを選択
MariaDB [(none)]> use web;
Database changed

# CREATE文でレコードを登録
MariaDB [web]> insert into product values(1,"TANAKA", "TEST1");
Query OK, 1 row affected (0.02 sec)

# CREATE文でレコードを登録
MariaDB [web]> insert into product values(2,"NOGUCHI", "TEST2");
Query OK, 1 row affected (0.01 sec)

# CREATE文でレコードを登録
MariaDB [web]> insert into product values(3,"RINA", "TEST3");
Query OK, 1 row affected (0.02 sec)

# CREATE文でレコードを登録
MariaDB [web]> insert into product values(4,"YAMADA", "TEST4");
Query OK, 1 row affected (0.01 sec)

# 登録したレコードの確認
MariaDB [web]> select * from product;
+------+---------+-------+
| id   | name    | col   |
+------+---------+-------+
|    1 | TANAKA  | TEST1 |
|    2 | NOGUCHI | TEST2 |
|    3 | RINA    | TEST3 |
|    4 | YAMADA  | TEST4 |
+------+---------+-------+
4 rows in set (0.01 sec)

MariaDB [web]>
テーブルのデータをWEBへ表示のコード
下記のPHPから直接表示したい場合です。
「could not find driver」が表示されるのは次のサイトを参照してください。
対応①:sudo apt-get install php-mysql
対応②:php.iniで以下の行を修正します。
;extension=pdo_mysql
↓
extension=pdo_mysql
対応③:rebootします。
※参照サイト
PHPでMySQLなどにPDO接続をすると、could not find driverのエラーが出る場合
https://pentan.info/server/pdo_could_not_find_driver.html
<html lang="ja">
<head><meta charset="utf-8"><title>product list</title>
</head>
<body>
<h1>product</h1>
<?
try {
  // MariaDB接続
$pdo = new PDO (
  'mysql:host=localhost;dbname=web;charset=utf8mb4','pi','Password',
  [
    PDO::ATTR_ERRMODE => PDO::ERRMODE_EXCEPTION,
    PDO::ATTR_DEFAULT_FETCH_MODE => PDO::FETCH_ASSOC,
  ]
);
$stmt = $pdo->query("SELECT id, name, col from product");
while ($row = $stmt->fetch()) {
  print "$row[id], $row[name], $row[col] <br> \n";
}
// MariaDB切断
$pdo = null;
// エラー処理
} catch (PDOException $e) {
  echo $e->getMessage() . PHP_EOL;
  exit;
}
?>
</body></html>
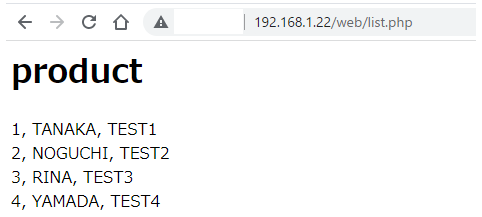
実行結果
次のURLから確認します。
http://192.168.1.22/web/list.php
※「192.168.1.22」サーバのIPアドレス
Smartyテンプレートを利用して表示
次のPHPコードを作成します。
# list.php
<?
# Smarty Libraryパスを定義
define('SMARTY_DIR', '/var/www/html/web/smarty/libs/');
# Smarty Library Classを読み込み
# require_once は、既に取り込まれたファイルは2回目以降は取り込まない(1度だけ取り込む)
require_once(SMARTY_DIR . 'Smarty.class.php');

# Smarty Library Classのインスタンス作成
$smarty = new Smarty();

# テンプレートファイルのパスを設定
$smarty->template_dir = "/var/www/html/web/tpl/";

# テンプレートのキャッシュフォルダを設定
$smarty->compile_dir = "/var/www/html/web/smarty/templates_c/";

try {
  // MariaDB接続
$pdo = new PDO (
  'mysql:host=localhost;dbname=web;charset=utf8mb4','pi','Password',
  [
    PDO::ATTR_ERRMODE => PDO::ERRMODE_EXCEPTION,
    PDO::ATTR_DEFAULT_FETCH_MODE => PDO::FETCH_ASSOC,
  ]
);
$sql = "SELECT id, name, col from product";
$stt = $pdo->prepare($sql);
$stt->execute();

while ($column = $stt->fetch(PDO::FETCH_ASSOC) ){
    $keys[] = $column;
}

$smarty->assign("rows", $keys);
// MariaDB切断
$pdo = null;
// エラー処理
} catch (PDOException $e) {
  echo $e->getMessage() . PHP_EOL;
}

$smarty->display("list.tpl");

?>
TPLファイル作成
次のテンプレートファイルを作成します。
# tpl/list.tpl
<html lang="ja">
<head><title>product list</title></head>
<body>
<h1>product list</h1>
{foreach $rows as $row}
{$row['id']},{$row['name']},{$row['col']}<BR>
{/foreach}
</body></html>
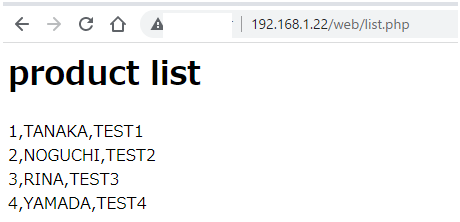
実行結果
今回はSmartyのテンプレートエンジンからレイアウトを表示します。
参照サイト
MySQL (MariaDB) ユーザー追加コマンド(ユーザー作成、権限付与)
https://shinmeisha.co.jp/newsroom/2021/04/25/mysql-mariadb-%E3%83%A6%E3%83%BC%E3%82%B6%E3%83%BC%E8%BF%BD%E5%8A%A0%E3%82%B3%E3%83%9E%E3%83%B3%E3%83%89%EF%BC%88%E3%83%A6%E3%83%BC%E3%82%B6%E3%83%BC%E4%BD%9C%E6%88%90%E3%80%81%E6%A8%A9%E9%99%90/
テーブルを作成する(CREATE TABLE文)
https://www.javadrive.jp/mysql/table/index1.html
最後に
配列をテンプレート側に渡して表示する項目のIDを指定すれば表示されました。
データの表示でしたが、次はbootstrapを利用してレイアウトを作成したいですね。
今日はここまで!!!ありがとうございます。