概要
React Three Fiberで、Materialにテクスチャを適用する方法をまとめました。
現在わかっているだけで、5パターンの適用方法があります。
ベースとなるモデル
この記事で扱うsceneです。
モデルにはテクスチャを適用していません。
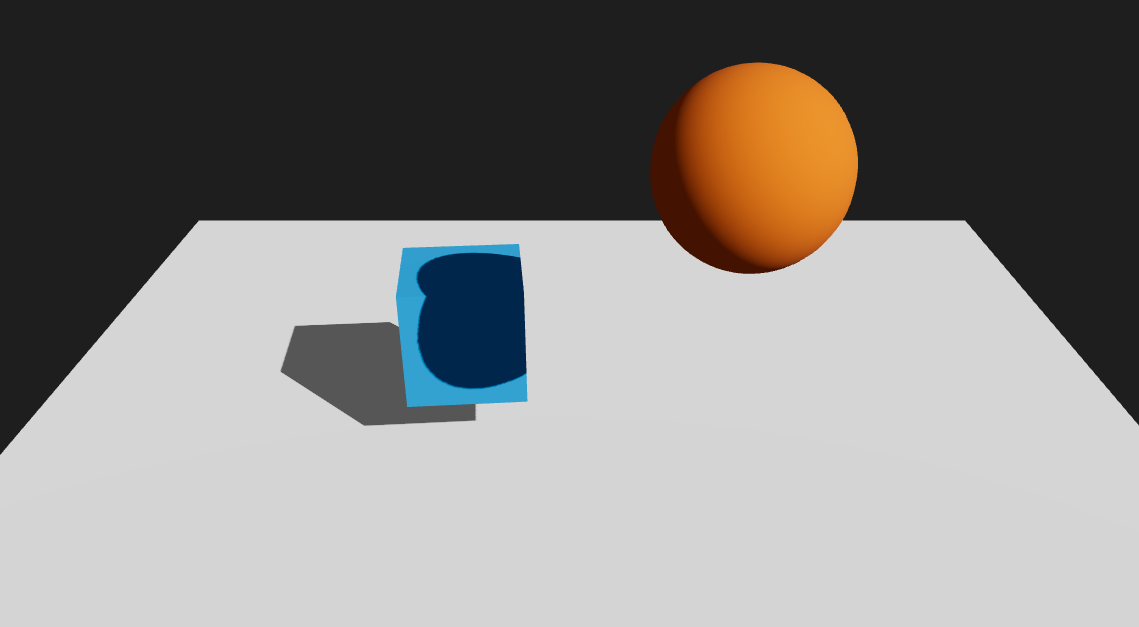 Cubeは床面に影を落としています。また、Sphereからの影を受けています。
コード
object以外のコードは、以降で紹介するコードと同じなので、ここでまとめて記載しておきます。
import React, { useRef, VFC } from 'react';
import * as THREE from 'three';
import { OrbitControls, Plane, Stats } from '@react-three/drei';
import { Canvas, useFrame } from '@react-three/fiber';

export const NoTexture: VFC = () => {
	return (
		<Canvas
			camera={{
				position: [0, 5, 8],
				fov: 50,
				aspect: window.innerWidth / window.innerHeight,
				near: 0.1,
				far: 2000
			}}
			dpr={window.devicePixelRatio}
			shadows>
			{/* canvas color */}
			<color attach="background" args={['#1e1e1e']} />
			{/* fps */}
			<Stats />
			{/* camera controller */}
			<OrbitControls />
			{/* lights */}
			<ambientLight intensity={0.1} />
			<directionalLight
				position={[5, 5, 5]}
				intensity={1}
				shadow-mapSize-width={2048}
				shadow-mapSize-height={2048}
				castShadow
			/>
			{/* object */}
			<Objects />
			{/* floor */}
			<Plane rotation={[-Math.PI / 2, 0, 0]} args={[10, 10]} receiveShadow>
				<meshStandardMaterial color="#fff" side={THREE.DoubleSide} />
			</Plane>
		</Canvas>
	)
}

// ==============================================
const Objects: VFC = () => {
	const boxRef = useRef<THREE.Mesh>(null)

	useFrame(() => {
		boxRef.current!.rotation.y += 0.01
	})

	return (
		<>
			<mesh ref={boxRef} position={[-1, 1, 0]} castShadow receiveShadow>
				<boxGeometry args={[1, 1, 1]} />
				<meshStandardMaterial color="#22a7f2" />
			</mesh>
			<mesh position={[1, 3, 2]} castShadow receiveShadow>
				<sphereGeometry args={[0.6, 32, 32]} />
				<meshStandardMaterial color="#ea7600" />
			</mesh>
		</>
	)
}
影の設定
影の設定については、以下の記事を参考にしてください。
Matcaps
Matcapsを使用したテクスチャの適用方法を紹介します。
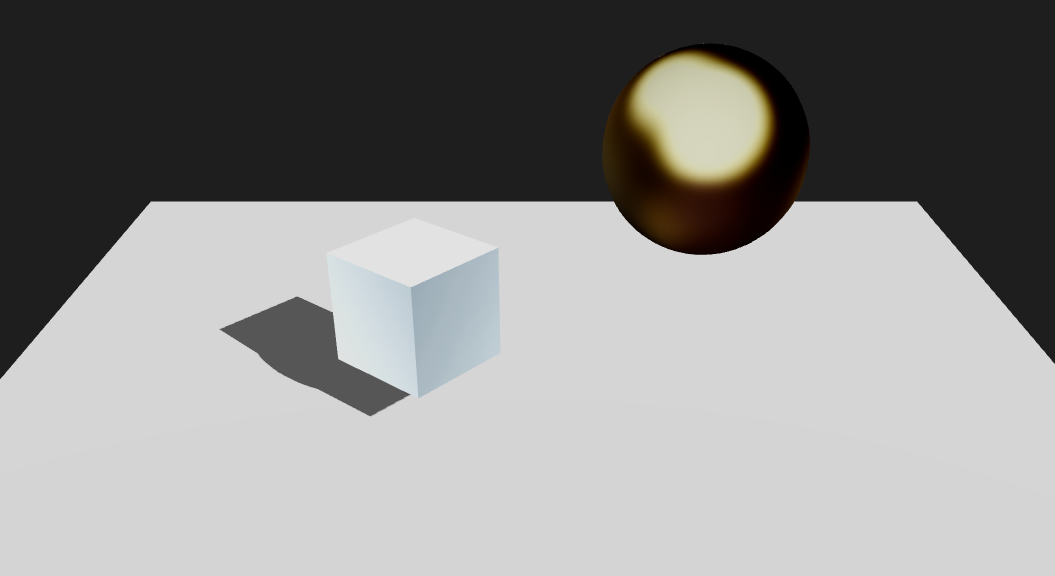
Matcapsを使用すると、メッシュ自体に落ちる影が適用されなくなります。
床面に、CubeとSphereの影は落ちています。しかし、テクスチャを適用したCubeには、Sphereの影が落ちません。
関連リンク
- ドキュメント
- テクスチャの仕様
コード
import React, { Suspense, useRef, VFC } from 'react';
import * as THREE from 'three';
import { OrbitControls, Plane, Stats, useMatcapTexture } from '@react-three/drei';
import { Canvas, useFrame } from '@react-three/fiber';

export const MatcapsTexture: VFC = () => {
	return (
		<Canvas {/* props */}>
			// ・・・
			{/* object */}
			<Suspense fallback={null}>
				<Objects />
			</Suspense>
			// ・・・
		</Canvas>
	)
}

// ==============================================
const Objects: VFC = () => {
	const boxRef = useRef<THREE.Mesh>(null)

	useFrame(() => {
		boxRef.current!.rotation.y += 0.01
	})

	const [matcap1] = useMatcapTexture('161B1F_C7E0EC_90A5B3_7B8C9B', 512)
	const [matcap2] = useMatcapTexture('36220C_C6C391_8C844A_8B7B4C', 512)

	return (
		<>
			<mesh ref={boxRef} position={[-1, 1, 0]} castShadow receiveShadow>
				<boxGeometry args={[1, 1, 1]} />
				<meshMatcapMaterial matcap={matcap1} />
			</mesh>
			<mesh position={[1, 3, 2]} castShadow receiveShadow>
				<sphereGeometry args={[0.6, 32, 32]} />
				<meshMatcapMaterial matcap={matcap2} />
			</mesh>
		</>
	)
}
- テクスチャを読み込む場合は、
Suspenseタグを使用して非同期処理にします。
<Suspense fallback={null}>
	<Objects />
</Suspense>
-
Matcapsは、
useMatcapTextureを使用して読み込みます。引数には、テクスチャコードと解像度を指定します。
const [matcap1] = useMatcapTexture('161B1F_C7E0EC_90A5B3_7B8C9B', 512)
const [matcap2] = useMatcapTexture('36220C_C6C391_8C844A_8B7B4C', 512)
Matcapsテクスチャは4色からなるテクスチャで、テクスチャコードはその色のHexカラーコードをつなげたものです。
https://github.com/nidorx/matcaps#textures
- 生成したテクスチャは、
meshMatcapMaterialに適用します。
<mesh ref={boxRef} position={[-1, 1, 0]} castShadow receiveShadow>
	<boxGeometry args={[1, 1, 1]} />
	<meshMatcapMaterial matcap={matcap1} />
</mesh>
Environment
Environmentタグを使用したテクスチャの適用方法を紹介します。
Environmentは、メッシュではなく周囲にテクスチャを適用します。
 Sphereは、`metalness`値を上げて、周辺環境を反射させています。
関連リンク
- ドキュメント
- テクスチャのダウンロードサイト
コード
import React, { Suspense, useRef, VFC } from 'react';
import * as THREE from 'three';
import { Environment, OrbitControls, Plane, Stats } from '@react-three/drei';
import { Canvas, useFrame } from '@react-three/fiber';

export const MatcapsTexture: VFC = () => {
	return (
		<Canvas {/* props */}>
			// ・・・
			{/* object */}
			<Suspense fallback={null}>
				<Environment preset="city" background />
			</Suspense>
			<Objects />
			// ・・・
		</Canvas>
	)
}

// ==============================================
const Objects: VFC = () => {
	const boxRef = useRef<THREE.Mesh>(null)

	useFrame(() => {
		boxRef.current!.rotation.y += 0.01
	})

	return (
		<>
			<mesh ref={boxRef} position={[-1, 1, 0]} castShadow receiveShadow>
				<boxGeometry args={[1, 1, 1]} />
				<meshStandardMaterial color="#22a7f2" />
			</mesh>
			<mesh position={[1, 3, 2]} castShadow receiveShadow>
				<sphereGeometry args={[0.6, 32, 32]} />
				<meshStandardMaterial color="#ea7600" metalness={1} roughness={0} />
			</mesh>
		</>
	)
}
Environmentタグでは、読み込むテクスチャを指定します。
<Suspense fallback={null}>
	<Environment preset="city" background />
</Suspense>
presetは、あらかじめ用意されているテクスチャです。
これ以外のテクスチャを使うには、filesを使用してテクスチャファイルをロードします。
<Suspense fallback={null}>
	<Environment files="/assets/comfy_cafe_2k.hdr" background />
</Suspense>
また、backgroundを指定することで周囲にテクスチャを表示します。
これを指定しない場合、周囲にテクスチャは適用されますが、表示自体はされません。

useCubeTexture
useCubeTextureフックを使用したテクスチャの適用方法を紹介します。
Environmentを使用したテクスチャと似ていますが、useCubeTextureではメッシュ自身にテクスチャを適用させます。
つまり、テクスチャを適用するメッシュを個別に指定することができます。
また、周辺にもテクスチャを適用することができます。
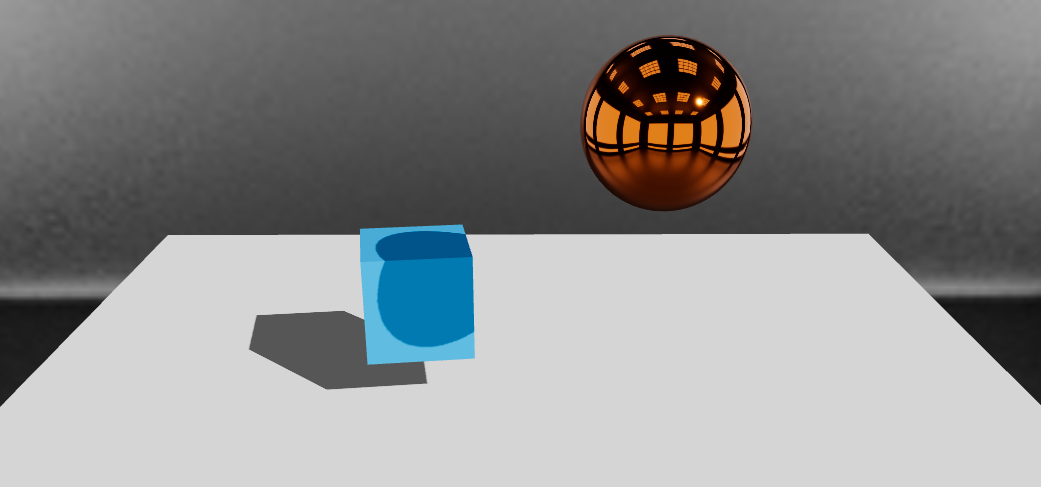 CubeとSphere、周辺環境にテクスチャを適用しています。床には適用していません。
関連リンク
- ドキュメント
コード
import React, { Suspense, useRef, VFC } from 'react';
import * as THREE from 'three';
import { OrbitControls, Plane, Stats, useCubeTexture } from '@react-three/drei';
import { Canvas, useFrame, useThree } from '@react-three/fiber';

export const MatcapsTexture: VFC = () => {
	return (
		<Canvas {/* props */}>
			// ・・・
			{/* object */}
			<Suspense fallback={null}>
				<Objects />
			</Suspense>
			// ・・・
		</Canvas>
	)
}

// ==============================================
const Objects: VFC = () => {
	const boxRef = useRef<THREE.Mesh>(null)

	useFrame(() => {
		boxRef.current!.rotation.y += 0.01
	})

	const { scene } = useThree()

	const texture = useCubeTexture(['px.png', 'nx.png', 'py.png', 'ny.png', 'pz.png', 'nz.png'], {
		path: '/assets/textures/cube/'
	})

	scene.background = texture

	return (
		<>
			<mesh ref={boxRef} position={[-1, 1, 0]} castShadow receiveShadow>
				<boxGeometry args={[1, 1, 1]} />
				<meshStandardMaterial color="#22a7f2" envMap={texture} />
			</mesh>
			<mesh position={[1, 3, 2]} castShadow receiveShadow>
				<sphereGeometry args={[0.6, 32, 32]} />
				<meshStandardMaterial color="#ea7600" envMap={texture} metalness={1} roughness={0} />
			</mesh>
		</>
	)
}
useCubeTextureは、6つのテクスチャを読み込みます。これはメッシュの周囲を取り巻く6面のテクスチャになります。
const texture = useCubeTexture(['px.png', 'nx.png', 'py.png', 'ny.png', 'pz.png', 'nz.png'], {
	path: '/assets/textures/cube/'
})
それを、マテリアルのenvMapに割り当てます。
<mesh position={[1, 3, 2]} castShadow receiveShadow>
	<sphereGeometry args={[0.6, 32, 32]} />
	<meshStandardMaterial color="#ea7600" envMap={texture} metalness={1} roughness={0} />
</mesh>
また、scene.background に割り当てることで、周囲にもテクスチャが適用されます。
scene.background = texture
CubeTextureを使用した屈折表現
texture.mappingにCubeRefractionMappingを指定することで、屈折表現をすることができます。

const { scene } = useThree()
const texture = useCubeTexture(['px.png', 'nx.png', 'py.png', 'ny.png', 'pz.png', 'nz.png'], {
	path: '/assets/textures/cube/'
})
texture.mapping = THREE.CubeRefractionMapping
scene.background = texture

//・・・

<mesh position={[1, 3, 2]} castShadow receiveShadow>
	<sphereGeometry args={[0.6, 32, 32]} />
	<meshBasicMaterial envMap={texture} refractionRatio={0.9} color="#fff" />
</mesh>
ただし、refractionRatioを指定できるmaterialは一部に限られているようです。わかっているもので以下のものがあります。
- meshPhongMaterial
- meshLambertMaterial
- meshBasicMaterial
公式サンプル
https://threejs.org/examples/#webgl_materials_envmaps
https://threejs.org/examples/#webgl_materials_cubemap_refraction
https://threejs.org/examples/#webgl_materials_cubemap
useTexture
useTextureフックを使用したテクスチャの適用方法を紹介します。
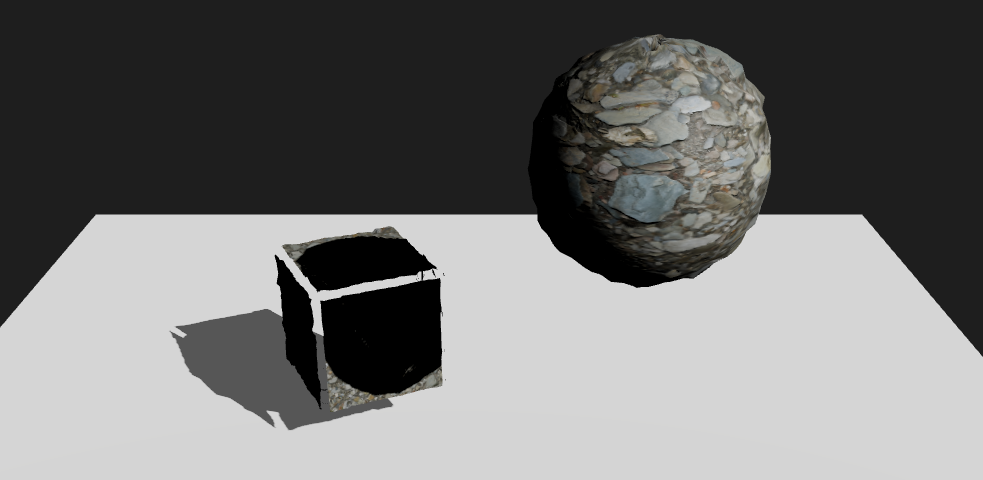
ただ、この方法はあまり実用的ではないと思います。
図を見るとCubeの面が分離しています。
これは、DisplacementMapとdisplacementScaleを割り当てたことが原因ですが、もっと言えばUVマッピングが正確にできていないからだと思います。(この辺は正確に調査できていないです)
コード上でUVマッピングすることもできますが、複雑なメッシュに対してUVマッピングするのは難しくコードも煩雑になります。
それよりもいい方法があります。次で紹介するBlenderを用いたテクスチャの適用です。
関連リンク
- ドキュメント
- テクスチャのダウンロードサイト
コード
import React, { Suspense, useRef, VFC } from 'react';
import * as THREE from 'three';
import { OrbitControls, Plane, Stats, useTexture } from '@react-three/drei';
import { Canvas, useFrame } from '@react-three/fiber';

export const Texture: VFC = () => {
	return (
		<Canvas {/* props */}>
			// ・・・
			{/* object */}
			<Suspense fallback={null}>
				<Objects />
			</Suspense>
			// ・・・
		</Canvas>
	)
}

// ==============================================
const Objects: VFC = () => {
	const boxRef = useRef<THREE.Mesh>(null)

	useFrame(() => {
		boxRef.current!.rotation.y += 0.01
	})

	const name = (type: string) => `/assets/textures/Rocks024S/Rocks024S_1K_${type}.jpg`

	const textureProps = useTexture({
		map: name('Color'),
		displacementMap: name('Displacement'),
		normalMap: name('NormalGL'),
		roughnessMap: name('Roughness'),
		aoMap: name('AmbientOcclusion')
	})

	return (
		<>
			<mesh ref={boxRef} position={[-1, 1, 0]} castShadow receiveShadow>
				<boxGeometry args={[1, 1, 1, 32, 32, 32]} />
				<meshStandardMaterial {...textureProps} displacementScale={0.1} />
			</mesh>
			<mesh position={[1, 3, 2]} castShadow receiveShadow>
				<sphereGeometry args={[0.6, 32, 32]} />
				<meshStandardMaterial {...textureProps} displacementScale={0.2} />
			</mesh>
		</>
	)
}
- displacementを適用する場合、geometryのセグメントを細かくする(頂点数を増やす)必要があります。
その頂点がdisplacementMapに従って凹凸の形状を取り、そのスケールをdisplacementScaleで決めます。
<mesh ref={boxRef} position={[-1, 1, 0]} castShadow receiveShadow>
	<boxGeometry args={[1, 1, 1, 32, 32, 32]} />
	<meshStandardMaterial color="#22a7f2" {...textureProps} displacementScale={0.1} />
</mesh>
Blender
Blenderを使用したテクスチャの適用方法を紹介します。
この方法では、Blender側でモデルを作成し、更にテクスチャも適用します。そして、そのモデルをglbエクスポートして、React Three Fiberに読み込ませます。
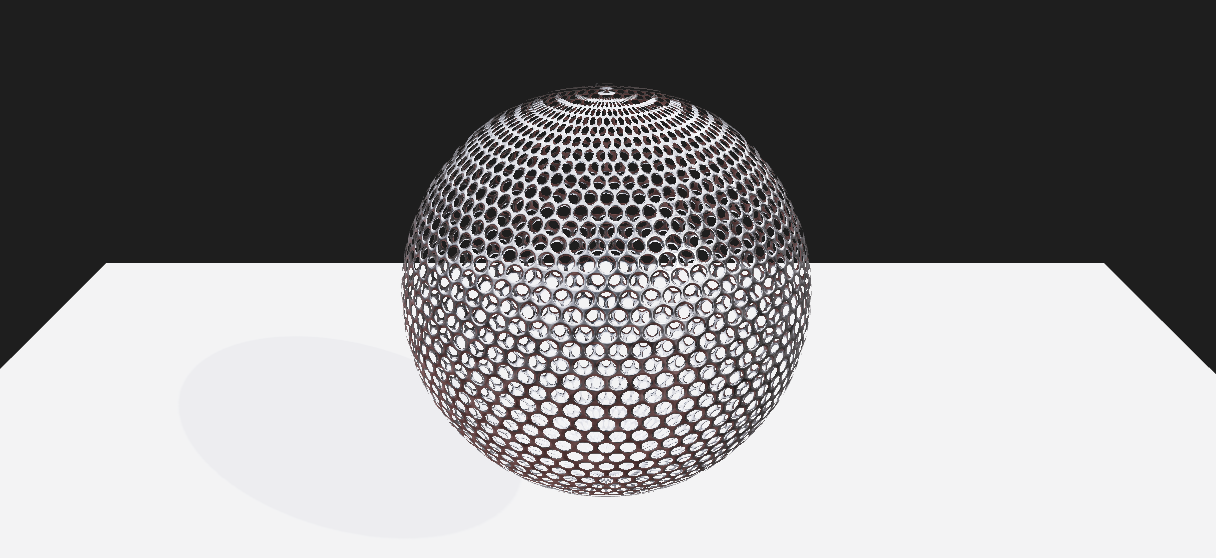
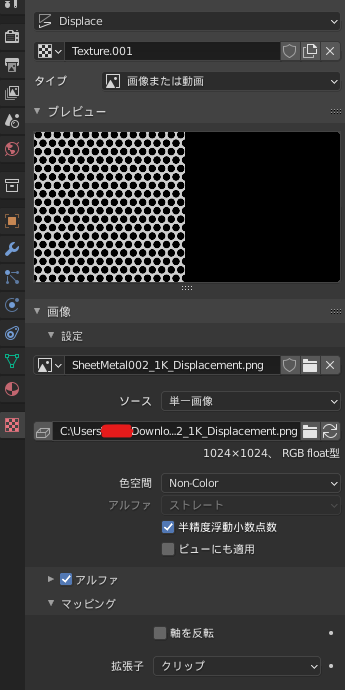
使用したテクスチャは以下のものです。
関連リンク
- glbファイルの仕様
- テクスチャのダウンロードサイト
モデリング(Blender)
UV球を追加します。
また、スムーズシェードもかけておきます。
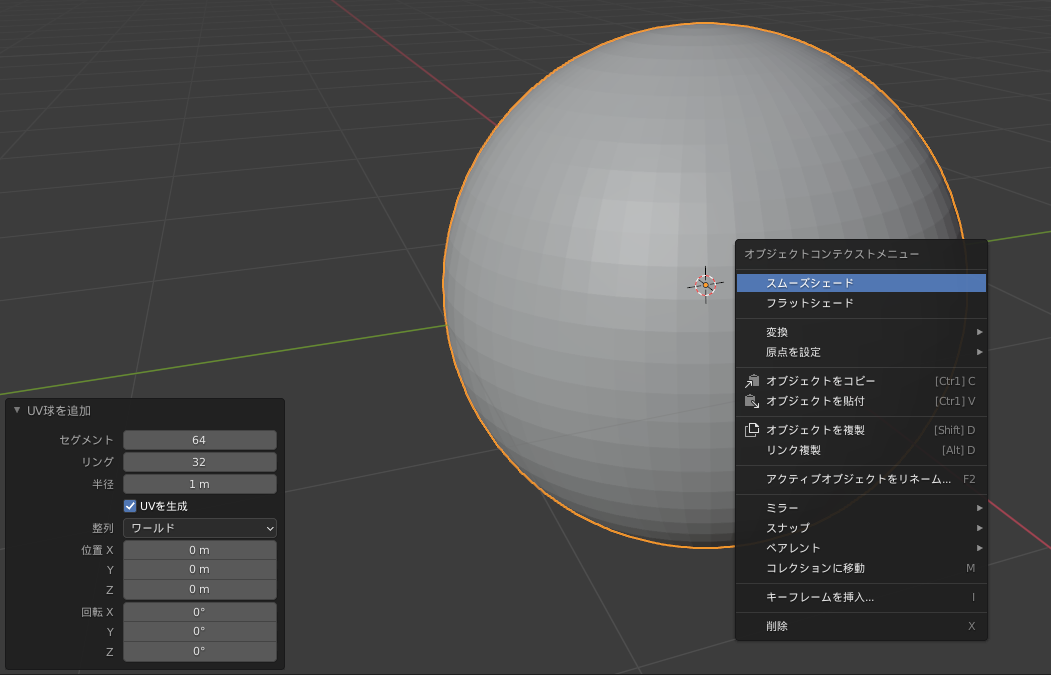
Shadingタグで、ノードを以下のように設定します。
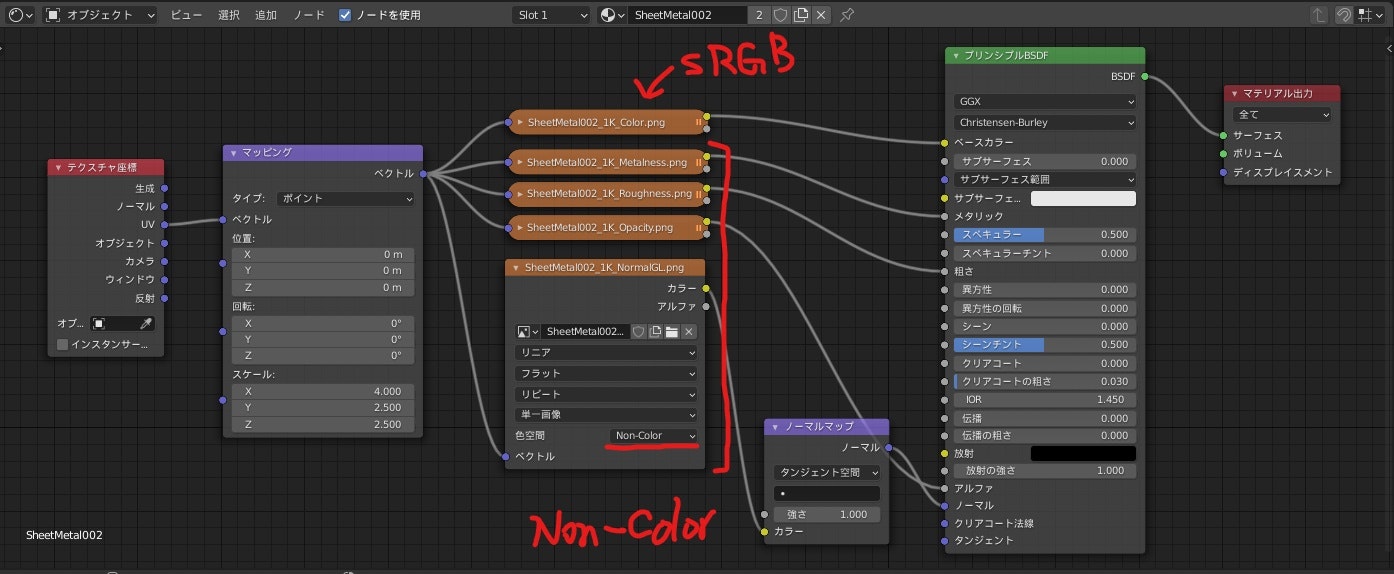
画像テクスチャノードに、ダウンロードしたテクスチャのマップをそれぞれ指定します。
ここで、Color Mapは、色空間にsRGBを指定します。その他のMapは、Non-Colorを指定します。
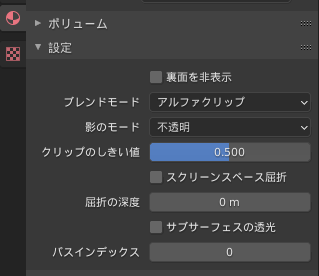
また、今回使用したテクスチャでは**Opacity Map(Alpha Map)**を指定しています。
このMapを指定する場合は、ノードの追加の他にマテリアルの設定から、ブレンドモードをアルファクリップにする必要があります。
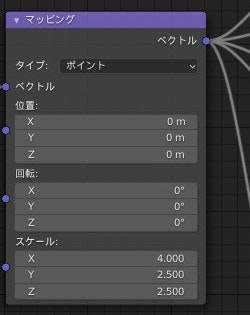
Blenderでテクスチャを指定する利点として、UV展開の設定の他に、マッピングノードでテクスチャの位置・角度・スケールを簡単に調整することができます。
Displacementについて
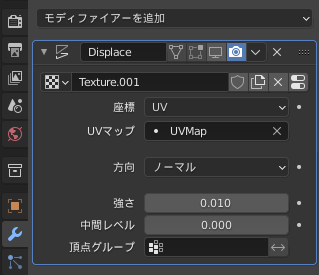
useTextureの例でDisplacementをやり玉にあげましたが、Displacement Mapを使用したBlenderでの設定については、ちゃんとした設定方法がわかっていません。
そもそもテクスチャを使用する箇所を、凹凸がわかるレベルで物凄くよって見ることはほぼないと思うので、いまのところ調査はしていません。
また、モディファイアを使うことで一応設定することが可能ですが、ちゃんと反映されていないっぽいので使用しませんでした。
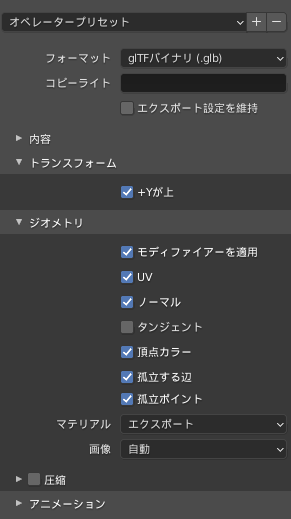
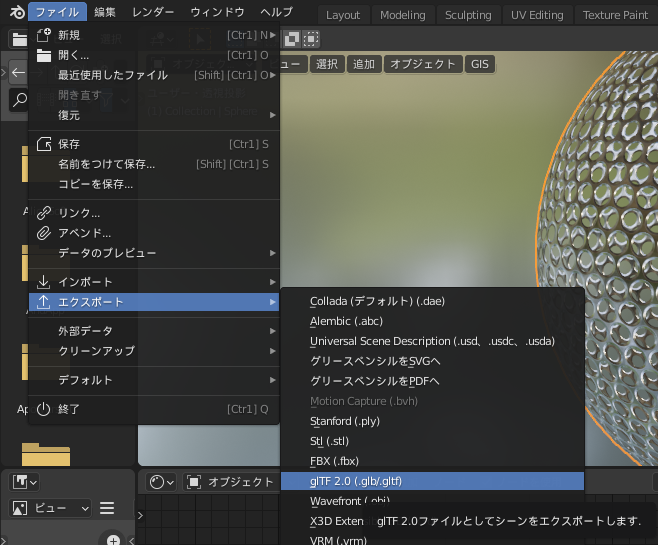
エクスポート
以下の手順で、作成したモデルをglbファイルでエクスポートします。
コードの雛形の生成
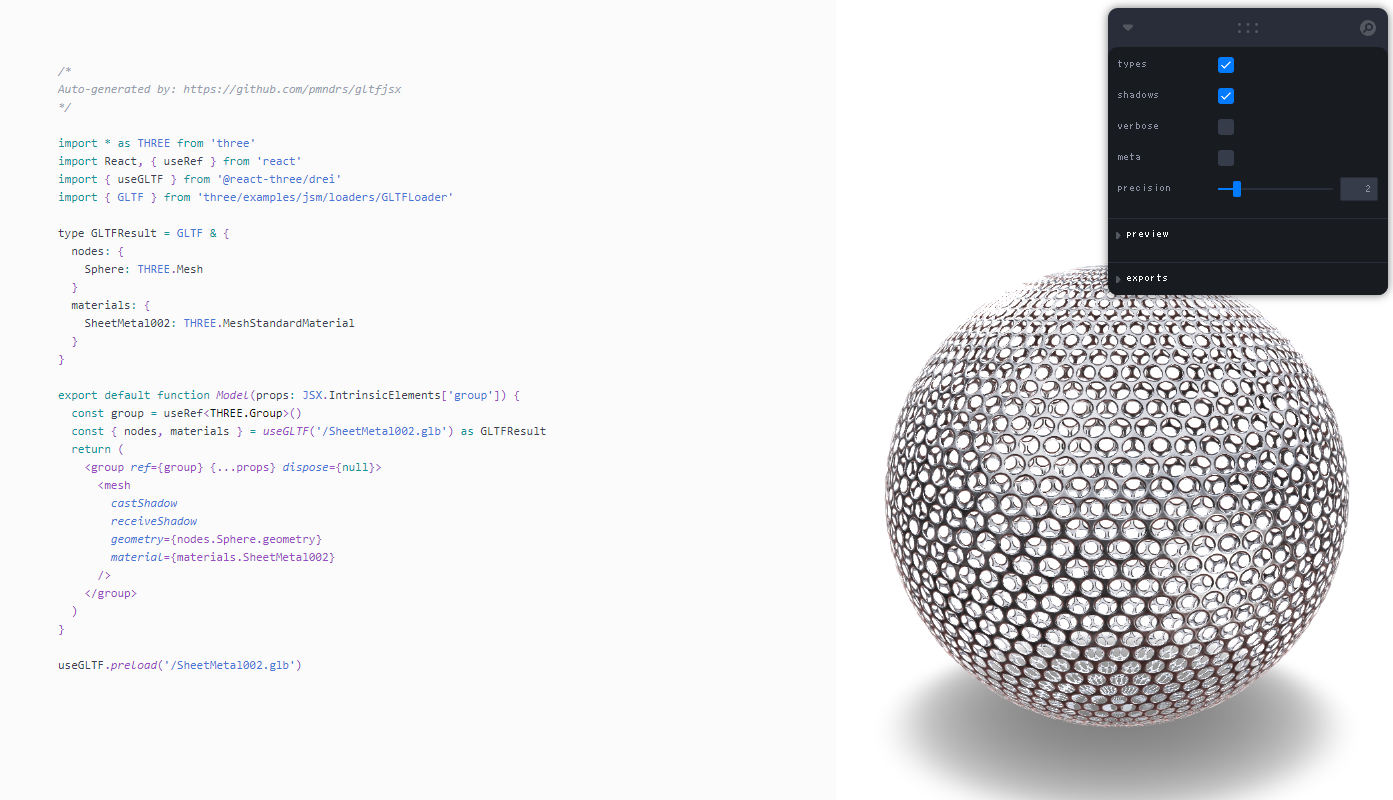
次に、エクスポートしたglbファイルをReact Three Fiberで読み込むわけですが、コードの雛形を生成してくれる便利なツールがあります。
このサイトに、エクスポートしたglbファイルを投げ込むと、モデルを表示してくれます。また、コードの雛形も同時に生成してくれます。
雛形コードの生成は、コマンドラインからも行えます。詳しくは以下を参照してください。
コード
import React, { Suspense, useRef, VFC } from 'react';
import * as THREE from 'three';
import { GLTF } from 'three/examples/jsm/loaders/GLTFLoader';
import { Environment, OrbitControls, Plane, Stats, useGLTF } from '@react-three/drei';
import { Canvas } from '@react-three/fiber';

export const GlbTexture: VFC = () => {
	return (
		<Canvas {/* props */}>
			// ・・・
			{/* object */}
			<Suspense fallback={null}>
				<Environment preset="city" />
				<Model />
			</Suspense>
			// ・・・
		</Canvas>
	)
}

// ==============================================
/*
Auto-generated by: https://github.com/pmndrs/gltfjsx
*/

type GLTFResult = GLTF & {
	nodes: {
		Sphere: THREE.Mesh
	}
	materials: {
		SheetMetal002: THREE.MeshStandardMaterial
	}
}

const ModelPath = '/assets/SheetMetal002.glb'

const Model: VFC = (props: JSX.IntrinsicElements['group']) => {
	const group = useRef<THREE.Group>()
	const { nodes, materials } = useGLTF(ModelPath) as GLTFResult

	return (
		<group ref={group} position={[0, 2, 0]} {...props} dispose={null}>
			<mesh
				castShadow
				receiveShadow
				geometry={nodes.Sphere.geometry}
				material={materials.SheetMetal002}
			/>
		</group>
	)
}

useGLTF.preload(ModelPath)
まとめ
手探りで調べたので間違った解釈をしているところがあるかもしれません。
「こういうテクスチャの割り当て方もあるよ」とか、「テクスチャをこういう風に使うと、こういう表現ができるよ」など、知っているかたがいれば是非コメントしてください。
