概要
皆様は、Windowsでスクリーンショット(以下、スクショ)を撮るときに何を使いますか?
デフォルトで入ってる機能として、主に以下のものがあります。
Print Screen
すべてのディスプレイに対して、一枚の画像としてスクショします。
ペイントなどに貼り付けて保存する必要があります。
Alt + Print Screen
アクティブなウィンドウに対してスクショします。
ペイントなどに貼り付けて保存する必要があります。
Win + Print Screen
すべてのディスプレイに対して、一枚の画像としてスクショします。
自動で保存され、デフォルトでは「C:\Users\Username\Pictures\Screenshots」に保存されます。
Win + Alt + Print Screen
アクティブなウィンドウに対してスクショします。
自動で保存され、デフォルトでは「C:\Users\Username\Videos\Captures」に保存されます。
使い勝手のいいのは、下2つでしょうか。
しかし、キーが押しづらく、使い勝手もいまいちだったので、自分で同様以上のことができるアプリ作ろうと思いました。
最後に配布URLを貼っています。気になった方は是非使ってみてください。
仕様
まず、キモとなる技術的な裏付けとして、フォーム外のキー入力を感知できるかを調べました。
できることが分かったので、作れる確信を持ちました。
メインの仕様として、作る前に以下を決めました。
- キー1つでスクショが撮れる
- スクショするディスプレイまたはアクティブウィンドウを選択できる
- 自動で保存する
- タスクトレイ表示し、常駐アプリとする
サブの仕様として、作りながら以下を決めました。
- 保存先のフォルダを設定できる
- スクショした後、ペイントで開くように設定できる
- スクショをするキーを設定できる
- 保存する拡張子を設定できる
- 保存するファイル名のテンプレートを設定できる

アイコンは、こちらのフリー素材を使用しました。

タスクトレイの表示

メニューとツールチップ
デフォルトでは、Pauseキーでスクショができます。
(P)は、PrimaryDisplayです。
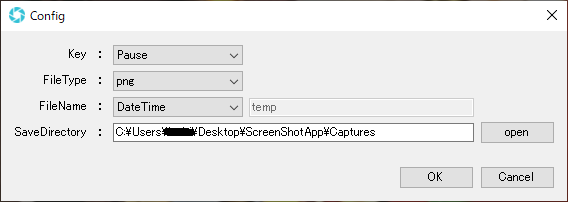
設定画面
プログラム
アプリは、C#(.Net)で Windows Form Application として作成しました。
以下、機能を実装するのに調べたことをまとめます。
フォーム外のキーイベントの感知
フォーム外のキーイベントを監視することを、キーロガーというそうです。
メインフォームに、Timerコントロールを追加して監視します。
private void timer1_Tick(object sender, EventArgs e) {
    var key_state = KeyStateBackgroundWatcher.IsKeyLocked(Keys.Pause);

    if (key_state) {
        Console.WriteLine("Keys.Pause");
    }
}

// WindowsAPIのインポート
[System.Runtime.InteropServices.DllImport("user32.dll",
    CharSet = System.Runtime.InteropServices.CharSet.Auto,
    CallingConvention = System.Runtime.InteropServices.CallingConvention.StdCall)]
public static extern short GetKeyState(int nVirtKey);

public static bool IsKeyLocked(Keys key_val) {
    return (GetKeyState((int)key_val) & 0x80) != 0;
}
参考:https://detail.chiebukuro.yahoo.co.jp/qa/question_detail/q12189853917
アプリをタスクトレイのみに表示する
static class Program {
    /// <summary>
    /// アプリケーションのメイン エントリ ポイントです。
    /// </summary>
    [STAThread]
    static void Main() {
        Application.EnableVisualStyles();
        Application.SetCompatibleTextRenderingDefault(false);

        // 画面を表示せず、アプリケーションを実行します。
        //Application.Run(new MainForm());
        var form = new MainForm();
        Application.Run();
    }
}
NotifyIconコントロールを追加します。メニューはこのNotifyIconに付属させます。
以下は、メニューのExitを押したときのイベントです。
アプリを終了する前に、notifyIcon1.Dispose()をすることで、タスクトレイ上にアイコンが残らないようにします。
private void tsmi_exit_Click(object sender, EventArgs e) {
    notifyIcon1.Dispose();
    Application.Exit();
}
アクティブウィンドウのスクショを撮る
以下は、ウィンドウの影を含めないで、キャプチャする方法です。
※アクティブウィンドウは、立体感を出すためかウィンドウ周りに影が入っていて、通常はそれを含めてキャプチャしてしまいます。
private static Bitmap CaptureActiveWindow() {
    //アクティブなウィンドウのデバイスコンテキストを取得
    IntPtr hWnd = NativeMethods.GetForegroundWindow();
    IntPtr winDC = NativeMethods.GetWindowDC(hWnd);
    //ウィンドウの大きさを取得
    NativeMethods.RECT winRect = new NativeMethods.RECT();
    NativeMethods.DwmGetWindowAttribute(
        hWnd,
        NativeMethods.DWMWA_EXTENDED_FRAME_BOUNDS,
        out var bounds,
        Marshal.SizeOf(typeof(NativeMethods.RECT)));
    NativeMethods.GetWindowRect(hWnd, ref winRect);
    //Bitmapの作成
    var offsetX = bounds.left - winRect.left;
    var offsetY = bounds.top - winRect.top;
    Bitmap bmp = new Bitmap(bounds.right - bounds.left, bounds.bottom - bounds.top);

    //Graphicsの作成
    using (var g = Graphics.FromImage(bmp)) {
        //Graphicsのデバイスコンテキストを取得
        IntPtr hDC = g.GetHdc();
        //Bitmapに画像をコピーする
        Console.WriteLine(winRect);
        NativeMethods.BitBlt(hDC, 0, 0, bmp.Width, bmp.Height, winDC, offsetX, offsetY, NativeMethods.SRCCOPY);
        //解放
        g.ReleaseHdc(hDC);
    }
    NativeMethods.ReleaseDC(hWnd, winDC);

    return bmp;
}

private static void screenShot_Active() {
    using (var bmp = CaptureActiveWindow()) {
        bmp.Save(@"hoge\image.png", ImageFormat.Png);
    }
}
class NativeMethods {
    public const int SRCCOPY = 13369376;
    public const int DWMWA_EXTENDED_FRAME_BOUNDS = 9;

    [DllImport("user32.dll")]
    public static extern IntPtr GetDC(IntPtr hwnd);

    [DllImport("gdi32.dll")]
    public static extern int BitBlt(IntPtr hDestDC,
        int x, int y, int nWidth, int nHeight,
        IntPtr hSrcDC, int xSrc, int ySrc, int dwRop);

    [DllImport("user32.dll")]
    public static extern IntPtr ReleaseDC(IntPtr hwnd, IntPtr hdc);
    [StructLayout(LayoutKind.Sequential)]
    public struct RECT {
        public int left; public int top; public int right; public int bottom;
    }

    [DllImport("user32.dll")]
    public static extern IntPtr GetWindowDC(IntPtr hwnd);

    [DllImport("user32.dll")]
    public static extern IntPtr GetForegroundWindow();

    [DllImport("user32.dll")]
    public static extern int GetWindowRect(IntPtr hwnd, ref RECT lpRect);

    [DllImport("dwmapi.dll")]
    public static extern int DwmGetWindowAttribute(IntPtr hwnd, int dwAttribute, out RECT pvAttribute, int cbAttribute);
}
参考:https://teratail.com/questions/103093
すべてのディスプレイを1枚スクショとして撮る
private static string screenShot_All() {
    int left = SystemInformation.VirtualScreen.Left;
    int top = SystemInformation.VirtualScreen.Top;
    int width = SystemInformation.VirtualScreen.Width;
    int hight = SystemInformation.VirtualScreen.Height;

    Rectangle rect = new Rectangle(left, top, width, hight);
    using (var bmp = new Bitmap(rect.Width, rect.Height, PixelFormat.Format32bppArgb)) {
        using (var g = Graphics.FromImage(bmp)) {
            g.CopyFromScreen(rect.X, rect.Y, 0, 0, rect.Size, CopyPixelOperation.SourceCopy);
        }
        bmp.Save(@"hoge\image.png", ImageFormat.Png);
    }
}
あとは、設定の読み込み処理や保存処理などをちょこちょこ書けば終わりです。
バグ
アクティブウィンドウを取得する場合、対象がブラウザだとうまく取得できません。
以下に、(推測みたいですが)理由がありました。
Unity×Windowsの画面キャプチャで四苦八苦してる話(1)
user32.dllを使用している場合、うまく取得できないウィンドウがあるみたいですね...![]()
配布
以下で配布しています。(配布は、予告なく終了する可能性があります)
zipを解凍したら、フォルダごとどこかに置いて、ScreenShotApp.exeを起動してください。