概要
Webpackを使用したTypeScriptの開発環境に、Reactを導入します。
通常のライブラリとは違い、Reactはフレームワークに近いので設定をいじる必要があります。
プロジェクトは、以下で作成したものをベースに使用します。
【TypeScript】VSCodeでTypeScriptの開発環境を構築する②(webpack ver.5)
※ こちらを利用する場合は、READMEを読んでください。
この記事は、以下のコースの受講に伴って、備忘録として書いています。詳しく知りたい方は、是非受講してみてください。
環境
- Windows10
- TypeScript 4.2.4
- webpack 5.36.2
- React 17.0.2
- VSCode
- Chrome
構築
パッケージのインストール
VSCodeでプロジェクトを開き、ターミナルからReactをインストールします。
npm install --save react react-dom
npm install --save-dev @types/react @types/react-dom
React は JavaScript で書かれたライブラリで、型定義ファイルを含んでいません。
なので、TypeScript で利用する場合は、型定義ファイルもインストールする必要があります。なお、これは開発時にのみ必要なファイルなので、--save-devとしています。
設定ファイルの変更
tsconfig.json
tsファイルをjsファイルにコンパイルするための設定
{
  "compilerOptions": {
    /* Basic Options */
    "target": "ES6",
    "module": "ES2015",
    "sourceMap": true,
    "outDir": "./dist",
    // "rootDir": "./src",
    "removeComments": true,
    "noEmitOnError": true,

    /* Strict Type-Checking Options */
    "strict": true,

    /* Additional Checks */
    "noUnusedLocals": true,
    "noUnusedParameters": true,
    "noImplicitReturns": true,

    /* Module Resolution Options */
    "esModuleInterop": true,

    /* Experimental Options */
    "experimentalDecorators": true,

    /* Advanced Options */
    "skipLibCheck": true,
    "forceConsistentCasingInFileNames": true,

    /* React Options */
    "jsx": "react", // ★ 追加
  }
}
webpack.config.js
webpackを使用してビルド(コンパイル&バンドル)するための設定
開発時用のファイル
const path = require('path');

module.exports = {
	mode: 'development',
	entry: './src/app.tsx', // ★ 変更
	output: {
		filename: 'bundle.js',
		path: path.resolve(__dirname, 'dist')
	},
	devServer: {
		publicPath: '/dist/'
	},
	devtool: 'inline-source-map',
	module: {
		rules: [
			{
				test: /\.tsx$/, // ★ 変更
				use: 'ts-loader',
				exclude: /node_modules/
			}
		]
	},
	resolve: {
		extensions: ['.ts', '.js', '.tsx'] // ★ 変更
	},
	target: ['web', 'es5'] // ★ 追加。IE11の設定。Chromeで使用する場合はいらない
};
webpack.config.prod.js
webpackを使用してビルド(コンパイル&バンドル)するための設定
本番用(ビルド用)のファイル
const path = require('path');
const CleanPlugin = require('clean-webpack-plugin');

module.exports = {
	mode: 'production',
	entry: './src/app.tsx', // ★ 変更
	output: {
		filename: 'bundle.js',
		path: path.resolve(__dirname, 'dist')
	},
	devtool: false,
	module: {
		rules: [
			{
				test: /\.tsx$/, // ★ 変更
				use: 'ts-loader',
				exclude: /node_modules/
			}
		]
	},
	resolve: {
		extensions: ['.ts', '.js', '.tsx'] // ★ 変更
	},
	target: ['web', 'es5'], // ★ 追加
	plugins: [new CleanPlugin.CleanWebpackPlugin()]
};
スクリプトの変更&追加
index.html を変更し、srcフォルダ内をすべて削除します。
index.html
<div id="app"></div>を追加しています。
<!DOCTYPE html>
<html lang="ja">
	<head>
		<meta charset="UTF-8" />
		<meta http-equiv="X-UA-Compatible" content="IE=edge" />
		<meta name="viewport" content="width=device-width, initial-scale=1.0" />
		<script type="module" src="dist/bundle.js" defer></script>
		<title>Document</title>
	</head>
	<body>
		<div id="app"></div>
	</body>
</html>
App.tsx
src/App.tsx を追加します。(コンポーネントなのでファイル名は大文字)
import React, { useState } from 'react';
import ReactDOM from 'react-dom';

import InputForm from './components/InputForm';

const App: React.FC = () => {
	const [value, setValue] = useState<string>('');

	const titleUpdateHandler = (text: string) => {
		setValue(text);
	};

	return (
		<div>
			<h1>Hello, React! {value}</h1>
			<InputForm onSubmitInput={titleUpdateHandler} />
		</div>
	);
};

ReactDOM.render(<App />, document.querySelector('#app'));
InoutForm.tsx
src/components/InputForm.tsx を追加します。(コンポーネントなのでファイル名は大文字)
import React, { useRef } from 'react';
import { InputFormProps } from './component.model';

const InputForm: React.FC<InputFormProps> = props => {
	const textInputRef = useRef<HTMLInputElement>(null);

	const onSubmitHandler = (event: React.FormEvent) => {
		event.preventDefault();

		// どっちでも取れる
		const enteredText = textInputRef.current!.value;
		// const enteredText = (document.getElementById('user-input')! as HTMLInputElement).value;

		props.onSubmitInput(enteredText);
	};

	return (
		<form onSubmit={onSubmitHandler}>
			<input type="text" id="user-input" ref={textInputRef} />
			<button type="submit">送信</button>
		</form>
	);
};
component.model.tsx
src/components/component.model.tsx を追加します。(型定義モジュールなのでファイル名は小文字)
export type InputFormProps = {
	onSubmitInput: (text: string) => void;
};
ビルド&デバッグ
ビルド(本番用ファイルの生成)、デバッグに関しては、【TypeScript】VSCodeでTypeScriptの開発環境を構築する②(webpack ver.5)と同様の操作です。
確認
最終的なプロジェクトの構成は、以下のようになります。
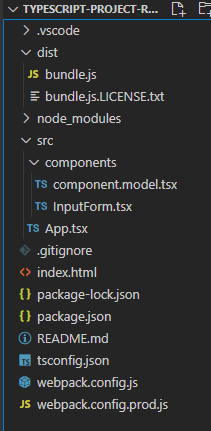
distフォルダに、コンパイルされバンドルされたbundle.jsが作成されました。
Tips
webpackを使用しない場合の環境構築
webpackを使用しない場合は、以下の操作で環境を構築できます。
1)VSCodeで空のプロジェクトを開き、ターミナルで以下を実行します。
npx create-react-app . --template typescript
2)1の方法だと、うまくいかないケースがあるようです。
その場合は、一度グローバルにcreate-react-appを入れます。そのあと、空のプロジェクトにcreate-react-appを作成します。
npm install -g create-react-app
create-react-app . --template typescript