概要
Three.jsのReact用ライブラリ react-three-fibar を使用して、Adobe Mixamoからダウンロードしたモデルをブラウザ上で表示する方法をまとめました。
https://nemutas-mixamo-animation.web.app/
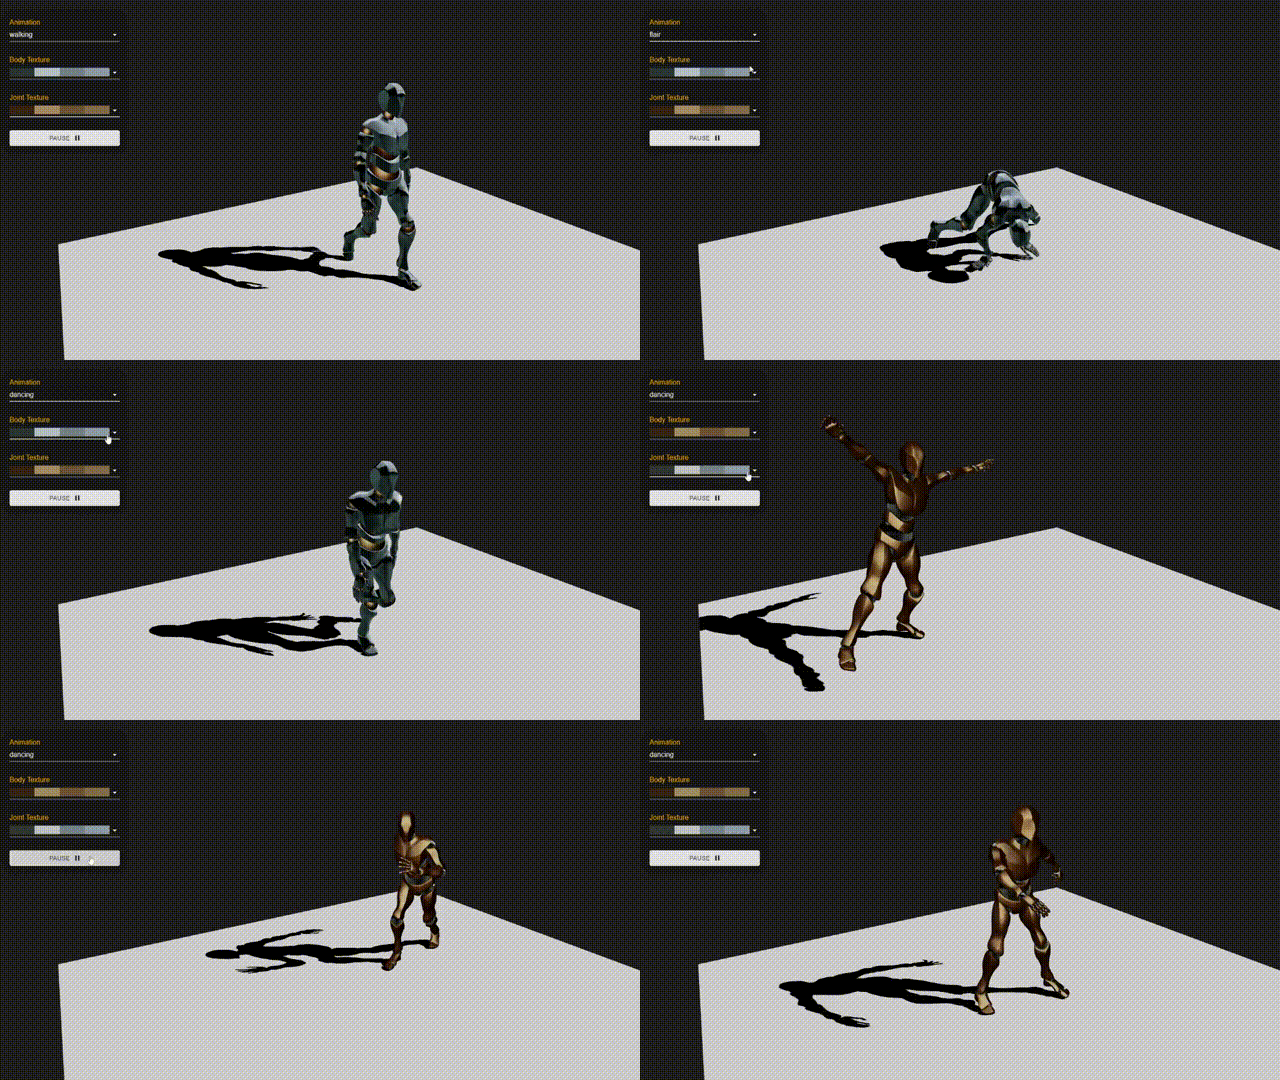
着想は公式デモから得ていますが、少し作りを変えています。
デモでは、ひとつのモデルファイルに3Dモデルと複数のアニメーションをまとめて、それをインポートしています。
ただこの方法だと、MixamoからダウンロードしたデータをBlenderなりで統合する手間がかかります。この手間は、アニメーションを後から追加したり3Dモデルを変更する場合も発生します。
そこで、実装におけるコンセプトとして、
3Dモデルとアニメーションのファイルをひとつひとつ分けて扱い、導入コストが低く、拡張性が高い設計
にします。
環境
- react - 17.0.2
- typescript - 4.4.3
- three - 0.132.2
- react-three/fiber - 7.0.7
- react-three/drei - 7.8.2
- valtio - 1.2.3
- mui/material - 5.0.0
- mui/icons-material - 5.0.0
モデルファイル(Adobe Mixamo)
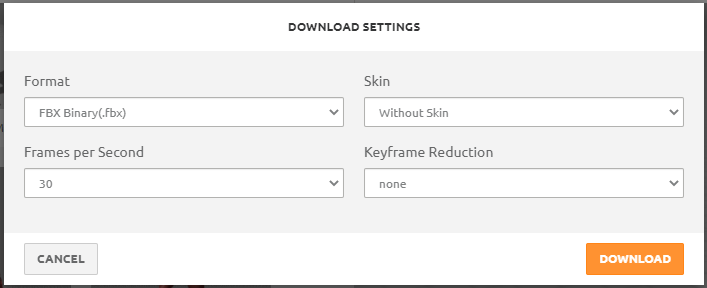
Mixamoでは、3Dモデルやアニメーションを(.fbx)形式で、無料でダウンロードすることができます。
Adobeへのユーザー登録は必要です。
実装では、3DモデルとしてYBot、アニメーションとしてWalkingやSwing Dancingなどを使用させて頂きました。
ダウンロード
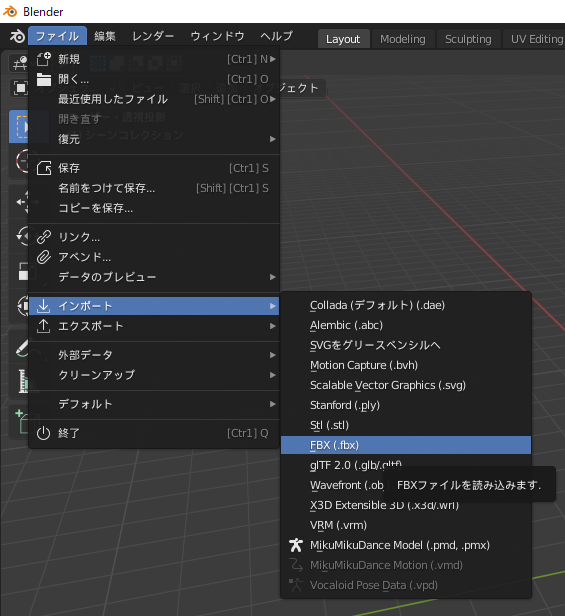
.glbファイルの生成
モデルファイル(.fbx)を、Blenderを使用して**.glb**形式に変換します。
-
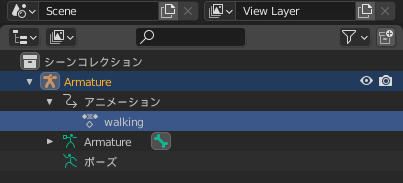
アニメーションファイルは、扱いやすいように一部ファイル名を変更します。
アクション名をファイル名と同じにしておきます。walking.glbを作成したいので、アクション名もwalkingに変更します。
-
エクスポート方法については、以下を参照してください。
プロジェクトの作成
- 任意のプロジェクトフォルダを作成して、以下を実行します。
npx create-react-app . --template typescript --use-npm
- 必要なパッケージをインストールします。
npm i three @react-three/fiber @react-three/drei
npm i -D @types/three
- コントローラー用のパッケージをインストールします。
npm i valtio
npm install @mui/material @mui/icons-material @emotion/react @emotion/styled
Material UIについて、v5.0.0になってパッケージ名が変更になったようです。
また、依存パッケージとして、@emotion/react・@emotion/styledをインストールする必要があります。
実装
モデルファイル
モデルファイルを以下の場所に配置します。
public/assets/ybot.glb
public/assets/animations/walking.glb
public/assets/animations/dancing.glb
コード
params.ts
staticな値を格納します。
export const AnimationNames = ['walking', 'flair', 'dancing', 'dancing2', 'dynamic_pose'] as const

export const TextureNames = [
	'3A2412_A78B5F_705434_836C47',
	'293534_B2BFC5_738289_8A9AA7',
	'15100F_241D1B_292424_2C2C27',
	'161B1F_C7E0EC_90A5B3_7B8C9B',
	'191514_6D5145_4E3324_3B564D',
	'1B1B1B_999999_575757_747474',
	'1A2461_3D70DB_2C3C8F_2C6CAC',
	'253C3C_528181_406C6C_385F5F',
	'2E763A_78A0B7_B3D1CF_14F209',
	'C5A292_635247_F2D7D6_846A5B',
	'C7B9A1_F8F1E4_EEE4D2_E4D8C4',
	'C7C7D7_4C4E5A_818393_6C6C74',
	'C8C8C8_3F3F3F_787878_5C5C5C',
	'D07E3F_FBBD1F_8D2840_24120C',
	'D54C2B_5F1105_F39382_F08375',
	'E6BF3C_5A4719_977726_FCFC82',
	'F75F0B_461604_9A3004_FB9D2F',
	'FBB43F_FBE993_FB552E_FCDD65'
] as const
- AnimationNamesは、アニメーションのファイル名かつアクション名として使っています。
- TextureNamesは、テクスチャーのファイル名を格納しています。詳しくはテクスチャーで説明しています。
types.ts
globalで使用する型の定義をします。
import { AnimationNames, TextureNames } from './params';

export type AnimationName = typeof AnimationNames[number]

export type TextureName = typeof TextureNames[number]
- 配列に対して、
typeof 配列[number]とすることで、配列要素のUnion型として型を定義できます。
store.ts
valtioを使用して、モデルの状態管理をします。
import { proxy } from 'valtio';
import { AnimationName, TextureName } from './types';

type Model = {
	animation: AnimationName
	texture: {
		body: TextureName
		joint: TextureName
	}
	isPaused: boolean
}

export const modelState = proxy<Model>({
	animation: 'walking',
	texture: {
		body: '293534_B2BFC5_738289_8A9AA7',
		joint: '3A2412_A78B5F_705434_836C47'
	},
	isPaused: true
})
- animationは、ファイル名かつアクション名を管理します。
- textureは、モデルのテクスチャーを管理します。詳しくはテクスチャーを参照してください。
- isPausedは、アニメーションの実行状態を管理します。(一時停止かどうか)
- proxyのなかで定義されている値は、それぞれの初期値になります。
useAnimation.ts
アニメーションをインポートし、実行するカスタムフックです。
/* eslint-disable react-hooks/rules-of-hooks */

import { useEffect } from 'react';
import { useSnapshot } from 'valtio';
import { useAnimations, useGLTF } from '@react-three/drei';
import { AnimationNames } from './params';
import { modelState } from './store';

export const useAnimation = () => {
	const modelSnap = useSnapshot(modelState)

	const animationClips: THREE.AnimationClip[] = []
	AnimationNames.forEach(name => {
		const { animations } = useGLTF(`/assets/animations/${name}.glb`)
		animationClips.push(...animations)
	})

	const { actions, ref } = useAnimations(animationClips)

	// animation
	useEffect(() => {
		actions[modelSnap.animation]?.reset().fadeIn(0.5).play()

		return () => void actions[modelSnap.animation]?.fadeOut(0.5)
	}, [actions, modelSnap.animation])

	// pause
	useEffect(() => {
		const action = actions[modelSnap.animation]
		if (action) {
			action.paused = modelSnap.isPaused
		}
	}, [actions, modelSnap.animation, modelSnap.isPaused])

	return ref
}
-
useAnimationsは、最初に読み込んだデータをキャッシングしているようで、引数である
animationClipsの値が変わっても返すactionsは変更されません。最初は状態管理しているanimationの変更に併せて動的に読み込ませる設計でしたが、うまくいきませんでした。(細かい仕様がわかってないです...)
そこで、最初にすべてのアニメーションを一度に読み込むようにしたら、うまくいきました。
実際に、公式デモでもそのようにアニメーションを変更できるようにしています。 -
**useEffect(animation)**では、アニメーションが切り替わったタイミングで、**reset()**をして
play()を実行しています。
アクションをリセットすることで、アクションが切り替わったタイミングで前の情報を残さないようにします。(ないとバグります)
AnimationAction.reset -
**useEffect(pause)**では、アクションの一時停止または実行を設定しています。
Model.tsx
3Dモデル及びアニメーションのインポートと描画を行います。
ファイルの雛形を、ybot.glbに対してgltfjsxを使用して作成しています。gltfjsxの使用方法は以下を参照してください。
/*
Auto-generated by: https://github.com/pmndrs/gltfjsx
*/

import React, { VFC } from 'react';
import * as THREE from 'three';
import { GLTF } from 'three/examples/jsm/loaders/GLTFLoader';
import { useSnapshot } from 'valtio';
import { useGLTF, useMatcapTexture } from '@react-three/drei';
import { modelState } from './store';
import { useAnimation } from './useAnimation';

type GLTFResult = GLTF & {
	nodes: {
		Alpha_Joints: THREE.SkinnedMesh
		Alpha_Surface: THREE.SkinnedMesh
		mixamorigHips: THREE.Bone
	}
	materials: {
		Alpha_Joints_MAT: THREE.MeshStandardMaterial
		Alpha_Body_MAT: THREE.MeshStandardMaterial
	}
}

const ModelPath = '/assets/ybot.glb'

export const Model: VFC<JSX.IntrinsicElements['group']> = props => {
	const modelSnap = useSnapshot(modelState)
	const { nodes, materials } = useGLTF(ModelPath) as GLTFResult

	const groupRef = useAnimation()

	const [matcapBody] = useMatcapTexture(modelSnap.texture.body, 512)
	const [matcapJoints] = useMatcapTexture(modelSnap.texture.joint, 512)

	return (
		<group ref={groupRef} {...props} dispose={null}>
			<group name="Armature" rotation={[Math.PI / 2, 0, 0]} scale={0.02}>
				<primitive object={nodes.mixamorigHips} />
				{/* Joints */}
				<skinnedMesh
					castShadow
					geometry={nodes.Alpha_Joints.geometry}
					material={materials.Alpha_Joints_MAT}
					skeleton={nodes.Alpha_Joints.skeleton}>
					<meshMatcapMaterial attach="material" matcap={matcapJoints} />
				</skinnedMesh>
				{/* Body */}
				<skinnedMesh
					castShadow
					geometry={nodes.Alpha_Surface.geometry}
					material={materials.Alpha_Body_MAT}
					skeleton={nodes.Alpha_Surface.skeleton}>
					<meshMatcapMaterial attach="material" matcap={matcapBody} />
				</skinnedMesh>
			</group>
		</group>
	)
}
useGLTF.preload(ModelPath)
- アニメーションは、作成したuseAnimationを使用して読み込みます。生成されるgroupRefを上位の
groupタグに割り当てます。
テクスチャー
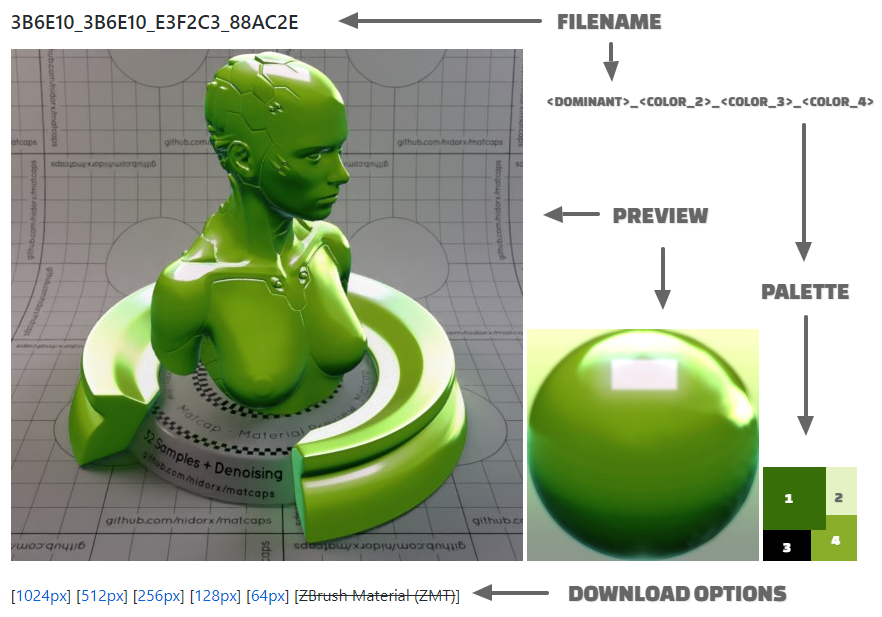
3Dモデルのテクスチャーは、Matcapを使用します。
-
Matcapを使用すると、**3Dモデルに影が落ちなくなります。**ただし、3Dモデル自体が他に落とす影は有効です。(
castShadowは効く、receiveShadowは効かなくなる) -
Matcapは、4色(HexColorコードの組み合わせ)からなるテクスチャーです。そのコードをuseMatcapTextureに指定してインポートします。
Controller.tsx
valtioを使ったデータの受け渡しをしているだけなので、ご興味のある方は参考にしてください。
コード
import React, { VFC } from 'react';
import { useSnapshot } from 'valtio';
import { css } from '@emotion/css';
import PauseIcon from '@mui/icons-material/Pause';
import PlayArrowIcon from '@mui/icons-material/PlayArrow';
import { Button, MenuItem, Select, SelectChangeEvent, Typography } from '@mui/material';
import { AnimationNames, TextureNames } from './params';
import { modelState } from './store';
import { AnimationName, TextureName } from './types';

export const Controller: VFC = () => {
	return (
		<div className={styles.container}>
			<div>
				<Typography className={styles.text}>Animation</Typography>
				<AnimationSelector />
			</div>

			<div>
				<Typography className={styles.text}>Body Texture</Typography>
				<TextureSelector textureType="body" />
			</div>

			<div>
				<Typography className={styles.text}>Joint Texture</Typography>
				<TextureSelector textureType="joint" />
			</div>

			<ControlButton />
		</div>
	)
}

// ==============================================
const AnimationSelector: VFC = () => {
	// const classes = useStyles()
	const modelSnap = useSnapshot(modelState)

	const handleChange = (event: SelectChangeEvent<AnimationName>) => {
		modelState.animation = event.target.value as AnimationName
	}

	return (
		<Select value={modelSnap.animation} fullWidth variant="standard" onChange={handleChange}>
			{AnimationNames.map((name, i) => (
				<MenuItem key={i} value={name}>
					{name}
				</MenuItem>
			))}
		</Select>
	)
}

// ==============================================
type TextureSelectorProps = {
	textureType: keyof typeof modelState.texture
}

const TextureSelector: VFC<TextureSelectorProps> = ({ textureType }) => {
	// const classes = useStyles()
	const modelSnap = useSnapshot(modelState)

	const handleChange = (event: SelectChangeEvent<TextureName>) => {
		modelState.texture[textureType] = event.target.value as TextureName
	}

	return (
		<Select
			value={modelSnap.texture[textureType]}
			fullWidth
			variant="standard"
			onChange={handleChange}>
			{TextureNames.map((name, i) => {
				const colors = name.split('_')
				return (
					<MenuItem key={i} value={name}>
						<div className={styles.texturePreviewContainer}>
							<div className={styles.texturePreview(colors[0])} />
							<div className={styles.texturePreview(colors[1])} />
							<div className={styles.texturePreview(colors[2])} />
							<div className={styles.texturePreview(colors[3])} />
						</div>
					</MenuItem>
				)
			})}
		</Select>
	)
}

// ==============================================
const ControlButton: VFC = () => {
	const modelSnap = useSnapshot(modelState)

	const clickHandler = () => {
		modelState.isPaused = !modelSnap.isPaused
	}

	return (
		<>
			{modelSnap.isPaused ? (
				<Button variant="contained" endIcon={<PlayArrowIcon />} onClick={clickHandler}>
					play
				</Button>
			) : (
				<Button variant="contained" endIcon={<PauseIcon />} onClick={clickHandler}>
					pause
				</Button>
			)}
		</>
	)
}

// ==============================================
const styles = {
	container: css`
		width: 300px;
		padding: 20px;
		background-color: rgba(255, 255, 255, 0.2);
		border-radius: 5%;
		display: flex;
		flex-direction: column;
		row-gap: 30px;
	`,
	text: css`
		color: orange;
	`,
	texturePreviewContainer: css`
		width: 100%;
		height: 20px;
		display: grid;
		grid-template-columns: repeat(4, auto);
	`,
	texturePreview: (color: string) => css`
		width: 100%;
		height: 100%;
		background-color: #${color};
	`
}
YBot.tsx
Canvasへの追加をしています。
import React, { Suspense, VFC } from 'react';
import { css } from '@emotion/css';
import { OrbitControls } from '@react-three/drei';
import { TDirectionalLight } from '../objects/TDirectionalLight';
import { TFloorPlane } from '../objects/TFloorPlane';
import { TCanvas } from '../TCanvas';
import { Controller } from './Controller';
import { Model } from './Model';

export const YBot: VFC = () => {
	return (
		<div className={styles.container}>
			<TCanvas>
				{/* control */}
				<OrbitControls />
				{/* light */}
				<TDirectionalLight position={[5, 5, 5]} />
				{/* model */}
				<Suspense fallback={null}>
					<Model />
				</Suspense>
				{/* objects */}
				<TFloorPlane />
			</TCanvas>

			<div className={styles.controller}>
				<Controller />
			</div>
		</div>
	)
}

const styles = {
	container: css`
		position: relative;
		width: 100%;
		height: 100%;
	`,
	controller: css`
		position: absolute;
		top: 20px;
		left: 20px;
	`
}
-
TCanvas、TDirectionalLight、TFloorPlaneは、react-three-fiberのコンポーネントをラップしたものです。詳しくは、リポジトリを参照してください。
リポジトリ
再編したものなのでディレクトリ構成だけ少し違いますが、おおむね記事通りです。
GitHubにソースをpushするだけなら大丈夫ですが、
GitHub Pagesに登録しようとすると、なぜか.glbファイルを読み込めなくなり、アプリ表示時にエラーになります。
なので、アプリケーションのデプロイは、Firebaseにしています。
まとめ
Mixamoモデル以外を使う場合でも実装方法は変わらないと思います。
次は、自分で作ったボーンモデルをアプリケーション内でコントロールできるようにしたいです。
参照
- 公式デモ
- Mixamo
- MatCap Texture

