目的
DockerとLet's EncryptをつかってWebサイトをSSL化させる。
前提条件
ドメインの取得して名前解決できること。
本構成イメージ
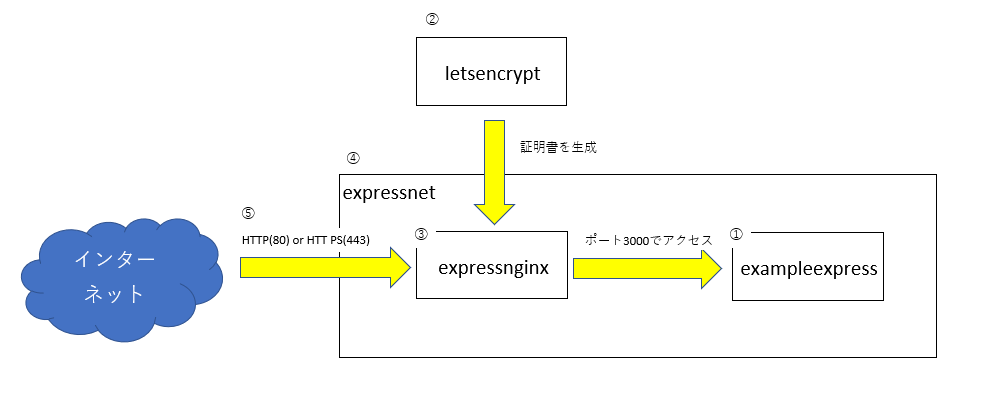
順番はあまり関係ないが、⑤は最後に行う。
①exampleexpressイメージ作成
app.js
var express = require('express');
var app = express();

app.get('/', function (req, res) {
  res.send('Hello World!');
});

app.listen(3000, function () {
  console.log('Example app listening on port 3000!');
});
packages.json
{
  "name": "exampleexpress",
  "version": "1.0.0",
  "description": "",
  "main": "app.js",
  "scripts": {
    "test": "echo \"Error: no test specified\" && exit 1"
  },
  "author": "",
  "license": "ISC",
  "dependencies": {
    "express": "^4.14.0"
  }
}
Dockerfile
FROM node:onbuild
EXPOSE 3000
CMD node app.js
以下のコマンドでイメージを作成する。
docker build -t exampleexpress .
②証明書を発行
以下のコマンドを実行
export LETSENCRYPT_EMAIL=<youremailaddress>
export DNSNAME=www.example.com

docker run --rm \
    -p 443:443 -p 80:80 --name letsencrypt \
    -v "/etc/letsencrypt:/etc/letsencrypt" \
    -v "/var/lib/letsencrypt:/var/lib/letsencrypt" \
    quay.io/letsencrypt/letsencrypt:latest \
    certonly -n -m $LETSENCRYPT_EMAIL -d $DNSNAME --standalone --agree-tos
③expressnginxイメージを作成
nginx.conf
user  nginx;
worker_processes  1;

error_log  /var/log/nginx/error.log warn;
pid        /var/run/nginx.pid;


events {
    worker_connections  1024;
}


http {
    include       /etc/nginx/mime.types;
    default_type  application/octet-stream;

    log_format  main  '$remote_addr - $remote_user [$time_local] "$request" '
                      '$status $body_bytes_sent "$http_referer" '
                      '"$http_user_agent" "$http_x_forwarded_for"';

    access_log  /dev/stdout  main;
    sendfile        on;
    keepalive_timeout  65;

    server {
        listen       80;
        server_name  _;
        return 301 https://$host$request_uri;
    }

    server {
        listen              443 ssl;
        #add_header Strict-Transport-Security "max-age=31536000; includeSubDomains" always;
        server_name         www.example.com;
        ssl_certificate     /etc/letsencrypt/live/www.example.com/fullchain.pem;
        ssl_certificate_key /etc/letsencrypt/live/www.example.com/privkey.pem;
        ssl_protocols       TLSv1 TLSv1.1 TLSv1.2;
        ssl_ciphers         HIGH:!aNULL:!MD5;

        location ^~ /.well-known/ {
            root   /usr/share/nginx/html;
            allow all;
        }

        location / {
            proxy_set_header Host $host;
            proxy_set_header X-Real-IP $remote_addr;
            proxy_pass http://expresshelloworld:3000;
        }
    }
}
Dockerfile
FROM nginx:alpine
COPY nginx.conf /etc/nginx/nginx.conf
以下のコマンドを実行
docker build -t expressnginx .
④ネットワーク作成
以下のコマンドを実行
docker network create -d bridge expressnet
⑤Webサーバを動かす
以下のコマンドを実行
docker run -d \
    --name expresshelloworld --net expressnet exampleexpress
docker run -d -p 80:80 -p 443:443 \
    --name expressnginx --net expressnet \
    -v /etc/letsencrypt:/etc/letsencrypt \
    -v /usr/share/nginx/html:/usr/share/nginx/html \
    expressnginx
その他
証明書の更新
以下のコマンドを実行
export LETSENCRYPT_EMAIL=me@example.com
export DNSNAME=www.example.com

docker run --rm --name letsencrypt \
    -v "/etc/letsencrypt:/etc/letsencrypt" \
    -v "/var/lib/letsencrypt:/var/lib/letsencrypt" \
    -v "/usr/share/nginx/html:/usr/share/nginx/html" \
    quay.io/letsencrypt/letsencrypt:latest \
    certonly -n --webroot -w /usr/share/nginx/html -d $DNSNAME --agree-tos